IntelliJ上创建Tomcat + Jersey 工程
REST以其简洁的模式被越来越多的web服务采用和实现,并出现了很多框架,Jersey是其中优秀代表。
Jersey扩展了JAX-RS 参考实现, 提供了更多的特性和工具, 可以进一步地简化 RESTful service 和 client 开发。尽管相对年轻,但已经是一个产品级的 RESTful service 和 client 框架。
需要做一个RESTful架构的web服务,结构为IntelliJ + Tomcat + Maven + Jersey。(注:这里的Intellij需要用 Ultimate版本)
1、新建项目
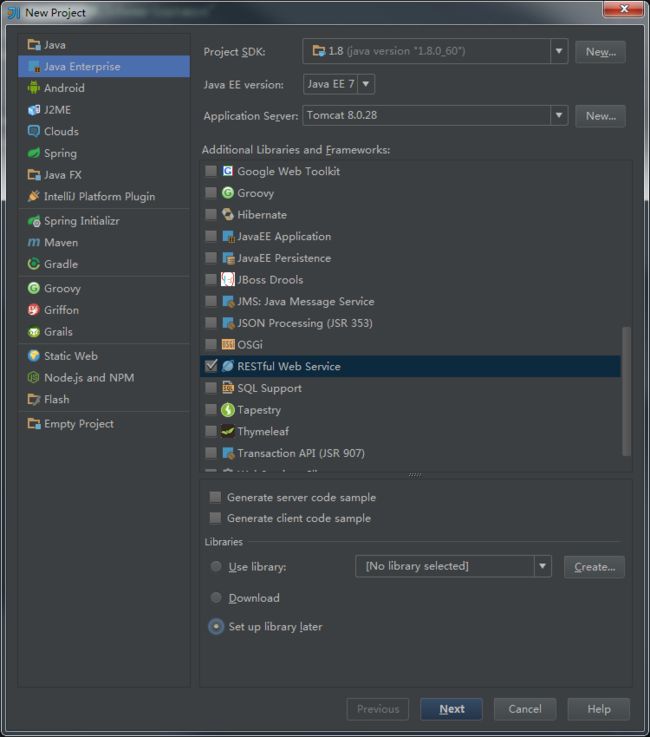
使用Intellij新建工程,选择Java Enterprise=>RESTful Web Service,下边的Libraries选择Setup Library Later,方便后边我们用Maven管理Jersey包。如图:
2、添加框架支持
这里我们要添加web application和Maven的支持。在项目名称上右键=》Add Frameworks Support,选中Web Application和Maven,前者会添加web文件夹,里边包括web-inf和web.xml,后者会添加pom.xml。
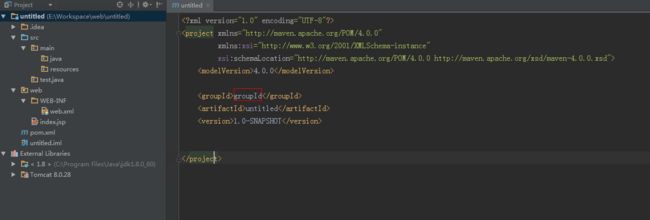
此时项目目录看着应该是这个样子的,在pom.xml中修改自己的groupID。

3、配置Tomcat服务
Run=》Run...=》Edit Configurations对Tomcat进行配置,默认应该已经有一个,没有的话自己添加。
如果没有特殊需求的话,这里只需要改一个warning,根据下方提示Fix部署的问题,可以保持默认直接apply,然后运行Tomcat就可以了。

此时打开的http://localhost:8080/页面是空的,编辑一下index.jsp,里边随便添点东西,就可以显示出来了。
3、添加REST环境支持
修改pom.xml文件,添加jersey的依赖。找了下,新版的release是2.23。可以在这里找,可以直接复制粘贴。
<dependency>
    <groupId>org.glassfish.jersey.containersgroupId>
    <artifactId>jersey-container-servletartifactId>
    <version>2.23version>
dependency>完成后会自动下载对应的依赖,如果没有开启自动导入,用View=》Tool Windows=》Maven Projects打开Maven试图,compile一下就行了。
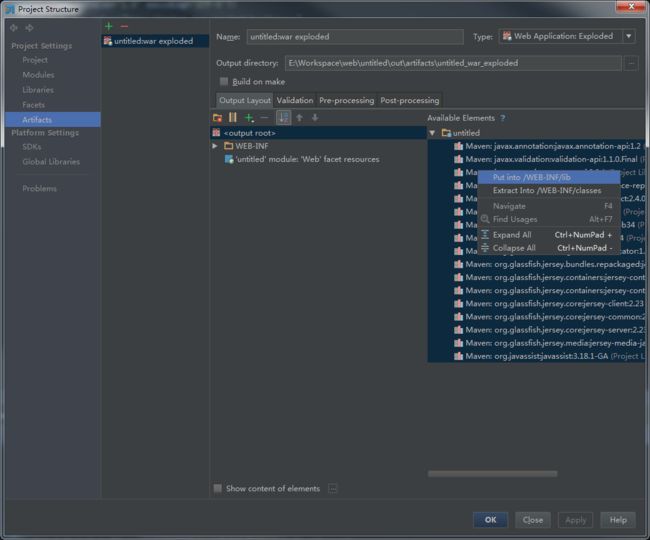
接下来需要把项目依赖的lib发布到WEB-INFO/lib下,选择File=》Project Structure...,然后按照下图所示操作,全选包,Put into /WEB-INF/lib,然后apply即可。

4、添加测试
(1)在src/main/java下新建一个Java文件,这里放在com.test包里。
@Path("hello")
public class HelloJsersy {
    @GET
    @Produces("text/plain")
    public String getString(){
        return "hello jersey";
    }

    @GET
    @Path("{username}")
    @Produces("text/plain")
    public String getParam(@PathParam("username")String username){
        return "hello  "+username;
    }
}
第一个函数getString()没有再指定@Path,直接响应hello,访问页面时将返回字符串hello jersey;第二个函数getParam()指定了@Path,响应hello/{username},其中{username}为地址传过来的参数。例如使用hello/tom访问就返回字符串hello tom。
(2)修改web.xml文件
这里是添加jersey的处理,添加以下内容:
<servlet>
        <servlet-name>JAX-RS Servletservlet-name>
        <servlet-class>org.glassfish.jersey.servlet.ServletContainerservlet-class>
        <init-param>
            <param-name>jersey.config.server.provider.packagesparam-name>
            <param-value>com.testparam-value>
        init-param>
        <load-on-startup>1load-on-startup>
    servlet>
    <servlet-mapping>
        <servlet-name>JAX-RS Servletservlet-name>
        <url-pattern>/test/*url-pattern>
    servlet-mapping>
这里的
OK,现在重启一下Tomcat,访问http://localhost:8080/test/hello就可以看到hello jersey了
中文乱码处理
以上虽然搭建好环境,但是用浏览器访问的时候中文显示乱码。
(1)修改Tomcat默认编码
修改Tomcat目录下conf/server.xml文件
<Service name="Catalina">
<Connector port="8080" protocol="HTTP/1.1" connectionTimeout="20000" redirectPort="8443"/>
……
<Connector port="8009" protocol="AJP/1.3" redirectPort="8443"/>给其中的Connector添加上utf8编码URIEncoding="UTF-8",最后类似于:
<Service name="Catalina">
<Connector port="8080" protocol="HTTP/1.1" connectionTimeout="20000" redirectPort="8443"  URIEncoding="UTF-8"/>
……
<Connector port="8009" protocol="AJP/1.3" redirectPort="8443"  URIEncoding="UTF-8"/>
重启Tomcat,即可正常显示页面中的中文;
(2)为Jersey指定编码
这个也很简单,在@Produces里指定就好了,类似于:
@Produces("application/json;charset=utf8")OK!
