Linux-0.11 实验二 操作系统的引导 实验报告
一、实验目标
- 熟悉 hit-oslab 实验环境;
- 认识并理解操作系统的引导过程;
- 掌握操作系统的基本开发过程;
- 能对操作系统代码进行简单的控制。
二、实验内容和结果
1. 改写 bootsect.s 文件
bootsect.s 中打印 “Loading system …” 的相关代码在 ! Print some inane message和 msg1处,修改这两部分代码即可。
修改显示文本:
msg1:
    .byte 13,10
    .ascii "hwg's OS is booting ..." ! 自定义打印内容
    .byte 13,10,13,10
修改打印代码:
! Print some inane message

    mov ah,#0x03        ! 读取光标位置
    xor bh,bh
    int 0x10

    mov cx,#29          ! 打印29个字符
    mov bx,#0x0007      ! page 0, attribute (normal)
    mov bp,#msg1
    mov ax,#0x1301      ! write string, move cursor
    int 0x10
删去无关代码,最终 bootsect.s 文件的内容如下:
entry _start
_start:
    mov ah,#0x03
    xor bh,bh
    int 0x10
    mov cx,#29
    mov bx,#0x0007
    mov bp,#msg1
    mov ax,#0x07c0
    mov es,ax
    mov ax,#0x1301
    int 0x10
inf_loop:
    jmp inf_loop
msg1:
    .byte   13,10
    .ascii "hwg's OS is booting ..."
    .byte   13,10,13,10
.org 510
boot_flag:
    .word   0xAA55
.org 510定义了当前的汇编位置,下一个位操作符.word定义了一个双字节内存变量,因此编译后生成的可执行程序恰好为 512 字节。
然后使用下面两个命令进行编译链接:
as86 -0 -a -o bootsect.o bootsect.s
ld86 -0 -s -o bootsect bootsect.o
获得 544 字节的目标文件,再使用命令 dd bs=1 if=bootsect of=Image skip=32获得 512 字节的镜像文件,拷贝到 ~/oslab/linux-0.11目录下。
dd 命令:用指定大小的块拷贝一个文件,并在拷贝的同时进行指定的转换。
if=inputfile of=outputfile,skip=blocks为跳过读入缓冲区开头的 blocks 块内容。

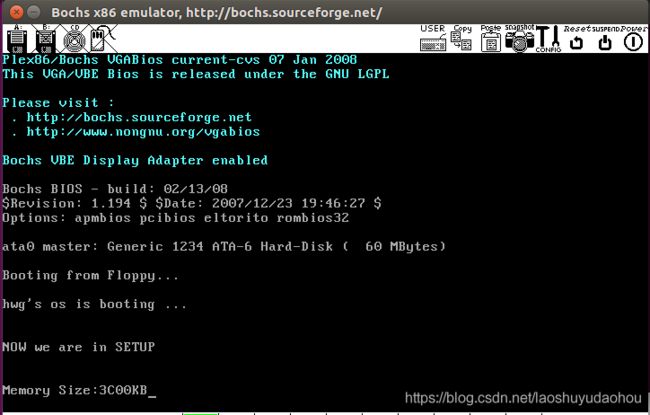
回到~/oslab目录下,使用命令 ./run运行,成功打印 “hwg’s os is booting …” ,如下:

2. 改写 setup.s 文件
上面已经实现了打印的代码,只需要小小修改就能作为 setup.s 的代码,如下:
entry _start
_start:
    mov ah,#0x03
    xor bh,bh
    int 0x10
    mov cx,#25
    mov bx,#0x0007
    mov bp,#msg2
    mov ax,#0x07c0
    mov ax,cs
    mov es,ax
    mov ax,#0x1301
    int 0x10
inf_loop:
    jmp inf_loop
msg2:
    .byte   13,10
    .ascii "Now we are in SETUP"
    .byte   13,10,13,10
.org 510
boot_flag:
    .word   0xAA55
在原 bootsect.s 程序中,函数 load_setup利用 int 0x13中断从磁盘载入 setup 模块,如果出错,则复位驱动器重试。这里直接使用即可。
SETUPLEN=2
SETUPSEG=0x07e0
entry _start
_start:
    mov ah,#0x03
    xor bh,bh
    int 0x10
    mov cx,#29
    mov bx,#0x0007
    mov bp,#msg1
    mov ax,#0x07c0
    mov es,ax
    mov ax,#0x1301
    int 0x10

load_setup:
    mov dx,#0x0000
    mov cx,#0x0002
    mov bx,#0x0200
    mov ax,#0x0200+SETUPLEN
    int 0x13
    jnc ok_load_setup
    mov dx,#0x0000
    mov ax,#0x0000
    int 0x13
    jmp load_setup

ok_load_setup:
    jmpi    0,SETUPSEG

msg1:
    .byte   13,10
    .ascii "hwg's OS is booting ..."
    .byte   13,10,13,10

.org 510
boot_flag:
    .word   0xAA55
修改完后,需要分别编译和链接 bootsect.s 和 setup.s 两个文件,这里直接使用 Makefile 提高效率。
在 ~/oslab/linux-0.11目录下执行 makeBootImage命令, make 就会根据 Makefile 的指引执行 tools/build.c,生成内核镜像文件。build.c会从命令行参数获取 bootsect 、setup 和 system 三者然后一起写入 Image ,而上述命令的第三个参数是 none ,所以要在 build.c中注释掉与 system 相关的内容:

再次执行 makeBootImage命令,然后运行,便能打印 setup.c 程序中的语句,如下:

接下来开始获取硬件参数。
这里获取内存信息:
原 setup.s 程序中,36-41 行的代码将 ds 置为 INITSEG(0x9000) ,这已经在 bootsect 程序中设置完毕,实测可以去掉。43-47 行的代码利用 int 0x15中断获取了扩展内存大小并保存在 0x90002 处,这部分便是我们需要的,如下图所示,而剩下的代码与题目无关可以全部去掉。
! Get memory size (extended mem, kB)

    mov ah,#0x88
    int 0x15
    mov [2],ax
接下来完善打印信息,复用 bootsect.s 的打印代码,将 “memory size” 和 “KB” 打印出来。最终 setup.s 程序如下:
entry _start
_start:
! Print "NOW we are in SETUP"
    mov ah,#0x03
    xor bh,bh
    int 0x10
    mov cx,#25
    mov bx,#0x0007
    mov bp,#msg2
    mov ax,cs
    mov es,ax
    mov ax,#0x1301
    int 0x10
    mov ax,cs
    mov es,ax

! Get memory size (extended mem, kB)
    mov ah,#0x88
    int 0x15
    mov [2],ax

! Print "Memory Size:"
    mov ah,#0x03
    xor bh,bh
    int 0x10
    mov cx,#14
    mov bx,#0x0007
    mov bp,#msg_memory
    mov ax,#0x1301
    int 0x10

! Print size
    mov dx,[2]
    call    print_hex

! Print "KB"
    mov ah,#0x03
    xor bh,bh
    int 0x10
    mov cx,#2
    mov bx,#0x0007
    mov bp,#msg_kb
    mov ax,#0x1301
    int 0x10

inf_loop:
    jmp inf_loop

print_hex:
    mov    cx,#4
print_digit:
    rol    dx,#4
    mov    ax,#0xe0f
    and    al,dl
    add    al,#0x30
    cmp    al,#0x3a
    jl     outp
    add    al,#0x07
outp:
    int    0x10
    loop   print_digit
    ret
print_nl:
    mov    ax,#0xe0d
    int    0x10
    mov    al,#0xa
    int    0x10
    ret

msg2:
    .byte 13,10
    .ascii "NOW we are in SETUP"
    .byte 13,10,13,10
msg_memory:
    .byte 13,10
    .ascii "Memory Size:"
msg_kb:
    .ascii "KB"
打印结果如下:
此时题目内容就完成了。
接下来对内存参数和硬盘参数进行探究。
原 setup.s 程序中,49-63 行通过 int 0x10中断来获取显卡信息,将显卡信息加载到内存地址 0x90004 至 0x9000D 处,且这段代码没有修改 ds 寄存器的值,所以 ds 寄存器仍为 0x9000 ,故直接设置 dx 后 call print_hex即可。
! 例如获取显卡特性参数
! 原 setup.s 第58-60、63行
mov ah, #0x12
mov bl,#0x10
int 0x10
mov [12],cx
! 例如打印显卡特性参数
mov dx,[12]
call print_hex
原 setup.s 程序中,65-75 行复制了第一个硬盘参数的信息。第一个硬盘参数的首地址是中断向量 0x41 的向量值,知道地址后直接用 movvsb复制。
值得注意的是,这段代码由于有对不同内存的访问,修改了 ds 的内存的值为 0x0000,且修改了 es 寄存器的值为 0x9000,所以后续打印信息时需要把它们修改回去。
entry _start
_start:
! Print "NOW we are in SETUP"
    mov ah,#0x03
    xor bh,bh
    int 0x10
    mov cx,#25
    mov bx,#0x0007
    mov bp,#msg2
    mov ax,cs
    mov es,ax
    mov ax,#0x1301
    int 0x10
    mov ax,cs
    mov es,ax

! Get memory size (extended mem, kB)
    mov ax,#INITSEG
    mov ds,ax
    mov ah,#0x88
    int 0x15
    mov [2],ax

! Get disk params
    mov ax,#0x0000
    mov ds,ax
    lds si,[4*0x41]
    mov ax,#INITSEG
    mov es,ax
    mov di,#0x0004
    mov cx,#0x10
    rep
    movsb

! Restore es and ds
    mov ax,cs
    mov es,ax
    mov ax,#INITSEG
    mov ds,ax

! Print "Memory Size:"
    mov ah,#0x03
    xor bh,bh
    int 0x10
    mov cx,#14
    mov bx,#0x0007
    mov bp,#msg_memory
    mov ax,#0x1301
    int 0x10

! Print memory size
    mov dx,[2]
    call print_hex

! Print "KB"
    call kb_print

! Cyles
    mov ah,#0x03
    xor bh,bh
    int 0x10
    mov cx,#7
    mov bx,#0x0007
    mov bp,#msg_cyles
    mov ax,#0x1301
    int 0x10
    mov dx,[4]
    call print_hex

! Heads
    mov ah,#0x03
    xor bh,bh
    int 0x10
    mov cx,#8
    mov bx,#0x0007
    mov bp,#msg_heads
    mov ax,#0x1301
    int 0x10
    mov dx,[6]
    call print_hex

! Secotrs
    mov ah,#0x03
    xor bh,bh
    int 0x10
    mov cx,#10
    mov bx,#0x0007
    mov bp,#msg_sectors
    mov ax,#0x1301
    int 0x10
    mov dx,[12]
    call print_hex

inf_loop:
    jmp inf_loop

kb_print:
    mov ah,#0x03
    xor bh,bh
    int 0x10
    mov cx,#2
    mov bx,#0x0007
    mov bp,#msg_kb
    mov ax,#0x1301
    int 0x10
    ret

print_hex:
    mov    cx,#4
print_digit:
    rol    dx,#4
    mov    ax,#0xe0f
    and    al,dl
    add    al,#0x30
    cmp    al,#0x3a
    jl     outp
    add    al,#0x07
outp:
    int    0x10
    loop   print_digit
    ret
print_nl:
    mov    ax,#0xe0d
    int    0x10
    mov    al,#0xa
    int    0x10
    ret

msg2:
    .byte 13,10
    .ascii "NOW we are in SETUP"
    .byte 13,10,13,10
msg_memory:
    .byte 13,10
    .ascii "Memory Size:"
msg_cyles:
    .byte 13,10
    .ascii "Cyls:"
msg_heads:
    .byte 13,10
    .ascii "Heads:"
msg_sectors:
    .byte 13,10
    .ascii "Sectors:"
msg_kb:
    .ascii "KB"
打印结果如下:

这里打印的 sector 数值与实验楼实验指导的数值不同。根据实验指导,这里的 Sector 对应着 bochs/bochsrc.bxrc文件里的 spt,数值为38 (0x0026),但是实验中打印的数值是 200 (00C8)。
为了探究原因,首先把 bochs/bochsrc.bxrc文件里的各项参数进行修改,再次运行:
megs: 32
ata0-master: type=disk, mode=flat, cylinders=200, heads=32, spt=39

可知上面三个参数都随着配置文件的参数值的改变而改变了,而 Sectors 的值仍然没有改变。
所以猜测:Sector 的值不在这个内存地址保存,这里是实验楼的笔误。
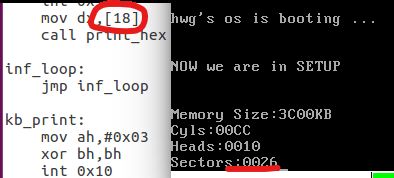
查询资料知, bochs/bochsrc.bxrc文件里的 spt,意为 Sectors Per Track(每磁道扇区数),根据《Linux完全内核注释》 214 页的硬盘基本参数信息表可知,每磁道扇区数相对 cyl 的位移为 14 (0X0E),上面的代码中将 cyl 的信息存放在了内存 0x90004 处,加上位移,Sector 的正确位置应该为 0x90012,所以更正 Sector 处的打印代码如下:
! Secotrs
    mov ah,#0x03
    xor bh,bh
    int 0x10
    mov cx,#10
    mov bx,#0x0007
    mov bp,#msg_sectors
    mov ax,#0x1301
    int 0x10
    mov dx,[18]   ! 18 + 0x90000 = 0x90012
    call print_hex
这时打印的参数便为正确的值,如图:
三、实验总结
1. 认识引导启动程序
bootsect.s 是磁盘引导块程序,主要作用是将 setup 模块加载到内存紧接着 bootsect 后面处位置处,再把 system 模块加载到内存 0x10000 开始的地方,最后长跳转到 setup 程序的开始处 (0x90200) 执行 setup 程序。
setup.s 是一个操作系统加载程序,主要作用是利用 ROM BIOS 中断读取机器系统数据,并将这些数据保存到 0x90000 开始的位置 (覆盖掉了 bootsect 程序) ,这些参数将被内核中相关程序使用,并且建立全局描述符表
setup 程序执行过程中还会把整个 system 模块移动到 0x00000 位置。setup.s 程序执行完后,就会跳到 head.s 程序开始处继续执行下去。
head.s 程序在被编译后会与内核其他程序一起被链接成 system 模块,位于 system 模块的最开始部分。从这里开始,内核完全都是在保护模式下运行了。
head.s 程序的主要作用是加载各个数据段寄存器,设置中断描述符表,设置全局段描述符表 GDT ,把原 GDT 表移动到内存适当位置,检测 A20 地址线是否已开启,设置管理内存的分页处理机制,最后转去执行 /init/main.c 中的 main() 程序。
2. 实验难点
此次实验涉及的代码大多在《Linux内核完全注释》一书中有详细解释,只需要根据书中的中文注释阅读代码,认识到每段代码大致是起什么作用,然后在本次实验中便可以直接复用里面的代码稍加修改,结合实验楼上的实验提示,便可解决。
四、问题
在实验报告中回答如下问题:
有时,继承传统意味着别手蹩脚。x86 计算机为了向下兼容,导致启动过程比较复杂。请找出 x86 计算机启动过程中,被硬件强制,软件必须遵守的两个“多此一举”的步骤(多找几个也无妨),说说它们为什么多此一举,并设计更简洁的替代方案。
①. A20地址线问题
Intel 80286 CPU 具有 24 根地址线,为了兼容 20 根地址线的Intel 8088 CPU 的环绕机制,A20 信号被发明出来从而控制内存寻址位数。而芯片集的不同导致机器启动时很难用统一的方法开启 A20 地址线。
解决方案是:较新的 PC 调用 BIOS 中断
int 0x15, ax=0x2401(被称为 Fast A20) 就可以直接实现 A20 的功能。②. system 模块二次移动问题
上面提到,bootsect 模块先将 system 模块加载到内存 0x10000 位置,等到 setup 模块运行时又将 system 模块移动到 0x0000位置。二次转移显得多此一举。
这样做是因为:计算机刚启动时处于实模式,内存 0x00000 开头一部分是留给 BIOS 存储中断向量表信息的,执行 bootsect 和 setup 模块时都需要用到 BIOS 中断,因此不能破坏这段信息,system 模块必须先加载到 0x10000 处。当setup.s 建立全局描述符表、中断描述符表,进入保护模式后,最开始的中断向量表就没用了,这时便可将 system 模块移动到 0x00000 处了。
解决方案是:BIOS 将中断向量表放到其他实模式下 BIOS 可以访问到的内存空间处,避免和 system 模块发生冲突,以便 system 模块能直接载入 0x00000 内存处。