使用IntelliJ IDEA构建Spring Boot项目示例
我们介绍新建Spring Boot项目的流程, 主要内容包含
- 创建项目
- 配置日志环境
- 使用配置文件
- 多环境下的配置文件
- 写一个demo服务
- 打包和部署
1. 创建项目
-
打开IntelliJ IDEA, 选择菜单File->New->Project.

-
输入组织名称(Group)和项目名称(Artifact).

-
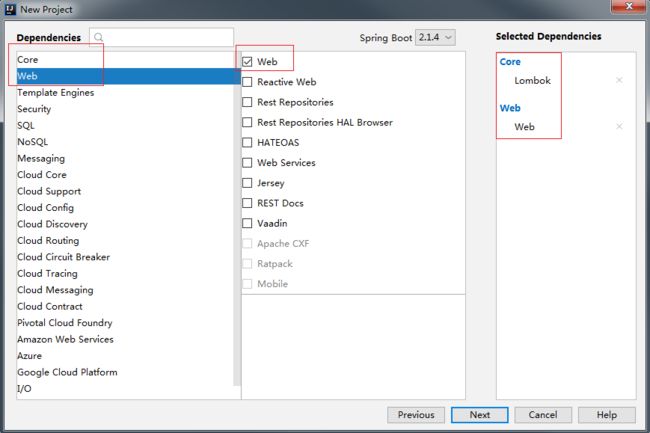
添加依赖包. 添加Web: Web即可. 我们建议添加一个插件Core: Lombok. 它可以在编译的时候自动生成模版代码(例如Getter和Setter).
-
按照提示一路Next就能完成项目的创建. 项目文件夹的结构如下图所示.

-
打开
DemoSpringBootApplication.java, 然后点击编辑器中的三角形图标即可启动服务. 至此项目创建完毕.

2. 配日志环境
我们使用SLF4j + Log4j2, 其中SLF4j是一个日志框架, 而Log4j2是日志框架的一种实现. 更多信息读者可以自行参考其他教程.
- 在pom.xml文件中添加如下依赖.
org.slf4j slf4j-api org.apache.logging.log4j log4j-slf4j-impl 2.11.2 org.apache.logging.log4j log4j-api 2.11.2 org.apache.logging.log4j log4j-core 2.11.2 - 在指定的位置添加
execlusion, 目的是过滤Springboot自带的日志依赖.org.springframework.boot spring-boot-starter-web org.springframework.boot spring-boot-starter-logging - 添加Log4j2的配置文件
log4j2.xml到resources文件夹下. 关于Log4j2如何配置, 可以自行参考网上教程.
下面的配置文件设置了3个日志输出:- 控制台 日志等级:INFO
- 文件(logs/info.log) 日志等级: INFO
- 文件(logs/error.log) 日志等级: ERROR
- 测试日志环境: 添加注解
@Slf4j可直接使用log变量.
DemoSpringBootApplicationTests.java
我们能看到如下的日志信息:@Slf4j @RunWith(SpringRunner.class) @SpringBootTest public class DemoSpringBootApplicationTests { @Test public void testLogger() { log.info("Logger is OK"); log.error("Logger is OK"); } }2019-05-10 10:54:18.096 [ INFO] - com.example.demospringboot.DemoSpringBootApplicationTests.testLogger(DemoSpringBootApplicationTests.java:20) - Logger is OK 2019-05-10 10:54:18.097 [ERROR] - com.example.demospringboot.DemoSpringBootApplicationTests.testLogger(DemoSpringBootApplicationTests.java:21) - Logger is OK
3. 使用配置文件
我们可以在application.properties文件中添加自定义配置, 例如
myConfig.foo=foo-foo
myConfig.bar=bar-bar
在代码中读取配置的方法如下. 新建一个配置类(名字任意):
MyConfig.java
@Data
@Component
public class MyConfig {
    @Value("${myConfig.foo}")
    private String foo;
    @Value("${myConfig.bar}")
    private String bar;
}
注解说明
- @Data 为类提供读写方法, 此外还提供了 equals(), hashCode(), toString() 方法.
- @Component Spring Boot为类提供管理功能, 可以自动生成对象.
- @Value (lombok) 读取配置文件中定义的字段.
注意 由于我们使用Spring Boot框架来加载配置文件, 因此不能直接通过
new MyConfig()这样的操作来初始化对象, 否则无法读取配置. 正确的使用方式应该是使用注解@Autowired, 由框架来帮助我们初始化对象.
MyConfigTest.java
@RunWith(SpringRunner.class)
@SpringBootTest
public class MyConfigTest {

    @Autowired
    private MyConfig myConfig;

    @Test
    public void test() {
        System.out.println("myConfig.foo = " + myConfig.getFoo());
        System.out.println("myConfig.bar = " + myConfig.getBar());
    }
}
运行上面的测试代码, 结果如下.
myConfig.foo = foo-foo
myConfig.bar = bar-bar
4. 多环境下的配置文件
实际的项目开发可能会有多套环境, 分别采用不同的配置. 为了方便打包和部署, 我们可以按照application-[xxx].properties的格式命名, 其中[xxx]代表环境名称. 示例如下:
- 开发环境:
application-dev.properties - 测试环境:
application-test.properties - 线上环境:
application-online.properties
然后在application.properties中设置当前环境的名称.
# 设置当前环境为开发环境
spring.profiles.active=dev
Spring Boot的默认配置可以参考 Common application properties.
5. 写一个demo服务
我们实现如下功能: 当用户访问 http://localhost:8080/config时返回配置文件的内容. 实现代码如下.
Controller.java
@RestController
public class Controller {

    // 配置类
    private MyConfig myConfig;

    @Autowired
    public Controller(MyConfig myConfig) {
        this.myConfig = myConfig;
    }

    // 以把配置文件的内容以JSON格式返回
    @RequestMapping(value = "/config", method = RequestMethod.GET)
    public String getConfig() {
        return new Gson().toJson(myConfig);
    }

}
说明: Gson类把对象转换成JSON字符串, 可以在pom.xml中添加如下依赖.
    com.google.code.gson
    gson
    2.8.5
6. 打包和部署
- 点击工具栏Edit Configurations菜单

- 点"+"(加号)新建Maven配置

- 命令行输入:
clean package, 然后确定

- 运行上一步建立的maven配置, IDE会在
target文件夹下生成demo-spring-boot-0.0.1-SNAPSHOT.jar.
注意 如果想跳过单元测试, 可以在pom.xml的plugins节点中添加如下依赖:org.apache.maven.plugins maven-surefire-plugin true - 进入target文件夹, 然后运行
java -jar demo-spring-boot-0.0.1-SNAPSHOT.jar即可启动服务. 在浏览器访问http://localhost:8080/config可以测试结果.
7. 完整的示例代码
https://github.com/xianqiu/demo-spring-boot