医学配准软件ants和相关python库antspy的介绍和安装
医学配准软件和相关python库的介绍和安装
文章目录
- 医学配准软件和相关python库的介绍和安装
- 1. ants源码安装和使用介绍
- 1.1 ants介绍
- 1.2 ants安装
- 1.3 ants使用
- 2. antspy的安装和使用介绍
- 2.1 antspy安装
- 2.2 配准
- 2.2.1 ants.registration参数介绍
- 2.2.2 ants.registration使用介绍
- 2.3 ants.apply_transforms 的使用介绍
1. ants源码安装和使用介绍
1.1 ants介绍
ANTs(Advanced Normalization Tools)是目前配准质量最好的软件 ,是基于c语言写的,运行速度很快
1.2 ants安装
官网上有安装方法介绍:ANTs源码安装;此安装方法适用于 linux和Mac;具体过程如下:
(1)安装git , cmak 和 c++编译器;
(2)在命令行中分别执行以下命令(假设当前目录在主目录下):
git clone git://github.com/stnava/ANTs.git
mkdir antsbin
cd antsbin
ccmake ../ANTs
make -j 4
(3)设置环境变量,并添加到 .bashrc 或者.profile文件中,即:
cd     #回到home目录,在该目录下会看到.profile和.bashrc文件
vim .profile       #打开.profile文件,输入 i ,进行插入编辑;在文件最后加入如下两句:
export ANTSPATH=/home/username/antsbin/bin/
export PATH=“$ANTSPATH:$PATH”
#按Esc,shift+ :  , w+q保存并退出;
(4)激活
source ~/.profile #激活环境变量设置;后面就可以使用了
注意:这个安装过程,充满了玄之又玄的味道;经常会报错,记得按照这个流程多重复几次,或许就可以安装成功;
1.3 ants使用
(1)使用 antsRegistrationSyN.sh 配准
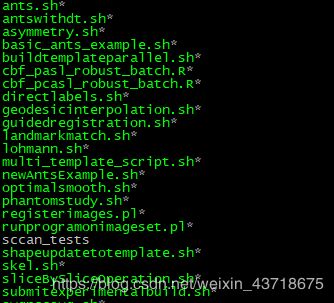
这个.sh文件在 /home/username/ANTs/Scripts 路径下: 进入这个路径,就可以看到各种各样的.sh文件,但是较为常用的,就是 antsRegistrationSyN.sh;
为了方便调用,最好将 该.sh文件路径添加到 .profile文件中去
a. 添加环境
打开.profile文件,在文件末尾添加下面一行:
export PATH=$PATH:/home/fangzuliang/ANTs/Scripts
source ~./profile
b. 使用
anstRegistrationSyN.sh  #在linux命令行输入当前命令,即可获取该文件的参数说明信息
antsRegistrationSyN.sh -d 3 -t s -n 10 -f '+templatePath+' -m '+brainPath+' -o '+outputPath   #使用示例
参数介绍:
(2)使用 antsRegistration进行配准
在安装成功ANTs和添加完环境变量后,就可以直接在命令行输入 antsRegistration进行相关查询和使用
参数查询:
antsRegistration   #或者
antsRegistration --help
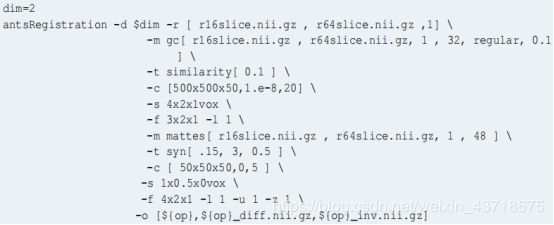
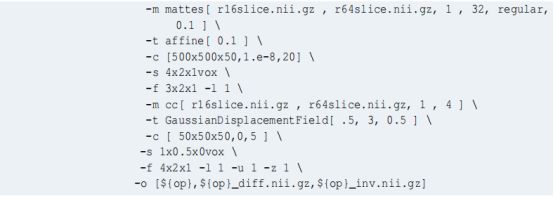
具体使用方法可以参考如下示例:
建议直接参考如上参数设置,一般情况下会多个方法一起用,如 Linear(elastic)+syn;
未完待续!后面有进行系列的实践,到时候再更新!
2. antspy的安装和使用介绍
在万物都可python的年代,仅能使用ants源码进行配准未免太过小家子气。于是就推出了 ants的python版本 antspy/antspyx
2.1 antspy安装
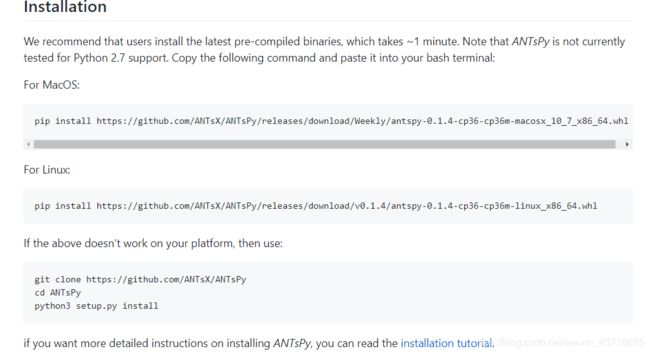
这里给出antspy github地址,给出了安装方法,
上面的安装方法,只能安装 0.1.4版本,这个版本在使用时,会存在一些小Bug,比如:move到fix的配准,必须将 int类型转换为 float类型;
而 0.1.8版本不存在这样的问题,具体安装办法很简单,一行代码搞定:
pip install git+https://github.com/ANTsX/ANTsPy.git #可能不能一次性成功,数个小时差不多
2.2 配准
2.2.1 ants.registration参数介绍
ants封装了一些配准方法,可以查询的有21种;
import ants
anst.registration?   #就可以看到多个这个函数自带的 21种配准方法
Signature:
ants.registration(
    fixed,
    moving,
    type_of_transform='SyN',
    initial_transform=None,
    outprefix='',
    mask=None,
    grad_step=0.2,
    flow_sigma=3,
    total_sigma=0,
    aff_metric='mattes',
    aff_sampling=32,
    syn_metric='mattes',
    syn_sampling=32,
    reg_iterations=(40, 20, 0),
    write_composite_transform=False,
    verbose=False,
    multivariate_extras=None,
    **kwargs,
)
Docstring:
Register a pair of images either through the full or simplified
interface to the ANTs registration method.

ANTsR function: `antsRegistration`

Arguments
---------
fixed : ANTsImage
    fixed image to which we register the moving image.

moving : ANTsImage
    moving image to be mapped to fixed space.

type_of_transform : string
    A linear or non-linear registration type. Mutual information metric by default.
    See Notes below for more.

initial_transform : list of strings (optional)
    transforms to prepend

outprefix : string
    output will be named with this prefix.

mask : ANTsImage (optional)
    mask the registration.

grad_step : scalar
    gradient step size (not for all tx)

flow_sigma : scalar
    smoothing for update field

total_sigma : scalar
    smoothing for total field

aff_metric : string
    the metric for the affine part (GC, mattes, meansquares)

aff_sampling : scalar
    the nbins or radius parameter for the syn metric

syn_metric : string
    the metric for the syn part (CC, mattes, meansquares, demons)

syn_sampling : scalar
    the nbins or radius parameter for the syn metric

reg_iterations : list/tuple of integers
    vector of iterations for syn. we will set the smoothing and multi-resolution parameters based on the length of this vector.

write_composite_transform : boolean
    Boolean specifying whether or not the composite transform (and its inverse, if it exists) should be written to an hdf5 composite file. This is false by default so that only the transform for each stage is written to file.

verbose : boolean
    request verbose output (useful for debugging)

multivariate_extras : additional metrics for multi-metric registration
    list of additional images and metrics which will
    trigger the use of multiple metrics in the registration
    process in the deformable stage. Each multivariate metric needs 5
    entries: name of metric, fixed, moving, weight,
    samplingParam. the list of lists should be of the form ( (
    "nameOfMetric2", img, img, weight, metricParam ) ). Another
    example would be  ( ( "MeanSquares", f2, m2, 0.5, 0
      ), ( "CC", f2, m2, 0.5, 2 ) ) .  This is only compatible
    with the SyNOnly transformation.


kwargs : keyword args
    extra arguments

Returns
-------
dict containing follow key/value pairs:
    `warpedmovout`: Moving image warped to space of fixed image.
    `warpedfixout`: Fixed image warped to space of moving image.
    `fwdtransforms`: Transforms to move from moving to fixed image.
    `invtransforms`: Transforms to move from fixed to moving image.

Notes  #这里列出了 配准方法
-----
typeofTransform can be one of:
    - "Translation": Translation transformation.
    - "Rigid": Rigid transformation: Only rotation and translation.
    - "Similarity": Similarity transformation: scaling, rotation and translation.
    - "QuickRigid": Rigid transformation: Only rotation and translation.
                    May be useful for quick visualization fixes.'
    - "DenseRigid": Rigid transformation: Only rotation and translation.
                    Employs dense sampling during metric estimation.'
    - "BOLDRigid": Rigid transformation: Parameters typical for BOLD to
                    BOLD intrasubject registration'.'
    - "Affine": Affine transformation: Rigid + scaling.
    - "AffineFast": Fast version of Affine.
    - "BOLDAffine": Affine transformation: Parameters typical for BOLD to
                    BOLD intrasubject registration'.'
    - "TRSAA": translation, rigid, similarity, affine (twice). please set
                regIterations if using this option. this would be used in
                cases where you want a really high quality affine mapping
                (perhaps with mask).
    - "ElasticSyN": Symmetric normalization: Affine + deformable
                    transformation, with mutual information as optimization
                    metric and elastic regularization.
    - "SyN": Symmetric normalization: Affine + deformable transformation,
                with mutual information as optimization metric.
    - "SyNRA": Symmetric normalization: Rigid + Affine + deformable
                transformation, with mutual information as optimization metric.
    - "SyNOnly": Symmetric normalization: no initial transformation,
                with mutual information as optimization metric. Assumes
                images are aligned by an inital transformation. Can be
                useful if you want to run an unmasked affine followed by
                masked deformable registration.
    - "SyNCC": SyN, but with cross-correlation as the metric.
    - "SyNabp": SyN optimized for abpBrainExtraction.
    - "SyNBold": SyN, but optimized for registrations between BOLD and T1 images.
    - "SyNBoldAff": SyN, but optimized for registrations between BOLD
                    and T1 images, with additional affine step.
    - "SyNAggro": SyN, but with more aggressive registration
                    (fine-scale matching and more deformation).
                    Takes more time than SyN.
    - "TVMSQ": time-varying diffeomorphism with mean square metric
    - "TVMSQC": time-varying diffeomorphism with mean square metric for very large deformation

Example
-------
>>> import ants
>>> fi = ants.image_read(ants.get_ants_data('r16'))
>>> mi = ants.image_read(ants.get_ants_data('r64'))
>>> fi = ants.resample_image(fi, (60,60), 1, 0)
>>> mi = ants.resample_image(mi, (60,60), 1, 0)
>>> mytx = ants.registration(fixed=fi, moving=mi, type_of_transform = 'SyN' )
File:      ~/work/anaconda3/envs/my_liver202/lib/python3.6/site-packages/ants/registration/interface.py
Type:      function
2.2.2 ants.registration使用介绍
具体调用方法为:
##将 3min向pre配准。1.获取文件路径;2.读取数据,数据格式为 ants.core.ants_image.ANTsImage;3.进行配准,方法为Affine;4.保存配准结果。
fix_path = 'pre.nii.gz'
move_path = '3min.nii.gz'
save_path = 'reg_3min.nii.gz'
fix_img = ants.image_read(fix_path)
move_img = ants.image_read(move_path)
outs = ants.registration(fix_img,move_img,type_of_transforme = 'Affine')
reg_img = outs['warpedmovout']
ants.image_write(reg_img,save_path)
上面有介绍 配准过程的返回值,有四个,依次为:
- warpedmovout :move 配到 fix 生成的配准结果;
- warpedfixout :fix 到 move 空间生成的结果 ; #一般不太常用
- fwdtransforms : move 到 fix 生成的 变换矩阵;在 move 有 label(mask)的时候,可以使用这个矩阵进行变换。
- invtransforms :fix 到 move的变换矩阵;
我们需要的是第一个结果,获取并写入到 save_path,就得到了我们想要的结果配准结果。
2.3 ants.apply_transforms 的使用介绍
为什么要介绍这个,是因为存在这种情况:
-
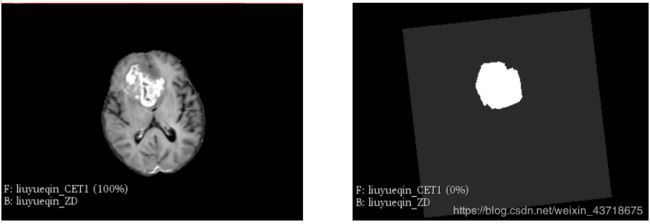
存在一个 待配准的文件 3min.nii.gz(图左) , 同时存在 描绘在这个 文件上的 label(图右)标签,如下:
在左图像上,我们明显看到一个亮色区域,即为病变区。 描述这个病变区域,就使用一个label(也称为 mask)文件(矩阵),即在病变区上,数值为1,在非病变区域,数值为0。
-
此时 有一个模板(template)文件,也就是 fix文件。我们想将 move文件配准到 fix的同时,也希望将对应的 label也变换到模板上。
-
这个时候,可以直接使用 上面讲到过的 变换矩阵,作用在 label上,就可以解决问题。
-
可能有同学好奇,为什么不直接 将 label文件当作 move文件,也配准到 fix上呢。这当然是不行的啊,大家自行思考哦!
下面展示代码:
#获取数据路径
fix_path = 'pre.nii.gz'
move_path = '3min.nii.gz'
move_label_path = '3min_label.nii.gz'

#读取数据,格式为: ants.core.ants_image.ANTsImage
fix_img = ants.image_read(fix_path)
move_img = ants.image_read(move_path)
move_label_img = ants.image_read(move_label_path)

#配准
outs = ants.registration(fix_img,move_img,type_of_transforme = 'Affine')

#获取配准后的数据,并保存
reg_img = outs['warpedmovout']
save_path = 'reg_3min.nii.gz'
ants.image_write(reg_img,save_path)

#获取move到fix的转换矩阵;将其应用到 move_label上;插值方式选取 最近邻插值; 这个时候也对应的将label变换到 配准后的move图像上
reg_label_img = ants.apply_transforms(fix_img ,move_label_img,transformlist= out['fwdtransforms'],interpolator = 'nearestNeighbor')
save_label_path = 'reg_3min_label.nii.gz'
ants.image_write(reg_label_img,save_label_path)
#可以查看这个方法的说明:
ants.apply_transforms?
Signature:
ants.apply_transforms(
    fixed,
    moving,
    transformlist,
    interpolator='linear',
    imagetype=0,
    whichtoinvert=None,
    compose=None,
    verbose=False,
    **kwargs,
)
Docstring:
Apply a transform list to map an image from one domain to another.
In image registration, one computes mappings between (usually) pairs
of images. These transforms are often a sequence of increasingly
complex maps, e.g. from translation, to rigid, to affine to deformation.
The list of such transforms is passed to this function to interpolate one
image domain into the next image domain, as below. The order matters
strongly and the user is advised to familiarize with the standards
established in examples.

ANTsR function: `antsApplyTransforms`

Arguments
---------
fixed : ANTsImage
    fixed image defining domain into which the moving image is transformed.

moving : AntsImage
    moving image to be mapped to fixed space.

transformlist : list of strings
    list of transforms generated by ants.registration where each transform is a filename.

interpolator : string
    Choice of interpolator. Supports partial matching.
        linear
        nearestNeighbor
        multiLabel for label images but genericlabel is preferred
        gaussian
        bSpline
        cosineWindowedSinc
        welchWindowedSinc
        hammingWindowedSinc
        lanczosWindowedSinc
        genericLabel use this for label images

imagetype : integer
    choose 0/1/2/3 mapping to scalar/vector/tensor/time-series

whichtoinvert : list of booleans (optional)
    Must be same length as transformlist.
    whichtoinvert[i] is True if transformlist[i] is a matrix,
    and the matrix should be inverted. If transformlist[i] is a
    warp field, whichtoinvert[i] must be False.
    If the transform list is a matrix followed by a warp field,
    whichtoinvert defaults to (True,False). Otherwise it defaults
    to [False]*len(transformlist)).

compose : string (optional)
    if it is a string pointing to a valid file location,
    this will force the function to return a composite transformation filename.

verbose : boolean
    print command and run verbose application of transform.

kwargs : keyword arguments
    extra parameters

Returns
-------
ANTsImage or string (transformation filename)

Example
-------
>>> import ants
>>> fixed = ants.image_read( ants.get_ants_data('r16') )
>>> moving = ants.image_read( ants.get_ants_data('r64') )
>>> fixed = ants.resample_image(fixed, (64,64), 1, 0)
>>> moving = ants.resample_image(moving, (64,64), 1, 0)
>>> mytx = ants.registration(fixed=fixed , moving=moving ,
                             type_of_transform = 'SyN' )
>>> mywarpedimage = ants.apply_transforms( fixed=fixed, moving=moving,
                                           transformlist=mytx['fwdtransforms'] )
到此基于 ants源码和 antspy的配准应用就介绍到这了,后面有机会将会详细介绍 医学常用的配准方法及其用途!
