opencv3.0-支持向量机(svm)使用介绍
这篇文章翻译opencv官网关于opencv3.0 svm的使用介绍
http://docs.opencv.org/3.0-beta/doc/tutorials/ml/introduction_to_svm/introduction_to_svm.html
具体使用可以参考: http://blog.csdn.net/u010869312/article/details/44927721
目标
在这篇文章中可以学到:
使用opencv 函数CvSVM::train建立一个基于SVMs的分类器,使用CvSVM::predict测试分类器的性能。
What is a SVM?
支持向量机(SVM)通常由超平面定义的区别式分类器。也就是说,给定标记的训练数据(监督式学习),SVM算法输出一个能够分类新样本的超平面。
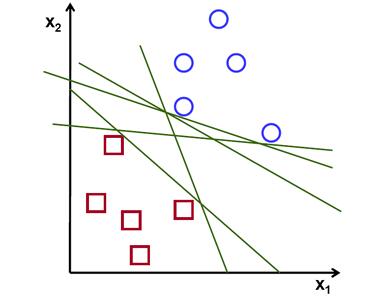
那么哪一个获得的超平面才是最优的呢?下面考虑一个简单的问题:
一组属于两个类的线性可分的二维点,找到一个分类直线。

在这个例子中使用笛卡尔平面处理线和点取代高维空间中的超平面和向量,这是一个简化的问题。理解这么做的唯一原因是例子构建的直觉更容易想象是非常重要的。但是在实际应用中分类的目标通常是大于2维的
在上面的图片我们可以看到有有多条直线可以解决问题,是否有一条直线式最好的呢?我们可以i直观的定义一个标注去评估直线的效果:
如果一条直线太靠近点是不好的因为其将对噪声敏感并且其不是一般意义上的正确。因此,我们的目标是找到一条直线尽可能的远离所有点。
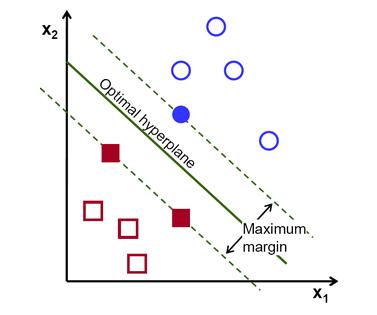
因此,SVM算法的操作是找到给出的最大极小距离的超平面去训练样本。而且,这个距离在SVM理论中有一个很重要名字叫做margin。所以,训练数据间的分离超平面的margin是最大的。
如何计算超平面
首先介绍定义超平面的符号:
f(x)=β_0+β^T x
β是权向量,β_0是偏移量。
最优超平面可以在一个无限数量的不同方式通过缩放β和β_0。在可能表示超平面中,一个选择是:
|β_0+β^T x|=1
x表示离超平面最佳的训练样本。一般来说,最靠近超平面的训练样本叫做support vectors。总所周知,这种表示是规范的超平面。
现在,我们使用几何学的结果给出一点x和超平面(β,β_0)之间的距离:
distance=|β_0+β^T x|/‖β‖
特别的: 对于规范的超平面,分子等于1。support vectors的距离:
distance_support vectors=|β_0+β^T x|/‖β‖=1/‖β‖
回想之前介绍的margin,这里定义M,是最近样本的距离的2倍
M=2/||β||
最终,M最大值的问题等同与函数L(β)的最小值的问题。这个约束模型要求超平面正确的分类所有的训练样本x_i。
最终:![]()
y_i表示每个训练样本的标签。
这是一个拉格朗日优化问题,这能够通过使用拉格朗日乘数获得最优超平面的权向量β和偏移量β_0。
opencv源码
#include
#include
#include "opencv2/imgcodecs.hpp"
#include
#include

using namespace cv;
using namespace cv::ml;

int main(int, char**)
{
    // Data for visual representation
    int width = 512, height = 512;
    Mat image = Mat::zeros(height, width, CV_8UC3);

    // Set up training data
    int labels[4] = {1, -1, -1, -1};
    Mat labelsMat(4, 1, CV_32SC1, labels);

    float trainingData[4][2] = { {501, 10}, {255, 10}, {501, 255}, {10, 501} };
    Mat trainingDataMat(4, 2, CV_32FC1, trainingData);

    // Set up SVM's parameters
    SVM::Params params;
    params.svmType    = SVM::C_SVC;
    params.kernelType = SVM::LINEAR;
    params.termCrit   = TermCriteria(TermCriteria::MAX_ITER, 100, 1e-6);

    // Train the SVM
    Ptr svm = StatModel::train(trainingDataMat, ROW_SAMPLE, labelsMat, params);

    Vec3b green(0,255,0), blue (255,0,0);
    // Show the decision regions given by the SVM
    for (int i = 0; i < image.rows; ++i)
        for (int j = 0; j < image.cols; ++j)
        {
            Mat sampleMat = (Mat_<float>(1,2) << j,i);
            float response = svm->predict(sampleMat);

            if (response == 1)
                image.at(i,j)  = green;
            else if (response == -1)
                image.at(i,j)  = blue;
        }

    // Show the training data
    int thickness = -1;
    int lineType = 8;
    circle( image, Point(501,  10), 5, Scalar(  0,   0,   0), thickness, lineType );
    circle( image, Point(255,  10), 5, Scalar(255, 255, 255), thickness, lineType );
    circle( image, Point(501, 255), 5, Scalar(255, 255, 255), thickness, lineType );
    circle( image, Point( 10, 501), 5, Scalar(255, 255, 255), thickness, lineType );

    // Show support vectors
    thickness = 2;
    lineType  = 8;
    Mat sv = svm->getSupportVectors();

    for (int i = 0; i < sv.rows; ++i)
    {
        const float* v = sv.ptr<float>(i);
        circle( image,  Point( (int) v[0], (int) v[1]),   6,  Scalar(128, 128, 128), thickness, lineType);
    }

    imwrite("result.png", image);        // save the image

    imshow("SVM Simple Example", image); // show it to the user
    waitKey(0);

}
说明
1、设置训练数据
这个例子的训练数据是由一组已经标记的2维点属于两个不同的类。其中一个类包含一个点和其他三个点。
float labels[4] = {1.0, -1.0, -1.0, -1.0};
float trainingData[4][2] = {{501, 10}, {255, 10}, {501, 255}, {10, 501}};
函数CvSVM::train的使用需要把训练数据存储为Mat类的float类型。因此创建如下所示的数组目标:
Mat trainingDataMat(4, 2, CV_32FC1, trainingData);
Mat labelsMat      (4, 1, CV_32FC1, labels);
2、设置SVM的参数
在这里我们使用最简单的情况来介绍SVM的理论,即训练样本是分为两类的,而且是线性可分的。然而,SVMs可以被用在各种各样问题中的(e.g.非线性分离数据问题,一个SVM使用一个内核函数提高样本的维度,等)。所以我们必须在训练SVM之前定义一些参数。这些参数存储在一个CvSVMParams类中。
ml::SVM::Params params;
params.svmType    = ml::SVM::C_SVC;
params.kernelType = ml::SVM::LINEAR;
params.termCrit   = TermCriteria(TermCriteria::MAX_ITER, 100, 1e-6);
。 Type of SVM 。在这里我们选择type ml::SVM::C_SVC,其能够被用于 n-class classification (n \geq 2)。这个参数定义在属性:ml::SVM::Params.svmType。
Note The important feature of the type of SVM CvSVM::C_SVC deals with imperfect separation of classes (i.e. when the training data is non-linearly separable). This feature is not important here since the data is linearly separable and we chose this SVM type only for being the most commonly used.
。 Type of SVM kernel. 我们不讨论内核函数,由于他们不是我们处理的感兴趣的训练数据。虽然如此,让我们简要介绍内核函数的主要思想。It is a mapping done to the training data to improve its resemblance to a linearly separable set of data. This mapping consists of increasing the dimensionality of the data and is done efficiently using a kernel function. We choose here the type ml::SVM::LINEAR which means that no mapping is done. This parameter is defined in the attribute ml::SVMParams.kernel_type.
。 算法的终止条件 SVM训练程序是应用解决一个在迭代条件下受约束的二次优化问题。这里我们指定一个最大迭代次数和宽容错误值,所以我们允许算法在少于预设步骤时完成,即使最优超平面尚未完成计算。这个参数定义在结构体cvTermCriteria。
3、训练SVM
我们使用CvSVM::train建立SVM模型。
CvSVM SVM;
SVM.train(trainingDataMat, labelsMat, Mat(), Mat(), params);
4 Regions classified by the SVM
CvSVM::predict使用一个已经训练好的SVM分类一个训练样本.在这个例子中我们使用这个方法根据SVM所做的预测给空间加颜色。In other words,an image is traversed interpreting its pixels as points of the Cartesian plane. Each of the points is colored depending on the class predicted by the SVM; in green if it is the class with label 1 and in blue if it is the class with label -1.
Vec3b green(0,255,0), blue (255,0,0);

for (int i = 0; i < image.rows; ++i)
    for (int j = 0; j < image.cols; ++j)
    {
    Mat sampleMat = (Mat_<float>(1,2) << i,j);
    float response = SVM.predict(sampleMat);

    if (response == 1)
       image.at(j, i)  = green;
    else
    if (response == -1)
       image.at(j, i)  = blue;
    }
5 Support vectors
这里我们使用一些方法去获得支持向量的方法。CvSVM::get_support_vector_count方法输出这个问题中的所有的支持向量,并且根据CvSVM::get_support_vector_count我们使用一个index获得每个support vectors。在这里,我们已经使用这个方法发现训练样本的support vectors并highlight。
int c     = SVM.get_support_vector_count();

for (int i = 0; i < c; ++i)
{
const float* v = SVM.get_support_vector(i); // get and then highlight with grayscale
circle(   image,  Point( (int) v[0], (int) v[1]),   6,  Scalar(128, 128, 128), thickness, lineType);
结果
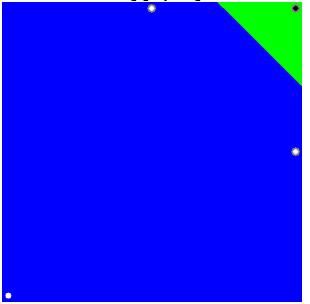
代码打开一幅图像并且显示两个类的训练样本。一个类中的点用白色圆圈表示,另外一个类用黑色圆圈表示。
SVM被训练并且用于分类图像中的像素。这个结果分割图像成一个蓝色区域和一个绿色区域。两个区域之间的边界时最优超平面。
最后使用灰色包围环绕训练样本显示support vectors 。
