SpringBoot(一):SpringBoot整合SpringDataJpa、freemarker,yml文件格式
SpringBoot
- 概述
- 入门程序
- 深度体验
- SpringDataJpa
- 页面渲染
- freemarker
- 静态资源处理
- yml(yaml)文件格式
概述
SpringBoot对Spring的缺点进行的改善和优化,基于约定优于配置的思想,可以让开发人员不必在配置与逻辑业务之间进行思维的切换,全身心的投入到逻辑业务的代码编写中,从而大大提高了开发的效率,一定程度上缩短了项目周期。
SpringBoot的特点
- 为基于Spring的开发提供更快的入门体验
- 开箱即用,没有代码生成,也无需XML配置。同时也可以修改默认值来满足特定的需求
- 提供了一些大型项目中常见的非功能性特性,如嵌入式服务器、安全、指标,健康检测、外部配置等
- SpringBoot不是对Spring功能上的增强,而是提供了一种快速使用Spring的方式
SpringBoot的核心功能
- 起步依赖
起步依赖本质上是一个Maven项目对象模型(Project Object Model,POM),定义了对其他库的传递依赖,这些东西加在一起即支持某项功能。
简单的说,起步依赖就是将具备某种功能的坐标打包到一起,并提供一些默认的功能。 - 自动配置
Spring Boot的自动配置是一个运行时(更准确地说,是应用程序启动时)的过程,考虑了众多因素,才决定Spring配置应该用哪个,不该用哪个。该过程是Spring自动完成的。
入门程序
需求:请求一个url响应json数据。
传统方法:
1)创建一个web工程
2)配置springmvc框架
- springmvc的配置文件
- web.xml配置前端控制器
3)编写controller
4)部署到tomcat下。
springboot:
1)创建springboot工程,要求必须是maven工程。必须继承spring-boot-stater-parent工程。
2)编写controller,实现业务逻辑
3)编写启动类,添加一个main方法。其上需要添加一个注解@SpringBootApplication
4)启动main方法
一、创建一个maven项目,添加父工程和依赖
父工程
<parent>
    <groupId>org.springframework.bootgroupId>
    <artifactId>spring-boot-starter-parentartifactId>
    <version>2.0.2.RELEASEversion>
parent>
起步依赖:不用配置版本,因为在spring-boot-starter-parent父工程的父工程中,已经定义好了常用jar包的版本
<dependencies>
    <dependency>
        <groupId>org.springframework.bootgroupId>
        <artifactId>spring-boot-starter-webartifactId>
    dependency>
dependencies>
二、编写controller
import org.springframework.web.bind.annotation.RequestMapping;
import org.springframework.web.bind.annotation.RestController;

import java.util.HashMap;
import java.util.Map;

@RestController
public class HelloController {

    @RequestMapping("/hello")
    public Map sayHello() {
        Map map = new HashMap();
        map.put("hello","world");
        return map;
    }
}
三、编写启动类
注意:
- 启动类的名称随意
@SpringBootApplication注解中,包含了@ComponentScan注解,这是包扫描器,扫描该类所在包的所有子包,所有这个类需要写在顶层。
//代表是一个springboot工程
@SpringBootApplication
public class HelloApplication {
    public static void main(String[] args) {
        SpringApplication.run(HelloApplication.class, args);
    }
}
深度体验
需求:查询数据库中的数据列表展示到页面。
SpringDataJpa
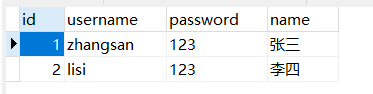
一、创建数据库,添加user表
二、引入SpringDataJpa起步依赖和数据库驱动
<dependency>
    <groupId>org.springframework.bootgroupId>
    <artifactId>spring-boot-starter-data-jpaartifactId>
dependency>

<dependency>
    <groupId>mysqlgroupId>
    <artifactId>mysql-connector-javaartifactId>
dependency>
三、创建一个配置文件application.properties(springboot配置文件,名字固定!)
配置数据源和jpa参数信息
spring.datasource.driverClassName=com.mysql.jdbc.Driver
spring.datasource.url=jdbc:mysql://127.0.0.1:3306/springboot?useUnicode=true&characterEncoding=utf8
spring.datasource.username=root
spring.datasource.password=root

#JPA Configuration:
spring.jpa.database=MySQL
spring.jpa.show-sql=true
spring.jpa.generate-ddl=true
四、编写实体类和dao
略
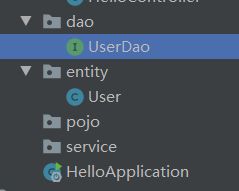
五、编写UserController
@RestController
@RequestMapping("/user")
public class UserController {
    @Autowired
    private UserDao userDao;

    @RequestMapping("/list")
    private List<User> showUserList(){
        return userDao.findAll();
    }
}
六、测试
页面渲染
可以直接使用静态html展示数据。
动态展示:页面动态生成,每次请求生成一次页面。
jsp:本质上就是servlet。servlet运行要求是一个servlet容器中。工程必须是web工程。需要把工程改造成web工程。
- 打包方式改为web工程
- 需要把springboot中嵌入的tomcat排除
所以,在springboot工程中,不推荐使用jsp
推荐使用模板技术:freemarker
freemarker
一、添加起步依赖
<dependency>
    <groupId>org.springframework.bootgroupId>
    <artifactId>spring-boot-starter-freemarkerartifactId>
dependency>
二、创建模板文件
- 保存的位置在
resources/templates目录下 - 文件的扩展名必须是
ftl

<html>
<head>
<title>hello springboottitle>
head>
<body>
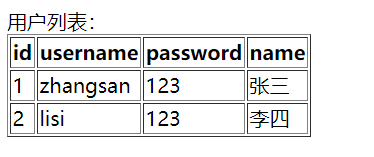
用户列表:<br>
<table border="1">
<tr>
<th>idth>
<th>usernameth>
<th>passwordth>
<th>nameth>
tr>
<#list userList as user>
<tr>
<td>${user.id}td>
<td>${user.username}td>
<td>${user.password}td>
<td>${user.name}td>
tr>
#list>
table>
body>
html>
三、编写PageController,把查询结果传递给模板
注意:
- 和jsp的使用方法一样,不能返回json
- 视图为user,后缀自动补充
@Controller
public class PageController {
    @Autowired
    private UserDao userDao;

    @RequestMapping("/page/user/list")
    public ModelAndView showUserList(){
        //查询用户列表
        List<User> userList = userDao.findAll();
        //把用户列表传递给模板
        ModelAndView modelAndView = new ModelAndView();
        modelAndView.addObject("userList",userList);
        modelAndView.setViewName("user");
        //返回逻辑视图
        return modelAndView;
    }
}
四、测试
静态资源处理
静态资源应该存放在resources/static目录下

使用该地址就能访问到1.jpg

yml(yaml)文件格式
也是key-value形式,可以表示一个对象、集合。
一、语法:
key: value
冒号后必须要有一个空格。
多级
key1:
	key2:
		key3: value
示例:改造application.properties为application.yml
注意:两个配置文件只能存在一个
spring:
  datasource:
    driverClassName: com.mysql.jdbc.Driver
    url: jdbc:mysql://127.0.0.1:3306/springboot?useUnicode=true&characterEncoding=utf8
    username: root
    password: root

#JPA Configuration:
  jpa:
    database: MySQL
    show-sql: true
    generate-ddl: true
二、定义常类
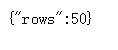
page:
  rows: 50
取出常类:和取出properties文件属性一样,都是使用@Value注解
@Value("${page.rows}")
private Integer rows;
测试
@RequestMapping("/page/rows")
    @ResponseBody
    public Map showRows(){
        Map map = new HashMap();
        map.put("rows",rows);
        return map;
    }
三、一次取出多个属性
person:
  name: zhangsan
  age: 18
  sex: 女
  address: 杭州
定义一个Person的pojo
添加@ConfigurationProperties注解,添加前缀属性prefix = "person"
添加@Component注解,让该类加载到spring容器中,这样容器中就存在一个属性为yml中定义属性的person类
@ConfigurationProperties(prefix = "person")
@Component
public class Person {
    private String name;
    private String age;
    private String sex;
    private String address;

	//省略getset
}
测试
@Autowired
private Person person;

@RequestMapping("/person")
public Person showPerson(){
    return person;
}

四、数组
方式一
定义数组
person:
  name: zhangsan
  age: 18
  sex: 女
  address: 杭州
  myaddress:
    - "北京昌平"
    - "上海浦东"
    - "新建和田"
方式二
myaddress: ["北京昌平","上海浦东","新建和田"]
在person类中添加一个属性
private String[] myAddress;
也可以使用list集合来接收
private List<String> myAddress;
测试结果
