ResNet 各个版本的区别
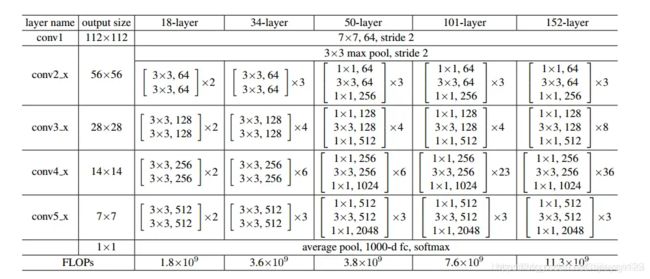
最近在研究分类问题,提到分类那就是必须要提到ResNet 这个经典的模型了。这个模型也分成了很多个版本。每个版本区别如下
这就是每一个版本ResNet的区别。我们可以看到主要的区别就是每一个卷积的多少的区别。这里又一个keras 的简单实现。
def ResNet50(include_top=True, weights='imagenet',
             input_tensor=None, input_shape=None,
             pooling=None,
             classes=1000):
    x = Conv2D(64, (7, 7), strides=(2, 2), name='conv1')(x)
    x = BatchNormalization(axis=bn_axis, name='bn_conv1')(x)
    x = Activation('relu')(x)
    x = MaxPooling2D((3, 3), strides=(2, 2))(x)

    x = conv_block(x, 3, [64, 64, 256], stage=2, block='a', strides=(1, 1))
    x = identity_block(x, 3, [64, 64, 256], stage=2, block='b')
    x = identity_block(x, 3, [64, 64, 256], stage=2, block='c')

    x = conv_block(x, 3, [128, 128, 512], stage=3, block='a')
    x = identity_block(x, 3, [128, 128, 512], stage=3, block='b')
    x = identity_block(x, 3, [128, 128, 512], stage=3, block='c')
    x = identity_block(x, 3, [128, 128, 512], stage=3, block='d')

    x = conv_block(x, 3, [256, 256, 1024], stage=4, block='a')
    x = identity_block(x, 3, [256, 256, 1024], stage=4, block='b')
    x = identity_block(x, 3, [256, 256, 1024], stage=4, block='c')
    x = identity_block(x, 3, [256, 256, 1024], stage=4, block='d')
    x = identity_block(x, 3, [256, 256, 1024], stage=4, block='e')
    x = identity_block(x, 3, [256, 256, 1024], stage=4, block='f')

    x = conv_block(x, 3, [512, 512, 2048], stage=5, block='a')
    x = identity_block(x, 3, [512, 512, 2048], stage=5, block='b')
    x = identity_block(x, 3, [512, 512, 2048], stage=5, block='c')
我么可以看到这是一个ResNet50的网络。里面的每一个模块数是(3,4,6,3)。我们可以在代码中具体看到。里面每一个小的模块的代码如下
def identity_block(input_tensor, kernel_size, filters, stage, block):
    """The identity block is the block that has no conv layer at shortcut.
    # Arguments
        input_tensor: input tensor
        kernel_size: defualt 3, the kernel size of middle conv layer at main path
        filters: list of integers, the filterss of 3 conv layer at main path
        stage: integer, current stage label, used for generating layer names
        block: 'a','b'..., current block label, used for generating layer names
    # Returns
        Output tensor for the block.
    """
    filters1, filters2, filters3 = filters
    if K.image_data_format() == 'channels_last':
        bn_axis = 3
    else:
        bn_axis = 1
    conv_name_base = 'res' + str(stage) + block + '_branch'
    bn_name_base = 'bn' + str(stage) + block + '_branch'

    x = Conv2D(filters1, (1, 1), name=conv_name_base + '2a')(input_tensor)
    x = BatchNormalization(axis=bn_axis, name=bn_name_base + '2a')(x)
    x = Activation('relu')(x)

    x = Conv2D(filters2, kernel_size,
               padding='same', name=conv_name_base + '2b')(x)
    x = BatchNormalization(axis=bn_axis, name=bn_name_base + '2b')(x)
    x = Activation('relu')(x)

    x = Conv2D(filters3, (1, 1), name=conv_name_base + '2c')(x)
    x = BatchNormalization(axis=bn_axis, name=bn_name_base + '2c')(x)

    x = layers.add([x, input_tensor])
    x = Activation('relu')(x)
    return x


def conv_block(input_tensor, kernel_size, filters, stage, block, strides=(2, 2)):
    """conv_block is the block that has a conv layer at shortcut
    # Arguments
        input_tensor: input tensor
        kernel_size: defualt 3, the kernel size of middle conv layer at main path
        filters: list of integers, the filterss of 3 conv layer at main path
        stage: integer, current stage label, used for generating layer names
        block: 'a','b'..., current block label, used for generating layer names
    # Returns
        Output tensor for the block.
    Note that from stage 3, the first conv layer at main path is with strides=(2,2)
    And the shortcut should have strides=(2,2) as well
    """
    filters1, filters2, filters3 = filters
    if K.image_data_format() == 'channels_last':
        bn_axis = 3
    else:
        bn_axis = 1
    conv_name_base = 'res' + str(stage) + block + '_branch'
    bn_name_base = 'bn' + str(stage) + block + '_branch'

    x = Conv2D(filters1, (1, 1), strides=strides,
               name=conv_name_base + '2a')(input_tensor)
    x = BatchNormalization(axis=bn_axis, name=bn_name_base + '2a')(x)
    x = Activation('relu')(x)

    x = Conv2D(filters2, kernel_size, padding='same',
               name=conv_name_base + '2b')(x)
    x = BatchNormalization(axis=bn_axis, name=bn_name_base + '2b')(x)
    x = Activation('relu')(x)

    x = Conv2D(filters3, (1, 1), name=conv_name_base + '2c')(x)
    x = BatchNormalization(axis=bn_axis, name=bn_name_base + '2c')(x)

    shortcut = Conv2D(filters3, (1, 1), strides=strides,
                      name=conv_name_base + '1')(input_tensor)
    shortcut = BatchNormalization(axis=bn_axis, name=bn_name_base + '1')(shortcut)

    x = layers.add([x, shortcut])
    x = Activation('relu')(x)
    return x
有了这个基本模块,大家就可以多次组合在一起成不同的版本了。
