下一个计划 : .NET/.NET Core应用性能管理
前言
最近几个月一直在研究开源的APM和监控方案,并对比使用了Zipkin,CAT,Sky-walking,PinPoint(仅对比,未实际部署),Elastic APM,TICK Stack,Prometheus等开源产品,其中不乏功能强大的监控和追踪系统,但它们都对.NET/.NET Core没有支持或支持不够完备。而在.NET/.NET Core平台也仅有Metrics.NET,AppMetrics,MiniProfiler等轻量级监控组件,它们也都和功能完备的APM系统差距甚远,也无法完全满足对当前流行的微服务系统进行全链路追踪和端对端监控的需求。为了满足实际的监控需求以及自身对APM系统的研究刨析,我决定从零开发.NET/.NET Core的APM,它应该包含
-
Http请求监控
-
应用健康检查
-
方法执行监控
-
应用内数据库访问监控
-
应用内缓存访问监控(Redis)
-
CLR/CoreCLR Runtime/GC/Threading监控
-
请求链路监控
-
分布式追踪
为了实现如上需求,我创建了AspectCoreAPM(基于AspectCore AOP的APM client agent)和Butterfly(独立的分布式追踪Server)两个开源项目,你可以在dotnet-lab[https://github.com/dotnet-lab]这个github organization下找到它们。下面将分别对两个项目进行简单介绍。
Butterfly--A distributed tracing server
Butterfly被设计为分布式追踪和APM的Server端,它将包含Collector,Storage,独立的Web UI,并使用Open Tracing规范来设计追踪数据。目前仅根据规范实现了Open Tracing API。
AspectCoreAPM
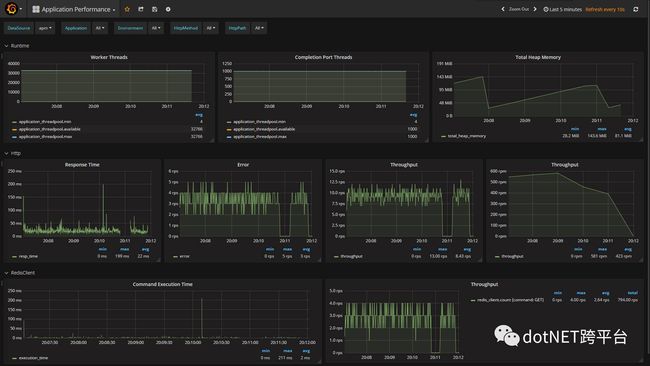
AspectCoreAPM抽象了APM的应用探针设计,它将会使用自动探针(收集CLR/CoreCLR数据),AOP探针(收集方法执行数据)和手动探针(业务数据)三种方式来收集数据发送到不同Collector Server或Storage。鉴于Butterfly Server并未完全实现,现阶段使用InfluxDB作为数据存储,并使用Grafana进行监控展示(在Butterfly Server完成后在Web UI进行统一的监控数据展示)。AspectCoreAPM目前已经完成了Http请求监控,简单的GC/Threading监控和RedisClient监控。
在使用AspectCoreAPM之前,我们需要先安装InfluxDB和Grafana。
在这里我使用ubuntu作为演示,如需在其他系统安装InfluxDB和Grafana,请各自参考它们的文档:
InfluxDb:https://portal.influxdata.com/downloads  Grafana:https://grafana.com/grafana/download
安装InfluxDB:
wget https://dl.influxdata.com/influxdb/releases/influxdb_1.4.2_amd64.debsudo dpkg -i influxdb_1.4.2_amd64.deb 安装之后,执行influx进入influxdb的CLI,并创建一个名称为aspectcore的database:
CREATE DATABASE aspectcore然后安装Grafana:
wget https://s3-us-west-2.amazonaws.com/grafana-releases/release/grafana_4.6.2_amd64.deb sudo dpkg -i grafana_4.6.2_amd64.debGrafana默认绑定的http地址为localhost,我们需要修改http_addr才可在外部访问Grafana,使用vi打开Grafana的配置文件:
sudo vi /etc/grafana/grafana.ini 找到http_addr配置修改为0.0.0.0:3000或你的外网IP。
在浏览器打开Grafana,默认账号和密码均为admin,然后添加DataSource。Type选择influxdb,并且database填写我们上面创建的aspectcore:
下载并导入AspectCoreAPM的Dashborad : https://grafana.com/dashboards/3837
接下来创建一个Asp.Net Core项目,并从nuget添加AspectCoreAPM:
Install-Package AspectCore.APM.AspNetCoreInstall-Package AspectCore.APM.LineProtocolCollectorInstall-Package AspectCore.APM.ApplicationProfiler 修改Startup.cs:
public class Startup{

 public Startup(IConfiguration configuration)    {
        Configuration = configuration;
    }

 public IConfiguration Configuration { get; }    // This method gets called by the runtime. Use this method to add services to the container.

  public IServiceProvider ConfigureServices(IServiceCollection services)    {
        services.AddMvc();

        services.AddAspectCoreAPM(component =>
        {
            component.AddApplicationProfiler();
  //注册ApplicationProfiler收集GC和ThreadPool数据
            component.AddHttpProfiler();
    //注册HttpProfiler收集Http请求数据
            component.AddLineProtocolCollector(options => //注册LineProtocolCollector将数据发送到InfluxDb
            {
                options.Server = "http://192.168.3.4:8086"; //你自己的InfluxDB Http地址
                options.Database = "aspectcore";    //你自己创建的Database
            });
        });
    return services.BuildAspectCoreServiceProvider(); //返回AspectCore AOP的ServiceProvider,这句代码一定要有
    }

     // This method gets called by the runtime. Use this method to configure the HTTP request pipeline.

      public void Configure(IApplicationBuilder app, IHostingEnvironment env)    {
        app.UseAspectCoreAPM();     //启动AspectCoreAPM,这句代码一定要有
        app.UseHttpProfiler();      //启动Http请求监控

        if (env.IsDevelopment())
        {
            app.UseDeveloperExceptionPage();
        }

        app.UseMvc();
    }
} 启动应用并访问页面。最后回到Grafana,在DataSource处选择aspectcore,就能看到我们的监控数据啦。
有问题反馈
希望有更多的.NET/.NET Core开发者能关注到这个项目并参与进来。
如果您有任何问题,请提交 Issue 给我们。
Github : https://github.com/dotnet-lab/AspectCore-APM
如果您觉得此项目对您有帮助,请点个Star~
AspectCore QQ群: 306531723
原文:http://www.cnblogs.com/liuhaoyang/p/next-plan-apm.html
.NET社区新闻,深度好文,欢迎访问公众号文章汇总 http://www.csharpkit.com
![]()