unity下基于贴图混合(Texture Blending)的自定义妆容方案
在游戏行业和虚拟现实的推动下,数字化虚拟角色得到了大量的应用。我们对“虚拟角色”的理解已经从单一的虚拟形象演变为玩家设计自己的角色,玩家通过选择不同的皮肤/皱纹/眼影/腮红/唇彩/纹身/痣/晒痕/指甲等脸部妆容创造出独具个性的形象。本文给出一种在unity中基于贴图混合的自定义妆容方案,实现实时的更换眉毛/胡子/腮红等功能。
自定义妆容方案思路如下:
- 美术为整张脸准备一张基础贴图 (只有皮肤的BaseColor)

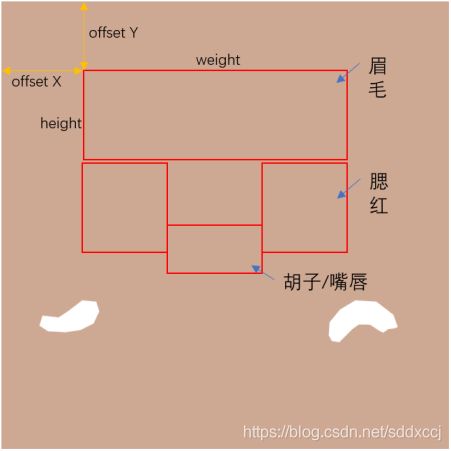
- 根据可更换部件在主贴图上划分出每个部件的矩形范围,每个部件范围由四个参数描述:offsetX,offsetY,width,height分别表示每个区域在主贴图上的偏移、宽度和高度。每个部件的小贴图的宽度和高度应和矩阵区域的宽度高度一致。

3. 根据width和height制作对应大小的可替换部位的贴图

4. 如果小贴图要改变颜色,或者附加一层细节纹理,通过设置整体像素颜色块逐像素改变贴图的颜色,并根据贴图Alpha通道值跟细节纹理进行混合,混合公式如下:


5. 将主贴图及其对应的shader拷贝到RenderTexture,然后遍历可替换部件数组,按照offsetX和offsetY将小贴图合并到主贴图上,将主贴图渲染到一个FrameBufferObject上。

6. 最后将混合后的贴图应用到模型上

贴图混合的几种方法
Method1:CPU端逐像素根据alpha通道进行叠加。
public void MergeTexture_(Texture2D tt1, Texture2D tt2, int offsetX, int offsetY)
        {

            Texture2D newTex = new Texture2D(tt1.width, tt1.height, TextureFormat.ARGB32, false);

            newTex.SetPixels(tt1.GetPixels());

            for (int x = 0; x < tt2.width; x++)
            {
                for (int y = 0; y < tt2.height; y++)
                {
                    var PixelColorFore = tt2.GetPixel(x, y) * tt2.GetPixel(x, y).a;
                    var newY = tt1.height - offsetY - tt2.height + y;
                    var PixelColorBack = tt1.GetPixel(x + offsetX, newY) * tt1.GetPixel(x + offsetX, newY).a;
                    newTex.SetPixel(x + offsetX, newY, PixelColorFore+ PixelColorBack);
                }
            }
            newTex.Apply();
             System.IO.File.WriteAllBytes(Application.dataPath + "/" + tt1.name + ".png", newTex.EncodeToPNG());
            GameObject.Find("obj001").GetComponent<Renderer>().material.mainTexture = newTex;
        }
这里注意下,由于需要对Texture进行读取像素,因此需要将相应的Texture设置为Read/Write Enabled,否则会报错。
Method2 逐像素操作改为块操作
逐像素操作可以用unity内置函数改为块操作,经过测试,能大概少一半的耗时
public void MergeTexture(Texture2D tt1, Texture2D tt2, int offsetX, int offsetY)
        {

            Texture2D newTex= new Texture2D(tt1.width, tt1.height, TextureFormat.ARGB32, false);

            newTex.SetPixels(tt1.GetPixels());
            Color32[] colors = tt2.GetPixels32();
            // tt1.
            newTex.SetPixels32(offsetX, tt1.height - offsetY - tt2.height,tt2.width,tt2.height, colors,0);
            newTex.Apply();
            GameObject.Find("obj001").GetComponent<Renderer>().material.mainTexture = newTex;
        }
Method3 调用Unity的底层绘制接口在GPU上进行操作
上述方案基本上是在CPU端进行的,实际上可以调用Unity的底层绘制接口在GPU上进行操作,主要是利用RenderTexture和Graphics.DrawTexture()进行操作
public Texture2D texture;        //Starting image.
    public Texture2D stampTexture;   //Texture to Graphics.Drawtexture on my RenderTexture.
    public float posX = 256f;        //Position the DrawTexture command while testing.
    public float posY = 256f;        //Position the DrawTexture command while testing.
    RenderTexture rt;                //RenderTexture to use as buffer.

    void Start()
    {
        rt = new RenderTexture(1024, 1024, 32);           //Create RenderTexture 512x512 pixels in size.
        GameObject.Find("obj001").GetComponent<Renderer>().material.mainTexture = rt;   //Assign my RenderTexure to be the main texture of my object.
        RenderTexture.active = rt;
        Graphics.Blit(texture, rt);          //Blit my starting texture to my RenderTexture.
        RenderTexture.active = rt;                      //Set my RenderTexture active so DrawTexture will draw to it.
        GL.PushMatrix();                                //Saves both projection and modelview matrices to the matrix stack.
        GL.LoadPixelMatrix(0, 1024, 1024, 0);            //Setup a matrix for pixel-correct rendering.
                                                         //Draw my stampTexture on my RenderTexture positioned by posX and posY.
        Graphics.DrawTexture(new Rect(posX, posY, stampTexture.width, stampTexture.height), stampTexture);
        Texture2D png = new Texture2D(rt.width, rt.height, TextureFormat.ARGB32, false);
        png.ReadPixels(new Rect(0, 0, rt.width, rt.height), 0, 0);
        System.IO.File.WriteAllBytes(Application.dataPath + "/" + "nihao.png", png.EncodeToPNG());
        GL.PopMatrix();
        //Restores both projection and modelview matrices off the top of the matrix stack.
        RenderTexture.active = null;                    //De-activate my RenderTexture.
谢谢!