比特币学习笔记
比特币概述
什么是比特币
- 交易的确认数/Confirms,指的是当前区块后面接了区块的数目
- 比特币是一种数字加密货币协议,它仅仅约定了在比特币网络中 节点旳行为规范
- BitcoinCore项目中包含两个完整的比特币协议实现,这样的实现我们称之为节点软件
- 图形版的bitcoin-qt
- 命令行版的bitcoind
- BitcoinCore项目中的bitcoin-cli软件是一个基于节点的RPC API命令行工具,可以用它来和节点进行交互人机交互
节点软件与客户端
节点软件清零
-
~$ bitcoind :启动命令行版本的比特币节点
-
~$ pkill bitcoind :杀死命令行版本的比特币节点
-
将区块链清零
~$ pkill bitcoind
~$ rm -rf ~/.bitcoin/regtest
~$ bitcoind
节点软件配置
-
bitcoind的运行依赖于其配置文件,在ubuntu中,该文件的路径为
~/.bitcoin/bitcoin.conf。对于一个新部署的
bitcoind节点,首先需要修改的是RPC API的访问控制, 下面的设定将允许客户端以用户user和密码123456来访问RPC API接口:rpcuser=user rpcpassword=123456bitcoind有三种运行模式,可以分别连接到主链、测试链或构建一个单节点 的私有链用于开发。在本课程中,我们将其运行模式设置为私有链模式:
regtest=1
使用客户端工具
节点软件bitcoind实现了完整的比特币规范,但是它没有提供人机操作接口, 因此我们需要借助于bitcoin-cli这个命令行工具来访问节点软件提供的功能。
例如,可以使用getbalance 子命令来获取节点钱包余额:

注意:如果没有执行过其他的操作,你看到的余额应该是0.00000000。
bitcoin-cli的子命令对应于节点旳JSON RPC开发接口,可以完成地址创建、 交易发送、余额查询、区块浏览等诸多任务。
身份:密钥与地址
比特币的身份识别体系是建立在非对称加密技术之上的去中心化系统,每一个身份对应着一对密钥.
- 使用bitcoin-cli创建一个新的地址
~$ bitcoin-cli getnewaddress
2NC6QeGFjxyBb1qqYq5wz3UyufQ4cMMVz7S
- 查看该地址的相关信息
~$ bitcoin-cli validateaddress 2NC6QeGFjxyBb1qqYq5wz3UyufQ4cMMVz7S
{
"isvalid": true,
"address": "2NC6QeGFjxyBb1qqYq5wz3UyufQ4cMMVz7S",
...
"pubkey": "02c865c914ee88ac798e66e0623012286c1549c709a4f8efa994a1504f180574f5",
...
}
- 使用地址导出该地址的私钥,这个不是从公钥推导出私钥,而是将公钥映射的私钥拿出来.dumpprivkey导出的私钥是经过base58编码过的
~$ bitcoin-cli dumpprivkey 2NC6QeGFjxyBb1qqYq5wz3UyufQ4cMMVz7S
cNvFMEshrc7oNaoPwFgygmpwzM7xt1DAtvD5xh5uogQZuoMk7S4v
节点钱包
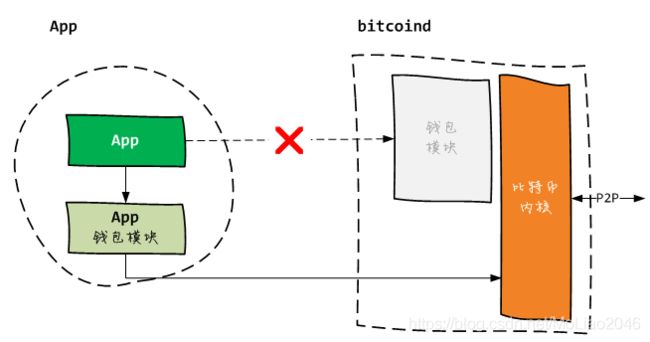
bitcoind除了实现完整的比特币核心协议外,还包含了一个重要的模块钱包
默认配置下bitcoind会启用节点钱包,如果你希望,如果你希望禁止钱包功能,准备自己管理秘钥与地址,你可以再配置文件中设置
disablewallet=1
节点提供的很多RPC调用都是由钱包模块来实现的,当调用getnewaddress 命令时候,就是由钱包模块来生成秘钥和地址,并自动加加入到钱包中的.
挖矿:交易确认与激励
挖矿奖励得到的比特币必须要等101个确认之后才能生效
在私有链上可以执行下面命令挖出101个区块
~$ bitcoin-cli generate 101
当挖出102个区块的时候,第一个区块的挖矿奖励就会到账,此时可以使用下面的命令查看余额
~$ bitcoin-cli getbalance
比特币转账交易
使用bitcoind内置的钱包转账
-
使用
getnewaddress生成一个新的地址以便测试~$ bitcoin-cli getnewaddress 2MzJkG1a4ZfWt3v3d3Rmkv57Z7UyLDHpep5 -
使用
sendtoaddress命令向这个新地址转账.
~$ bitcoin-cli sendtoaddress 2MzJkG1a4ZfWt3v3d3Rmkv57Z7UyLDHpep5 2.45
- 挖矿确认这笔交易,确认6次
~$ bitcoin-cli generate 6
- 查看该地址的余额
~$ bitcoin-cli getreivedbyaddress 2MzJkG1a4ZfWt3v3d3Rmkv57Z7UyLDHpep5 6
2.45000000
使用PRC应用开发接口
RPC API概述
BitcoinCore项目中的bitcoind可以使用RPC API来允许第三方应用通过节点软件访问比特币网络.实际上bitcoin-cli就是通过这个接口来实现其功能的.我可以完全在java程序中实现bitcoin-cli的功能.

method:字段声明要调用的远程方法名params字段声明调用参数列表jsonrpc字段声明采用JSON RPC版本号- 可选
id字段则用于简历响应消息与请求消息之间的关联,以便客户端在同时发送多个请求后能正确跟踪其响应
JSON RPC采用了JSON语法,表示一个远程调用过程的请求与应答消息.JSON RPC传输与协议无关,他使用JSON格式内容来承载HTTP报文.
bitcoind在不同的网络下,会监听不同的端口.
- 主网模式:8332
- 测试网模式:18332
- Regtest开发模式:18443
可以再bitcoind配置文件中配置来修改监听端口
rpcbind=127.0.0.1
rpcport=7878
使用curl测试RPC API
如果linux中没有curl可以从官网下载
如果想返回的json信息利于阅读,可以使用jq,没有jq需要去下载
访问getnetworkinfo节点
~$ curl -X POST -d '{
> "jsonrpc":"1.0",
> "method":"getnetworkinfo",
> "params":[],
> "id":"123"
> }' http://user:123456@localhost:18443 | jq

在Java代码中访问RPC API
只是将上面的json格式的数据进行封装,然后再请求,如下
//创建HttpClient
CloseableHttpClient client = HttpClients.createDefault();
//创建请求
//rpcuser=user 节点允许客户端登录的用户名
//rpcpassword=123456 节点允许客户端登录的密码
//127.0.0.1 节点的IP
//18443 节点监听的端口
HttpPost req = new HttpPost("http://user:[email protected]:18443");
req.setHeader("Content-Type","application/json");
StringEntity payload = new StringEntity("{\"jsonrpc\":\"1.0\",\"method\":\"getnetworkinfo\",\"params\":[],\"id\":123}");
req.setEntity(payload);
//获取响应
CloseableHttpResponse rsp = client.execute(req);
String ret = EntityUtils.toString(rsp.getEntity());
client.close();
//显示结果
System.out.format("rsp => \n%s\n",ret);
使用JSON RPC封装库
上面是手动封装json格式,我们可以直接利用库来封装json rpc请求,可以使用JavaBitcoinRpcClient库来进行封装请求.

**该库是基于java原生HttpURLConnection实现,接口非常简洁,每一个RPC调用都对应BitcoinRpcClient的接口方法.**该库内置了一个json编码解码器,我们可以直接将java对象转为json或者将json转为java对象.
下面的例子是使用该库调用getNetworkInfo()方法:
import wf.bitcoin.javabitcoindrpcclient.BitcoindRpcClient.Unspent;
import wf.bitcoin.javabitcoindrpcclient.BitcoinJSONRPCClient;
import java.util.*;
public class App{
public static void main(String[] args) throws Exception {
System.out.println("Access bitcoind rpc with polve client");
//rpcuser=user 节点允许客户端登录的用户名
//rpcpassword=123456 节点允许客户端登录的密码
//127.0.0.1 节点的IP
//18443 节点监听的端口
String nodeUrl = "http://user:[email protected]:18443";
BitcoinJSONRPCClient client = new BitcoinJSONRPCClient(nodeUrl);
System.out.format("network info => \n%s\n",client.getNetworkInfo());
}
}
利用UTXO计算钱包余额
完整代码
public class App{
public static void main(String[] args) throws Exception {
System.out.println("hello,bitcoinj");
BitcoinJSONRPCClient client = new BitcoinJSONRPCClient("http://user:[email protected]:18443");//设置节点的信息,账户,密码
double balance = client.getBalance();//获取节点余额
System.out.format("wallet balance => %f\n",balance);
double amount = 0.;
List<Unspent> utxos = client.listUnspent();//未使用的utxo
for(Unspent utxo: utxos){
amount += utxo.amount();
}
System.out.format("calculated balance => %f\n",amount);
}
使用JSON RPC java封装查询余额的方法
public class App {
public static void main(String[] args) throws Exception{
System.out.println("Access bitcoind rpc with apache httpclient");
CloseableHttpClient client = HttpClients.createDefault();
HttpPost req = new HttpPost("http://user:[email protected]:18443");
req.setHeader("Content-Type","application/json");
StringEntity payload = new StringEntity("{\"jsonrpc\":\"1.0\",\"method\":\"getbalance\",\"params\":[],\"id\":123}");
req.setEntity(payload);
CloseableHttpResponse rsp = client.execute(req);
String ret = EntityUtils.toString(rsp.getEntity());
client.close();
System.out.format("rsp => \n%s\n",ret);
}
创建地址 发送交易 查看交易的java代码实现
public static void main(String[] args) throws Exception {
System.out.println("Access bitcoind rpc with wrapper client");
BitcoinJSONRPCClient client = new BitcoinJSONRPCClient("http://user:[email protected]:18443");
System.out.format("balance => %s\n",client.getBalance());
String addr = client.getNewAddress();
System.out.format("address => %s\n",addr);
String txid = client.sendToAddress(addr,1.9);
System.out.format("fund txid => %s\n",txid);
client.generate(6);
RawTransaction rawtx = client.getRawTransaction(txid);
System.out.format("tx vin => \n%s\n",rawtx.vIn());
System.out.format("tx vout => \n%s\n",rawtx.vOut());
}
让网站支持比特币支付

当用户选择用比特币支付的时候,可以发送一个二维码给用户,地址可以自己重新创建一个.
当用户支付成功的时候,后台就可以开始使用getreceivedbyaddress命令来检查订单对应的收款情况,一旦收到足量的比特币,即可结束该订单的支付,并启动产品或服务的交付.默认情况下,getreceivedbyaddress至少需要六个确认才会报告地址收到交易.
地址的离线生成与管理
概述
在前面的部分,都是使用节点软件的getNewAddress调用来创建新的比特币地址,地址对应的私钥以及交易的签名都是由节点钱包模块管理,应用程序无法控制,这种模式有一定得限制.
如果要获得最大程度的灵活性,需要抛开节点软件,使用java代码来离线生成地址,这些离线生成的地址自然不属于节点钱包管理,因此也会带来一些额外的问题.
- 需要理解秘钥,地址,脚本,这些比特币内部的机制
- 需要我们自己进行罗交易的构造以及签名,而不是简单的调用sendtoaddress
- 需要我们自己跟踪这些地址相关的UTXO,而不是简单的调用listunspent
- 需要自己汇总比特币余额,没有getBalance可以用.
一旦试图自己管理地址,从某种程度上说,基本就需要实现一个钱包模块了.
下面将主要使用bitcoinj库来完成这些任务.他是一个比特币协议的java实现版本.在gradle配置中实现依赖
dependencies {
compile 'org.bitcoinj:bitcoinj-core:0.14.7'
}
创建公钥私钥
私钥可以推导出公钥,公钥可以推导出地址,地址只是公钥的一种简明表达式

私钥本质是一个随机数,从私钥出发,利用椭圆曲线乘法运算可以推导出公钥,而公钥利用hash算法就可以得到比特币地址.这两次运算都是单向不可逆的,因此无法从地址反推出公钥,也无法从公钥反推出私钥.
bitcoinj的ECKey类可以方便的创建公钥和私钥,并提供了多种形式的返回值.
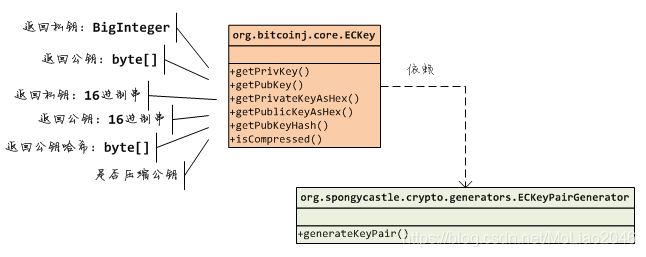
下面代码实现了创建私钥公钥的16进制字符串
ECKey key = new ECKey();
String prv = key.getPrivateKeyAsHex();
System.out.format("private => %s\n",prv);
String pub = key.getPublicKeyAsHex();
System.out.format("public => %s\n",pub);
压缩形式的公钥比非压缩形式的短一半,因此ECKey默认生成的都是使用压缩形式的公钥.可以使用isCompressed()来验证这一点
调用秘钥对象的getPubKeyHash()方法可以得到公钥的hash值,这个正是构造比特币地址的核心数据
String pubKeyHash = HEX.encode(key.getPubKeyHash());
System.out.format("pubkey hash => %s\n",pubKeyHash);
创建P2PKH地址
比特币的演化中出现了若干形式的地址,但核心始终是一致的:识别目标用户的身份.
P2PKH(Pay To Public Key Hash 花费公钥hash)地址是第一种被定义的比特币地址, 它基于公钥的哈希而生成.P2PKH包含三部分:
- 8位网络前缀
- 106位公钥hash
- 32位校验码后缀
这三部分经过base58编码,就得到了P2PKH地址

地址前缀
了解前缀是啥
不同的前缀经过base58编码后,会形成不同的前导符,这样可以很容易区分地址类型.

bitcoinj针对不同的网络提供了对应的封装类,这些网络封装类中标记了不同的前缀反感,当我们生成地址时候,需要指定一个网络参数对象,以便正确的应用地址前缀.

获取私有链模式下的网络参数对象
NetworkParameters params = RegTestParams.get();
在bitcoinj中使用Address类表征一个比特币地址,如果想要构建一个P2PHK地址,需要传入一个网络参数和公钥hash.代码如下:
NetworkParameters params = RegTestParams.get();
ECKey key = new ECKey();
Address addr = new Addr(params,key.getPubKeyHash());
System.out.format("p2pkh address => %s\n",addr.toString());
另外一种简单的方法
NetworkParameters params = RegTestParams.get();
ECKey key = new ECKey();
Address addr = key.toAddress(params);
System.out.format("p2pkh address => %s\n",addr.toString());
身份验证逻辑
Pay to PubKey Hash Address类除了getAddress()方法之外,还有一个方法.

getScriptPubKey()方法用来获取地址对应的公钥脚本,调用它将会返回如下 的结果:

公钥脚本的作用
如果一个UTXO上标明了接收地址,那么接收地址持有人该如何向节点证明这个UTXO属于我的?
P2PKH地址是由公钥推导出来的,公钥可以验证私钥签名,那么只要引用UTXO的交易后,提供对交易的签名和公钥,节点就可以利用公钥来验证提交交易者,是不是该地址的持有人.

上面的图中,交易2222的提交者需要在交易的输入中,为引用的每个UTXO补充自己的公钥以及对交易的签名,然后提交给节点,节点将按照如下逻辑验证提交者是否是地址X的真正持有人:
- 验证公钥:利用公钥推算地址,校验是否与地址x一致,如果不一致则拒绝交易
- 验证私钥:利用交易签名和公钥,验证提交的签名是否匹配,如果不一致则拒绝交易
- 接收并广播交易
当我们向目标地址发送比特币时候,实际上相当于给这个转出的UTXO加上了一个目标地址提供的锁,而只有目标地址对应的私钥才可以解开这个锁.
getScriptPubKey()方法返回的公钥脚本----给我发的UTXO,请用我提供的锁先上锁.
P2PKH脚本执行原理
在UTXO肿定义一段脚本(公钥脚本),在引用UTXO时定义另一段脚本(签名脚本),节点在验证UTXO所有权时,只需要拼接这两段脚本,并确定运行结果为true,就表示交易者的确持有该UTXO.

就是验证脚本的签名和公钥先进入栈中,然后将公钥备份,将备份的公钥hash,然后加密脚本的公钥hash入栈,之后和之前的公钥hash比对,如果正确就再使用公钥对签名进行认证,认证成功,那么该UTXO就属于生成签名脚本的人 了.
创建P2SH地址
比特币UTXO所有权的认证是完全基于交易中嵌入的两部分脚本来完成的.
P2SH(Pay To Script Hash 花费脚本hash) 地址为了充分利用比特币脚本能力而提出的改进.这种地址是基于脚本的hash来构造的—该脚本被称为赎回(redeem)脚本
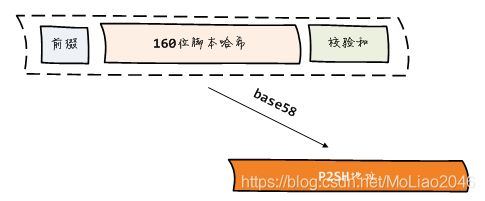
P2SH地址的公钥脚本只是简单的验证UTXO的消费者所提交的序列化的赎回脚本 serializedRedeemScript是否匹配预留的脚本hashscriptHash

如果验证通过,那么节点将反序列化消费者提供的赎回脚本,并与签名再次拼接.如下图

使用bitcoinj来创建一个赎回脚本
NetworkParameters params = RegTestParams.get(); //私有链模式
ECKey key = new ECKey();
//赎回脚本和公钥有关
Script redeemScript=(newScriptBuilder()).data(key.getPubKey()).op(OP_CHECKSIG).build();
//从赎回脚本里面拿脚本的hash值
byte[] hash = Utils.sha256hash160(redeemScript.getProgram());
//传入网络参数与脚本hash值获取一个P2SH地址
Address addr = Address.fromP2SHHash(params,hash);
System.out.format("p2sh address => %s\n",addr.toString());
多重签名赎回脚本
XXX
使用分层确定性密钥
概述
分层指的是秘钥之间存在层级关系,从父秘钥可以生成子秘钥.
确定性指的是可以根据秘钥在层级中的编号,就可以从父秘钥推导出子秘钥的内容.比如主秘钥m,我可以通过m推导出子秘钥m/1/2
生成主密钥
使用分层确定性秘钥树第一步,生成主秘钥,如图.和普通秘钥生成类似,**种子数据(熵)**用来增加秘钥的不可预测性.
熵经过HAMC哈希变换后,得到512位数据,拆分为两部分:主链码和主私钥.
- 主私钥可以继续推导出主公钥
- 主链码可以作为子密钥生成的熵,提高子密钥的不可预测性.
在bitcoinj中可以使用HDKeyDerivation实例来生成层级主秘钥:

createMasterPrivateKey()可以根据传入种子生成一个层级主密钥对象,不过为了便于备份层级密钥树,通常会选择使用助记词来生成种子,进而推导出主密钥.下面的代码将生成熵,然后推导出助记词,最后将助记词转为种子,生成层级主密钥.
//随机熵
SecureRandom rand = new SecureRandom();
byte[] entropy = new byte[16];
rand.nextBytes(entropy);
//熵转化为助记词
MnemonicCode mc = new MnemonicCode();
List<String> mnemonic = mc.toMnemonic(entropy);
//助记词转化为种子
String pass = "7878";
byte[] seed = MnemonicCode.toSeed(mnemonic,pass);
//生成主密钥 主密钥可以生成子密钥,子密钥分私钥和公钥
DeterministicKey masterKey = HDKeyDerivation.createMasterPrivateKey(seed);
确定性密钥是ECKey的继承类,因此你可以使用getPrivateKeyAsHex()来查看私钥 的16进制表示串。
生成助记词完整代码:
package com.hubwiz.demo;
import org.bitcoinj.core.NetworkParameters;
import org.bitcoinj.params.RegTestParams;
import org.bitcoinj.crypto.MnemonicCode;
import java.io.*;
import java.util.*;
import java.security.SecureRandom;
import org.apache.commons.io.FileUtils;
public class App{
public static void main(String[] args) throws Exception {
//生成助记词
System.out.println("hello,bitcoinj");
SecureRandom rand = new SecureRandom();
byte[] entropy = new byte[16];
rand.nextBytes(entropy);
MnemonicCode mc = new MnemonicCode();
List<String> mnemonic = mc.toMnemonic(entropy);
String words = String.join(" ",mnemonic);
System.out.format("mnemonic => %s\n",words);
FileUtils.writeStringToFile(new File("../mnemonic.txt"),words);
List<String> restored = Arrays.asList(words.split(" "));
System.out.format("restored => %s\n",words);
}
}
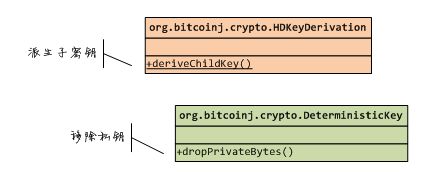
派生子密钥
在层级密钥树中,使用父秘钥(Parent Key)和父链码(Parent Chaincode),可以推导出指定序号的子密钥.
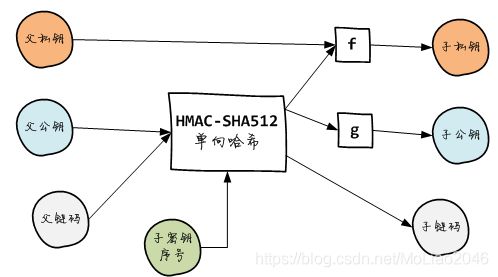
上图中,参与单向hash运算的三个信息:
- 父公钥
- 父链码
- 子密钥序号
一起决定了HMAC哈希的512位输出,而这512位输出的一半将作为子密钥的链码,另一半则分别用于生成子公钥和子私钥.
在bitcoinj中,使用HDKeyDerivation实例的deriveChildKey()方法,就可以生成指定层级密钥的指定编号子密钥及链码了:
列如:下面的代码生成主密钥7878 # 子密钥,并显示其中的私钥和公钥
//可以生成编号为7878的密钥和链码,这样子的秘钥中包含公钥和私钥
DeterministicKey key = HDKeyDerivation.deriveChildKey(masterKey,7878);
System.out.format("child#7878 priv => %s\n",key.getPrivateKeyAsHex());
System.out.format("child#7878 pub => %s\n", key.getPublicKeyAsHex());
主密钥生成扩展子密钥
package com.hubwiz.demo;
import org.bitcoinj.core.NetworkParameters;
import org.bitcoinj.params.RegTestParams;
import org.bitcoinj.crypto.MnemonicCode;
import org.bitcoinj.crypto.HDKeyDerivation;
import org.bitcoinj.crypto.DeterministicKey;
import java.io.*;
import java.util.*;
import java.security.SecureRandom;
import org.apache.commons.io.FileUtils;
public class App{
public static void main(String[] args) throws Exception {
System.out.println("Derive child key");
DeterministicKey masterKey = restoreMasterKey();//拿到主密钥
DeterministicKey currentKey = masterKey;
for(int i=1;i<4;i++){
//主密钥生成子层级密钥
currentKey = HDKeyDerivation.deriveChildKey(currentKey,0);
String padding = new String(new char[i*2]).replace("\0", " ");
//拿到子密钥(层级密钥)的公钥
System.out.format("%sprivate key=>%s\n",padding,currentKey.getPrivateKeyAsHex());
}
}
//通过助记词生成主秘钥(层级密钥)
private static DeterministicKey restoreMasterKey() throws Exception{
String words = FileUtils.readFileToString(new File("../mnemonic.txt"));
//拿到助记词
List<String> mnemonic = Arrays.asList(words.split(" "));
System.out.format("mnemonic => %s\n",mnemonic);
MnemonicCode mc = new MnemonicCode();
//指定编号
String pass = "7878";
//生成随机数种子
byte[] seed = mc.toSeed(mnemonic,pass);
//生成主密钥(层级密钥)
DeterministicKey masterKey = HDKeyDerivation.createMasterPrivateKey(seed);
System.out.format("master private key => %s\n",masterKey.getPrivateKeyAsHex());
System.out.format("master public key => %s\n",masterKey.getPublicKeyAsHex());
return masterKey;
}
}
无私钥派生
只需要父公钥和父链码就可以推导出指定编号的子公钥和子链码,这意味着可以在不泄露主私钥的情况下动态生成子公钥及其地址,当我的网站增加比特币支付功能时候,这是个好办法.
***无私钥派生公钥,并不是用层级公钥来派生的,而是使用扩展密钥的公钥来派生公钥地址的.
masterPubKey = masterKey.dropPrivateBytes();
//拿到密钥的公钥,进行无私钥派生子密钥
DeterministicKey key = HDKeyDerivation.deriveChildKey(masterPubKey,7878);
System.out.format("child#7878 pub => %s\n", key.getPublicKeyAsHex());
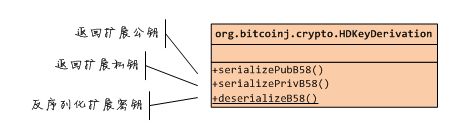
使用扩展秘钥
在生成子密钥的过程中,最重要两个参数就是主密钥和链码了,因此,如果在父密钥的表示中包含这两部分信息,就可以直接使用父密钥来生成子密钥了.----这就是扩展秘钥/Extended Key的直观含义.

我们可以使用层级密钥对象的serializePubB58()或者serializePrivB58()方法将其转换为扩展秘钥形式,也可以使用层级密钥类的静态方法deserializeB58()将一个扩展秘钥恢复为层级密钥:
下面的代码使用masterkey主密钥,派生7878子密钥,然后分别 生成其扩展私钥和扩展公钥:
NetworkParameters params = RegTestParams.get();
DeterministicKey key = HDKeyDerivation.deriveChildKey(masterKey,7878);
String xprv = key.serializePrivB58(params);
String xpub = key.serializePubB58(params);
扩展秘钥使用前缀不同的网络,因此也需要在生成扩展密钥时,传入特定的网络对象.
也可以从扩展密钥恢复出对应的层级密钥(部分公私),下面代码使用层级密钥类的静态方法deserializeB58()来完成
NetworkParameters params = RegTestParams.get();
String xprv = "tprv....";
DeterministicKey key = DeterministicKey.deserializeB58(xprv,params);
扩展密钥生成层级密钥,层级密钥生成子密钥
package com.hubwiz.demo;
import org.bitcoinj.core.NetworkParameters;
import org.bitcoinj.params.RegTestParams;
import org.bitcoinj.crypto.MnemonicCode;
import org.bitcoinj.crypto.HDKeyDerivation;
import org.bitcoinj.crypto.DeterministicKey;
import java.io.*;
import java.util.*;
import java.security.SecureRandom;
import org.apache.commons.io.FileUtils;
public class App{
public static void main(String[] args) throws Exception {
//仅仅从公钥派生子密钥
System.out.println("Derive child key from Pubkey only");
whenReceive();
whenSpend();
}
private static void whenReceive() throws Exception {
//获取扩展密钥公钥文件流
String xpub = FileUtils.readFileToString(new File("../xpub.txt"));
System.out.format("xpub => \n%s\n",xpub);
NetworkParameters np = RegTestParams.get();
//将扩展密钥公钥流恢复为层级密钥
DeterministicKey key = DeterministicKey.deserializeB58(xpub,np);
//System.out.format("public key => %s\n",key.getPublicKeyAsHex());
DeterministicKey currentKey = key;
for(int i=1;i<4;i++){
//从层级密钥中生成层级子密钥
currentKey = HDKeyDerivation.deriveChildKey(currentKey,0);
String padding = new String(new char[i*2]).replace("\0", " ");
//获取层级子密钥的公钥
System.out.format("%spublic key => %s\n",padding,currentKey.getPublicKeyAsHex());
}
}
private static void whenSpend() throws Exception {
//获取私钥文件流
String xprv = FileUtils.readFileToString(new File("../xprv.txt"));
System.out.format("xprv => \n%s\n",xprv);
NetworkParameters np = RegTestParams.get();
//从扩展私钥流反序列化得到层级密钥
DeterministicKey key = DeterministicKey.deserializeB58(xprv,np);
//System.out.format("private key => %s\n",key.getPrivateKeyAsHex());
//System.out.format("public key => %s\n",key.getPublicKeyAsHex());
DeterministicKey currentKey = key;
for(int i=1;i<4;i++){
//从层级密钥得到层级子密钥
currentKey = HDKeyDerivation.deriveChildKey(currentKey,0);
String padding = new String(new char[i*2]).replace("\0", " ");
//拿到层级子密钥的公钥
System.out.format("%spublic key => %s\n",padding,currentKey.getPublicKeyAsHex());
System.out.format("%sprivate key => %s\n",padding,currentKey.getPrivateKeyAsHex());
}
}
private static DeterministicKey restoreMasterKey() throws Exception{
//获取助记词流
String words = FileUtils.readFileToString(new File("../mnemonic.txt"));
List<String> mnemonic = Arrays.asList(words.split(" "));
System.out.format("mnemonic => %s\n",mnemonic);
MnemonicCode mc = new MnemonicCode();
String pass = "7878";
byte[] seed = mc.toSeed(mnemonic,pass);
//从随机数生成一个确定性主密钥(层级密钥)
DeterministicKey masterKey = HDKeyDerivation.createMasterPrivateKey(seed);
System.out.format("master private key => %s\n",masterKey.getPrivateKeyAsHex());
System.out.format("master public key => %s\n",masterKey.getPublicKeyAsHex());
return masterKey;
}
}
导出扩展公钥和扩展私钥
package com.hubwiz.demo;
import org.bitcoinj.core.NetworkParameters;
import org.bitcoinj.params.RegTestParams;
import org.bitcoinj.crypto.MnemonicCode;
import org.bitcoinj.crypto.HDKeyDerivation;
import org.bitcoinj.crypto.DeterministicKey;
import java.io.*;
import java.util.*;
import java.security.SecureRandom;
import org.apache.commons.io.FileUtils;
public class App{
public static void main(String[] args) throws Exception {
System.out.println("Export extended key");
//主密钥
DeterministicKey masterKey = restoreMasterKey();
//拿到层级子密钥
DeterministicKey key = HDKeyDerivation.deriveChildKey(masterKey,0);
System.out.format("private key => \n%s\n",key.getPrivateKeyAsHex());
NetworkParameters np = RegTestParams.get();
//层级子密钥得到扩展私钥
String xprv = key.serializePrivB58(np);
//层级子密钥得到扩展公钥
String xpub = key.serializePubB58(np);
System.out.format("xprv => \n%s\n",xprv);
System.out.format("xpub => \n%s\n",xpub);
//将扩展公钥和扩展私钥导出
FileUtils.writeStringToFile(new File("../xprv.txt"),xprv);
FileUtils.writeStringToFile(new File("../xpub.txt"),xpub);
}
private static DeterministicKey restoreMasterKey() throws Exception{
String words = FileUtils.readFileToString(new File("../mnemonic.txt"));
List<String> mnemonic = Arrays.asList(words.split(" "));
System.out.format("mnemonic => %s\n",mnemonic);
MnemonicCode mc = new MnemonicCode();
String pass = "7878";
byte[] seed = mc.toSeed(mnemonic,pass);
//通过助记词生成主密钥
DeterministicKey masterKey = HDKeyDerivation.createMasterPrivateKey(seed);
System.out.format("master private key => %s\n",masterKey.getPrivateKeyAsHex());
System.out.format("master public key => %s\n",masterKey.getPublicKeyAsHex());
return masterKey;
}
}
总结:扩展密钥和层级密钥可以相互转换.
- 层级密钥只有一个,扩展密钥分为公钥和私钥
- 层级密钥可以通过方法生成扩展私钥和扩展公钥
- 扩展公钥或者扩展私钥可以反序列化为层级密钥
- 层级密钥可以生成子层级密钥
- 无私钥派生地址是通过层级密钥拿到公钥然后再生成的地址,与扩展密钥无关.
使用强化派生密钥
扩展密钥同时包含了链码和密钥信息,这对于继续派生子密钥很方便,但同时也带来了安全上的隐患,下图展示了第N层链码和公钥及其某个后代私钥泄露的情况.最可怕的是可以逆向推导出父密钥.

解决办法是改变派生的算法,使用父私钥而不是父公钥来生成子链码及其子密钥,这样得到的子密钥被称为强化密钥

比特币根据子密钥序号来区分派生的扩展密钥是普通子密钥还是强化子密钥,当序号小于0x80000000时候,生成普通子密钥,否则是强化子密钥.
int id = 123;
DeterministicKey normalKey = HDKeyDerivation.deriveChildKey(masterKey,id);
DeterministicKey hardenedKey = HDKeyDerivation.deriveChildKey(masterKey,id | 0x80000000);
也可以通过childNumber对象来指明是否是强化密钥
DeterministicKey normalKey = HDKeyDerivation.deriveChildKey(masterKey,new ChildNumeber(123,false));
DeterministicKey hardenedKey = HDKeyDerivation.deriveChildKey(masterKey,new ChildNumber(123,true));
强化子密钥代码:
package com.hubwiz.demo;
import org.bitcoinj.core.NetworkParameters;
import org.bitcoinj.params.RegTestParams;
import org.bitcoinj.crypto.MnemonicCode;
import org.bitcoinj.crypto.HDKeyDerivation;
import org.bitcoinj.crypto.DeterministicKey;
import org.bitcoinj.crypto.ChildNumber;
import java.io.*;
import java.util.*;
import java.security.SecureRandom;
import org.apache.commons.io.FileUtils;
public class App{
public static void main(String[] args) throws Exception {
System.out.println("Hardened key");
DeterministicKey masterKey = restoreMasterKey();
//通过(层级密钥)主密钥获取(层级密钥)普通子密钥
DeterministicKey normalKey = HDKeyDerivation.deriveChildKey(masterKey,new ChildNumber(0,false));
System.out.format("normal child#0 private key => %s\n",normalKey.getPrivateKeyAsHex());
//通过(层级密钥)主密钥获取强化子密钥
DeterministicKey hardenedKey = HDKeyDerivation.deriveChildKey(masterKey,new ChildNumber(0,true));
System.out.format("hardened child#0 private key => %s\n",hardenedKey.getPrivateKeyAsHex());
}
//通过助记词获取秘钥
private static DeterministicKey restoreMasterKey() throws Exception{
String words = FileUtils.readFileToString(new File("../mnemonic.txt"));
List<String> mnemonic = Arrays.asList(words.split(" "));
System.out.format("mnemonic => %s\n",mnemonic);
MnemonicCode mc = new MnemonicCode();
String pass = "7878";
byte[] seed = mc.toSeed(mnemonic,pass);
DeterministicKey masterKey = HDKeyDerivation.createMasterPrivateKey(seed);
System.out.format("master private key => %s\n",masterKey.getPrivateKeyAsHex());
System.out.format("master public key => %s\n",masterKey.getPublicKeyAsHex());
return masterKey;
}
}
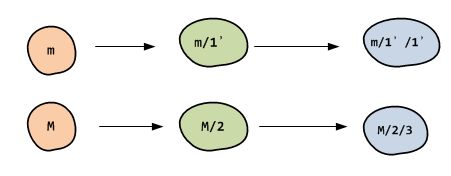
路径表示法
在使用层级确定性密钥时,使用路径表示法可以方便定位到一个远离若干层的后代密钥,列如下面分别表示了m/1/1和m/2/3在整个层级密钥树中的亲缘关系:
在bitcoinj中首先使用HDUtils的静态方法parsePath()将制定的路径字符串解析为ChildNumber实例列表,然后使用层级密钥对象DeterministicHierarchy的get()方法创建密钥.例如:
路径的各层之间使用/符号隔开,M表示主公钥,密钥序列号之后使用H则表示这是一个强化派生子密钥,否则就是一个普通派生密钥.
DeterministicHierarchy hd = new DetarministicHeirarchy(masterKey);
String path = "M/1H/2H/3";
List<ChildNumber> cnl = HDUtils.parsePath(path);
DeterministicKey key = hd.get(cnl);
BIP44给出了一种五层路径划分建议,可用于多个币种(得看看怎么使用)

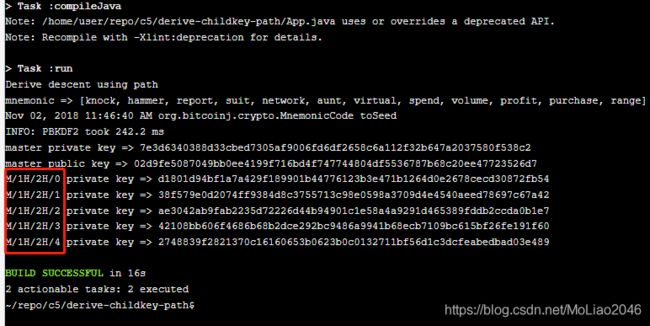
使用路径表示派生后代密钥
package com.hubwiz.demo;
import org.bitcoinj.core.NetworkParameters;
import org.bitcoinj.params.RegTestParams;
import org.bitcoinj.crypto.MnemonicCode;
import org.bitcoinj.crypto.HDKeyDerivation;
import org.bitcoinj.crypto.DeterministicKey;
import org.bitcoinj.crypto.DeterministicHierarchy;
import org.bitcoinj.crypto.HDUtils;
import org.bitcoinj.crypto.ChildNumber;
import java.io.*;
import java.util.*;
import java.security.SecureRandom;
import org.apache.commons.io.FileUtils;
public class App{
public static void main(String[] args) throws Exception {
System.out.println("Derive descent using path");
DeterministicKey masterKey = restoreMasterKey();
DeterministicHierarchy hd = new DeterministicHierarchy(masterKey);
for(int i=0;i<5;i++){
String path = String.format("M/1H/2H/%d",i);//生成0,1,2,3,4个层级密钥,如图
List<ChildNumber> cnl = HDUtils.parsePath(path);
DeterministicKey key = hd.get(cnl,true,true);
System.out.format("%s private key => %s\n",path,key.getPrivateKeyAsHex());
}
}
private static DeterministicKey restoreMasterKey() throws Exception{
String words = FileUtils.readFileToString(new File("../mnemonic.txt"));
List<String> mnemonic = Arrays.asList(words.split(" "));
System.out.format("mnemonic => %s\n",mnemonic);
MnemonicCode mc = new MnemonicCode();
String pass = "7878";
byte[] seed = mc.toSeed(mnemonic,pass);
//获取层级密钥
DeterministicKey masterKey = HDKeyDerivation.createMasterPrivateKey(seed);
System.out.format("master private key => %s\n",masterKey.getPrivateKeyAsHex());
System.out.format("master public key => %s\n",masterKey.getPublicKeyAsHex());
return masterKey;
}
}
离线构造裸交易
解读sendtoaddress
当我们使用sendtoaddress调用转账时,只需要指定一个目标地址和转账金额,但实际上bitcoind在真正向网络广播这笔交易之前,做了大量的工作:
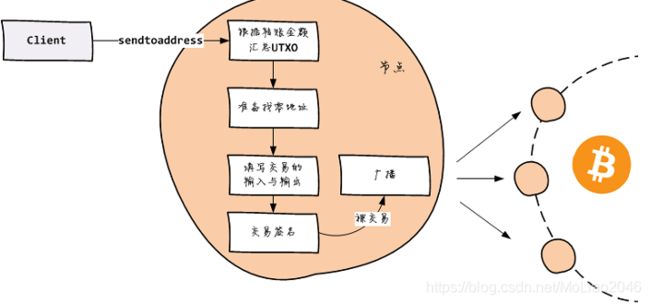
bitcoind首先需要根据转账金额来汇总需要的UTXO,如果必要的话还需要准备一个找零地址,接下来填写交易的输入和输出,最后使用私钥签名交易,从而得到一个裸交易广播到网络中的其他节点.
当我们自己管理秘钥时,就需要离线构造裸交易,然后提交裸交易给节点广播,确认.使用裸交易而不是钱包交易的好处是,我们不必担心泄露私钥,而且可以严格的控制交易的每个组成部分.
罗交易的构造与广播
要构造一个裸交易,首先我们需要根据转账金额来找到需要的一组UTXO,出于简单起见,我们假设要花掉一个面值10比特币的UTXO,支付给shop对应的地址5个比特币.

首先我们创建三个身份,分别代表上图中的spender(income),shop和change
ECKey spenderKey = new ECKey();
ECKey shopKey = new ECKey();
ECKey changeKey = new ECKey();
在bitcoinj中使用Transation来表示一个交易对象:

首先创建交易对象:
NetworkParameters params = RegTestParams.get();//私有链下的模式
Transaction tx = new Transaction(params);
使用交易构造器的addSignedInput()方法设置交易输入,其参数是交易输出点(交易id和输出序列号,公钥脚本和私钥签名:
String utxo_txid = "78a37b87b03101a5ff28266f01365e61122bca00c6910f8d9c5c0f450cd05c62";
int utxo_vout = 0;
//spender私钥 私有链模式
Script utxo_script = (new ScriptBuilder()).createOutputScript(spenderKey.toAddress(params));
//utxo 上一个交易的utxo 本次使用的vout 一起构成一个交易opt
TransactionOutPoint txopt = new TransactionOutPoint(utxo_vout,utxo_txid);
//创建一个裸交易 txop 未花费交易输出 utxo_script utxo签名脚本 spenderKey 花费脚本
tx.addSignedInput(txopt,utxo_script,spenderKey);
使用交易构造器addOutput()方法来设置交易输出,其参数是金额和目标地址.注意在bitcoinj中,交易金额是Staoshi,因此5比特应该转为500000000
Coin tval = Coin.parseCoin("5");//金额
Address shopAddr = shopKey.toAddress(params); //商店密钥 得到地址
tx.addOutput(tval,shopAddr);//设置交易输出
由于交易输入所引用的UTXO面值10个比特,而我只准备5个比特给商店shop,因此还需要将剩余的5个比特币扣除一部分手续费后转给零钱地址:
Coin cval = Coin.parseCoin("4.9999");
Address changeAddr = changeKey.toAddress(params);//改变的秘钥 生成一个地址专门接收剩余的比特币
tx.addOutput(cval,changeAddr);//设置交易输出
最后使用交易对象的bitcoinDerialize()方法将签名的交易对象转化为字节数组,并进一步编码为16进制字符串,这就是可以直接提交给节点的sendrawTranscation调用的裸交易了.
String hexTx = HEX.encode(tx.bitcoinSerialize());
可以使用节点的decoderRawTransaction调用检查一下裸交易的内容是否与我们预期的一直:
BitcoinJSONRPCClient client = new BitcoinJSONRPCClient("http://user:[email protected]:18443"); //创建一个client
BitcoindRpcClient.RawTransaction rawtx = client.decodeRawTransaction(hexTx);//将交易解开
System.out.format("raw tx => %s\n",rawTx);
也可以直接将交易提交给节点确认:
String txid = client.sendRawTransaction(hexTx);
client.generate(6);
需要指出的事,交易所引用的UTXO必须是链上真是村子的,sendrawtransaction 调用才会成功
消费P2PKH地址上的UTXO代码
package com.hubwiz.demo;
import org.bitcoinj.core.NetworkParameters;
import org.bitcoinj.params.RegTestParams;
import org.bitcoinj.core.Transaction;
import org.bitcoinj.core.TransactionOutPoint;
import org.bitcoinj.core.ECKey;
import org.bitcoinj.core.Address;
import org.bitcoinj.core.Coin;
import org.bitcoinj.core.UTXO;
import org.bitcoinj.core.Sha256Hash;
import org.bitcoinj.script.Script;
import static org.bitcoinj.core.Utils.HEX;
import wf.bitcoin.javabitcoindrpcclient.BitcoinJSONRPCClient;
import wf.bitcoin.javabitcoindrpcclient.BitcoindRpcClient.RawTransaction;
import java.io.*;
import java.util.*;
import java.security.SecureRandom;
import java.io.ByteArrayOutputStream;
import org.apache.commons.io.FileUtils;
public class App{
private static BitcoinJSONRPCClient client;
private static NetworkParameters params;
static {
try {
params = RegTestParams.get();//获取私有网络
//创建客户端
client = new BitcoinJSONRPCClient("http://user:[email protected]:18443");
}catch(Exception e){
System.out.format("static init error");
}
}
public static void main(String[] args) throws Exception {
System.out.println("Raw tx for spending utxo@p2pkh");
//捐赠者密钥
ECKey spenderKey = new ECKey();
//商店密钥
ECKey shopKey = new ECKey();
//找零密钥
ECKey changeKey = new ECKey();
//寻找UTXO 传入消费者地址
UTXO utxo = fund(spenderKey.toAddress(params).toString(),2.0);
System.out.format("utxo => %s\n",utxo);
//拿到UTXO 消费者密钥,商店地址,金额,找零地址,创建一个裸交易
String hexTx = spend(utxo,spenderKey,shopKey.toAddress(params),Coin.parseCoin("1.2"),changeKey.toAddress(params));
//decode(hexTx);
broadcast(hexTx);
}
//组合交易
private static String spend(UTXO utxo,ECKey spenderKey,Address shopAddr,Coin shopAmount,Address changeAddr) throws Exception {
System.out.format("spend %s sat to %s \n", shopAmount,shopAddr);
交易费率
Coin fee = Coin.parseCoin("0.0001");
//utxo扣除交易费与花费剩余的金额
Coin changeAmount = utxo.getValue().subtract(shopAmount).subtract(fee);
System.out.format("change %s sat to %s \n",changeAmount,changeAddr);
//创建交易
Transaction tx = new Transaction(params);
//添加输出 金额 与商店地址
tx.addOutput(shopAmount,shopAddr);
//添加输出 剩余金额 找零地址
tx.addOutput(changeAmount,changeAddr);
//交易点 创建
TransactionOutPoint fundOutPoint = new TransactionOutPoint(params,utxo.getIndex(),utxo.getHash());
//添加交易输入 交易点 脚本和消费者密钥
tx.addSignedInput(fundOutPoint,utxo.getScript(),spenderKey);
//将交易序列化
String hexTx = HEX.encode(tx.bitcoinSerialize());
System.out.format("raw tx => %s\n",hexTx);
return hexTx;
}
private static void decode(String hexTx) throws Exception{
RawTransaction rawTx = client.decodeRawTransaction(hexTx);
System.out.format("raw tx => %s\n",rawTx);
}
//将交易广播
private static void broadcast(String hexTx) throws Exception {
//通过客户端将交易的16进制发送出去
String txid = client.sendRawTransaction(hexTx);
//待6个块确认
client.generate(6);
System.out.format("raw tx confirmed => %s\n",txid);
}
//寻找UTXO 消费者地址 金额
private static UTXO fund(String addr,double amount) throws Exception{
System.out.format("fund spender %s %.8f btc\n",addr,amount);
//通过客户端,在通过地址找到交易id
String txid = client.sendToAddress(addr,amount);
//设置6个区块之后生效
client.generate(6);
//一个存在的交易
RawTransaction rawtx = client.getRawTransaction(txid);
//System.out.format("rawtx => %s\n",rawtx);
//拿到这个存在交易的输出列表
List<RawTransaction.Out> vout = rawtx.vOut();
//遍历
for(RawTransaction.Out out : vout){
//如果这个交易输出 通过脚本拿到地址包含穿进来的地址的话
if(out.scriptPubKey().addresses().contains(addr)) {
//可以将这个输出创建为一个交易输出
UTXO utxo = new UTXO(
//获取这个交易的id UTXO构造这么长么
new Sha256Hash(rawtx.txId()),
out.n(),
Coin.parseCoin(String.format("%f",out.value())),
0, //height to be updated
false,
//脚本
new Script(HEX.decode(out.scriptPubKey().hex()))
);
//然后返回这个UTXO
return utxo;
};
}
return null;
}
}
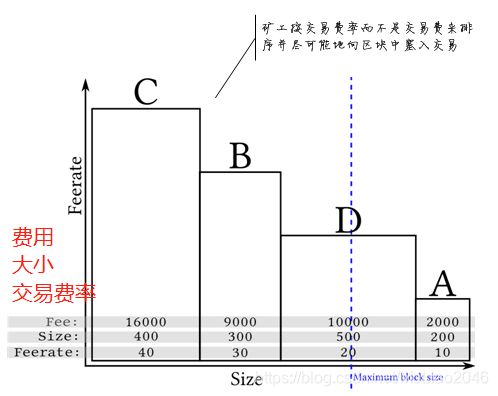
理解交易费
交易费率(交易费/交易大小)影响着交易被打包确认的速度.
多重签名裸交易
这个等下再看吧
使用SPV节点
SPV节点概述
SPV 是比特币白皮书中阐述的比特币节点的另一种实现方法,与全节点相比,SPV节点只需要下载区块头信息,然后根据自己钱包需要从全节点下载相关交易即可.考虑到一个区块头80个字节,那么一年的去块头也就4.2M左右,因此SPV非常适合用于构建轻量级的钱包应用,SPV节点也被称为轻节点.
bitcoinj包含了完整的SPV节点实现,主要组成部件如下图所示

-
Wallet:钱包组件,负责密钥管理和钱包交易维护
-
Peer:SPV节点需要连接到至少一个全节点才能正常工作,两者之间的通信遵循标准的比特币P2P协议.bitcoinj使用Peer组件来抽象每个与之连接的比特币节点,并通过它完成区块/交易的查询与下载.
-
PeerGroup:所有的Peer实例由单一的PeerGoup组件来管理,该组件需要利用Wallet组件的信息来向对端节点请求(与钱包中的秘钥)相关的区块/交易
-
BlockChain:BlockChain组件是SPV节点逻辑的核心实现,它接收来自对端P2P节点的区块数据,并结合本地已有区块不断动态组织最优链,同时在适合的时机,通知钱包更新与其相关的信息,如UTXO等,BlockChain组件依赖于BlockStore组件实现区块数据持久化.
-
BlockStore:BlockStore组件是SPV节点区块链的持久化实现模块,用来保存完整的区块头以及部分相关交易数据.
使用钱包应用套件
如果希望快速应用bitcoinj的SPV钱包,可以直接使用WalletAPPkit组件,它屏蔽了相当多的实现细节,暴露给开发者非常简洁的开发接口:

初始化一个WallteAppKit实例只需要三个参数**:网络参数,链库文件目录和文件名前缀**,列如下面代码将./data目录下创建的myapp.spvchain链库文件和myapp.wallet钱包文件:
NetworkParameters params = RegTestParams.get();
WalletAppKit kit = new WalletAppKit(params,new File("./data"),"myapp");
接下来我们可以使用setPeerNodes()方法添加节点,或者使用下面的语法糖添加一个本地节点:
kit.connectToLocalHost();//添加本地节点,kit
然后启动服务并等待服务就绪:
kit.startAsync();
kit.awaitRunning();
kit的启动流程示意图:
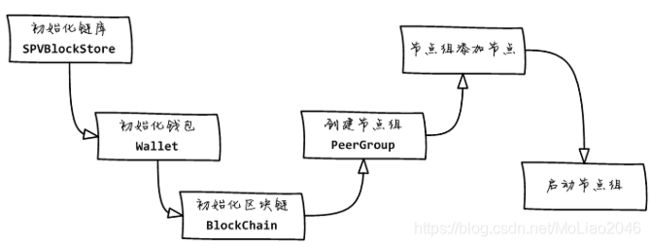
kit会自动创建相关的SPV组件,比如钱包,区块链,节点租等,我们可以相应使用wallet(),chain()``peerGtoup()等方法来获取Kit创建的这些组件实例.
我们通常需要利用钱包实例来发送交易.例如下面的代码将利用钱包中的余额向指定的地址转2.5个比特币,等待广播完成,并打包交易ID:
TransactionBroadcaster caster = kit.peerGroup();//矿工
Address to = new Address(params,"mipcBbFg9gMiCh81Kj8tqqdgoZub1ZJRfn");
Coin value = Coin.parseCoin("2.5");
Wallet.SendResult result = kit.wallet().sendCoins(caster,to,value);
result.broadcastComplete.get();
System.out.format("txid => %s\n", result.tx.getHash());
另一个常用的操作是查询钱包余额,例如
System.out.format("wallet balance => %s\n", kit.wallet().getBalance().toPlainString());
钱包密钥与地址管理
钱包组件的第一个核心功能就是秘钥/地址的管理,他提供了必要的方法来创建密钥/地址,或者从外部导入密钥;

创建一个钱包实例很简单,传入相应的网络参数即可:
NetworkParameters params = RegTestParams.get();
Wallet wallet = new Wallet(params);
Wallet 组件的密钥管理功能实际上由KeyChainGroup实例中包含的一个基础密钥链BasicKeyChain实例和若干个确定性密钥链DeterMinisticKeyChain`实例来完成.
基础密钥链负责管理那些随机性密钥,例如使用importKey()导入密钥时,就是基础密钥链在工作;
ECKey key = new ECKey(); //这个就是随机性密钥
wallet.importKey(key);
而当前激活的确定性密钥链则用来生成新的秘钥或地址,例如当你使用freshKey()方法获取一个新的秘钥时,就是确定性密钥链在工作:
DeterministicKey key = wallet.freshKey(KeyPurpose.RECEIVE_FUNDS);//这个是确定性密钥,用来生成新的层级密钥或者地址
System.out.format("hd key private => %s\n", key.getPrivateKeyAsHex());
freshKey()需要一个参数来声明新密钥的用途,容易理解不同的用途对应确定性密钥路径中的用途部分的不同数值,bitcoinj目前声明了以下四种类型用途:
enum KeyPurpose {
RECEIVE_FUNDS, //收款
CHANGE, //找零
REFUND, //退款
AUTHENTICATION //验证
}
由于大多数情况下你需要的事一个可以收款的秘钥,因此Wallet提供了一个简化的方法freshReceiveKey()来返回当前收款用途的秘钥.
System.out.format("hd key private => %s\n",wallet.freshReceiveKey().getPrivateKeyAsHex());
每次调用freshKey()都会返回一个新密钥,这在某些情况下可能不太适合,因此Wallet也提供了一个currentKey()方法来返回当前密钥-----只有当前密钥被使用后(例如接收到支付),该方法才会返回另一个新的秘钥:
for(int i=0;i<3;i++){
System.out.format("current hd key private =>%s\n", wallet.currentReceiveKey().getPrivateKeyAsHex());
}
交易是否与钱包有关
**如果钱包地址只启用确定性密钥链,那么返回密钥就等价于返回地址了,**例如:
Address addr = wallet.currentReceiveKey().toAddress(params);
Address sameAddr = wallet.currentReceiveAddress();
但如果启用了多个确定性密钥链,例如用于多重签名,那么地址和密钥就不是一一对应了。 因此,我们总应该使用freshAddress()或currentAddress()来获得用于收款的地址。 不懂
检索密钥:
Wallet实现了KeyBag接口的三个方法,都是利用特定的信息检索密钥,这对于判断一个交易是否与钱包有关非常重要.
例如,Coinbase交易的输出脚本采用P2PK,因此我们需要使用findKeyFromPubKey() 这个方法来判断一个coinbse交易是否与钱包中的某个密钥有关;如果交易是发送到P2PKH 地址的,那么我们就需要使用findKeyFromPubHash()方法来判断这个交易是否与 钱包相关;而对于发送到P2PSH地址的交易,则需要使用findRedeemFromScriptHash() 方法来进行判断了。
下面代码使用公钥hash检索钱包中是否存在对应的私钥
byte[] hash = HEX.decode("......");
ECKey foundKey = wallet.findKeyFromPubHash(hash);
if(!foundKey) System.out.println("not found");
else System.out.println("found");
钱包持久化与载入
Wallet的内容可以持久化到磁盘文件中,可以调用钱包实例saveTofile()方法将内容存入指定文件,也可以调用静态方法loadFeomFile()返回利用指定文件内容填充的钱包对象.
wallet.saveToFile(new File("./wallet.dat"));
Wallet restored = Wallet.loadFromFile(new File("./wallet.dat"));
钱包交易池
除了密钥管理,钱包组件的另一个核心功能就是跟踪与其管理的秘钥相关交易.bitcoinj使用四个交易池来管理不同类型的钱包交易:

每个交易池都是从一个交易hash到交易的映射表,外部逻辑负责将与钱包相关交易按照如下规则置入不同的池中:
- Pool.UNSPENT 如果一个交易在最优链区块中,并且该交易包含钱包可以消费输出,那么该交易就存储
unspent池 - Pool.SPENT:如果一个交易在最优链区块中,并且该交易不再包含钱包可以消费的输出,像已经被消耗掉,那么该交易就存入
Spent池 - Pool.Pending:如果一个交易所在区块目前不在最优链中,那么该交易就存入
pending池 - Pook.DEAD:如果一个交易永远不可能被确认,那么该交易就存入
dead池中.
使用addWalletTransaction()方法来手动添加一些钱包交易,然后查看钱包余额:
NetworkParameters params = RegTestParams.get();
Wallet wallet = new Wallet(params);//钱包
ECKey key = new ECKey();//密钥
wallet.importKey(key);//关联
Transaction tx = new Transaction(params);//创建交易
tx.addOutput(Coin.parseCoin("2.0"),key);
TransactionConfidence txcf = tx.getConfidence();//交易可信模型
txcf.setConfidenceType(ConfidenceType.BUILDING);//交易可信类型
txcf.setDepthInBlocks(6);//6个块确认
WalletTransaction wtx = new WalletTransaction(WalletTransaction.Pool.UNSPENT,tx);//创建一个钱包交易
Wallet.addWalletTransaction(wtx);//将交易加入钱包
System.out.format("balance => %s\n",wallet.getBalance().toPlainString());
bitcoinj查询余额,可以使用getTransaction()方法在所有的池中搜索指定hash的交易,也可以使用getTransactionPool()方法读取指定的池,下面代码搜索指定hash的交易,并显示PENDING池中的交易数量:
String txid = "...";
Transaction foundTx = wallet.getTransaction(txid);//用交易id在所有池中搜索交易
if(foundTx != null) System.out.format("tx %s => found\n",$txid);
Map<Sha256Hash,Transaction> pool = wallet.getTransactionPool(Pool.PENDING);//用钱包在待确认池中获取交易
System.out.format("pending pool size => %d\n",pool.size());
钱包余额算法
当钱包计算余额时,并非直接使用四个交易池,而是基于一个额外的hash集合myUnSpents.当我们调用addWalletTransaction()方法时,会同步更新这个集合.
getBalnace()方法有几个不同的重载类型,最复杂的情况下,可以接受一个参数来指定余额类型,这是一个wallet.BalanceType枚举类型值,可选如下:
public enum BalanceType {
ESTIMATED, //估算余额
AVAILABLE, //有效余额
ESTIMATED_SPENDABLE, //可消费估算余额
AVAILABLE_SPENDABLE //可消费有效余额
}
下面代码估算各人资产总额:
Coin balance = wallet.getBalance(BalanceType.ESTIMATED);
ESTIMATED将采用最宽松的条件筛选myUnspents集合中的UTXO,以下类型的交易输出都会计算在内:
- 不陈述的coinbase交易输出
- 处于pending状态的交易输出
- 钱包内没有对应私钥的交易输出,即WatchOnly交易
ESTIMATED余额适合快速估算各人的总资产,而不考虑当前是否有效.不过大多数情况下,我们还是希望条件收紧一些,排除那些目前还不能花费的交易输出,因此不加参数的getBalance()调用等价于getBalance(BalanceType.AVAILABLE).
AVAILABLE余额对UTXO的筛选条件要更严格一些,它选中以下交易类型,但并不要求钱包内包含消费该交易所需的私钥:
- 非钱包自身提交的交易至少需要一个确认
- 钱包自身提交并广播的pengding交易
ESTIMATED_SPENDABLE则是在ESTIMATED的基础上进一步筛选那些可消费的交易输出,即钱包内包含对应的私钥,可以进行签名的交易输出,.
这四种不同的余额类型对myUnspents集合中的交易输出进行初步过滤.
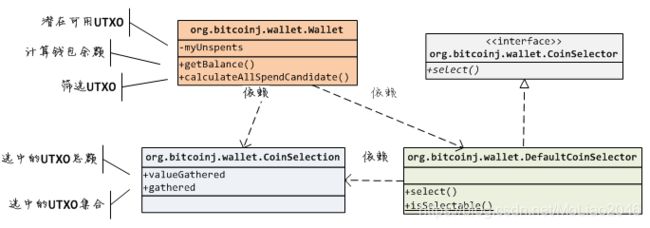
CoinSelector接口只定义了一个方法select(),输入目标资金额度以及候选交易列表,返回交易输出.
public interface CoinSelector {
CoinSelection select(Coin target, List<TransactionOutput> candidates);
}
**bitcoinj提供默认的CoinSelector实现DefaultCoinSelector,其策略对应于上面 AVAILABLE余额类型的规则。.**也可以使用钱包的setCoinSelector()方法使其生效.
下面代码实现了一个保守型的UTXO选择器,只有当交易在最优链上而且具有6个确认时候,才选中该交易输出:
public class ConservativeCoinSelector implements CoinSelector{
public CoinSelection select(Coin target,List<TransactionOutput> candidates){
//创建一个集合
ArrayList<TransactionOutput> selected = new ArrayList<TransactionOutput>();
long total = 0;
for(TransactionOutput output: candidates){
if(total >= target.value) break;
//交易可信度
TransactionConfidence txcf = output.getParentTransaction().getConfidence();
//可信度类型
if(txcf.getConfidenceType().equals(ConfidenceType.BUILDING) &&
//大于6个区块
txcf.getDepthInBlocks() >=6){
total += output.getValue().value;
}
}
return new CoinSelection(Coin.valueOf(total),selected);
}
}
Wallet wallet = new Wallet(RegTestParams.get());
//将这个保守计算钱包余额的类型加入该钱包中
wallet.setCoinSelector(new ConservativeCoinSelector());
交易可信度模型
在比特币中,通常我们使用一个交易的确认数,来表达这个交易的稳定性,bitcoinj则进一步提出了交易可信度模型TransactionConfidence来表述对一个交易的风险分析结论.

在bitcoinj中,每个交易对象都包含TransactionConfidence实例,使用getCoinFidence()可以获得这个交易的可信度模型,例如,下面的代码获取指定交易可信度模型,并读取其可信度类型,确认数和来源
TransactionConfidence txcfd = tx.getConfidence();
System.out.format("tx confidence type => %d\n", txcfd.getConfidenceType());//可信类型
System.out.format("tx confirmations => %d\n", txcfd.getDepthInBlocks());//确认数
System.out.format("tx source => %d\n", txcfd.getSource());//来源
可信类型被定义为TransactionConfidence.ConfideceType枚举,可选值如下:
public enum ConfidenceType{
BUILDING(1), //交易在最优链中
PENDING(2), //交易待确认
DEAD(4), //交易不可能得到确认,除非发生链重构
IN_CONFLICT(5), //和其他交易引用了相同的交易输出
UNKNOWN(0); //状态未知
}
那些具有BUILDING,PENDING可信类型的交易输出,如果交易在最优链上,那么可以进一步获取该交易的确认数.
另一个与交易风险分析相关的是交易来源,使用TransactionConfidence.Source枚举类型表示,
public enum Source{
UNKNOWN, //来源未知
NETWORK, //交易来自网络
SELF //交易是钱包自己生成的
}
显然,如果我们自己生成的交易,那么久不需要过多担心该交易存在的风险.
钱包交易的可信度模型是由BlockChain来动态调整的,例如当最优链新增了一个区块,那么原有的BUILDING类型的交易就会自动增加一个深度.有时候我们希望等待一个交易达到一定数量的确认后才执行某个操作,可以使用addEventListener来添加一个监听对象,例如:
tx.getConfidence().addEventListener((TransactionConfidence confidence, ChangeReason reason)->{
if(confidence.getConfidenceType() == ConfidenceType.BUILDING &&
confidence.getDepthInBlocks() == 6 ) { /*发货....*/}
});
区块链库组件
bitcoinj的SPV节点的本地区块存储是由BlockStore链库组件负责,目前提供了三种适合SPV节点的BlockStore接口实现:

MemoryBlockStore主要用于测试,它使用一个内存中的hash映射表来存储区块,SPVBlockStore是bitcoinj用于SPV节点存储的标准实现,他采用自定义的定长文件结构保存区块数据;LeveIDBBlockStore则采用LeveIDB数据库保存区块数据.
下面代码初始化一个SPVBlockStore:
NetworkParameters params = RegTestParams.get();
BlockStore store = new SPVBlockStore(params,new File("./store.spv"));//保存区块数据的文件
BlockStore的最重要的两个方法就是put和get,分别用于存入区块和提取区块.不过值得指出的是,bitcoinj使用了额外的StoredBlock类来表征持久化的区块,与标准的Block相比,在StoredBlok中保存了区块头之外的两个数据:累计工作量和区块高度.可以认为StoredBlock是bitcoinj在计算复杂度和存储空间两者之间做的一个简单设计选择.
下面的代码利用链头区块构造一个新的区块,然后保存
StoredBlock head = store.getChainHead();//获取链头区块
Address addr = new Address(params,"mipcBbFg9gMiCh81Kj8tqqdgoZub1ZJRfn");
Block block = head.getHeader().createNextBlock(addr);
StoredBlock next = head.build(block.cloneAsHeader());//新建一个区块,放入文件中保存
store.put(next);
区块链组件
区块链BlockChain组件是bitcoinj实现SPV节点的核心组件,它负责根据比特币的规则动态的将区块组织成最优链(最大工作量/最长),并提供关键的时间接口来帮助其他组件动态调整钱包交易的可信度.
bitcoinj有两个区块链实现:BlockChain和FullPrunedBlockChain,分别对应于SPV节点和全节点,这里只介绍SPV节点.
BlockChain组件的实例化通常需要指定一个BlockStore组件来持久化
NetworkParameters params = RegTestParams.get();
BlockStore store = new SPVBlockStore(params,new File("./store.spv"));//创建存储结构
BlockChain chain = new BlockChain(params,store);//创建链
一旦创建了BlockChain实例,就可以调用其add()方法来向区块链中加入区块,下面代码利用链头区块创建一个新的区块,然后追加回链上.
Block head = chain.getChainHead().getHeader();
Address addr = new Address(params,"mipcBbFg9gMiCh81Kj8tqqdgoZub1ZJRfn");
Block block = head.createNextBlock(addr);
chain.add(block);//将块加入到链中
System.out.format("current height: %d\n",chain.getBestChainHeight());
BlockChain提供了三个事件接口供其他组件在合适的时机嵌入代码:
- NewBestBlockListener:当最优链上产生新的区块时,触发该事件
- ReorganizeListener:当区块链发生重构时,触发该事件
- TransactionReceivedInBlockListener:当最优链上产生新的交易时,触发该事件
钱包组件会利用这些事件来动态调整钱包交易的状态及其可信度模型,Wallet实现了上述三个事件接口,当我们调用chain.addWallet()方法时,将自动监听这些事件.
下面的代码创建一个钱包,并将其加入区块链,然后我们手工添加一些区块,再检查钱包余额;
Wallet wallet = new Wallet(params);
chain.add(wallet);
Address addr = wallet.currentReceiveAddress();
Block head = chain.getChainHead().getHeader();
Block next = head.createNextBlock(addr);//创建块
chain.add(next);//将块加入链
System.out.format("balance => %s\n", wallet.getBalance().toPlainString());
P2P节点组
在真实的比特币环境中,区块并不是我们手工构造的,而是通常来自于网络上其他节点,因此一个SPV节点需要处理与其他节点的P2P通信协议.
在bitcoinj中,P2P协议通信是由Peer(窥视)类完成的,一个Peer对象可以表示一个对应的节点,因此在一个应用中通常会存在多个Peer实例分别表征与不同节点的链接

Peer完整的实现了比特币的P2P协议,因此通过Peer组件,bitcoinj可以利用P2P通道来获取感兴趣区块和交易信息,不过在建立和对端的Socket链接后,必须首先交换版本信息来进行协议握手,因此创建Peer实例时,需要传入VersionMessage实例.
NetworParameters params = RegTestParams.get();
VersionMessage ver = new VersionMessage(params,0);
PeerAddress pa = PeerAddress.localhost(params);
Peer peer = new Peer(params,ver,pa,null);//创建Peer实例
在bitcoinj中,Peer的链接过程是借助额外的管理器完成的,一旦连接完成,Peer会自动交换版本信息,完成握手,我们就可以调用P2P协议封装方法了,列如测试节点连同性的方法ping():
NioClientManager cm = new NioClientManager();
cm.openConnection(peer.getSocketAddress(),peer);
peer.getVersionHandshakeFuture().get();
peer.ping().get();
Peer提供了非常多的事件接口,可以方便地跟踪P2P协议的交互,例如,使用PreMessageReceivedEventListener我们可以查看每一个收到的P2P消息:
peer.addPreMessageReceivedEventListener(Threading.SAME_THREAD,(Peer p, Message m)->{
System.out.format("PreMessageReceived event triggered => %s\n",m.getClass().getSimpleName());
return m;
});//Peer监听查看每一个收到的P2P消息
Peer实例也可以与BlockChain实例关联起来,这样来自网络的区块将自动送入BlockChain实例进行处理,在实例化Peer类时,只需要在最后一个参数传入BlockChain实例:
NetworParameters params = RegTestParams.get();
BlockStore store = new SPVBlockStore(params,new File("./mychain.spv"));//创建存储结构
BlockChain chain = new BlockChain(params,store);//创建链
VersionMessage ver = new VersionMessage(params,0);
PeerAddress pa = PeerAddress.localhost(params);
Peer peer = new Peer(params,ver,pa,chain);//创建Peer时候,加入链
P2P节点管理器
为了避免我们直接管理多个Peer,bitcoinj提供了PeerGroup组件来承担Peer的管理工作,我们只需要向PeerGroup声明要连接的节点地址,或者干脆让它自动发现节点就可以了(如何自己发现):

下面代码使用PeerGroup连接到本地的bitcoinj节点,并打印节点最优链高度.
NetworkParameters params = RegTestParams.get();
PeerGroup pg = new PeerGroup(params);
PeerAddress pa = PeerHost.localhost(params);//连接到本地节点
pg.addAddress(pa);
pg.start();
Peer peer = pg.waitForPeers(1).get().get(0);
System.out.format("peer best height => %d\n",peer.getBestHeight());
PeerGroup同时实现了TransactionBroadCaster接口约定broadCastTransaction()方法,因此当我们调用钱包sendCoins()方法执行比特币转账时,需要传入的第一个参数就是PeerGoup实例
TransactionBroadcaster caster = kit.peerGroup();
Address to = new Address(params,"mipcBbFg9gMiCh81Kj8tqqdgoZub1ZJRfn");
Coin value = Coin.parseCoin("2.5");
kit.wallet().sendCoins(caster,to,value);//传入PeerGoup节点 也就是矿工
PeerGroup负责根据钱包里的密钥(动态)生成相应的布隆过滤器(Bloom Filter),并发送节点来预约与钱包相关的交易,因此如果你不是使用WalletAppkit创建PEerGroup和Wallet实例,记得要将两者关联起来.
PeerGroup pg = new PeerGroup(params);
Wallet wallet = new Wallet(params);
pg.addWallet(wallet);
节点发现
第一次启动的时候,程序并不知道任何活动全节点的 IP 地址。为了发现这些 IP 地址,程序会请求一个或者多个 DNS 地址(也叫做 DNS 种子),这些 DNS 地址都是硬编码到 Bitcoin Core 和 Bitcoinj 当中的。请求响应会包含一个或者多个接受新链接的全节点的 IP 地址对应的 DNS 的记录。
代码
如何使用WalletAppKit
package com.hubwiz.demo;
import org.bitcoinj.core.NetworkParameters;
import org.bitcoinj.params.RegTestParams;
import org.bitcoinj.kits.WalletAppKit;
import org.bitcoinj.wallet.Wallet;
import org.bitcoinj.core.Address;
import org.bitcoinj.core.Coin;
import org.bitcoinj.core.PeerAddress;
import org.bitcoinj.utils.BriefLogFormatter;
import wf.bitcoin.javabitcoindrpcclient.BitcoinJSONRPCClient;
import java.io.File;
import java.net.InetAddress;
public class App {
private static BitcoinJSONRPCClient client;
private static NetworkParameters params;
private static WalletAppKit kit;
static {
try{
params = RegTestParams.get();//获取测试网络参数
//设置节点RPC API的访问用户名密码
client = new BitcoinJSONRPCClient("http://user:[email protected]:18443");
//网络参数,链库文件目录和文件名前缀,这行代码将在data目录下,创建链库文件(专门装块数据的文件)和钱包
kit = new WalletAppKit(params,new File("./data"),"myapp");
}catch(Exception e){
System.out.println("error init static members.");
}
}
public static void main(String[] args) throws Exception{
System.out.println("WalletAppKit demo");
BriefLogFormatter.initWithSilentBitcoinJ();
//像kit中添加本地节点,这个节点到底是bitcoinj中内置的节点还是别的节点呢
kit.connectToLocalHost();
kit.startAsync();
kit.awaitRunning();
showBalance();
fundWallet();
showBalance();
spendWallet();
showBalance();
}
//获取钱包中余额
private static void showBalance(){
System.out.format("balance => %s btc\n",kit.wallet().getBalance().toPlainString());
}
private static void fundWallet() {
//使用client 执行转账 currentReceiveAddress() 返回一个收钱的地址(这个API有局限性),该API返回一个收钱地址
String txid = client.sendToAddress(kit.wallet().currentReceiveAddress().toString(),10.78);
client.generate(6);
System.out.format("fund wallet 10 btc\n");
}
//使用kit转账
private static void spendWallet() throws Exception {
Address to = new Address(params,"mipcBbFg9gMiCh81Kj8tqqdgoZub1ZJRfn");
Coin value = Coin.parseCoin("1");
//转账 加入PeerGroup节点 加入矿工
Wallet.SendResult result = kit.wallet().sendCoins(kit.peerGroup(),to,value);
result.broadcastComplete.get();
client.generate(6);
}
//停止交易
private static void shutdown(){
kit.stopAsync();
kit.awaitTerminated();
}
}
Wallet组件的密钥与地址管理
package com.hubwiz.demo;
import org.bitcoinj.core.NetworkParameters;
import org.bitcoinj.params.RegTestParams;
import org.bitcoinj.core.ECKey;
import org.bitcoinj.core.Address;
import org.bitcoinj.crypto.DeterministicKey;
import org.bitcoinj.wallet.KeyChain;
import org.bitcoinj.wallet.KeyChain.KeyPurpose;
import org.bitcoinj.wallet.Wallet;
import wf.bitcoin.javabitcoindrpcclient.BitcoinJSONRPCClient;
import java.io.File;
public class App {
private static BitcoinJSONRPCClient client;
private static NetworkParameters params;
static {
try{
params = RegTestParams.get();//获取私有网络参数
//设置节点RPC API访问的用户名密码
client = new BitcoinJSONRPCClient("http://user:[email protected]:18443");
}catch(Exception e){
System.out.println("error init static members.");
}
}
public static void main(String[] args) throws Exception{
System.out.println("Wallet key and address management");
Wallet wallet = new Wallet(params);//创建钱包
ECKey randomKey = new ECKey();//创建随机密钥
wallet.importKey(randomKey); //将随机密钥导入钱包
System.out.format("import random key => %s\n",randomKey.getPrivateKeyAsHex());
//通过钱包生成一个收款确定性密钥,这个方法可以调用多次,每次只返回当前密钥,除非用过了,才换
DeterministicKey currentRecvKey = wallet.currentKey(KeyPurpose.RECEIVE_FUNDS);
System.out.format("current key => %s\n", currentRecvKey.getPrivateKeyAsHex());
//生成一个确定性的收款密钥
DeterministicKey currentRecvKeyAgain = wallet.currentReceiveKey();
System.out.format("current key => %s\n", currentRecvKeyAgain.getPrivateKeyAsHex());
//从钱包生成一个用于收款的地址 ,这个API没有局限性
Address currentRecvAddr = wallet.currentAddress(KeyPurpose.RECEIVE_FUNDS);
System.out.format("current address => %s\n", currentRecvAddr);
//从钱包生成一个用于收款的地址,这个API有局限性
Address currentRecvAddrAgain = wallet.currentReceiveAddress();
System.out.format("current address => %s\n", currentRecvAddrAgain);
for(int i=0;i<2;i++){
//freshKey每次返回不同确定性密钥,freshReceiveKey 新生成一个收款密钥
DeterministicKey key = wallet.freshReceiveKey();
System.out.format("fresh key => %s\n", key.getPrivateKeyAsHex());
//这个获取收款地址的IP有局限性
Address addr = wallet.freshReceiveAddress();
System.out.format("fresh address => %s\n",addr);
}
//使用随机密钥公钥hash,检索钱包中是否存在对应的私钥
ECKey foundKey = wallet.findKeyFromPubHash(randomKey.getPubKeyHash());
System.out.format("found key from pubkey hash => %s\n", foundKey);
//使用确定性密钥的公钥hash,检索钱包中是否存在对应的私钥
ECKey foundKey2 = wallet.findKeyFromPubKey(currentRecvKey.getPubKey());
System.out.format("found key from pubkey => %s\n", foundKey2);
wallet.saveToFile(new File("./wallet.dat"));
}
}
Wallet组件的钱包交易管理
package com.hubwiz.demo;
import org.bitcoinj.core.NetworkParameters;
import org.bitcoinj.params.RegTestParams;
import org.bitcoinj.core.Transaction;
import org.bitcoinj.core.Coin;
import org.bitcoinj.core.ECKey;
import org.bitcoinj.wallet.Wallet;
import org.bitcoinj.wallet.WalletTransaction;
import org.bitcoinj.wallet.WalletTransaction.Pool;
import org.bitcoinj.core.TransactionConfidence;
import org.bitcoinj.core.TransactionConfidence.ConfidenceType;
import org.bitcoinj.core.Sha256Hash;
import java.util.Map;
public class App {
private static NetworkParameters params;
static {
try{
params = RegTestParams.get();//获取网络参数
}catch(Exception e){
System.out.println("error init static members.");
}
}
public static void main(String[] args) throws Exception{
System.out.println("Wallet tx management");
//创建钱包
Wallet wallet = new Wallet(params);
//创建随机数密钥
ECKey key = new ECKey();
wallet.importKey(key);
//创建交易
Transaction tx = new Transaction(params);
//增加输入
tx.addOutput(Coin.parseCoin("2.78"),key);
//获取可信度模型
TransactionConfidence txcf = tx.getConfidence();
//设置可信度类型
txcf.setConfidenceType(ConfidenceType.BUILDING);
//6个块确认
txcf.setDepthInBlocks(6);
//未花费的钱包交易类型
WalletTransaction wtx = new WalletTransaction(Pool.UNSPENT,tx);
//向钱包中添加钱包交易类型
wallet.addWalletTransaction(wtx);
//用交易ID在所有类型交易池中搜集交易
Transaction foundTx = wallet.getTransaction(tx.getHash());
if(foundTx != null) System.out.println("tx => found");
else System.out.println("tx => not found");
//用钱包在未花费交易池中搜集与钱包相关的交易
Map<Sha256Hash,Transaction> pool = wallet.getTransactionPool(Pool.UNSPENT);
System.out.format("unspent pool size => %d\n",pool.size());
System.out.format("balance => %s btc\n", wallet.getBalance().toPlainString());
}
}
Wallet组件余额计算机制
package com.hubwiz.demo;
import org.bitcoinj.core.NetworkParameters;
import org.bitcoinj.params.RegTestParams;
import org.bitcoinj.core.Transaction;
import org.bitcoinj.core.Coin;
import org.bitcoinj.core.ECKey;
import org.bitcoinj.wallet.Wallet;
import org.bitcoinj.wallet.WalletTransaction;
import org.bitcoinj.wallet.WalletTransaction.Pool;
import org.bitcoinj.core.TransactionConfidence;
import org.bitcoinj.core.TransactionConfidence.ConfidenceType;
import org.bitcoinj.core.Sha256Hash;
import java.util.Map;
public class App {
private static NetworkParameters params;
static {
try{
params = RegTestParams.get();//获取网络参数
}catch(Exception e){
System.out.println("error init static members.");
}
}
public static void main(String[] args) throws Exception{
System.out.println("Wallet key and address management");
//创建钱包
Wallet wallet = new Wallet(params);
//创建随机密钥
ECKey key = new ECKey();
//导入随机密钥
wallet.importKey(key);
ECKey key2 = new ECKey();
//导入随机密钥2
wallet.importKey(key2);
//添加钱包交易
wallet.addWalletTransaction(fakeWalletTx(key,"13.",3));
wallet.addWalletTransaction(fakeWalletTx(key2,"13.",8));
System.out.format("balance@default => %s\n", wallet.getBalance().toPlainString());
//设置计算余额的方式
wallet.setCoinSelector(new ConservativeCoinSelector());
//获取钱包中的余额
System.out.format("balance@conservative => %s\n", wallet.getBalance().toPlainString());
}
//创建钱包交易
private static WalletTransaction fakeWalletTx(ECKey key, String value, int confirmations){
//创建一个交易
Transaction tx = new Transaction(params);
//增加输出
tx.addOutput(Coin.parseCoin(value),key);
TransactionConfidence txcf = tx.getConfidence();
//设置可信度模型
txcf.setConfidenceType(ConfidenceType.BUILDING);
txcf.setDepthInBlocks(confirmations);
//创建一个未花费交易
return new WalletTransaction(Pool.UNSPENT,tx);
}
}
package com.hubwiz.demo;
import org.bitcoinj.core.Coin;
import org.bitcoinj.core.TransactionOutput;
import org.bitcoinj.core.TransactionConfidence;
import org.bitcoinj.core.TransactionConfidence.ConfidenceType;
import org.bitcoinj.wallet.CoinSelector;
import org.bitcoinj.wallet.CoinSelection;
import java.util.*;
//获取钱包余额中的计算方式
public class ConservativeCoinSelector implements CoinSelector {
public CoinSelection select(Coin target,List<TransactionOutput> candidates){
ArrayList<TransactionOutput> selected = new ArrayList<TransactionOutput>();
long total = 0;
for(TransactionOutput output: candidates){
if(total >= target.value) break;
TransactionConfidence txcf = output.getParentTransaction().getConfidence();
if(txcf.getConfidenceType().equals(ConfidenceType.BUILDING) && txcf.getDepthInBlocks() >=6){
total += output.getValue().value;
}
}
return new CoinSelection(Coin.valueOf(total),selected);
}
}
BlockStore组件的使用方法
package com.hubwiz.demo;
import org.bitcoinj.core.NetworkParameters;
import org.bitcoinj.params.RegTestParams;
import org.bitcoinj.store.BlockStore;
import org.bitcoinj.store.MemoryBlockStore;
import org.bitcoinj.store.SPVBlockStore;
import org.bitcoinj.store.LevelDBBlockStore;
import org.bitcoinj.core.Address;
import org.bitcoinj.core.StoredBlock;
import org.bitcoinj.core.Block;
import org.bitcoinj.core.Context;
import java.io.File;
public class App {
private static NetworkParameters params;
private static Context context;
static {
try{
//设置参数
params = RegTestParams.get();
context = new Context(params);
}catch(Exception e){
System.out.println("error init static members.");
}
}
public static void main(String[] args) throws Exception{
System.out.println("BlockStore interface and implementations");
//BlockStore store = new MemoryBlockStore(params);
//BlockStore store = new SPVBlockStore(params,new File("./store.spv"));
BlockStore store = new LevelDBBlockStore(context,new File("./db/"));
//拿到链头存储区块,这个是一个过渡
StoredBlock head = store.getChainHead();
System.out.format("head block => %s\n",head);
//创建地址
Address addr = new Address(params,"mipcBbFg9gMiCh81Kj8tqqdgoZub1ZJRfn");
//从链头区块创建块
Block block = head.getHeader().createNextBlock(addr);
//将块变为存储块 StoredBlock 也可以存入到BlockStore中
StoredBlock next = head.build(block.cloneAsHeader());
store.put(next);
System.out.format("last added => %s\n",store.get(next.getHeader().getHash()));
System.out.format("head block => %s\n", store.getChainHead());
}
}
BlockChain的使用方法
package com.hubwiz.demo;
import org.bitcoinj.core.NetworkParameters;
import org.bitcoinj.params.RegTestParams;
import org.bitcoinj.store.BlockStore;
import org.bitcoinj.store.SPVBlockStore;
import org.bitcoinj.core.Address;
import org.bitcoinj.core.StoredBlock;
import org.bitcoinj.core.Block;
import org.bitcoinj.core.BlockChain;
import java.io.File;
public class App {
private static NetworkParameters params;
static {
try{
params = RegTestParams.get();//获取网络参数
}catch(Exception e){
System.out.println("error init static members.");
}
}
public static void main(String[] args) throws Exception{
System.out.println("BlockChain interface and implementations");
//设置块存储文件
BlockStore store = new SPVBlockStore(params,new File("./store.spv"));
//创建链条
BlockChain chain = new BlockChain(params,store);
//chain.getChainHead() 获取链头区块 getHeader()从链头区块拿到块
Block head = chain.getChainHead().getHeader();
System.out.format("head block => %s\n",head);
//创建地址
Address addr = new Address(params,"mipcBbFg9gMiCh81Kj8tqqdgoZub1ZJRfn");
//将新建的块和地址,绑定在一起
Block block = head.createNextBlock(addr);
//将新建的块添加进链中
chain.add(block);
System.out.format("head block => %s\n", chain.getChainHead());
}
}
Peer组件的使用
package com.hubwiz.demo;
import org.bitcoinj.core.NetworkParameters;
import org.bitcoinj.params.RegTestParams;
import org.bitcoinj.core.Context;
import org.bitcoinj.core.ECKey;
import org.bitcoinj.core.Message;
import org.bitcoinj.core.VersionMessage;
import org.bitcoinj.core.PeerAddress;
import org.bitcoinj.core.VersionMessage;
import org.bitcoinj.core.Peer;
import org.bitcoinj.net.NioClientManager;
import org.bitcoinj.core.Utils;
import org.bitcoinj.utils.Threading;
import wf.bitcoin.javabitcoindrpcclient.BitcoinJSONRPCClient;
import com.google.common.util.concurrent.ListenableFuture;
import java.lang.Math;
import java.lang.Thread;
import java.net.SocketAddress;
public class App {
private static BitcoinJSONRPCClient client;
private static NetworkParameters params;
static {
try{
params = RegTestParams.get();//获取网络参数
//设置节点RPC API访问的用户名密码
client = new BitcoinJSONRPCClient("http://user:[email protected]:18443");
}catch(Exception e){
System.out.println("error init static members.");
}
}
public static void main(String[] args) throws Exception{
System.out.println("Access bitcoind with p2p protocol");
//P2P节点管理器
NioClientManager cm = new NioClientManager();
//设置Peer对应的节点
PeerAddress peerAddr = PeerAddress.localhost(params);
System.out.format("peer address => %s\n",peerAddr);
//设置版本信息
VersionMessage ver = new VersionMessage(params,0);
//设置当前时间
ver.time = Utils.currentTimeSeconds();
ver.bestHeight = 0;
ver.relayTxesBeforeFilter = true;
//Peer需要上下文
new Context(params); //peer need a context
//创建Peer对象
Peer peer = new Peer(params, ver, peerAddr, null);
//为Peer添加一个接收监听器,查看每一个收到的P2P消息
peer.addPreMessageReceivedEventListener(Threading.SAME_THREAD,(Peer p, Message m)->{
System.out.format("PreMessageReceived event triggered => %s\n",m.getClass().getSimpleName());
return m;
});
//P2P节点管理器运行
cm.startAsync();
cm.awaitRunning();
//节点管理器进行握手交互
ListenableFuture<SocketAddress>future=cm.openConnection(peerAddr.toSocketAddress(),peer);
//进行交互
peer.getVersionHandshakeFuture().get();
//trigger ping/pong
//正式访问了
peer.ping().get();
System.out.format("peer best height => %d\n",peer.getBestHeight());
}
//简单获取一个交易ID
static String fundRandomAddress() throws Exception {
ECKey key = new ECKey();
String addr = key.toAddress(params).toString();
double amount = 0.1;
System.out.format("fund random address %s of %f btc\n",addr,amount);
String txid = client.sendToAddress(addr,amount);
return txid;
}
}
PeerGroup的使用方法
package com.hubwiz.demo;
import org.bitcoinj.core.NetworkParameters;
import org.bitcoinj.params.RegTestParams;
import org.bitcoinj.core.Context;
import org.bitcoinj.core.ECKey;
import org.bitcoinj.core.PeerGroup;
import org.bitcoinj.core.Peer;
import org.bitcoinj.core.PeerAddress;
import org.bitcoinj.core.Message;
import org.bitcoinj.utils.Threading;
import wf.bitcoin.javabitcoindrpcclient.BitcoinJSONRPCClient;
import com.google.common.util.concurrent.ListenableFuture;
import java.lang.Math;
import java.lang.Thread;
import java.net.SocketAddress;
public class App {
private static BitcoinJSONRPCClient client;
private static NetworkParameters params;
static {
try{
//获取网络参数
params = RegTestParams.get();
client = new BitcoinJSONRPCClient("http://user:[email protected]:18443");
}catch(Exception e){
System.out.println("error init static members.");
}
}
public static void main(String[] args) throws Exception{
System.out.println("Management of a group of peers");
//获取PeerGroup
PeerGroup pg = new PeerGroup(params);
//设置Peer对应的节点
PeerAddress pa = PeerAddress.localhost(params);
//将节点加入进PeerGroup中
pg.addAddress(pa);
//启动PeerGroup
pg.start();
//等待Peers
Peer peer = pg.waitForPeers(1).get().get(0);
//为Peer添加监听器
peer.addPreMessageReceivedEventListener(Threading.SAME_THREAD,(Peer p, Message m)->{
System.out.format("PreMessageReceived event triggered => %s\n",m.getClass().getSimpleName());
return m;
});
//可以开始ping了
peer.ping().get();
System.out.format("peer best height => %d\n",peer.getBestHeight());
}
}
bintcoin.conf配置文件
##
## bitcoin.conf configuration file. Lines beginning with # are comments.
##
# 网络相关配置
# Network-related settings:
# 在测试网络上运行而不是真正的比特币网络。
# Run on the test network instead of the real bitcoin network.
# testnet=0
运行私有网络
# Run a regression test network
regtest=1
测试网络
testnet=1
# 通过SOCkS5代理连接
# Connect via a SOCKS5 proxy
# proxy=127.0.0.1:9050
绑定到给定的地址,并始终监听他 这个端口应该比特币与外界通信的端口
# Bind to given address and always listen on it. Use [host]:port notation for IPv6
# bind=127.0.0.1
// 绑定到给定地址,并将连接到它的白名单列入白名单。使用[host]:IPv6的端口表示法
# Bind to given address and whitelist peers connecting to it. Use [host]:port notation for IPv6
#whitebind=
##############################################################
## Quick Primer on addnode vs connect ##
## Let's say for instance you use addnode=4.2.2.4 ##
## addnode will connect you to and tell you about the ##
## nodes connected to 4.2.2.4. In addition it will tell ##
## the other nodes connected to it that you exist so ##
## they can connect to you. ##
## connect will not do the above when you 'connect' to it. ##
## It will *only* connect you to 4.2.2.4 and no one else.##
## ##
## So if you're behind a firewall, or have other problems ##
## finding nodes, add some using 'addnode'. ##
## ##
## If you want to stay private, use 'connect' to only ##
## connect to "trusted" nodes. ##
## ##
## If you run multiple nodes on a LAN, there's no need for ##
## all of them to open lots of connections. Instead ##
## 'connect' them all to one node that is port forwarded ##
## and has lots of connections. ##
## Thanks goes to [Noodle] on Freenode.
addnode 与 connect 的区别
假设您使用了 addnode=4.2.2.4 参数,那么该节点就会与你的节点连接,并且将与他相连的节点也告诉你,另外他也会将你的节点信息告知与他自己想连接的节点,这样他们也可以连接到你的节点上.
connect在你的节点连接到它时候并不会做上述的工作,仅仅它会与你连接,而其他节点不会与你连接.
如果你在防火墙后面,或者因为其他原因无法找到节点,则使用addnode添加一些节点.如果你想保证隐私,使用connect连接到哪些您可以信任的节点.
如果你在局域网内运行了多个节点,您不需要让他们建立许多连接,您只需要使用connect让他们统一连接到一个拥有多个节点的链接.
##############################################################
# Use as many addnode= settings as you like to connect to specific peers
#addnode=69.164.218.197
#addnode=10.0.0.2:8333
# Alternatively use as many connect= settings as you like to connect ONLY to specific peers
#connect=69.164.218.197
#connect=10.0.0.1:8333
侦听模式,默认情况下启用,但使用“connect”时除外,使用connect时候节点就不监听**在这个地方,我可以使用一个暴露的节点,然后将这个节点保护起来**
# Listening mode, enabled by default except when 'connect' is being used
#listen=1
入站+出站的最大连接数
# Maximum number of inbound+outbound connections.
#maxconnections=
JSON-RPC 选项(用于控制运行中的 Bitcoin/bitcoind 进程)
# JSON-RPC options (for controlling a running Bitcoin/bitcoind process)
#
server=1 告知 Bitcoin-QT 接受 JSON-RPC 命令
# server=1 tells Bitcoin-Qt and bitcoind to accept JSON-RPC commands
server=1
绑定到给定地址以侦听JSON-RPC连接。使用[host]:IPv6的端口表示法。
# Bind to given address to listen for JSON-RPC connections. Use [host]:port notation for IPv6.
可以多次指定此选项(默认值:绑定到所有接口)
# This option can be specified multiple times (default: bind to all interfaces)
#rpcbind=
rpcbind=127.0.0.1
在此端口监听RPC连接
# Listen for RPC connections on this TCP port:
rpcport=7878
# If no rpcpassword is set, rpc cookie auth is sought. The default `-rpccookiefile` name
# is .cookie and found in the `-datadir` being used for bitcoind. This option is typically used
# when the server and client are run as the same user.
如果没有,则必须设置rpcuser和rpcpassword以保护JSON-RPC api。
# If not, you must set rpcuser and rpcpassword to secure the JSON-RPC api. The first
# method(DEPRECATED) is to set this pair for the server and client:
rpcuser=user
rpcpassword=123456
下面这个也是设置用户的
#
# The second method `rpcauth` can be added to server startup argument. It is set at intialization time
# using the output from the script in share/rpcuser/rpcuser.py after providing a username:
#
# ./share/rpcuser/rpcuser.py alice
# String to be appended to :
# rpcauth=alice:f7efda5c189b999524f151318c0c86$d5b51b3beffbc02b724e5d095828e0bc8b2456e9ac8757ae3211a5d9b16a22ae
# Your password:
# DONT_USE_THIS_YOU_WILL_GET_ROBBED_8ak1gI25KFTvjovL3gAM967mies3E=
#
# On client-side, you add the normal user/password pair to send commands:
#rpcuser=alice
#rpcpassword=DONT_USE_THIS_YOU_WILL_GET_ROBBED_8ak1gI25KFTvjovL3gAM967mies3E=
#
# You can even add multiple entries of these to the server conf file, and client can use any of them:
# rpcauth=bob:b2dd077cb54591a2f3139e69a897ac$4e71f08d48b4347cf8eff3815c0e25ae2e9a4340474079f55705f40574f4ec99
客户端在HTTP连接建立后,等待多少秒完成下一个RPC HTTP请求
# How many seconds bitcoin will wait for a complete RPC HTTP request.
# after the HTTP connection is established.
#rpcclienttimeout=30
# By default, only RPC connections from localhost are allowed.
# Specify as many rpcallowip= settings as you like to allow connections from other hosts,
# either as a single IPv4/IPv6 or with a subnet specification.
默认允许来自本机的RPC 连接,在这里可以指定多个其他的IP地址来连接本地RPC 端口
# NOTE: opening up the RPC port to hosts outside your local trusted network is NOT RECOMMENDED,
# because the rpcpassword is transmitted over the network unencrypted.
# it is also read by bitcoind to determine if RPC should be enabled
#rpcallowip=10.1.1.34/255.255.255.0
#rpcallowip=1.2.3.4/24
IPV 6 这么设置么
#rpcallowip=2001:db8:85a3:0:0:8a2e:370:7334/96
此设置可以将RPC命令发送到该地址主机上的bitcoind上
# You can use Bitcoin or bitcoind to send commands to Bitcoin/bitcoind
# running on another host using this option:
#rpcconnect=127.0.0.1
# Create transactions that have enough fees so they are likely to begin confirmation within n blocks (default: 6).
# This setting is over-ridden by the -paytxfee option.
#txconfirmtarget=n
# Miscellaneous options
预生成如下数目的公钥和私钥,这样钱包备份便可对已有的交易以及未来多笔交易有效
# Pre-generate this many public/private key pairs, so wallet backups will be valid for
# both prior transactions and several dozen future transactions.
#keypool=100
这里是设置默认手续费的地方,每笔交易的默认手续费
# Pay an optional transaction fee every time you send bitcoins. Transactions with fees
# are more likely than free transactions to be included in generated blocks, so may
# be validated sooner.
#paytxfee=0.00
通过删除旧块启用修剪降低存储要求,此模式与-txindex和rescan不兼容
# Enable pruning to reduce storage requirements by deleting old blocks.
# This mode is incompatible with -txindex and -rescan.
# 默认
# 0 = default (no pruning).
允许通过RPC手动修剪
# 1 = allows manual pruning via RPC.
最小为550 修剪
# >=550 = target to stay under in MiB.
#prune=550
# User interface options
最小化启动比特币客户端
# Start Bitcoin minimized
#min=1
最小化到系统托盘
# Minimize to the system tray
# minimizetotray=1
将跟踪/调试信息发送到控制台而不是debug.log文件
# Send trace/debug info to console instead of debug.log file
printtoconsole=1
自动创建Tor隐藏服务
# Automatically create Tor hidden service (default: 1)
listenonion=1
bitcoin.conf 配置解释
// bitcoin.conf配置文件。以#开头的行是注释。
## bitcoin.conf configuration file. Lines beginning with # are comments.
##
// 这些设置是为Linode VPS设计的,请参阅https://github.com/ChristopherA/Learning-Bitcoin-from-the-Command-Line
## These settings are designed for Linode VPS see https://github.com/ChristopherA/Learning-Bitcoin-from-the-Command-Line
## Lines beginning with # are comments. 以#开头的行是注释。
// 取消注释并编辑您想要使用的选项,详细指南如下:https://en.bitcoin.it/wiki/Running_Bitcoin
## Uncomment and edit options you wish to use, detailed guide here: https://en.bitcoin.it/wiki/Running_Bitcoin
//启用传入数据连接
### Enable incoming data connections
//为了确保完整节点事物验证 必须同时启用'upnp'和'listen'
## To ensure your Fullnode validates transactions it is necessary to have both ‘upnp’ and ‘listen’ enabled.
//请注意,许多用户还需要在本地服务器启用端口转发
## Note that many users will also need to enable Port Forwarding on their home router.
//要执行此操作:在你的浏览器中,去到路由页面如192.168.0.1,选择高级设置
## To do this: go to your router’s page e.g. 192.168.0.1 in your browser then choose Advanced Settings
// 在端口8333上设置转发,以获取全节点和应用更改的IP地址
## Setup port forwarding on TCP/UDP 8333 to 8333 for the IP address of your Fullnode and Apply Changes
// 如果成功,你将及时注意到连接数增加到8以上
## If successful you will notice in time the number of connections increase above 8
// 详细信息请看官网
## For more details see here: https://bitcoin.org/en/full-node#network-configuration
// 使用UPnP映射侦听端口(默认值:0)
upnp=1
// 侦听模式,默认情况下启用,但使用“连接”时除外
# Listening mode, enabled by default except when 'connect' is being used
listen=1
// 不要使用Internet Relay Chat来查找对等方。
# Do not use Internet Relay Chat to find peers.
noirc=0
// 用于比特币开发和区块链分析。索引模式与prune = 1不兼容。
## Use this for Bitcoin development and blockchain analysis. Index mode is incompatible with prune=1.
// 注意取消注释这一行将使比特币重新扫描整个区块链,这可能需要几天时间
# Note uncommenting this line will make Bitcoin rescan the whole blockchain which can takes several days
txindex=1
//性能:带宽和内存使用情况
## Performance: Bandwidth and Memory usage
//设置脚本验证线程的数量
# Set the number of script verification threads (-2 to 16, 0 = auto, <0 = leave that many cores free, default: 0)
// 基本连接节点有4个核心,所以设置为3
# A basic Linode has 4 cores, so set to 3.
par=1
// 设置数据库缓存大小 使用比特币时候,越低越好
# Set database cache size in megabytes (4 to 16384, default: 100). Lower is better when using Bitcoin
//与其他程序运行,如果你使用内存多,下初始块就快.
# with other apps running, but initial blockchain download is faster if you use more memory.
// 使用linode 时候用1536M内存,当完成后,使用256M
# Using Linode I suggest 1536 MB and optionally change to 256 after chain is complete.
dbcache=1536
//仅仅发送和接收完整块,没有其他事务,blocksonly = 1 可以节约很多带宽
# Send and receive complete blocks only, no loose transactions. blocksonly=1 can reduce bandwidth by 88%
blocksonly=1
# Max number of megabytes uploaded by node per day. 137MB is 144Mb, and is 1:1 ratio with downloading 1 day of blocks
maxuploadtarget=137
mempoolexpiry=72
maxmempool=300
maxorphantx=100
## To save disk space you can prune the blockchain to n MB below. Min value is 550. 0 means Pruning is disabled.
# Note if you prune before syncing, Bitcoin will still validate every block but it will only use up the max disk
# space specified below, deleting block data as it syncs. The node still relays transactions to other nodes when enabled.
#prune=550
## Spam protection
limitfreerelay=10
minrelaytxfee=0.0001
## Maximum number of inbound+outbound connections
# Consider setting this to 16-24 if you have issues
maxconnections=32
## Data directory for bitcoin, Use for external devices or if not using the default directory
# sample datadir=/home/media/USB/.bitcoin
# defaults are:
# Linux: ~/.bitcoin/
# Macintosh: ~/Library/Application Support/Bitcoin/
# Windows: %APPDATA%\Bitcoin
# XP: C:\Documents and Settings\YOURUSERNAME\Application data\Bitcoin
# Vista & 7: C:\Users\YOURUSERNAME\Appdata\Roaming\Bitcoin
#datadir=
#
# JSON-RPC options (for controlling a running Bitcoin/bitcoind process)
#
在后台运行,并接收JSON RPC命令
# daemon=1 tells bitcoind to run in background and accept JSON-RPC commands
daemon=1
# server=1 tells Bitcoin-Qt to accept JSON-RPC commands.
# it is also read by bitcoind to determine if RPC should be enabled
server=1
# Bind to given address and always listen on it. Use [host]:port notation for IPv6
#bind=