rollup是什么
Rollup 是一个 JavaScript 模块打包器,可以将小块代码编译成大块复杂的代码,例如 library 或应用程序,对代码模块采用es6格式
特性
- tree shaking
Rollup静态分析代码中的import,并将排除任何未实际使用的代码,使得不会增加额外的依赖或使项目的大小膨胀。
并且,这种基于显式的 import 和 export 语句的方式,它远比「在编译后的输出代码中,简单地运行自动 minifier 检测未使用的变量」更有效
- 导入 CommonJS(Importing CommonJS)
通过插件导入已存在的commonJS模块
- 发布 ES6 模块(Publishing ES6 Modules)
为了确保你的 ES6 模块可以直接与「运行在 CommonJS(例如 Node.js 和 webpack)中的工具(tool)」使用,你可以使用 Rollup 编译为 UMD 或 CommonJS 格式,然后在 package.json 文件的 main 属性中指向当前编译的版本。如果你的 package.json 也具有 module 字段,像 Rollup 和 webpack 2 这样的 ES6 感知工具(ES6-aware tools)将会直接导入 ES6 模块版本。
安装rollup
- 全局 npm install -g rollup
- 项目 npm install --save-dev rollup
安装完毕后,****rollup -v***查看下是否安装成功
rollup由浅入深
接下来,我们用一系列demo',逐级去接触rollup
demo0-开始使用rollup
1.初始化一个工程,创建一个依赖模块文件lib.js和入口文件index.js。
// lib.js
export function logA() {
    console.log('function logA called')
}

export function logB() {
    console.log('function logB called')
}
// index.js
import { logA } from './lib'
logA()2.然后在当前工程下,打开终端,输入rollup index.js -f es -o dist.js
index.js是我们的入口文件
dist.js是我们的输出文件
-f es 表示--format es,打包输出格式为es格式,"output.format", which can be one of "amd", "cjs", "system", "esm", "iife" or "umd"
-o 表示输出文件的路径,在 -o 后面跟着的 dist.js 就是我们要生成的最终打包文件了。
其实这里本来应该加上一个参数-i,用来表示入口文件的路径,但rollup是会把没有加参数的文件默认为是入口文件,因此我们在这里省略了这个参数
显示出这条信息之后,我们发现目录下已经多出了一个 dist.js 文件,打开文件,我们发现里面的代码是这样的
function logA() {
    console.log('function logA called');
}

logA();
3.此时我们就已经完成了打包作业,可以将dist.js引入到HTML文件或是node模块中了。
3.1 为了测试下,我们新建一个index.html
rollup 打包测试
demo1-使用rollup进行模块化打包
如果在demo0中的index.js文件中把logA()改成export default logA(),那么rollup最后的打包结果就会是
function logA() {
    console.log('function logA called');
}

var index = logA();

export default index
显然这样的代码是不能直接在浏览器端和node端运行的,我们需要把原先的ES6模块转化成浏览器和node支持的形式
那么我们先来看下模块输出的几种格式,我们使用rollup -h查看下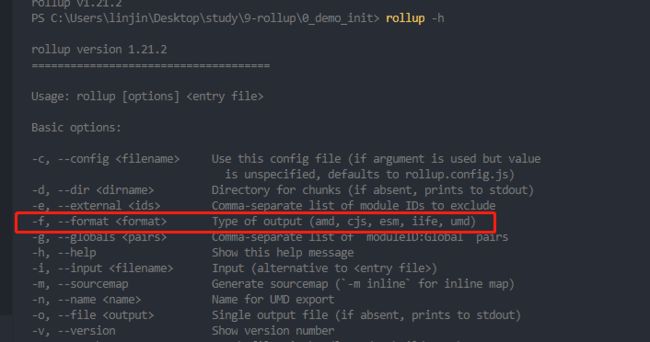
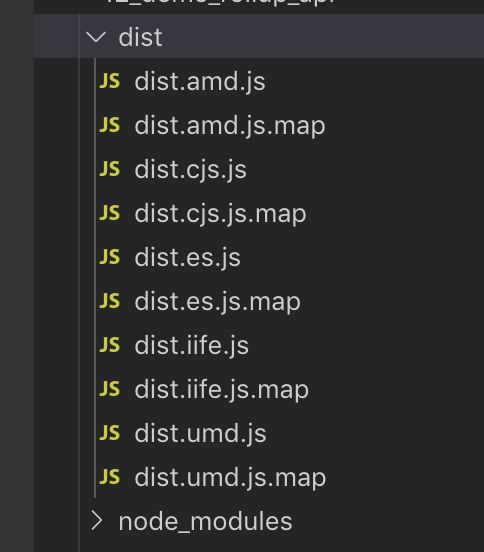
接下来我们用rollup来打包一下,在demo0中的index.js文件里将logA()改成export default logA(),然后npm init初始化一个package.json,并在package.json文件中写好不同模块的打包命令
"build:amd": "rollup index.js -f amd -o ./dist/dist.amd.js",
"build:cjs": "rollup index.js -f cjs -o ./dist/dist.cjs.js",
"build:es": "rollup index.js -f es -o ./dist/dist.es.js",
"build:iife": "rollup index.js -f iife -n result -o ./dist/dist.iife.js",
"build:umd": "rollup index.js -f umd -n result -o ./dist/dist.umd.js",
"build:all": "npm run build:amd && npm run build:cjs && npm run build:es && npm run build:iife && npm run build:umd"
在这里我们发现在设置模块为iife(立即执行函数)和umd时,还加上了一个参数-n,这是因为我们将logA()的结果设置为模块的输出结果,那么在使用iife和umd时,需要事先设定模块的名称,才能让其他人通过这个模块名称引用到你的模块的输出结果。
在命令行中输入npm run build:all,运行所有打包命令,查看效果
PS: 使用amd模块打包方式时,若不指定模块名称,则会打包成匿名函数,若想打包成一个具名函数,则需要使用-u或--id来指定具名函数名称。
除了-f之外,还有许多其他的参数可以使用,看到这里可能有些同学会觉得麻烦了,这么多参数用起来好麻烦,每次都要输一长串的命令,那么有没有更好的方法来控制rollup的参数配置呢?
当然有,接下来我们就尝试使用配置文件来控制rollup打包。
demo2-使用配置文件来进行rollup打包
1.创建一个demo2
沿用之前demo1的内容,我们在demo2的项目下创建一个文件,取名为rollup.config.js,这个文件就是rollup的配置文件了,rollup根据配置文件的输出配置来进行打包,接下来我们在配置文件中输入配置代码:
export default {
    input: 'index.js',
    output: {
        file: 'dist.js',
        format: 'cjs'
    }
};- input表示打包的入口文件,
- output 表示打包输出 output.file表示输出文件名,output.format 表示输出文件模块格式
PS: 若使用iife或umd模块打包,需要添加属性moduleName,用来表示模块的名称;若用amd模块打包,可以配置amd相关的参数(使用umd模块模式时,也会使用到amd相关配置参数):
amd: {
    id: 'amd-name',   // amd具名函数名称
    define: 'def'     // 用来代替define函数的函数名称
}
在这里我们发现配置文件也是使用了ES6语法,这是因为rollup可以自己处理配置文件,所以能够直接用ES6的模块输出(当然,你也可以选择使用node的module.exports方式来输出配置。
2.在package.json文件中编写npm scripts命令
"build": "rollup -c"-c这个参数表示使用配置文件来进行打包,若后面没有指定使用的配置文件路径,则使用默认的配置文件名称rollup.config.js。
3.在命令行中输入npm run build,执行打包,可以看到生成了打包文件dist.js
'use strict';

function logA() {
    console.log('function logA called');
}

var index = logA();

module.exports = index;
4. 进阶:当rollup配置文件最终输出的不是一个对象而是一个数组时,rollup会把每一个数组元素当成一个配置输出结果,因此可以在一个配置文件内设置多种输出配置
例如,我们添加一个indexB.js文件,在这个文件中我们将logA替换为logB,并将rollup配置文件改为:
export default [
    {
        input: 'index.js',
        output: {
            file: 'dist/dist.js',
            format: 'cjs'
        }
    },
    {
        input: 'indexB.js',
        output: {
            file: 'dist/distB.js',
            format: 'cjs'
        }
    }
];
运行打包命令,发现在dist目录下生成了distA.js和distB.js两个文件,说明多项配置打包成功。
除了上面这种输出一个配置数组之外,你还可以通过配置target属性来输出多个打包文件:
export default {
    input: 'index.js',
    output: [
        {
            file: 'dist/dist.es.js',
            format: 'es'
        }, {
            file: 'dist/dist.cjs.js',
            format: 'cjs'
        }, {
            file: 'dist/dist.umd.js',
            name: 'dist_umd',
            format: 'umd'
        }
    ]
}
这样配置会在dist目录下面输出bundle.cjs.js,bundle.umd.js和bundle.es.js三个打包文件,同时umd模块的名称会被定义成dist_umd。
demo3-监听文件变化,随时打包
我们在开发过程中,需要频繁对源文件进行修改,如果每次都自己手动输一遍打包命令,那真的是要烦死。因此,我们选择使用rollup提供的监听功能,安装rollup-wacth模块,再在rollup命令后面加上-w参数,就能让rollup监听文件变化,即时打包。
1.新版的rollup已经封装了watch功能,不需要额外安装
2.编写npm scripts:
"watch": "rollup -c -w"好了,这个时候你就可以随便修改你的源文件了,rollup会自动为你打包的。
PS: 若是你不想监听某些文件,只要在配置文件中加上
watch: {
    exclude: ['path/to/file/which/you/want/to/ignore']
}
就行了,其中的exclude表示你想要忽略的文件的路径(支持glob模式匹配)
demo4-是时候写ES6了
ES6可以说是现代JS开发100%会用到的技术了,rollup虽然支持了解析import和export两种语法,但是却不会将其他的ES6代码转化成ES5代码,因此我们在编写ES6代码的时候,需要引入插件来支持ES6代码的解析。
1.安装插件和你需要的babel preset:
npm i rollup-plugin-babel @babel/preset-env @babel/core --save-dev2.创建.babalrc文件:
{
    "presets": [
        [
            "env",
            {
                "modules": false
            }
        ]
    ]
}
之所以使用modules:false这个参数,是因为rollup默认是通过ES6模块语法来解析文件间的依赖,rollup默认是不支持解析common.js的模块规范的(怎么让rollup支持我会在接下来的demo中讲解),因此需要让babel不转化模块相关的语法,不然rollup在使用过程中会报错。
3.编写rollup配置文件:
import babel from 'rollup-plugin-babel';

export default {
    input: 'index.js',
    output: [
        {
            file: 'dist/dist.es.js',
            format: 'es'
        }, {
            file: 'dist/dist.cjs.js',
            format: 'cjs'
        }, {
            file: 'dist/dist.umd.js',
            name: 'dist_umd',
            format: 'umd'
        }
    ],
    plugins: [
        babel({
            exclude: 'node_modules/**'
        })
    ]
}
4. 编写es6代码
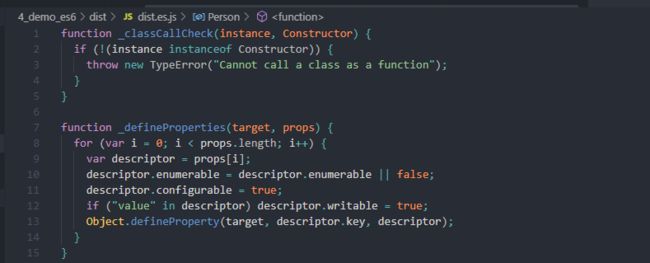
这里我们新建三个文件,两个类Person和Man和一个入口文件index.js
// Person.js
export default class Person {
    constructor (name, gender = '男') {
        this.name = name
        this.gender = gender
    }

    say () {
        console.log(`我的名字是${this.name},是一个${this.gender}生`)
    }
}
// Man.js
import Person from './Person'
export default class Man extends Person {
constructor (name) {
super(name, '男')
}
}// index.js
import Man from './Man'
new Man('KainStar').say()5. 运行npm run build
看看打包出来的文件能不能运行,执行node dist/dist.js![]()
demo5-解析cjs,打包第三方模块
有时候我们会引入一些其他模块的文件(第三方的或是自己编写的),但是这些第三方的模块为了能够直接使用,往往不是ES6模块而是用commonjs的模块方式编写的,这个时候我们需要将commonjs的模块转化为ES6模块,这样才能让rollup进行正确的解析。
1.解析commonjs
解析commonjs需要引入一个rollup插件——rollup-plugin-commonjs
安装插件
npm i rollup-plugin-commonjs --save-dev
// or
yarn add rollup-plugin-commonjs --dev
2.配置项中配置插件
import commonjs from 'rollup-plugin-commonjs'

export default {
    input: 'index.js',
    output: [{
        file: 'dist/dist.cjs.js',
        name: 'cjs_test',
        format: 'iife'
    }
    ],
    plugins: [
        commonjs()
    ]
}
3. 编写cjs模块的文件
// index.js
exports.logA = function logA() {
    console.log('function logA called')
}

exports.logB = function logB() {
    console.log('function logB called')
}
4. 运行npm run build
5.在打包第三方模块的过程中遇到的问题总结
由于rollup无法直接解析npm模块,因此需要引入插件rollup-plugin-node-resolve并配合之前的commonjs插件来解析这些第三方模块
5.1 安装插件和第三方模块
npm i rollup-plugin-node-resolve lodash --save-dev
// or
yarn add rollup-plugin-node-resolve lodash --dev
5.2 在配置文件中配置插件
// rollup.config.sj
import commonjs from 'rollup-plugin-commonjs'
import resolve from 'rollup-plugin-node-resolve'

export default {
    input: 'index.js',
    output: [{
        file: 'dist/dist.cjs.js',
        name: 'cjs_test',
        format: 'iife'
    }
    ],
    plugins: [
        resolve({
            jsnext: true,
            main: true,
            browser: true
        }),
        commonjs()
    ]
}
jsnext表示将原来的node模块转化成ES6模块,
main和browser则决定了要将第三方模块内的哪些代码打包到最终文件中。
ps:由于commonjs和node-resolve中的配置属性很多,因此不一一解释,希望了解更多的同学可以去官方仓库查看说明。
5.3 编写index.js
import compact from 'lodash/compact'

const array = [0, 1, false, 2, '', 3]
const compctedArray = compact(array)
console.log(compctedArray)

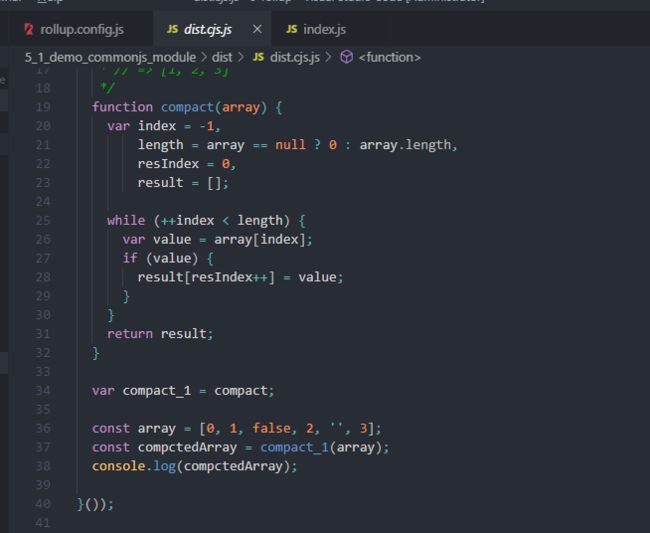
// 在这里我们只引用了lodash中的compact方法,那么在最终代码里,应该也只会添加compact方法的代码。
5.4 运行npm run build 查看打包结果
确实只添加了compact方法的代码,而没有将lodash全部引入。
demo6-不要打包到一个文件,为rollup设置外部模块和全局变量
在平时的开发中,我们经常会引入其他的模块,但是在使用的时候,我们又不想把它们打包到一个文件里,想让他们作为单独的模块(或文件)来使用,方便浏览器端进行缓存,这个时候就需要使用配置文件中的external属性了
1.我们在demo5的基础上,把jquery安装到第三方模块中
npm i jquery --save-dev
// or
yarn add jquery --dev
2.将配置文件改成
import commonjs from 'rollup-plugin-commonjs'
import resolve from 'rollup-plugin-node-resolve'

export default {
    input: 'index.js',
    output: [{
        file: 'dist/dist.cjs.js',
        name: 'cjs_test',
        format: 'iife'
    }],
    external: ['jquery'],
    plugins: [
        resolve({
            jsnext: true,
            main: true,
            browser: true
        }),
        commonjs()
    ]
}
external用来表示一个模块是否要被当成外部模块使用,属性的值可以是一个字符串数组或一个方法,当传入的是一个字符串数组时,所有数组内的模块名称都会被当成是外部模块,不会被打包到最终文件中
3. 在index.js中引入jquery
import compact from 'lodash/compact'
import JQuery from 'jquery'

const array = [0, 1, false, 2, '', 3]
const compctedArray = compact(array)
console.log(compctedArray)
4.在这里我们把jquery当成一个外部模块,执行打包命令:
检查打包出来的文件,我们发现lodash的compact方法依旧被打包进了最终文件中,但是jquery却没有被打包进去,而是以$的全局变量形式被传入到了立即执行函数中。
在这里rollup又给我们输出了一条提示信息,意思是我们没有在配置文件中给外部模块jquery设置全局变量名称,因此rollup自己猜测了一个名称$,当成是依赖的全局变量名。
如果直接使用全局的$的话,可能会因为变量$被其他引入的代码覆盖而报错,因此我们要将$替换为不容易冲突的jQuery变量,在配置文件中添加globals属性:
import commonjs from 'rollup-plugin-commonjs'
import resolve from 'rollup-plugin-node-resolve'

export default {
    input: 'index.js',
    output: [{
        file: 'dist/dist.cjs.js',
        name: 'cjs_test',
        format: 'iife',
        globals: {
            jquery: 'jQuery'
        }
    }],
    external: ['jquery'],
    plugins: [
        resolve({
            jsnext: true,
            main: true,
            browser: true
        }),
        commonjs()
    ]
}只是提示第三方模块未使用,实际上我们确实没有使用
globals的值是一个对象,key表示使用的模块名称(npm模块名),value表示在打包文件中引用的全局变量名,在这里我们就是把jquery模块的全局变量名设置为jQuery,重新打包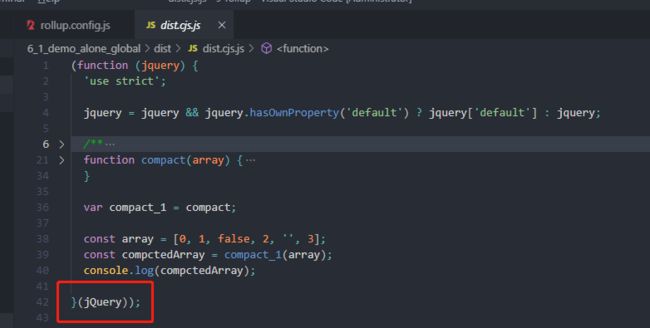
在重新打包出来的文件中,我们发现最后传入的参数已经由$变为了jQuery,而且rollup也没有输出提示信息
demo7-打包node内置模块
有时候我们想要在浏览器端使用node自带的一些内置模块,一般情况下会使用browserify这个工具来打包,但是browserify打包出来的文件实在太大,因此我们用rollup选择性地导入我们需要的node内置模块
1.安装插件
npm i rollup-plugin-node-builtins --save-dev
// or
yarn add rollup-plugin-node-builtins --dev
node-builtins对不同的node内置模块支持不同,有些模块可能需要使用其他的插件(例如rollup-plugin-node-globals)才能正常打包,具体的支持情况可以查看node-builtins的官方仓库。
2.编写配置文件
import builtins from 'rollup-plugin-node-builtins'

export default {
    input: 'index.js',
    output: [{
        file: 'dist/dist.cjs.js',
        name: 'cjs_test',
        format: 'iife'
    }],
    plugins: [
        builtins()
    ]
}
3. 编写入口文件
import { join } from 'path'

const path_base = 'E://node'
const path_joined = join(path_basem, 'bin')
console.log(path_joined)
4. 运行npm run build
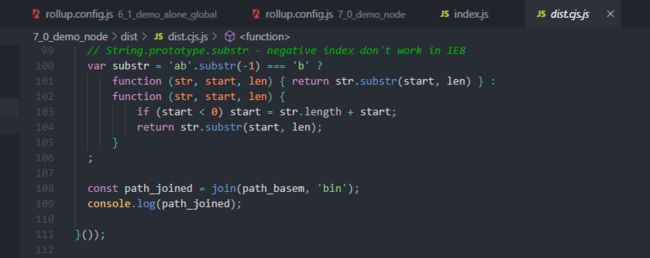
在这里我们使用node内置的path模块,运行打包命令,发现dist.js文件中引入了额外的100多行代码,这100多行代码就实现了path模块的join方法供我们使用。
PS: 我建议,如果不是必要的情况,最好能够使用其他人编写的第三方实现库或自己造轮子实现,而不是使用node内置的模块,因为在引用某些模块时,node-builtins可能会引入过多的代码,这样会大大增加最后打包的文件的大小,使用他人的第三方库或自己的实现可控性更高
demo8 配合CDN来使用rollup
有时候我们可能会使用CDN服务器上的js文件,但是又不想在本地安装一个相同的模块(也有可能没有对应的模块),可能在版本升级的时候会产生一些问题,这个时候我们就需要使用rollup的paths属性了,这个属性可以帮助你把依赖的代码文件地址注入到打包之后的文件里。
1.编写配置文件
export default {
    input: 'index.js',
    output: [{
        file: 'dist/dist.amd.js',
        format: 'amd'
    }],
    external: ['jquery'],
    paths: {
        jquery: 'https://cdn.bootcss.com/jquery/3.2.1/jquery.js'
    }
}
在这里我们要使用cdn上的jquery文件,paths属性的值可以是一个对象或用法与external属性方法相似的方法(只是返回的不是boolean值而是文件的地址)。若使用对象来表示,则key值为需要引入的模块名称,value值为对应的文件地址
2. 编写index.js
import $ from 'jquery'

$('#p').html('rollup 使用paths属性配合CDN')
3. 运行npm run build
demo9 最小化你的代码
代码发布时,我们经常会把自己的代码压缩到最小,以减少网络请求中的传输文件大小
rollup的插件rollup-plugin-uglify就是来帮助你压缩代码的,我们接下来就用这个插件来压缩一下我们的代码
1. 安装插件
npm i rollup-plugin-uglify --save-dev
// or
yarn add rollup-plugin-uglify --dev
2. 配置
import { uglify } from 'rollup-plugin-uglify'

export default {
    input: 'index.js',
    output: [{
        file: 'dist/dist.js',
        format: 'iife',
        name: 'test'
    }],
    plugins: [
        uglify()
    ]
}
3. 随便写点index.js
4. npm run build
运行打包命令,查看dist.js文件,发现代码已经被压缩了
但是,压缩过的代码在debug时会带来很大的不便,因此我们需要在压缩代码的同时生成一个sourceMap文件
幸运的是,rollup自己就支持sourceMap文件的生成,不需要我们去引入其他插件,只需要在配置文件的对应output中加上:
import { uglify } from 'rollup-plugin-uglify'

export default {
    input: 'index.js',
    output: [{
        file: 'dist/dist.js',
        format: 'iife',
        name: 'test',
        sourcemap: true
    }],
    plugins: [
        uglify()
    ]
}
重新打包,我们发现不仅生成了dist.js.map文件,而且dist文件最后加上了一行//# sourceMappingURL=dist.js.map,并且在浏览器中可以正确加载源文件
PS: 若是将sourcemap属性的值设置为inline,则会将sourceMap的内容添加到打包文件的最后
demo10 为你的代码添eslint检查
在大型工程的团队开发中,我们需要保证团队代码风格的一致性,因此需要引入eslint,而且在打包时需要检测源文件是否符合eslint设置的规范,若是不符合则抛出异常并停止打包。在这里我们使用rollup的eslint插件rollup-plugin-eslint:
1.安装插件
npm i eslint rollup-plugin-eslint --save-dev
// or
yarn add eslint rollup-plugin-eslint --dev
2. 编写eslint配置文件.eslintrc
{
    "env": {
        "browser": true,
        "commonjs": true,
        "es6": true,
        "node": true
    },
    "parserOptions": {
        "ecmaFeatures": {
            "jsx": false
        },
        "sourceType": "module"
    },
    "rules": {
        "semi": [
            "error",
            "never"
        ]
    }
}
3.在这里我们强制要求不使用分号,然后在源文件中加上一个分号
// src/index.js
console.log(1);
4.编写配置文件
import eslint from 'rollup-plugin-eslint';

export default {
    input: 'src/index.js',
    output: [{
        file: 'dist/dist.js',
        format: 'iife',
        name: 'test',
        sourcemap: true
    }],
    plugins: [
        eslint.eslint({
            throwOnError: true,
            throwOnWarning: true,
            include: ['src/**'],
            exclude: ['node_modules/**']
        })
    ]
}
throwOnError和throwOnWarning设置为true时,如果在eslint的检查过程中发现了error或warning,就会抛出异常,阻止打包继续执行(如果设置为false,就只会输出eslint检测结果,而不会停止打包)
5. 执行打包命令,发现eslint在输出了检查结果之后抛出了异常,而且dist.js文件也没有生成
删除index.js文件中的分号,重新打包,发现打包成功
6.进阶:
在平时的开发过程中,我们经常会使用IDE或编辑器的eslint插件,以便提早发现问题,但是有时候这些插件会去检查打包完的文件,导致你的提示框里一直会有eslint检测到错误的消息
我们现在有两种解决方案:
- 一是创建一个.eslintignore文件,将打包文件加进去,让eslint忽略这个文件
- 还有一种就是让rollup在打包文件的开始和最后自动生成注释来阻止eslint检测代码,使用这种方法时,需要使用rollup配置文件的两个属性:banner和footer,这两个属性会在生成文件的开头和结尾插入一段你自定义的字符串。我们利用这个属性,在打包文件的开头添加/eslint-disable /注释,让eslint不检测这个文件。
添加banner和footer属性
banner: '/*eslint-disable */'重新打包,我们发现打包文件的开头被插入了这段注释字符串,而且eslint插件也不报dist.js文件的错了
demo11 控制开发环境和生产环境下的配置
1.配置文件的开发/生产环境配置
有时候我们会需要区分开发环境和生产环境,针对不同的打包要求输出不同的打包配置,但是我们又不想写rollup.config.dev.js和rollup.config.prod.js两个文件,因为可能两者之间的区别只是一个uglify插件。
因此,我们就需要用变量来控制配置文件的输出内容,rollup命令行给我们提供了一个设置环境变量的参数--environment,在这个参数后面加上你需要设置的环境变量,不同变量间用逗号分隔,用冒号后面的字符串表示对应变量的值(若不加冒号,则默认将值设为字符串true):
在package.json文件中编写对应的npm scripts命令:
"dev": "rollup -c --environment NODE_ENV:development",
"build": "rollup -c --environment NODE_ENV:production"
最后修改我们的rollup配置文件
import { uglify } from 'rollup-plugin-uglify'

let isProd = process.env.NODE_ENV === 'production'

// 通用的插件
const basePlugins = []
// 开发环境需要使用的插件
const devPlugins = []
// 生产环境需要使用的插件
const prodPlugins = [uglify()]

let plugins = [...basePlugins].concat(isProd ? prodPlugins : devPlugins)
let outputFilePath = isProd ? './dist/dist.min.js' : './dist/dist.js'

export default {
    input: 'src/index.js',
    output: [{
        file: outputFilePath,
        format: 'iife',
        name: 'test',
        sourcemap: isProd
    }],
    plugins: plugins
}
我们分别运行两个npm scripts命令,查看打包的结果:
2. 源文件开发/生产环境信息注入
有时候需要将生产环境信息添加到源文件里,这个时候就需要使用rollup的配置属性intro和outro了
如果说banner和footer是在文件开始和结尾添加字符串,那么intro和outro就是在被打包的代码开头和结尾添加字符串了,以iife模式来举例,如果我们配置了这四个属性,那么输出结果就会是:
// banner字符串
(function () {
'use strict';
// intro字符串

// 被打包的代码

// outro字符串
}());
// footer字符串
下面我们实际使用一下,在index.js文件里加上一段需要依赖的代码
if (DEVELOPMENT) {
  console.log('development')
} else {
  console.log('production')
}
然后修改配置文件
import { uglify } from 'rollup-plugin-uglify'

let isProd = process.env.NODE_ENV === 'production'

// 通用的插件
const basePlugins = []
  // 开发环境需要使用的插件
const devPlugins = []
  // 生产环境需要使用的插件
const prodPlugins = [uglify()]

let plugins = [...basePlugins].concat(isProd ? prodPlugins : devPlugins)
let outputFilePath = isProd ? './dist/dist.min.js' : './dist/dist.js'

export default {
  input: 'src/index.js',
  output: [{
    file: outputFilePath,
    format: 'iife',
    name: 'test',
    sourcemap: isProd,
    intro: 'const DEVELOPMENT = ' + !isProd
  }],
  plugins: plugins
}3. 源文件开发/生产环境信息替换
有时候我们会把开发/生产环境的信息直接写在源文件里面,这个时候用intro来注入代码的方式就不适合了。这个时候我们就需要使用rollup-plugin-replace插件来对源代码的变量值进行替换:
在上面这个文件的基础上,先把intro给注释了,然后
npm i rollup-plugin-replace --save-dev
// or
yarn add rollup-plugin-replace --dev
接着,更改下配置,
import { uglify } from 'rollup-plugin-uglify'
import replace from 'rollup-plugin-replace'

let isProd = process.env.NODE_ENV === 'production'

// 通用的插件
const basePlugins = [replace({
  DEVELOPMENT: !isProd
})]

// 开发环境需要使用的插件
const devPlugins = []

// 生产环境需要使用的插件
const prodPlugins = [uglify()]

let plugins = [...basePlugins].concat(isProd ? prodPlugins : devPlugins)
let outputFilePath = isProd ? './dist/dist.min.js' : './dist/dist.js'

export default {
  input: 'src/index.js',
  output: [{
    file: outputFilePath,
    format: 'iife',
    name: 'test',
    sourcemap: isProd,
    // intro: 'const DEVELOPMENT = ' + !isProd
  }],
  plugins: plugins
}
demo12 使用rollup的API
有时候我们会需要在打包的前后执行一些其他的代码,但是又不想引入其他构建工具(例如gulp),那么就可以使用rollup提供的node API来编写你自己的打包流程。
rollup模块只提供了一个rollup函数,这个函数的参数和我们编写配置文件时导出的参数不同,减少了很多配置属性,留下来的主要是一些输入相关的配置。(具体的配置属性可以查看rollup wiki的javascript API一节)
执行这个函数返回的是一个Promise,并且在then方法中提供一个bundle对象作为参数,这个对象保存了rollup对源文件编译一次之后的结果,而且提供了generate和write两个方法
- write方法提供了编译并将打包结果输出到文件里的功能,返回的是一个没有参数的Promise,可以让你自定义接下来执行的代码
- generate方法是只提供了编译的功能,返回一个Promise,这个Promise有一个对象参数,包含了code(编译完之后的代码)和map(分析出来的sourceMap对象)两个属性,一般用在插件开发中
在这里我们只使用write方法来编写一个为所有模块类型打包,并输出打包完毕提示的文件,至于generate的使用方法我们会放在编写插件一节中介绍。
const rollup = require('rollup').rollup

rollup({
    entry: 'index.js'
}).then(bundle => {

    // 保存所有Promise的列表
    let writePromiseList = []
    // 声明所有需要打包的模块类型
    let moduleTypesList = ['es','cjs','amd','umd','iife']

    moduleTypesList.forEach(function(moduleType) {
        writePromiseList.push(bundle.write({
            dest: './dist/dist.' + moduleType + '.js',
            format: moduleType,
            sourceMap: true
        }))
    })

    return Promise.all(writePromiseList)

}).then(() => {
    console.log('全部模块格式打包完毕')
    // 其他代码
})
将package.json文件内的npm scripts命令添加
"rollup": "node rollup.js"
demo13 除了打包JS,我们还能……
一个web项目内肯定不会只有js文件,还有css、html(也可能是模板文件)和其他类型的文件,那么我们在打包的时候能不能把这些文件一起打包呢?
我们需要区分一下,在这里的打包有两种意思,
- 一种是让这些文件可以像JS文件一样,在源代码中被import并使用;
- 还有一种是通过在源文件中import这些文件,最后将它们合并到一起并导出到一个最终文件内。
不同的rollup插件有不同的效果,在使用的时候一定要查看插件的相关说明
安装插件
npm i rollup-plugin-scss --save-dev
// or
yarn add rollup-plugin-scss --dev
编写配置文件
import { uglify } from 'rollup-plugin-uglify'
import scss from 'rollup-plugin-scss'

let isProd = process.env.NODE_ENV === 'production'

// 通用的插件
const basePlugins = [scss({
  output: {
    file: './dist/css/style.css'
  }
})]

// 开发环境需要使用的插件
const devPlugins = []

// 生产环境需要使用的插件
const prodPlugins = [uglify()]

let plugins = [...basePlugins].concat(isProd ? prodPlugins : devPlugins)
let outputFilePath = isProd ? './dist/dist.min.js' : './dist/dist.js'

export default {
  input: 'src/index.js',
  output: [{
    file: outputFilePath,
    format: 'iife',
    name: 'test',
    sourcemap: isProd
  }],
  plugins: plugins
}
编写src/index.js
import './scss/text.scss'
import './scss/bg.scss'

var html = `

        测试文字

`
document.body.innerHTML = html
编写src/scss/text.scss
$white: #fff;
.text-white {
  color: $white;
}
编写src/scss/bg.scss
$blue: #69c4eb;
.bg-blue {
  background-color: $blue
}


