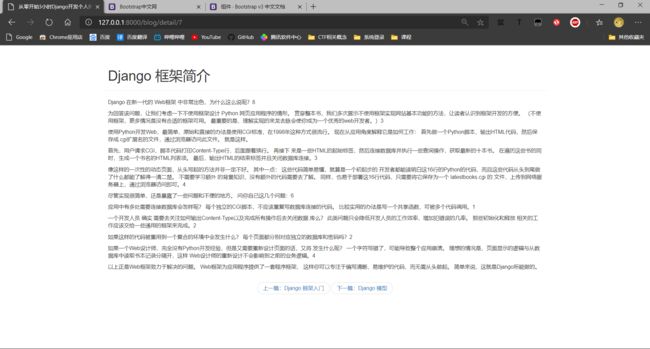
零基础Django3小时开发个人博客系统
准备阶段
- Python>=3.5
- Django==2.0
- Pycharm IDE
Python安装
- 官网下载Python对应版本的安装包(Python3.7.7 For Windows)
- 双击安装包文件,安装时务必勾选Add to Path选项
Django安装
- 同时按
Win+R键,输入cmd回车,打开命令提示符窗口 - 在窗口中输入
pip install django==2.0
Pycharm IDE安装
- Pycharm安装包下载
- Professional:专业版,可免费试用 / Community:社区版,免费开源版本(个人开发推荐)
- 双击安装包进行安装
Django常用基础命令
$ django-admin help

Type 'django-admin help ' for help on a specific subcommand.

Available subcommands:

[django]
    check
    compilemessages
    createcachetable
    dbshell
    diffsettings
    dumpdata
    flush
    inspectdb
    loaddata
    makemessages
    makemigrations
    migrate
    runserver
    sendtestemail
    shell
    showmigrations
    sqlflush
    sqlmigrate
    sqlsequencereset
    squashmigrations
    startapp
    startproject
    test
    testserver
Note that only Django core commands are listed as settings are not properly configured (error: Requested setting INSTALLED_APPS, but settings are not configured. You must either define the environment variable DJANGO_SETTINGS_MODULE or call settings.configure() before accessing settings.).
基础命令:
- startproject:创建一个Django项目
- startapp:创建一个Django应用
- check:校验项目完整性
- runserver:本地环境一键运行项目
- shell:进入Django shell环境
- test:执行Django测试用例
数据库相关命令
- makemigrations:创建用于模型变更的迁移文件
- migrate:执行makemigrations创建的迁移文件
- dumpdata:导出数据库文件到文件
- loaddata:导入文件数据到数据库
新建项目
- 打开PyCharm,选择
Creat New Project: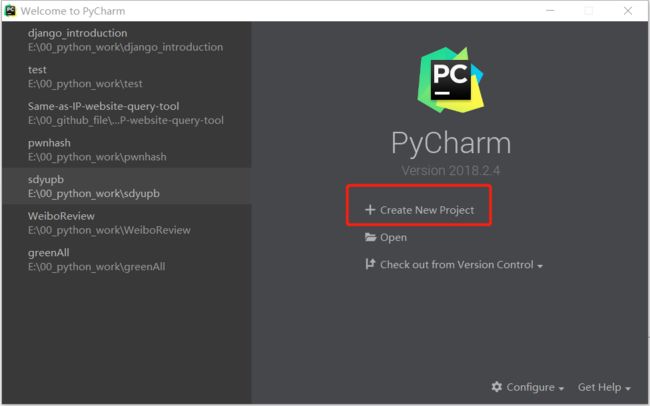
- 在New Project窗口中选择Django选项:
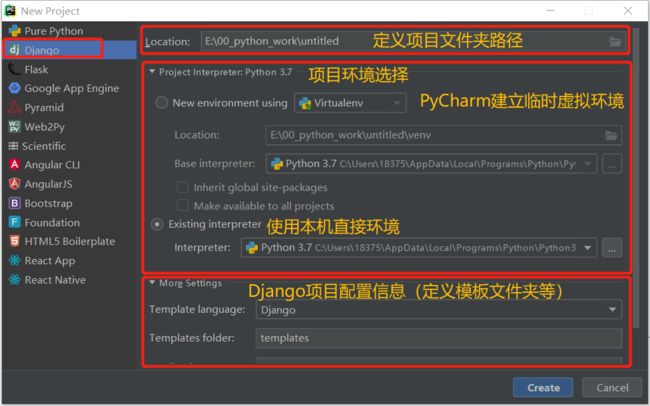
- 创建名为django_introduction的项目:在Terminal中输入
django-admin startproject django_introduction
项目目录内容解读
- setting.py:项目配置文件
- urls.py:项目路由文件
- manage.py:项目管理文件
- db.sqlite3:sqlite3数据库文件
预览项目
- 在terminal中执行
python manage.py runserver,访问提示的网址,提示django项目创建完成即可
创建Django应用
Django项目与Django应用的区别
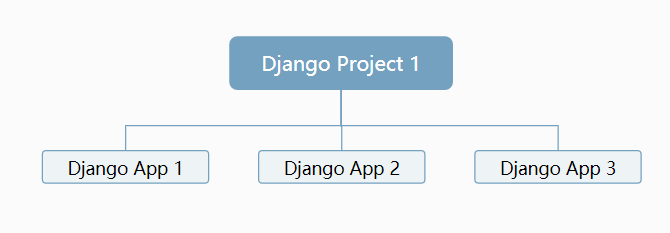
- 一个Django项目就是一个基于Django的Web应用
- 一个Django应用就是一个可重用的Python包,Django应用不可直接运行
- 每个Django应用可自己管理模型、视图、模板、路由、静态文件等
- 一个Django项目可包含一组配置及若干个Django应用:

创建Django blog 应用
- 在terminal中输入
python manage.py startapp blog
应用目录内容解读
- views.py:视图处理方法文件
- models.py:定义应用模型的文件
- admin.py:定义admin模块管理对象的地方
- apps.py:声明应用的地方
- tests.py:编写应用测试用例的地方
- urls.py:(默认无本文件,自行创建)管理应用路由的地方
- templates文件夹:(默认无本文件夹,自行创建)HTML视图模板文件夹
- migrations文件夹:存放模型变更文件的文件夹
Django_HelloWorld
Django 视图
- 早期的静态Html不满足需求,由Django视图产生内容
Django路由
- runserver可以看到Django欢迎页
- 请求没办法到达视图函数
- 配置路由绑定视图函数和URL
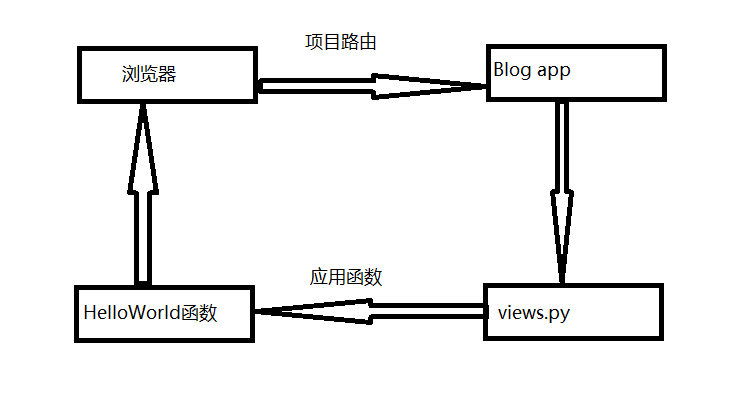
Django HelloWorld
- 基本过程:
- 在app中views.py添加视图函数:
from django.http import HttpResponse
# Create your views here.
def hello_world(request):
    return HttpResponse("Hello World")
- 在app中urls.py添加路由:
import blog.views
urlpatterns = [
    path('hello_world', blog.views.hello_world)
]
- 在项目urls.py添加路由:
from django.contrib import admin
from django.urls import path, include
from blog import views
urlpatterns = [
    path('admin/', admin.site.urls),
    path('blog/', include('blog.urls'))
]
- 在项目settings.py的INSTALLED_APP列表中添加声明blog应用:
INSTALLED_APPS = [
    'django.contrib.admin',
    'django.contrib.auth',
    'django.contrib.contenttypes',
    'django.contrib.sessions',
    'django.contrib.messages',
    'django.contrib.staticfiles',

    # myapp(添加此行进行应用声明)
    'blog.apps.BlogConfig'
]
认识Django模型层
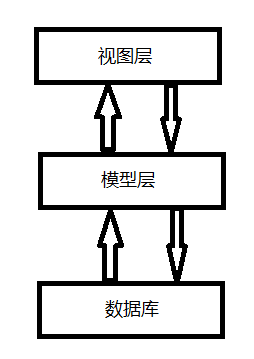
为什么要用到模型层
- 屏蔽不同数据库间的差异
- 开发者更加专注于业务逻辑开发
- 提供很多便捷工具有助开发
模型层相关配置
博客文章模型设计
- 文章标题:string
- 文章摘要:string
- 文章内容:string
- 文章ID:int自增
- 发布日期:date自取
模型层定义字段
- 数字类型:IntegerField
- 文本类型:TextField
- 日期:DateField
- 自增ID:AutoField
- 主键定义:Primary_key属性
创建模型层步骤
- 在models.py中创建新类
- 定义变量名及类型
from django.db import models
# Create your models here.
class Article(models.Model):
    # 文章唯一ID
    article_id = models.AutoField(primary_key=True)
    # 文章标题
    title = models.TextField()
    # 文章摘要
    brief_content = models.TextField()
    # 文章主要内容
    content = models.TextField()
    # 文章发布日期
    publish_date = models.DateField(auto_now=True)
- 在shell中执行
python manage.py makemigrations创建模型迁移文件 - 在shell中执行
python manage.py migrate执行迁移文件
Django shell
什么事Django shell
- Python shell 用于交互式Python编程
- Django shell 类似,继承Django项目环境
为什么使用Django shell
- 临时性操作,使用Django shell更方便
- 小范围的Debug更简单,不需要运行整个项目来测试
- 方便开发、方便调试、方便Debug
Django shell 使用方法
python manage.py shell
示范用例
$ from blog.models import Article
# 新建文章
$ a = Article()
$ a.title = 'Django shell Test'
$ a.brief_content = 'Django shell Test brief content'
$ a.content = 'test django shell new article content.'
$ print(a)	# 打印预览
$ a.save()	# 保存文章
# 读取文章
$ article = Article.objects.all()[0]
$ print(article.title,article.brief_content,article.content)
Django admin 模块
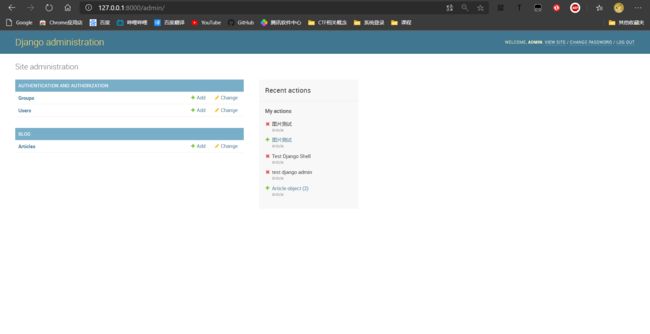
什么是Django admin模块
- Django的后台管理工具
- 读取定义的模型元数据,提供强大的管理使用页面
为什么使用Django admin模块
- Django shell操作方式复杂
- 管理页面是基础设施中重要的一部分
- 认证用户、显示管理模型、校验输入等功能类似
如何使用Django admin模块
- 创建管理员用户:
python manage.py addsuperuser按提示设定用户名及密码即可 - 在admin.py中声明文章模型:
from django.contrib import admin
# Register your models here.
from .models import Article
admin.site.register(Article)
- 在Django admin页面中管理文章时显示文章标题,在models.py的文章模型类中添加:
	# 在Django 的admin模块中返回title
	def __str__(self):
	    return self.title
实现博客数据返回页面
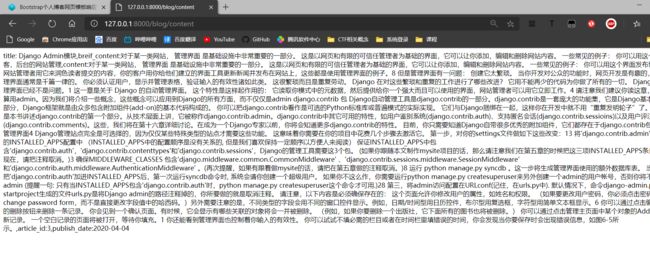
- 在views.py创建返回数据的函数:
from blog.models import Article	# 导入文章模型
# 创建函数,返回第一篇文章内容
def article_content(request):
    article = Article.objects.all()[0]
    title = article.title
    brief_content = article.brief_content
    content = article.content
    article_id = article.article_id
    publish_date = article.publish_date
    return_str = 'title: %s,breif_content:%s,content:%s,article_id:%s,publish_date:%s' % (title, brief_content, content, article_id, publish_date)
    return HttpResponse(return_str)
- 在urls.py中声明函数路由:
from django.urls import path, include
import blog.views
urlpatterns = [
    path('hello_world', blog.views.hello_world),
    path('content', blog.views.article_content)	#将视图函数路由到 /blog/content 下
]
使用 Bootstrap 实现静态博客页面
在blog文件夹下新建templates/blog文件夹用于存放html模板文件
设计页面及布局
- 博客首页
- 文章详情页
Bootstrap及Bootstrap栅格系统
- Bootstrap提供了非常多的开源控件
- 官方网站 Bootstrap · The most popular HTML, CSS, and JS library in the world. / Bootstrap中文网 Bootstrap中文网
- 栅格系统:把页面均匀分为12等份
Bootstrap静态页面编写示例
- index.html
<html lang="en">
<head>
    <meta charset="UTF-8">
    <title>从零开始3小时Django开发个人博客系统title>

    <link rel="stylesheet" href="https://cdn.jsdelivr.net/npm/[email protected]/dist/css/bootstrap.min.css"
          integrity="sha384-BVYiiSIFeK1dGmJRAkycuHAHRg32OmUcww7on3RYdg4Va+PmSTsz/K68vbdEjh4u" crossorigin="anonymous">

    <script src="https://cdn.jsdelivr.net/npm/[email protected]/dist/js/bootstrap.min.js"
            integrity="sha384-Tc5IQib027qvyjSMfHjOMaLkfuWVxZxUPnCJA7l2mCWNIpG9mGCD8wGNIcPD7Txa"
            crossorigin="anonymous">script>
head>
<body>
<div class="container page-header">
    <h1>从零开始3小时Django开发个人博客系统
        <small>——来SCsmall>
    h1>
div>
<div class="container page-body">
    <div class="col-md-9" role="main">
        <div class="body-main">
            <div>
                <h2><a href="#">文章标题1a>h2>
                <p>
                    文章缩略信息
                p>
            div>
            <div>
                <h2><a href="#">文章标题2a>h2>
                <p>
                    文章缩略信息
                p>
            div>
            <div>
                <h2><a href="#">文章标题3a>h2>
                <p>
                    文章缩略信息
                p>
            div>
        div>
    div>
    <div class="col-md-3" role="complementary">
        <div>
            <h2>最新文章h2>
            <h4><a href="#">文章标题4a>h4>
            <h4><a href="#">文章标题3a>h4>
            <h4><a href="#">文章标题2a>h4>
            <h4><a href="#">文章标题1a>h4>
        div>
    div>
div>
body>
html>
- detail.html
<html lang="en">
<head>
    <meta charset="UTF-8">
    <title>从零开始3小时Django开发个人博客系统title>

    <link rel="stylesheet" href="https://cdn.jsdelivr.net/npm/[email protected]/dist/css/bootstrap.min.css"
          integrity="sha384-BVYiiSIFeK1dGmJRAkycuHAHRg32OmUcww7on3RYdg4Va+PmSTsz/K68vbdEjh4u" crossorigin="anonymous">

    <script src="https://cdn.jsdelivr.net/npm/[email protected]/dist/js/bootstrap.min.js"
            integrity="sha384-Tc5IQib027qvyjSMfHjOMaLkfuWVxZxUPnCJA7l2mCWNIpG9mGCD8wGNIcPD7Txa"
            crossorigin="anonymous">script>
head>
<body>
<div class="container page-header">
    <h1>文章标题h1>
div>
<div class="container body-main">
    <div>
        <p>文章内容p>
    div>
div>
body>
html>
更多
- 关于Bootstrap的知识可查阅官方文档或我的另一篇笔记Bootstrap学习笔记(有道云笔记)
Django模板系统
介绍
- 视图文件不适合编码Html
- 页面设计改变需要修改Python代码
- 网页逻辑和视图处理应分开设计
- 模板系统的表现形式是文本
- 分离文档的表现形式和表现内容
- 模板系统定义了特有的标签占位符
基本语法
变量标签:{{ 变量 }}
示例{{ now }}
for循环标签:{% for x in list %},{% endfor %}
示例
{% for item in list %}
- {{ item }}
{% endfor %}
if-else标签:{% if %},{% else %},{% endif %}
示例:
{% if true %}
it's true
{% else %}
it's false
{% endif %}
使用模板系统渲染博客页面
- 在views.py中创建视图信息函数
def get_index_page(request):
    all_article = Article.objects.all()
    return render(request, 'blog/index.html',	# 定义模板文件
                  {'article_list':all_article}	# 返回整个文章列表)
    pass
- 在urls.py文件中定义index导向函数
from django.urls import path, include
import blog.views
urlpatterns = [
    path('hello_world', blog.views.hello_world),
    path('content', blog.views.article_content),
    path('index', blog.views.get_index_page)
]
- 根据Django标签语法修改静态页面成为模板
- index.html
<html lang="en">
<head>
    <meta charset="UTF-8">
    <title>从零开始3小时Django开发个人博客系统title>

    <link rel="stylesheet" href="https://cdn.jsdelivr.net/npm/[email protected]/dist/css/bootstrap.min.css"
          integrity="sha384-BVYiiSIFeK1dGmJRAkycuHAHRg32OmUcww7on3RYdg4Va+PmSTsz/K68vbdEjh4u" crossorigin="anonymous">

    <script src="https://cdn.jsdelivr.net/npm/[email protected]/dist/js/bootstrap.min.js"
            integrity="sha384-Tc5IQib027qvyjSMfHjOMaLkfuWVxZxUPnCJA7l2mCWNIpG9mGCD8wGNIcPD7Txa"
            crossorigin="anonymous">script>
head>
<body>
<div class="container page-header">
    <h1>从零开始3小时Django开发个人博客系统
        <small>——来SCsmall>
    h1>
div>
<div class="container page-body">
    <div class="col-md-9" role="main">
        <div class="body-main">
            {% for article in article_list %}
                <div>
                    <h2><a href="#">{{ article.title }}a>h2>
                    <p>
                        {{ article.brief_content }}
                    p>
                div>
            {% endfor %}
        div>
    div>
    <div class="col-md-3" role="complementary">
        <div>
            <h2>最新文章h2>
            {% for article in top5_article_list %}
                <h4><a href="#">{{ article.title }}a>h4>
            {% endfor %}
        div>
    div>
div>
body>
html>
def get_detail_page(request):
    curr_article = Article.objects.all()[0]
    section_list = curr_article.content.split('\n')
    return render(request, 'blog/detail.html', {'curr_article': curr_article, 'section_list': section_list})
    pass
- 在urls.py文件中定义index导向函数
from django.urls import path, include
import blog.views
urlpatterns = [
    path('hello_world', blog.views.hello_world),
    path('content', blog.views.article_content),
    path('index', blog.views.get_index_page),
    path('detail', blog.views.get_detail_page)
]
- 根据Django标签语法修改静态页面成为模板
- detail.html
<html lang="en">
<head>
    <meta charset="UTF-8">
    <title>从零开始3小时Django开发个人博客系统title>

    <link rel="stylesheet" href="https://cdn.jsdelivr.net/npm/[email protected]/dist/css/bootstrap.min.css"
          integrity="sha384-BVYiiSIFeK1dGmJRAkycuHAHRg32OmUcww7on3RYdg4Va+PmSTsz/K68vbdEjh4u" crossorigin="anonymous">

    <script src="https://cdn.jsdelivr.net/npm/[email protected]/dist/js/bootstrap.min.js"
            integrity="sha384-Tc5IQib027qvyjSMfHjOMaLkfuWVxZxUPnCJA7l2mCWNIpG9mGCD8wGNIcPD7Txa"
            crossorigin="anonymous">script>
head>
<body>
<div class="container page-header">
    <h1>{{ curr_article.title }}h1>
div>
<div class="container body-main">
    <div>
        {% for section in section_list %}
            <p>{{ section }}p>
        {% endfor %}
    div>
div>
body>
html>
实现文章链接
设计文章链接格式
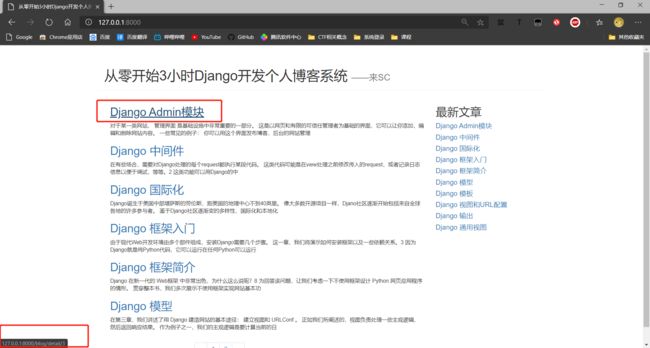
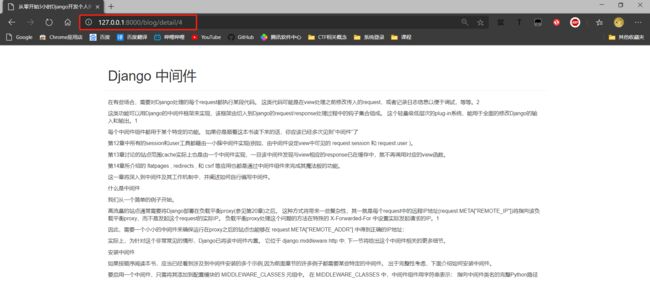
- 根据文章ID生成如/blog/detail/3类似的格式的url
- 修改urls.py路由文件为:
from django.urls import path, include
import blog.views
urlpatterns = [
path('hello_world', blog.views.hello_world),
path('content', blog.views.article_content),
path('index', blog.views.get_index_page),
path('detail/' , blog.views.get_detail_page)
]
- 修改views.py文件的get_detail_page函数:
def get_detail_page(request, article_id):
    all_article = Article.objects.all()
    curr_article = None
    for article in all_article:
        if article.article_id == article_id:
            curr_article = article
            break
    section_list = curr_article.content.split('\n')
    return render(request, 'blog/detail.html', {'curr_article': curr_article, 'section_list': section_list})
    pass
- 修改index.html内的链接格式:
<html lang="en">
<head>
    <meta charset="UTF-8">
    <title>从零开始3小时Django开发个人博客系统title>

    <link rel="stylesheet" href="https://cdn.jsdelivr.net/npm/[email protected]/dist/css/bootstrap.min.css"
          integrity="sha384-BVYiiSIFeK1dGmJRAkycuHAHRg32OmUcww7on3RYdg4Va+PmSTsz/K68vbdEjh4u" crossorigin="anonymous">

    <script src="https://cdn.jsdelivr.net/npm/[email protected]/dist/js/bootstrap.min.js"
            integrity="sha384-Tc5IQib027qvyjSMfHjOMaLkfuWVxZxUPnCJA7l2mCWNIpG9mGCD8wGNIcPD7Txa"
            crossorigin="anonymous">script>
head>
<body>
<div class="container page-header">
    <h1>从零开始3小时Django开发个人博客系统
        <small>——来SCsmall>
    h1>
div>
<div class="container page-body">
    <div class="col-md-9" role="main">
        <div class="body-main">
            {% for article in article_list %}
                <div>
                    <h2><a href="/blog/detail/{{ article.article_id }}">{{ article.title }}a>h2>
                    <p>
                        {{ article.brief_content }}
                    p>
                div>
            {% endfor %}
        div>
    div>
    <div class="col-md-3" role="complementary">
        <div>
            <h2>最新文章h2>
            {% for article in top5_article_list %}
                <h4><a href="/blog/detail/{{ article.article_id }}">{{ article.title }}a>h4>
            {% endfor %}
        div>
    div>
div>
body>
html>
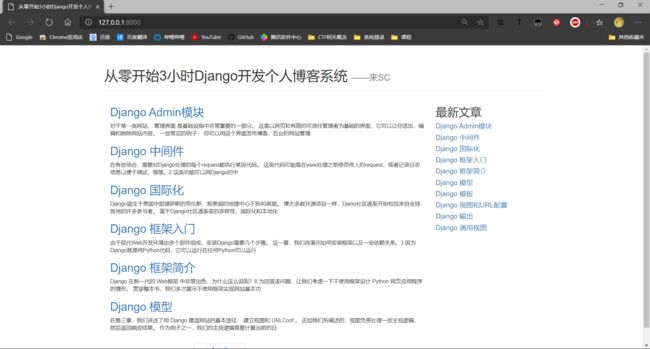
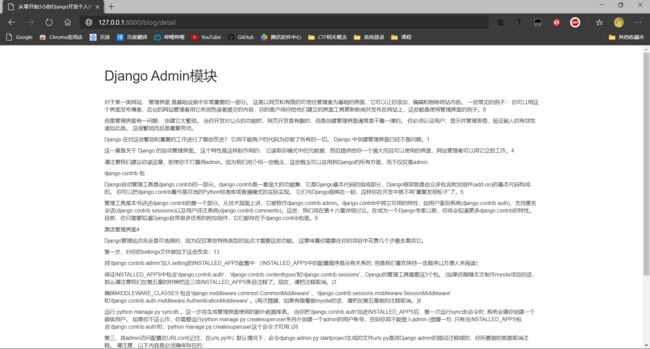
至此,博客发布及浏览功能均已实现
博客文章上下篇
- 在Bootstrap中文网的组件中寻找翻页按钮组件并复制代码
<nav aria-label="...">
  <ul class="pager">
    <li><a href="#">Previousa>li>
    <li><a href="#">Nexta>li>
  ul>
nav>
- 更改views.py 的get_detail_page函数,获取上下文章的地址及标题信息:
def get_detail_page(request, article_id):
    all_article = Article.objects.all()
    curr_article = None
    previous_article = None
    next_article = None
    for index, article in enumerate(all_article):
        if index == 0:
            previous_article_index = 0
            next_article_index = index + 1
        elif index == len(all_article) - 1:
            previous_article_index = index - 1
            next_article_index = index
        else:
            previous_article_index = index - 1
            next_article_index = index + 1
        if article.article_id == article_id:
            curr_article = article
            previous_article = all_article[previous_article_index]
            next_article = all_article[next_article_index]
            break
    section_list = curr_article.content.split('\n')
    return render(request, 'blog/detail.html', {'curr_article': curr_article, 'section_list': section_list,'previous_article': previous_article,'next_article': next_article})
- 将翻页代码添加到detail.html中并稍作更改:
<html lang="en">
<head>
    <meta charset="UTF-8">
    <title>从零开始3小时Django开发个人博客系统title>

    <link rel="stylesheet" href="https://cdn.jsdelivr.net/npm/[email protected]/dist/css/bootstrap.min.css"
          integrity="sha384-BVYiiSIFeK1dGmJRAkycuHAHRg32OmUcww7on3RYdg4Va+PmSTsz/K68vbdEjh4u" crossorigin="anonymous">

    <script src="https://cdn.jsdelivr.net/npm/[email protected]/dist/js/bootstrap.min.js"
            integrity="sha384-Tc5IQib027qvyjSMfHjOMaLkfuWVxZxUPnCJA7l2mCWNIpG9mGCD8wGNIcPD7Txa"
            crossorigin="anonymous">script>
head>
<body>
<div class="container page-header">
    <h1>{{ curr_article.title }}h1>
div>
<div class="container body-main">
    <div>
        {% for section in section_list %}
            <p>{{ section }}p>
        {% endfor %}
    div>
div>
<div>
    <nav aria-label="...">
        <ul class="pager">
            <li><a href="/blog/detail/{{ previous_article.article_id }}">上一篇:{{ previous_article.title }}a>li>
            <li><a href="/blog/detail/{{ next_article.article_id }}">下一篇:{{ next_article.title }}a>li>
        ul>
    nav>
div>
body>
html>
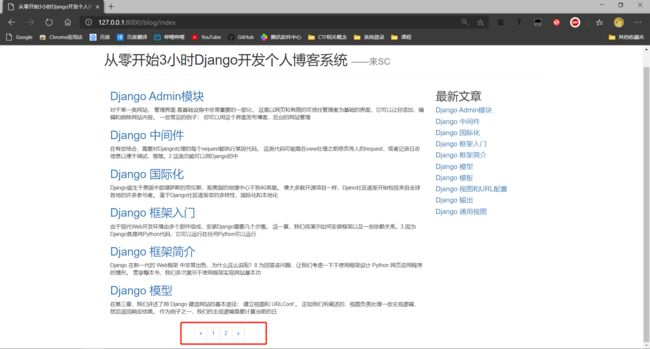
实现首页分页显示效果
Django分页工具
- Django自带分页工具,直接使用
from django.core.paginator import Paginator导入即可 - 常用分页函数示例
paginator = Paginator(文章列表,每页文章数)
paginator.num_pages	# 获取总分页数
paginator_article_list = paginator.page(page)	# 获取每页文章列表
paginator_article_list.has_next(1)	# 第一页是否有下一页,返回值为布尔类型
paginator_article_list.has_previous(2)	# 第二页是否有上一页,返回值为布尔类型
实现分页
- 在Bootstrap中文网的组件中寻找翻页按钮组件并复制代码:
<nav aria-label="Page navigation">
  <ul class="pagination">
    <li>
      <a href="#" aria-label="Previous">
        <span aria-hidden="true">«span>
      a>
    li>
    <li><a href="#">1a>li>
    <li><a href="#">2a>li>
    <li><a href="#">3a>li>
    <li><a href="#">4a>li>
    <li><a href="#">5a>li>
    <li>
      <a href="#" aria-label="Next">
        <span aria-hidden="true">»span>
      a>
    li>
  ul>
nav>
- 更改views.py 的get_index_page函数,获取每页文章数量及分页信息:
def get_index_page(request):
    page = request.GET.get("page")
    if page:
        page = int(page)
    else:
        page = 1
    print("page_num:", page)
    all_article = Article.objects.all()
    top5_article_list = Article.objects.order_by('-publish_date')[:10]
    paginator = Paginator(all_article, 6)
    page_num = paginator.num_pages
    print('page_num:', page_num)
    page_article_list = paginator.page(page)
    if page_article_list.has_next():
        next_page = page + 1
    else:
        next_page = page
    if page_article_list.has_previous():
        previous = page - 1
    else:
        previous = page
    return render(request, 'blog/index.html',
                  {'article_list': page_article_list, 'page_num': range(1, page_num + 1), 'curr_page': page,
                   'next_page': next_page, 'previous': previous, 'top5_article_list': top5_article_list})
    pass
- 将分页代码添加到index.html中并稍作更改:
<html lang="en">
<head>
    <meta charset="UTF-8">
    <title>从零开始3小时Django开发个人博客系统title>

    <link rel="stylesheet" href="https://cdn.jsdelivr.net/npm/[email protected]/dist/css/bootstrap.min.css"
          integrity="sha384-BVYiiSIFeK1dGmJRAkycuHAHRg32OmUcww7on3RYdg4Va+PmSTsz/K68vbdEjh4u" crossorigin="anonymous">

    <script src="https://cdn.jsdelivr.net/npm/[email protected]/dist/js/bootstrap.min.js"
            integrity="sha384-Tc5IQib027qvyjSMfHjOMaLkfuWVxZxUPnCJA7l2mCWNIpG9mGCD8wGNIcPD7Txa"
            crossorigin="anonymous">script>
head>
<body>
<div class="container page-header">
    <h1>从零开始3小时Django开发个人博客系统
        <small>——来SCsmall>
    h1>
div>
<div class="container page-body">
    <div class="col-md-9" role="main">
        <div class="body-main">
            {% for article in article_list %}
                <div>
                    <h2><a href="/blog/detail/{{ article.article_id }}">{{ article.title }}a>h2>
                    <p>
                        {{ article.brief_content }}
                    p>
                div>
            {% endfor %}
        div>
        <div class="body-footer">
            <div class="col-md-4 col-md-offset-3">
                <nav aria-label="Page navigation">
                    <ul class="pagination">
                        <li>
                            <a href="/blog/index?page= {{ previous }}" aria-label="Previous">
                                <span aria-hidden="true">«span>
                            a>
                        li>
                        {% for num in page_num %}
                            <li><a href="/blog/index?page={{ num }}">{{ num }}a>li>
                        {% endfor %}
                        <li>
                            <a href="/blog/index?page= {{ next_page }}" aria-label="Next">
                                <span aria-hidden="true">»span>
                            a>
                        li>
                    ul>
                nav>
            div>
        div>
    div>
    <div class="col-md-3" role="complementary">
        <div>
            <h2>最新文章h2>
            {% for article in top5_article_list %}
                <h4><a href="/blog/detail/{{ article.article_id }}">{{ article.title }}a>h4>
            {% endfor %}
        div>
    div>
div>
body>
html>
其他
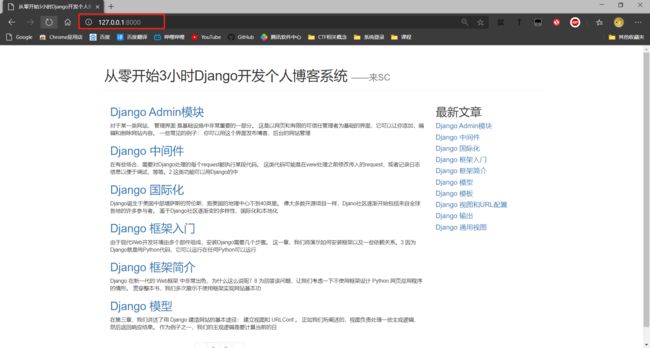
定义网址首页
- 在项目的路由文件urls.py中添加如下内容
from blog import views
urlpatterns = [
    path('', views.get_index_page, name='home')  # 自定义首页views,将空白路由定义为主页导向主页函数
]
{{ next_page }}" aria-label=“Next”>
»
最新文章
{% for article in top5_article_list %}
{{ article.title }}
{% endfor %}
其他
定义网址首页
- 在项目的路由文件urls.py中添加如下内容
from blog import views
urlpatterns = [
    path('', views.get_index_page, name='home')  # 自定义首页views,将空白路由定义为主页导向主页函数
]
