基于用户认证组件和Ajax实现登录验证
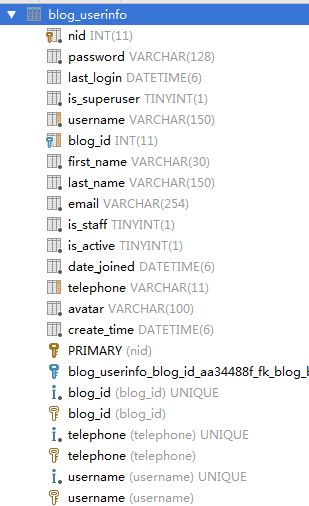
UserInfo表既有原生auth_user表的字段,又有你扩展的字段,以后用的接口UserInfo既是自己的用户表又是原生认证组件的用户表
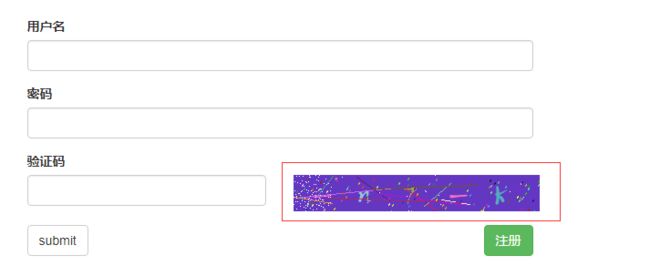
1.登录页面的设计
login.html
DOCTYPE html>
<html lang="en">
<head>
    <meta charset="UTF-8">
    <title>Titletitle>
    <link rel="stylesheet" href="/static/blog/bootstrap/css/bootstrap.css">
{#    <link rel="stylesheet" href="https://cdn.bootcss.com/bootstrap/3.3.7/css/bootstrap.css">#}
head>
<body>
<h3>登录页面h3>
<div class="container">
    <div class="row">
        <div class="col-md-6 col-lg-offset-3">
            <form>
                {% csrf_token %}
                <div class="form-group">
                    <label for="user">用户名label>
                    <input type="text" id="user" class="form-control">
                div>
                <div class="form-group">
                    <label for="pwd">密码label>
                    <input type="password" id="pwd" class="form-control">
                div>
                <div class="form-group">
                    <label for="pwd">验证码label>
                    <div class="row">
                        <div class="col-md-6">
                            <input type="text" class="form-control" id="valid_code">
                        div>
                        <div class="col-md-6">
                            <img width="270" height="40" id = "valid_code_img" src="/get_validCode_img/" alt="">
                        div>                                                 ##src 可以加静态文件,也可以动态,
                    div>
                div>

                <input type="button" class="btn btn-default login_btn pull-right" value="submit">class="error">
            form>
        div>
    div>
div>
2.验证码图片的生成
validCode.py
import random
def get_validCode_img(request):
    def get_random_color():  #随机生成一个新的图片背景
        return (random.randint(0,255), random.randint(0,255), random.randint(0,255))
    #方式一 --> 只需要了解它的流程
    # with open("luffy.jpg",'rb')as f:
    #     data = f.read()
    #return Httpresponse(data)
  #方式二: pip install pillow  --> 图像处理的模块
    # from PIL import Image
    # img = Image.new("RGB",(270,40), color=get_random_color()) #长度270,高度40,color是动态生成的,颜色三要素color=(0,255,0)
    # with open("validCode.png", "wb")as f:  #先加到磁盘上
    #     img.save(f,'png')  #会生成一个叫validCode.png的图片
    # with open("validCode.png", "rb")as f:  #再读出来;磁盘的处理速度是很慢的
    #     data = f.read()

    #方式三:  磁盘内存管理
    # from PIL import Image
    # from io import BytesIO  #--->BytesIO就是内存管理
    # img = Image.new("RGB",(270,40), color=get_random_color())
    # f = BytesIO()             #这种方式是放在内存中,f就是内存句柄
    # img.save(f,"png")  #save到内存里边了
    # data = f.getvalue()  #取出来
    #方式四:
    from PIL import Image, ImageDraw, ImageFont  #ImageDraw是画笔, ImageFont是字体大小
    from io import BytesIO
    import random
    img = Image.new("RGB",(270,40), color=get_random_color())  #这是刚刚生成的画板
    draw = ImageDraw.Draw(img) #画笔draw只为画板img服务。  draw.text()写文字 、draw.line()画线  、draw.point()画点
    kumo_font = ImageFont.truetype("static/font/kumo.ttf", size=32) #参数为字体路径、大小;ttf字体 ;拿到关于kumo.ttf的字体对象
  for i in range(5):
        random_num = str(random.randint(0,9))
        random_low_alpha = chr(random.randint(95,122)) #随机小写字母
        random_upper_alpha = chr(random.randint(65,90)) #随机大写字母
        random_char = random.choice([random_num, random_low_alpha, random_upper_alpha])
        draw.text((i*50+20, 5), random_char, get_random_color(), font=kumo_font)
  f = BytesIO()
    img.save(f,"png")
    data = f.getvalue()
噪声噪线
validCode.py
   width = 270  #要跟上边的宽高一致
    height = 40
    for i in range(10):
        x1 = random.randint(0,width)
        x2 = random.randint(0,width)
        y1 = random.randint(0,height)
        y2 = random.randint(0,height)
        draw.line((x1,y1,x2,y2), fill = get_random_color())
    for i in range(100):
        draw.point([random.randint(0,width), random.randint(0,width), random.randint(0,height), random.randint(0,height)])
        x = random.randint(0,width)
        y = random.randint(0,height)
        draw.arc((x, y, x+4, y+4),0, 90, fill=get_random_color())
3.验证码刷新
$("#valid_code_img")[0]"270" height="40" id="valid_code_img" src="http://127.0.0.1:8000/get_validCode_img/??" alt> $("#valid_code_img")[0].src "http://127.0.0.1:8000/get_validCode_img/??" $("#valid_code_img")[0].src+="?" #+="?"添加一次这个就刷新一次验证码 "http://127.0.0.1:8000/get_validCode_img/???" $("#valid_code_img")[0].src+="?" "http://127.0.0.1:8000/get_validCode_img/????" $("#valid_code_img")[0].src+="?" "http://127.0.0.1:8000/get_validCode_img/?????" $("#valid_code_img")[0].src+="?" "http://127.0.0.1:8000/get_validCode_img/??????" $("#valid_code_img")[0].src+="?" "http://127.0.0.1:8000/get_validCode_img/???????"
login.html