windows环境下anaconda+tensorflow+pycharm安装过程
参考博文:
1、windows环境下tensorflow安装过程详解 https://blog.csdn.net/laobai1015/article/details/84580243
2、清华镜像网站:https://mirrors.tuna.tsinghua.edu.cn/tensorflow/windows/cpu/
3、Tensorflow在win10下的安装(CPU版本)https://www.cnblogs.com/shuaishuaidefeizhu/p/9949899.html
4、Anaconda详细安装及使用教程https://blog.csdn.net/ITLearnHall/article/details/81708148
5、PyCharm2019 安装和配置 https://blog.csdn.net/weixin_44323869/article/details/88897387
6、Anaconda、TensorFlow安装和Pycharm配置详细教程,亲测有效!参考这个配置
一、anaconda安装(需要安装电脑能上网)
下载地址: 清华大学开源软件镜像站
https://mirrors.tuna.tsinghua.edu.cn/anaconda/archive/
我安装的是 Anaconda3-5.2.0-Windows-x86_64.exe
默认一路 NEXT即可,直到最后安装完毕。
1.1Anaconda安装成功与否测试
(1)进入Windows系统的cmd界面:然后输入:conda --version检查anaconda的版本
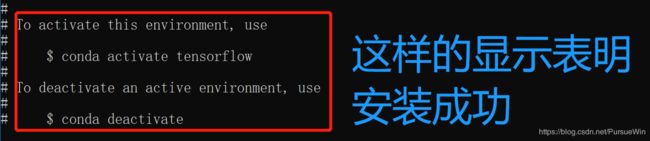
(2)检查目前安装了哪些环境变量:conda info --envs,如下所示即为成功
1.2 错误:conda不是内部或者外部命令
在环境变量后面加:(具体步骤,我的电脑-系统属性-高级系统设置-高级-环境变量-系统变量-找到Path,在里面加入:
1.3 安装python
(1)需要安装一个Python解译器,可以使用conda search --full -name python(Anaconda如果比较新的版本,可以使用conda search --full --name python)检查支持的Python版本。我安装的就是比较新的版本,所以使用的是conda search --full --name python检查Python版本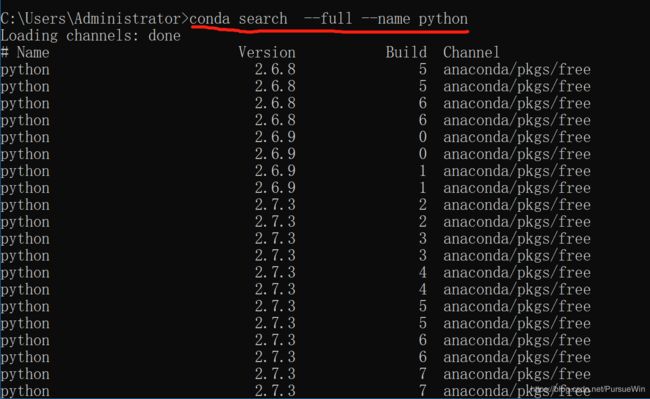
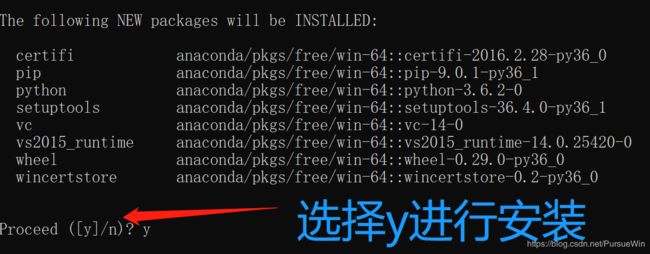
(2)安装Python解译器:conda create --name tensorflow python=3.6,我安装的是3.6版本,你可以根据自己需要安装自己的需要选择版本。(为了不出错,建议你也安装3.6版本)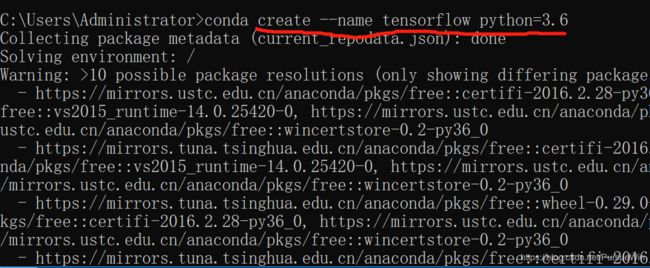
1.4、检查TensorFlow环境添加成功与否
(1)激活tensflow的环境:activate tensorflow
(2)检测tensflow的环境添加到了Anaconda里面:conda info --envs
(3)退出tensorflow的环境:deactivate tensorflow(不过这里不需要退出哈,因为我们要进行TensorFlow安装)
二、TensorFlow安装
前提: 在激活TensorFlow情况下(即前边有tensorflow字样),如果没有激活,需使用:activate tensorflow进行激活
(1)使用如下命令进行安装TensorFlow:pip install --upgrade --ignore-installed tensorflow,等待安装就可以了。
提示: 如果提示需要你升级你的pip的版本,那么你就根据上面的提示进行命令安装就可以了。我这里就遇到了,所以我升级了版本:python -m pip install --upgrade pip。
(2)安装TensorFlow:pip install --upgrade --ignore-installed tensorflow
2.1 测试TensorFlow安装是否成功
(1)打开之前安装的Anaconda,选择prompt
(2)使用activate tensorflow切换到tensorflow环境
(3)输入python进入Python编译环境
(4)依次输入如下命令:
import tensorflow as tf
hello = tf.constant('hello,tf')
sess = tf.Session()
print(sess.run(hello))
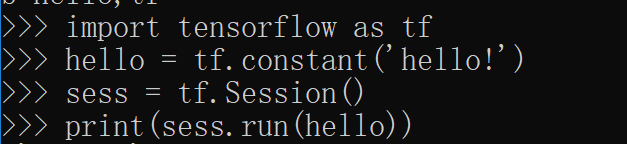
(5)显示如下结果表示测试成功:
2.2 错误处理
安装 tensorflow 版本为 2.3.0
2.2.1 在安装tensorflow完成后,import tensorflow as tf出现问题,问题如下:
| 1 2 3 4 5 6 7 8 9 10 11 12 13 14 15 16 17 18 19 20 21 22 23 24 25 26 27 28 29 30 31 32 33 34 35 36 37 38 39 40 41 42 43 44 |
|
问题原因:
tensorflow的新版本不支持比较老的cpu
解决办法:
卸载现有的tensorflow,安装tensorflow1.5版本
依次执行:
| 1 2 3 |
|
2.2.2 又报错 5555:
>>> import tensorflow as tf
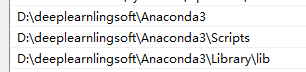
D:\deeplearnlingsoft\Anaconda3\envs\tensorflow\lib\site-packages\tensorflow\python\framework\dtypes.py:493: FutureWarning: Passing (type, 1) or '1type' as a synonym of type is deprecated; in a future version of numpy, it will be understood as (type, (1,)) / '(1,)type'.
_np_qint8 = np.dtype([("qint8", np.int8, 1)])
D:\deeplearnlingsoft\Anaconda3\envs\tensorflow\lib\site-packages\tensorflow\python\framework\dtypes.py:494: FutureWarning: Passing (type, 1) or '1type' as a synonym of type is deprecated; in a future version of numpy, it will be understood as (type, (1,)) / '(1,)type'.
_np_quint8 = np.dtype([("quint8", np.uint8, 1)])
D:\deeplearnlingsoft\Anaconda3\envs\tensorflow\lib\site-packages\tensorflow\python\framework\dtypes.py:495: FutureWarning: Passing (type, 1) or '1type' as a synonym of type is deprecated; in a future version of numpy, it will be understood as (type, (1,)) / '(1,)type'.
_np_qint16 = np.dtype([("qint16", np.int16, 1)])
D:\deeplearnlingsoft\Anaconda3\envs\tensorflow\lib\site-packages\tensorflow\python\framework\dtypes.py:496: FutureWarning: Passing (type, 1) or '1type' as a synonym of type is deprecated; in a future version of numpy, it will be understood as (type, (1,)) / '(1,)type'.
_np_quint16 = np.dtype([("quint16", np.uint16, 1)])
D:\deeplearnlingsoft\Anaconda3\envs\tensorflow\lib\site-packages\tensorflow\python\framework\dtypes.py:497: FutureWarning: Passing (type, 1) or '1type' as a synonym of type is deprecated; in a future version of numpy, it will be understood as (type, (1,)) / '(1,)type'.查阅后是因为numpy版本不符
通过以下代码将版本进行安装(安装过程conda会自动卸载之前不符合的版本):
pip install numpy==1.16.4 -i https://pypi.tuna.tsinghua.edu.cn/simple
2.2.3 执行测试代码出现问题:
>>> import tensorflow as tf
>>> hello = tf.constant('hello,tf')
>>> sess = tf.Session()
2020-08-20 13:55:57.006877: I C:\tf_jenkins\workspace\rel-win\M\windows\PY\36\tensorflow\core\platform\cpu_feature_guard.cc:137] Your CPU supports instructions that this TensorFlow binary was not compiled to use: AVX
>>> print(sess.run(hello))
b'hello,tf'
解决方法:
原因是下载TensorFlow的版本不支持cpu的AVX2编译。
可能是因为安装时使用的pip install tensorflow ,这样默认会下载X86_64的SIMD版本。
有两种解决办法:
1.忽略这个警告,不看它!
| 1 2 3 4 |
|
我们用第二个就可以了。
2.彻底解决,换成支持cpu用AVX2编译的TensorFlow版本。
首先,卸载原来版本的TensorFlow
| 1 |
|

完成后可以用pip list查看一下所有库,检查是否成功卸载。
然后去github下载正确的tf版本,Windows点这里下载。其他操作系统可以点这里找到对应的版本。
博主用的win10,python3.6,所以选择如下图:
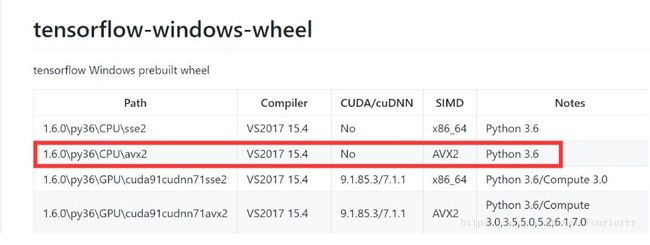
对应的path在上边的找到对应的.whl下载即可。
然后安装:
| 1 |
|
pip install tensorflow-1.6.0-cp36-cp36m-win_amd64.whl
成功安装后,再次运行TensorFlow就不会报错啦
2.2.3 What does version name ‘cp27’ or ‘cp35’ mean in Python?
如对于 gensim-0.12.4-cp27-none-win_amd64.whl文件名而言,将其文件名拆分的话,含义分别是:
- 0.12.4 - package version, they may be using semantic versioning
- cp27 - this package is for CPython. IronPython, Jython, or PyPy will probably be unhappy.
- CPython version 2.7.
- none - no feature of this package depends on the python Application Binary Interface, or ABI
- win_amd64 - this has been compiled for 64-bit Windows. That means that it probably has some code written in C/C++
- .whl - that means this is a wheel distribution. Which is handy, because it means if you’re running CPython 2.7 64-bit on Windows, and assuming you have pip installed, all you have to do to get this package is run: py -2.7 -m pip install –use-wheel gensim (assuming that it’s available on pypi, of course). You may need to py -2.7 -m pip install wheel first. But other than that, that should be all it takes.
版本不对下载正确版本即可
三、配置TensorFlow至Pycharm
pycharm安装 参考 https://blog.csdn.net/wuling129/article/details/107108512
只需将当前的Python编译环境配置为TensFlow安装路径中的Pyhton环境,具体操作如下:
1)打开Pycharm,点击“file”菜单下的settings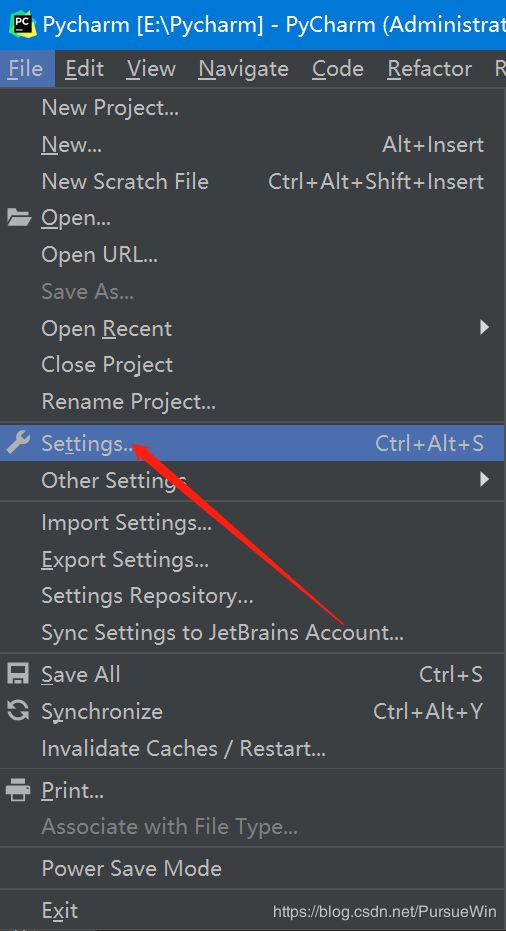
(2)点击“Project:Pycharm”中的“Project Interpreter”,点击右侧的小三角下的“Add”按钮,添加安装TensorFlow下的Python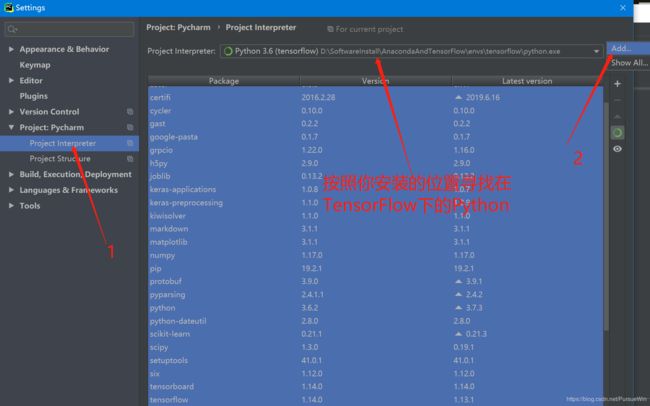
(3). 选择Existing Environment,找到TensorFlow安装路径下 bin包里的python文件
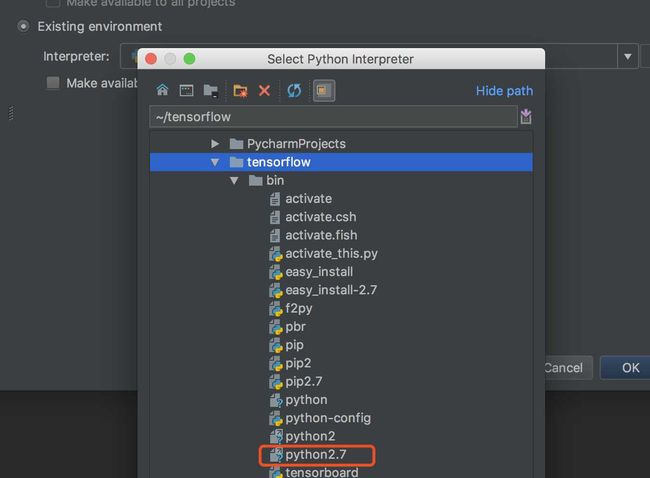
4. 添加完毕后,点击ok即可,之后就可以正常 import tensorflow