SpringBoot默认包扫描机制及使用@ComponentScan指定扫描路径
SpringBoot默认包扫描机制
标注了@Component和@Component的衍生注解如@Controller,@Service,@Repository就可以把当前的Bean加入到IOC容器中。那么SpringBoot是如何知道要去扫描@Component注解的呢。@ComponentScan做的事情就是告诉Spring从哪里找到bean
SpringBoot默认包扫描机制: 从启动类所在包开始,扫描当前包及其子级包下的所有文件。
我们可以通过以下的测试来验证一下。
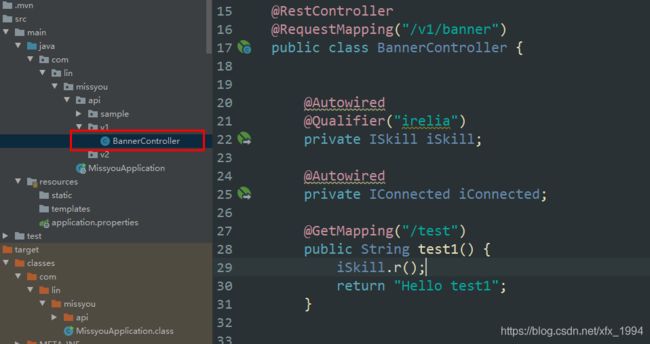
启动应用并访问BannerController这个控制器,目录结构如图

访问结果正常

当把BannerController移动到上一级目录,应用可以正常启动

但是再次访问刚才的路径时却出现了如下错误,代码是没有变动的,是Controller扫描 不到了。

实际上SpringBoot是通过@ComponentScan进行扫描。默认情况下,入口类上面的@SpringBootApplication里面有一个@ComponentScan,也就相当于@ComponentScan标注在入口类上。所以默认情况下,扫描入口类同级及其子级包下的所有文件。当我们想自己制定包扫描路径就需要加一个@ComponentScan
@ComponentScan的使用
常用参数含义
basePackages与value: 用于指定包的路径,进行扫描(默认参数)
basePackageClasses: 用于指定某个类的包的路径进行扫描
includeFilters: 包含的过滤条件
FilterType.ANNOTATION:按照注解过滤
FilterType.ASSIGNABLE_TYPE:按照给定的类型
FilterType.ASPECTJ:使用ASPECTJ表达式
FilterType.REGEX:正则
FilterType.CUSTOM:自定义规则
excludeFilters: 排除的过滤条件,用法和includeFilters一样
nameGenerator: bean的名称的生成器
useDefaultFilters: 是否开启对@Component,@Repository,@Service,@Controller的类进行检测
指定要扫描的包
上述例子,如果想扫描启动类上一级包,使用@ComponentScan指定包扫描路径,即可将BannerController加入到容器
@SpringBootApplication
@ComponentScan("com.lin")
public class MissyouApplication {
    public static void main(String[] args) {
        SpringApplication.run(MissyouApplication.class, args);
    }
}
excludeFilters 排除某些包的扫描
测试类准备:
@Controller
public class BannerController {
    BannerController(){
        System.out.println("Hello BannerController");
    }
}
--------------------------------------------------------------------
@Service
public class TestService {
    TestService(){
        System.out.println("Hello TestService");
    }
}
目录结构如下:

启动类上加@ComponentScan指定扫描lin这个包并排除@Controller这个注解标注的类
@SpringBootApplication
@ComponentScan(value = "com.lin",
        excludeFilters = {@ComponentScan.Filter(type = FilterType.ANNOTATION,value = {Controller.class})})
public class MissyouApplication {

    public static void main(String[] args) {
        SpringApplication.run(MissyouApplication.class, args);
    }
}
启动应用,控制台打印出了TestService而没有BannerController

@Component与@ComponentScan
在某个类上使用@Component注解,表明当需要创建类时,这个被注解标注的类是一个候选类。就像是有同学在举手。
@ComponentScan 用于扫描指定包下的类。就像看都有哪些举手了。