Flutter学习之旅(六)----ListView控件自定义Adapter以及带参数跳转
ListView控件是APP开发中最为常见的控件之一,回想Android开发中是重写BaseAdapter中的四个方法,尤其是getView()方法,返回我们最终显示的视图,并且在其中进行复用处理。在Flutter中,这个过程是怎样实现的呢?
首先给定要显示的数据
List<String> items=<String>['A','B','C','D','E','F','G','H','J'];其次自定义Adapter,处理每个子Item要显示的内容:
//buildListTile相当于ListView的Adapter
  Widget buildListTile(BuildContext context,String item){
    return new ListTile(
      isThreeLine: true,//子item的是否为三行
      dense: false,
      leading: new CircleAvatar(child: new Text(item),),//左侧首字母图标显示,不显示则传null
      title: new Text('子item的标题'),//子item的标题
      subtitle: new Text('子item的内容'),//子item的内容
      trailing: new Icon(Icons.arrow_right,color: Colors.green,),//显示右侧的箭头,不显示则传null
    );
  }
然后将这两者结合起来,即将List的内容设置给Adapter:
Iterable<Widget> listTitles=items.map((String item){//将items的内容设置给Adapter
      return buildListTile(context,item);
    });
最后将Adapter设置给ListVIew:
new ListView(
        children: listTitles.toList(),//添加ListView控件
      )
完整代码如下:
import 'package:flutter/material.dart';
void main(){
  runApp(new MaterialApp(home: new ListDemo(),));
}
class ListDemo extends StatefulWidget{
  @override
    _ListDemoState createState(){
      return new _ListDemoState();
  }
}
class _ListDemoState extends State<ListDemo>{
//buildListTile相当于ListView的Adapter
  Widget buildListTile(BuildContext context,String item){
    return new ListTile(
      isThreeLine: true,//子item的是否为三行
      dense: false,
      leading: new CircleAvatar(child: new Text(item),),//左侧首字母图标显示,不显示则传null
      title: new Text('子item的标题'),//子item的标题
      subtitle: new Text('子item的内容'),//子item的内容
      trailing: new Icon(Icons.arrow_right,color: Colors.green,),//显示右侧的箭头,不显示则传null
    );
  }
  @override
  Widget build(BuildContext context) {
    List items=['A','B','C','D','E','F','G','H','J'];
    Iterable listTitles=items.map((String item){//将items的内容设置给Adapter
      return buildListTile(context,item);
    });
    listTitles=ListTile.divideTiles(context: context,tiles: listTitles);//给Listview设置分隔线
    return new Scaffold(appBar: new AppBar(title: new Text('ListViewDemo'),),
      body: new Scrollbar(child: new ListView(
        children: listTitles.toList(),//添加ListView控件
      )),);
  }
} 上面就是用ListView展示列表数据的过程,一般列表都是可以点击的,点击后跳转到新的页面。在Android中是开启一个新的Activity,在Flutter中使用route作跳转。具体使用是在main方法runApp里面声明要跳转的新页面:
void main(){
  runApp(new MaterialApp(home: new ListDemo(),routes: <String,WidgetBuilder>{
    '/second_page':(BuildContext context){return new SecondPage(title: clickText,); }//先声明要跳转的新页面,title是要传递的参数,'/second_page'是给这个页面取个名字,后面会用到
  },));
}
然后在ListView的点击事件onTap里面进行跳转:
onTap: (){
        print('ListView点击事件');
        clickText=item;//获取点击的内容
        Navigator.of(context).pushNamed('/second_page');//页面跳转
      },
因为要跳转到第二个页面,所以我们需要在lib文件夹下面新建一个dart文件,然后在里面添加控件并且接收上一个页面传来的参数,第二个页面的代码为:
import 'package:flutter/material.dart';
class SecondPage extends StatefulWidget{
  SecondPage ({Key key,this.title}):super(key:key);//接收从上一个页面传来的值
  final String title;
  @override
  State createState() {
    return new _SecondPageState(title: title);
  }
}
class _SecondPageState extends State<SecondPage>{
  _SecondPageState({Key key,this.title});
  final String title;
  @override
  Widget build(BuildContext context) {
    return new Scaffold(appBar: new AppBar(title: new Text("第二页 $title"),),);//第二个页面的布局很简单,只有最上面的导航栏
  }
}
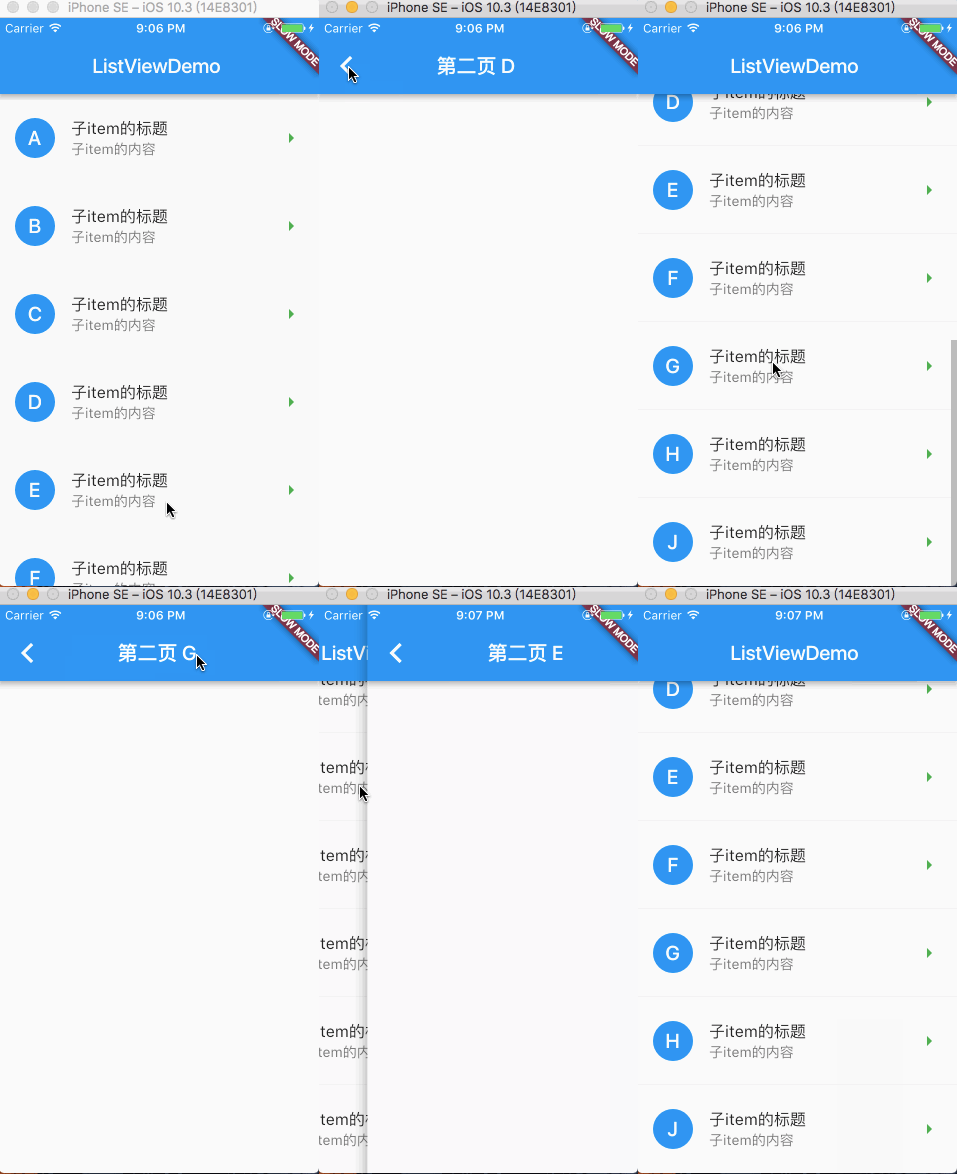
运行结果:
至此,常用的ListView展示数据以及点击跳转已经完成了,好像比Android里面简单些,看看iOS模拟器运行很流畅,而且界面相当漂亮,果然不愧于谷歌一直号称的“制作漂亮的app”。如果你也觉得界面流畅漂亮,不妨试试谷歌工程师给我们实现的各种酷炫效果,说不定会让你眼前一亮哦(提示:在/flutter/examples/flutter_gallery文件夹里面)。
源码下载

