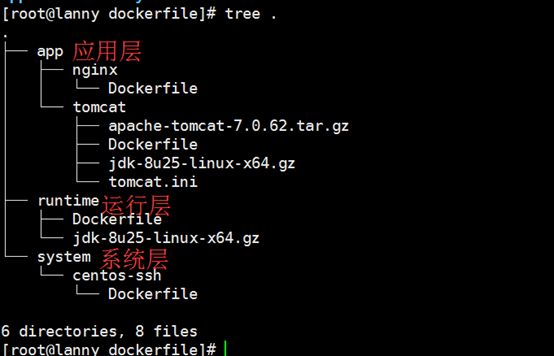
dockerfile动手自己建image
1,熟悉dockerfile语法
2,手动构建centos7
3,使用官网centos7
4,系统层--基于官网cenos7 添加 supervisor+ssh
启动后即启动ssh
5,运行层—安装jdk
6,app层安装tomcat,暴露8080.—supervisor接管.
设计原则:运行层和应用层均基于系统层.
1,docker file 设计
1,自己动手构建centos
先装个工具
yum install epel-release -y
yum install -y \
https://www.dwhd.org/wp-content/uploads/2016/06/febootstrap-3.21-4.el6_.x86_64.rpm \
https://www.dwhd.org/wp-content/uploads/2016/06/fakechroot-libs-2.9-24.5.el6_1.1.x86_64.rpm \
https://www.dwhd.org/wp-content/uploads/2016/06/febootstrap-supermin-helper-3.21-4.el6_.x86_64.rpm \
https://www.dwhd.org/wp-content/uploads/2016/06/fakechroot-2.9-24.5.el6_1.1.x86_64.rpm使用一个叫febootstrap来构建个镜像,过程就像是下载一个个目录从以下那个url.
oh 对,这个安装适用centos6 7,没错,同样使用centos7. 放心装吧.
接下去构建镜像:
制作镜相
febootstrap -i bash -i wget -i yum -i iputils -i iproute -i man -i vim-minimal -i openssh-server -i openssh-clients centos67 centos67-image http://mirrors.aliyun.com/centos/6.7/os/x86_64/
cd centos67-image
tar -c .|docker import - centos6.7-ssh

febootstrap -i bash -i wget -i yum -i iputils -i iproute -i man -i vim-minimal -i vim-enhanced.x86_64 -i openssh-server -i openssh-clients centos7 centos7 http://mirrors.aliyun.com/centos/7/os/x86_64/
cd centos67-image
tar -c .|docker import - centos6.7-ssh

#制作centos7.3镜像—我用的这种
febootstrap -i bash -i wget -i yum -i net-tools -i iputils -i iproute -i openssh-server -i openssh-clients -i man centos73 centos73-doc http://mirrors.163.com/centos/7.3.1611/os/x86_64/
#执行完后生成以下目录
cd docker73-doc
#进入目录将生成的文件导入为docker image
tar -c . | docker import - centos73-bash
1,系统层--新建个带有supervisor管理sshd 的centos.基于官网的centos来做吧
[root@lanny dockerfile]# cat system/centos-ssh/Dockerfile
#Docker for centos7

#Base images
FROM centos

#MAINTAINER
MAINTAINER lanny

#yum configuration
RUN  rm -rf /var/cache/yum/*
ADD yum.repos.d.tar.gz /etc/

#Base Pkg
RUN yum clean all \
        && yum makecache  \
        && yum -y install \
        epel-release \
        sudo \
        psmisc \
        net-tools \
        tree \
        lrzsz \
        wget \
        vim \
        git \
        mysql-devel \
        supervisor \
        openssh-server \
        openssh-clients \
        openssl-devel \
        yum clean all

#For CONFIG SSHD
RUN ssh-keygen -q -N "" -t rsa -f /etc/ssh/ssh_host_rsa_key && \
    ssh-keygen -q -N "" -t dsa -f /etc/ssh/ssh_host_dsa_key && \
    ssh-keygen -q -N "" -A -t ecdsa -f /etc/ssh/ssh_host_dsa_key

#For supervisor
RUN  mkdir -p /var/log/supervisor/
ADD supervisord.conf /etc/supervisord.conf
ADD sshd.ini /etc/supervisord.d/
CMD ["/usr/bin/supervisord", "--configuration=/etc/supervisord.conf"]

#set root pwd
RUN echo 'root:123456' | chpasswd

#
EXPOSE 22
穿插下supervisor安装方法:
centos6可以以下方法安装,确保不错
yum install python-setuptools -y
yum install epel-release -y
yum install python-meld3 -y
easy_install supervisor
centos7直接yum安装吧.
安装后配置,只需要修改为super前台运行即可
nodaemon=true上面有个坑坑惨了我, 就是sshd要前台运行,
执行systemctl start sshd时候报以下错误:
systemctl - Failed to get D-Bus connection: Operation not permitted[root@bff724b92c60 supervisord.d]# cat sshd.ini
[program:sshd]
command=/usr/sbin/sshd -D
process_name=%(program_name)s
autostart=true2,运行层
[root@lanny dockerfile]# cat runtime/Dockerfile
#Docker for jdk-8u25-linux-x64.gz

#Base images
FROM docker.io/lanny/centos73

#MAINTAINER
MAINTAINER lanny

#For JDK
ADD jdk-8u25-linux-x64.gz /usr/local/
RUN ln -s /usr/local/jdk1.8.0_25 /usr/local/jdk
RUN echo 'JAVA_HOME=/usr/local/jdk' >> /etc/profile && \
    echo 'PATH=/usr/local/sbin:/usr/local/bin:/usr/sbin:/usr/bin:/sbin:/bin:/bin:/usr/local/jdk/bin' >> /etc/profile && \
    echo CLASSPATH=.:/usr/local/jdk/lib:/usr/local/jdk/jre/lib >> /etc/profile && \
    echo export JAVA_HOME CLASSPATH >> /etc/profile

#For CONFIG SSHD
#ADD sshd.ini /etc/supervisord.d/
CMD ["/usr/bin/supervisord", "--configuration=/etc/supervisord.conf"]

#SSHD
EXPOSE 22
3,app层
[root@lanny dockerfile]# cat app/tomcat/Dockerfile
#Docker for jdk-8u25-linux-x64.gz apache-tomcat-7.0.62.tar.gz

#Base images
FROM docker.io/lanny/centos73

#MAINTAINER
MAINTAINER lanny

#For JDK
ADD jdk-8u25-linux-x64.gz /usr/local/
RUN ln -s /usr/local/jdk1.8.0_25 /usr/local/jdk
RUN echo 'JAVA_HOME=/usr/local/jdk' >> /etc/profile && \
    echo 'PATH=/usr/local/sbin:/usr/local/bin:/usr/sbin:/usr/bin:/sbin:/bin:/bin:/usr/local/jdk/bin' >> /etc/profile && \
    echo CLASSPATH=.:/usr/local/jdk/lib:/usr/local/jdk/jre/lib >> /etc/profile && \
    echo export JAVA_HOME CLASSPATH >> /etc/profile


#For tomcat
ADD apache-tomcat-7.0.62.tar.gz /usr/local
RUN ln -s /usr/local/apache-tomcat-7.0.62 /usr/local/tomcat
ENV TOMCAT_HOME /usr/local/tomcat

#For CONFIG SSHD
ADD tomcat.ini /etc/supervisord.d/
CMD ["/usr/bin/supervisord", "--configuration=/etc/supervisord.conf"]

#port
EXPOSE 22
EXPOSE 8080
tomcat的super管理脚本: 要注意前台运行
[root@bff724b92c60 supervisord.d]# cat tomcat.ini
[program:tomcat]
command=/usr/local/tomcat/bin/catalina.sh run
process_name=%(program_name)s
autostart=true
