Spring Boot 整合Neo4j笔记一
笔记主要记录如何使用Spring Boot Neo4j访问Neo4j数据库以及在实验过程中遇到的问题及解决方案。
开发环境:Myeclipes+spring boot+neo4j
安装neo4j数据库
在Maven项目添加spring-data-neo4j和相关依赖
编写domain对象
继承Neo4jRepository接口
实现service
在Controller中访问
运行截图
总结
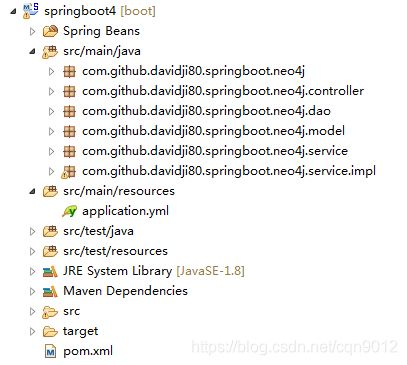
整体框架:

就像上面的架构图所展示的,后端主要分为四个部分:neo4j(数据库),repository, service 以及controller。在这四个部分中,传递以entity bean为model的数据。其中,repository(相当于dao层)负责对数据库进行直接操作(增删改查);service负责将repository整合,从而提供一定的服务;controller则负责根据service能提供的服务,产生一个API URL,为前端提供restful的数据服务。
1、建完Maven项目后,在pom.xml中注入依赖。
            org.springframework.boot
            spring-boot-starter-data-neo4j


            org.springframework.boot
            spring-boot-starter-web


			org.neo4j
			neo4j-ogm-http-driver
2、编写model层的实体类,也是数据库中的存储单元。要做到这一点,我们需要在生成的实体类加上注解 @NodeEntity,为了标识所有的节点,我给所有的entity bean class都加上了Id属性,并且给它加上注解@GraphId。另外,前面对Neo4j的介绍也说了,neo4j数据库里,主要由节点(node)和关系(relationship)组成。这里已经有了node,还差relationship,这就涉及到了另一个注解@Relationship。如下图所示,注解@Relationship表示了该node与其他node的关系,在class中是class的属性。
package com.github.davidji80.springboot.neo4j.model;

import org.neo4j.ogm.annotation.*;

@RelationshipEntity(type = "ACTED_IN")
public class ActedIn {
	@GraphId
    private Long id;

    @Property(name = "roles")
    private String roles;

    @StartNode
    private Person startNode;

    @EndNode
    private Movie endNode;

    public Long getId() {
        return id;
    }

    public void setId(Long id) {
        this.id = id;
    }

    public String getRoles() {
        return roles;
    }

    public void setRoles(String roles) {
        this.roles = roles;
    }

    public Person getStartNode() {
        return startNode;
    }

    public void setStartNode(Person startNode) {
        this.startNode = startNode;
    }

    public Movie getEndNode() {
        return endNode;
    }

    public void setEndNode(Movie endNode) {
        this.endNode = endNode;
    }
}
3、编写Repository层,继承Neo4jRepository接口。Neo4jRepository就如同spring jpa中的JpaRepository一样, 已经帮我们实现很多save、delete、findAll、 findOne、分页等功能,还能根据方法的名字和查询关系字符串自动组成And, or GT LT等等。
例如:
MovieRepository中的findByTitle方法会自动按照title帮我们查询Movie,就相当于MATCH (n:Movie) WHERE n.title = {title} RETURN n
而findByRevenueGreaterThan(int revenue);方法就相当于MATCH (n:Movie) WHERE n.revenue > {revenue} RETURN n
package com.github.davidji80.springboot.neo4j.dao;

import com.github.davidji80.springboot.neo4j.model.ActedIn;
import org.springframework.data.neo4j.repository.Neo4jRepository;

public interface ActedInRepository extends Neo4jRepository {
}
4、在repository之上,我们需要包装一层service,一般而言单个repository只是实现该对象自身的CRUD,如果我们要实现业务逻辑,需要在service中完成,比如完成演员到movie的关系添加, 在service中,有个方法addActor2Movie。该方法先调用PersonRepository查询person是否存在,然后调用MovieRepository查询movie是否存在,如果都存在就调用person的方法addActMovie,然后保存person对象, 否则就报错。
在实现对用service的时候,给对应的ServiceImpl加上注解@Service,这样一来。就能够使得在需要service的地方,只要声明为@Autowired,框架就会帮其自动匹配到它的实现类(ServiceImpl)
package com.github.davidji80.springboot.neo4j.service;

import com.github.davidji80.springboot.neo4j.model.ActedIn;
import com.github.davidji80.springboot.neo4j.model.Directed;
import com.github.davidji80.springboot.neo4j.model.Movie;
import com.github.davidji80.springboot.neo4j.model.Person;

public interface MovieServer {
    Person addPerson(Person person);
    Person findOnePerson(long id);
    void deleteOnePerson(long id);

    Movie addMovie(Movie movie);
    Movie findOneMovie(long id);

    Directed directed(Directed directed);
    ActedIn actedIn(ActedIn actedIn);
}
5、完成了上述的工作,service已经准备好了前端需要的各种服务,这时候我们需要将前后端连接起来,这时候就需要controller。生成一个Controller类,给它加上注解@Controller;然后通过@RequestMapping注解,给它配上API URL,进行路由控制;最后通过@ResponseBody @RequestBody 两个注解分别是向前端发送数据和从前端获取数据。
package com.github.davidji80.springboot.neo4j.controller;

import com.github.davidji80.springboot.neo4j.dao.PersonRepository;
import com.github.davidji80.springboot.neo4j.model.ActedIn;

import com.github.davidji80.springboot.neo4j.model.Directed;
import com.github.davidji80.springboot.neo4j.model.Movie;
import com.github.davidji80.springboot.neo4j.model.Person;
import com.github.davidji80.springboot.neo4j.service.MovieServer;
import org.springframework.beans.factory.annotation.Autowired;
import org.springframework.stereotype.Controller;
import org.springframework.web.bind.annotation.PathVariable;
import org.springframework.web.bind.annotation.RequestMapping;
import org.springframework.web.bind.annotation.ResponseBody;
import org.springframework.web.bind.annotation.RestController;


@RestController
@Controller  //处理请求
@RequestMapping("/movie")
public class MovieController {
    @Autowired
    private MovieServer movieServer;
    @Autowired
    private PersonRepository personRepository;

    @RequestMapping("addPerson")
    public Person addPerson(Person person) {
        return movieServer.addPerson(person);
    }
    @RequestMapping("/addPerson")
    public Person addPerson() {
        Person person = new Person();
        person.setName("zhangsan");
        person.setBorn(2018);
        return personRepository.save(person);
    }


    @RequestMapping("/findOnePerson/{id}")
    public Person findOnePerson(@PathVariable("id")String id){
        return movieServer.findOnePerson(Long.parseLong(id));
    }

    @RequestMapping("/deleteOnePerson/{id}")
    public String deleteOnePerson(@PathVariable("id")String id){
        movieServer.deleteOnePerson(Long.parseLong(id));
        return "success";
    }

    @RequestMapping("addMovie")
    public Movie addMobie(Movie movie) {
        return movieServer.addMovie(movie);
    }

    @RequestMapping("/findOneMovie/{id}")
    public Movie findOneMovie(@PathVariable("id")String id){
        return movieServer.findOneMovie(Long.parseLong(id));
    }

    @RequestMapping("/directed/{personId}/{movieId}")
    public Directed directed(@PathVariable("personId")String personId,@PathVariable("movieId")String movieId){
        Person person=movieServer.findOnePerson(Long.parseLong(personId));
        Movie movie=movieServer.findOneMovie(Long.parseLong(movieId));
        Directed directed=new Directed();
        directed.setStartNode(person);
        directed.setEndNode(movie);
        return movieServer.directed(directed);
    }

    @RequestMapping("/actedIn/{personId}/{movieId}")
    public ActedIn actedIn(@PathVariable("personId")String personId, @PathVariable("movieId")String movieId){
        Person person=movieServer.findOnePerson(Long.parseLong(personId));
        Movie movie=movieServer.findOneMovie(Long.parseLong(movieId));
        ActedIn actedIn=new ActedIn();
        actedIn.setRoles("龙套");
        actedIn.setStartNode(person);
        actedIn.setEndNode(movie);
        return movieServer.actedIn(actedIn);
    }
    @ResponseBody//把返回值写给浏览器
	@RequestMapping("/hello")//接收浏览器发来的hello
	public String hello(){
		return "hello world";
	}

}
6、编写启动类,添加上@EnableNeo4jRepositories注解,目的是激活我们定义的存储库接口,需要在@SpringBootApplication注解的类上加上EnableNeo4jRepositories。
package com.github.davidji80.springboot.neo4j;

import org.springframework.boot.SpringApplication;
import org.springframework.boot.autoconfigure.SpringBootApplication;
import org.springframework.context.annotation.ComponentScan;
import org.springframework.data.neo4j.repository.config.EnableNeo4jRepositories;

@SpringBootApplication
@EnableNeo4jRepositories
@ComponentScan(basePackages={"com.github.davidji80.springboot.*"})
public class Neo4jApplication {
    public static void main(String[] args) {
        SpringApplication.run(Neo4jApplication.class, args);
    }
}
7、运行之前的需要配置一下application.yml
 spring:
  data:
    neo4j:
      uri: http://localhost:7474
      username: neo4j
      password: 123456
总结:
遇到的问题:启动成功,但是页面出现404。
解决办法:在编写springboot的启动的Application必须放在controller类的外面,要不然扫描不到,例如,com包下放置springbootApplication类,则需要在建立包com.controller下放置controller类,因为在扫描时是逐级下扫,因此启动类需要放在最外层。