java学习笔记之ScheduledExecutorService初理解
文章目录
- 一、ScheduledExecutorService是什么?
- 二、ScheduledExecutorService的使用
- 1. schedule()方法
- 结果分析
- 结论
- 2. scheduleAtFixedRate()方法
- 结果分析
- 结论
- 3. scheduleWithFixedDelay()方法
- 结果分析
- 结论
- 三、ScheduledExecutorService的实现原理
- 四、一图胜千言
- 五、F&Q
ScheduledExecutorService接口是netty事件循环组(eventLoop)实现的顶级接口,因此需要对该接口有较为深入的理解才能较为更好的理解netty的事件循环组。
我们在学习一样东西的时候,可以从是什么、干什么、为什么等角度去理解知识。
一、ScheduledExecutorService是什么?
ScheduledExecutorService接口是java线程池中最重要的几个接口之一。
					Executor
						↑
				 ExecutorService
						↑
			 ScheduledExecutorService
它除了支持原生线程池的功能之外,同时支持定时任务处理的功能。
在JDK中为它提供了一个默认的实现类:ScheduledThreadPoolExecutor。下面我们来看它的基本用法。
二、ScheduledExecutorService的使用
ScheduledExecutorService包括三个方法:schedule()、scheduleAtFixedRate()、scheduleWithFixedDelay()。下面主要分析ScheduledThreadPoolExecutor实现类的使用。
1. schedule()方法
下面将演示该方法的基本使用,以及通过实验得出的结论,具体的实现原理后面分析。先来看几个例子。
例子1:
public static void main(String[] args) {
        // 注意此处线程个数为1
        ScheduledExecutorService executorService = Executors.newScheduledThreadPool(1);
        long start = System.currentTimeMillis();
        System.out.println("第一次提交");
        executorService.schedule(()->{
            System.out.println(System.currentTimeMillis() - start);
            try {
                // 注意此处休眠4秒
                Thread.sleep(4000);
            } catch (InterruptedException e) {
                e.printStackTrace();
            }
        }, 3, TimeUnit.SECONDS);
        System.out.println("第二次提交");
        executorService.schedule(()->{
            System.out.println(System.currentTimeMillis() - start);
        }, 3, TimeUnit.SECONDS);
}
输出:
第一次提交
第二次提交
3114
7115
例子2:
public static void main(String[] args) {
        // 相较于例子1,这里的线程池改为2
        ScheduledExecutorService executorService = Executors.newScheduledThreadPool(2);
        long start = System.currentTimeMillis();
        System.out.println("第一次提交");
        executorService.schedule(()->{
            System.out.println(System.currentTimeMillis() - start);
            try {
                // 注意此处休眠4秒
                Thread.sleep(4000);
            } catch (InterruptedException e) {
                e.printStackTrace();
            }
        }, 3, TimeUnit.SECONDS);
        System.out.println("第二次提交");
        executorService.schedule(()->{
            System.out.println(System.currentTimeMillis() - start);
        }, 3, TimeUnit.SECONDS);
}
输出:
第一次提交
第二次提交
3167
3169
例子3
public static void main(String[] args) {
        // 注意这里的线程池个数改为1了
        ScheduledExecutorService executorService = Executors.newScheduledThreadPool(1);
        long start = System.currentTimeMillis();
        System.out.println("第一次提交");
        executorService.schedule(()->{
            System.out.println(System.currentTimeMillis() - start);
            try {
                // 注意此处休眠4秒
                Thread.sleep(4000);
            } catch (InterruptedException e) {
                e.printStackTrace();
            }
        }, 3, TimeUnit.SECONDS);
        System.out.println("第二次提交");
        // 注意此处延迟时间改为2s
        executorService.schedule(()->{
            System.out.println(System.currentTimeMillis() - start);
        }, 2, TimeUnit.SECONDS);
}
输出:
第一次提交
第二次提交
2103
3100
结果分析
- 例子1中,线程池大小1,第一次提交的任务成功延迟3s执行,并且执行耗时为4s。而第二次提交的任务延迟7s后才执行,不符合3s延迟的预期。
- 例子2中,线程池大小2,第一次和第二次提交的任务都延迟3s执行,符合预期。说明当有多个任务提交的时候,延迟执行与线程池的大小和上一个任务执行耗时两个因素有关。
- 例子3中,线程池大小1,第一次提交的任务延迟3s执行,第二次提交的任务延迟2s执行。说明提交任务的先后顺序与实际执行的顺序无关。
结论
- 起到延迟执行的作用;
- 多次提交任务时,后面任务延迟执行的时间是否准确,与线程池的大小和上一个任务执行耗时两个因素有关。
- 提交任务的先后顺序与实际执行的顺序无关,而是与延迟时间有关。
2. scheduleAtFixedRate()方法
scheduleAtFixedRate()方法比起前面的schedule()方法复杂得多,这里就不再分析提交多个任务的情况,等到讲解了他们的实现原理之后,再根据原理分析即可。同样先演示其基本用法,再根据输出分析结论。
例子1
public static void main(String[] args) {
        ScheduledExecutorService executorService = Executors.newScheduledThreadPool(1);
        executorService.scheduleAtFixedRate(()->{
            System.out.println("coming");
            try {
                // 注意此处休眠时间为2s
                Thread.sleep(2000);
                System.out.println("sleep end");
            } catch (InterruptedException e) {
                e.printStackTrace();
            }
        // 延迟0s执行,周期为3s
        }, 0, 3, TimeUnit.SECONDS);
}
例子2
public static void main(String[] args) {
        ScheduledExecutorService executorService = Executors.newScheduledThreadPool(1);
        executorService.scheduleAtFixedRate(()->{
            System.out.println("coming");
            try {
                // 注意此处休眠时间为5s
                Thread.sleep(5000);
                System.out.println("sleep end");
            } catch (InterruptedException e) {
                e.printStackTrace();
            }
        // 延迟0s执行,周期为3s
        }, 0, 3, TimeUnit.SECONDS);
}
先到IDE跑这两个例子,我们可以发现。
结果分析
- 例子1中,任务正常的每3s周期性执行;
- 例子2中,每个任务执行耗时为5s,而我们预期的是周期3s执行一次。但事实上是需要等待上一个周期执行完毕,下一个周期马上执行。也就是5s执行一次。
结论
- 此方法用于周期性执行任务
- 当任务耗时长于周期,那么下一个周期任务将在上一个执行完毕之后马上执行。
- 当任务耗时短于周期,那么正常周期性执行。
3. scheduleWithFixedDelay()方法
例子1
public static void main(String[] args) {
        ScheduledExecutorService executorService = Executors.newScheduledThreadPool(1);
        executorService.scheduleWithFixedDelay(()->{
            System.out.println("coming");
            try {
                // 注意此处休眠时间为2s
                Thread.sleep(2000);
                System.out.println("sleep end");
            } catch (InterruptedException e) {
                e.printStackTrace();
            }
        // 第一个任务延迟0s执行,其余延迟为3s
        }, 0, 3, TimeUnit.SECONDS);
}
例子2
public static void main(String[] args) {
        ScheduledExecutorService executorService = Executors.newScheduledThreadPool(1);
        executorService.scheduleWithFixedDelay(()->{
            System.out.println("coming");
            try {
                // 注意此处休眠时间为5s
                Thread.sleep(5000);
                System.out.println("sleep end");
            } catch (InterruptedException e) {
                e.printStackTrace();
            }
        // 第一个任务延迟0s执行,其余延迟为3s
        }, 0, 3, TimeUnit.SECONDS);
}
到IDE跑这两个例子。
结果分析
- 例子1中,第二次执行等到上一次执行完毕之后,延迟3s才执行。
- 例子2中,也是一样。
结论
- 此方法用于周期性执行
- 无论上一个方法耗时多长,下一个方法都会等到上一个方法执行完毕之后,再经过delay的时间才执行。
三、ScheduledExecutorService的实现原理
下面分析的是JDK自带的ScheduledExecutorService接口的实现类ScheduledThreadPoolExecutor的实现原理。
ScheduledThreadPoolExecutor类继承自ThreadPoolExecutor,除了拥有普通线程池的功能之外,因为实现了ScheduledExecutorService接口,因而同时拥有定时器的功能。
ThreadPoolExecutor线程池太过基础,因此不再过多介绍。
- 首先看到ScheduledThreadPoolExecutor类的构造方法,它其实就是调用了父类ThreadPoolExecutor的构造方法,其余啥事都没干。
public ScheduledThreadPoolExecutor(int corePoolSize) {
        super(corePoolSize, Integer.MAX_VALUE, 0, NANOSECONDS,new DelayedWorkQueue());
 }
- ScheduledThreadPoolExecutor调用构造方法实例化之后,就能够调用相关的定时器方法了。下面先看schedule()方法。
public ScheduledFuture schedule(Runnable command, long delay,  TimeUnit unit) {
        if (command == null || unit == null)
            throw new NullPointerException();
        /**
         *将我们传入的Runnable对象封装成ScheduledFutureTask对象,ScheduledFutureTask类实现了RunnableScheduledFuture接口。
         *ScheduledFutureTask类除了包含Runnable属性表示任务本身外,还有time表示任务执行时间,period表示任务执行周期等。
         *有了这几个属性,当线程获取到ScheduledFutureTask对象时,就可以判断这个对象的Runnable属性是否到了要执行的时候。
         */
        RunnableScheduledFuture t = decorateTask(command,
            new ScheduledFutureTask(command, null, triggerTime(delay, unit)));
        // 将ScheduledFutureTask对象添加到线程池的任务队列中,这个队列是调用构造方法实例化的ScheduledThreadPoolExecutor的时候传入的DelayedWorkQueue
        delayedExecute(t);
        return t;
}
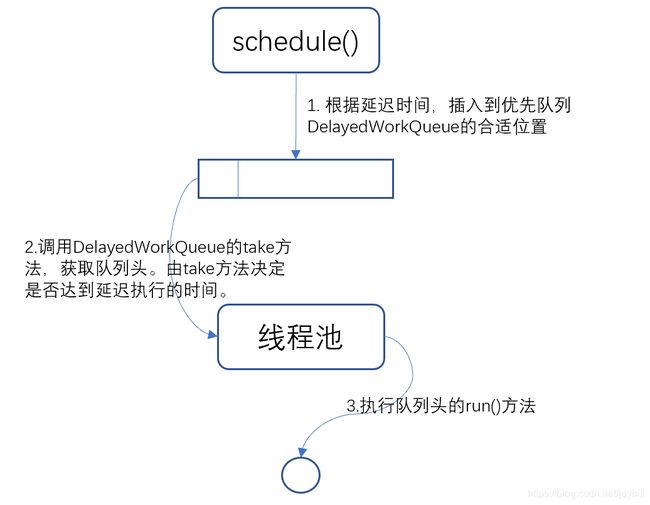
- 了解过ThreadPoolExecutor线程池的实现原理的都知道,线程会从任务队列中拿出队列头,然后执行。在ScheduledThreadPoolExecutor中,我们需要确保线程每次拿出的任务都是最近的时间内需要执行的任务,也就是说,队列头的任务必须是剩余时间最少、需要优先执行的。这时候优先队列
DelayedWorkQueue登场了。它能确保每次添加任务到队列的时候,按时间剩余多少的顺序将任务排在合适的位置。当线程调用getTask()方法获取队列头的元素时,它会拿队列头元素的time和当前时间对比,判断是否达到可以执行的时间。如果时间到了,那么返回队列头给线程执行,否则不返回。
public RunnableScheduledFuture take() throws InterruptedException {
            final ReentrantLock lock = this.lock;
            lock.lockInterruptibly();
            try {
                for (;;) {
                    RunnableScheduledFuture first = queue[0];
                    if (first == null)
                        available.await();
                    else {
                        // 判断队列头是否达到时间,可以执行
                        long delay = first.getDelay(NANOSECONDS);
                        if (delay <= 0)
                            return finishPoll(first);
                        first = null; // don't retain ref while waiting
                        if (leader != null)
                            available.await();
                        else {
                            Thread thisThread = Thread.currentThread();
                            leader = thisThread;
                            try {
                                available.awaitNanos(delay);
                            } finally {
                                if (leader == thisThread)
                                    leader = null;
                            }
                        }
                    }
                }
            } finally {
                if (leader == null && queue[0] != null)
                    available.signal();
                lock.unlock();
            }
        }
- 这样,schedule()的延迟执行就可以实现了。说白了,其实就是线程池调用获取队列头部的take()方法时,take()方法会判断队列头部元素是否达到可执行的时间,如果是则返回给线程执行。 当然,需要保证队列为优先队列。至于为什么不用
PriorityQueue而是再写一个,原因估计是PriorityQueue非线程安全并且不支持阻塞读写吧。 - 上面讲完了schedule()方法的实现原理,接下来看scheduleAtFixedRate()的实现原理。看下面代码,其实和schedule()方法差不多,只是为ScheduledFutureTask的outerTask属性赋值了,outerTask其实指向的是this。同样是把任务放到队列里面,等待线程执行。
public ScheduledFuture scheduleAtFixedRate(Runnable command, long initialDelay,  long period, TimeUnit unit) {
        if (command == null || unit == null)
            throw new NullPointerException();
        if (period <= 0)
            throw new IllegalArgumentException();
        ScheduledFutureTask sft = new ScheduledFutureTask(command, null, triggerTime(initialDelay, unit), unit.toNanos(period));
        RunnableScheduledFuture t = decorateTask(command, sft);
        sft.outerTask = t;
        delayedExecute(t);
        return t;
}
- 那么它是怎么实现周期性执行的呢?其实它是在被线程执行之后,在调用ScheduledFutureTask的run()方法那里处理的。
public void run() {
       // 是否为周期性任务
       boolean periodic = isPeriodic();
       if (!canRunInCurrentRunState(periodic))
           cancel(false);
       else if (!periodic)
           ScheduledFutureTask.super.run();
           // 是周期性任务的话,先执行它
       else if (ScheduledFutureTask.super.runAndReset()) {
           /*
            *   然后设置下一次执行的时间。这个方法里面period大于0表示是周期性执行,而小于0表示周期性延迟执行,即scheduleWithFixedDelay()方法。
            *   我们看到time属性被重新赋值了。如果是周期性执行,那么在上一次开始执行的time的基础上,加上period。
            *   如果是周期性延迟执行,那么在当前时间的基础上加上period。
			*   private void setNextRunTime() {
		    *       long p = period;
		    *       if (p > 0)
		    *            time += p;
		    *        else
		    *            time = triggerTime(-p);
		    *    }
            */
           setNextRunTime();
           /**
            * 然后在把outerTask加入队列中。因为outerTask和this指向的对象是一样的,而time属性在上面被改变了,
            * 所以把outerTask加入队列,等待线程处理。这样便可以实现周期性处理和周期性延迟处理了。
            */
           reExecutePeriodic(outerTask);
       }
}
- 说白了,周期性处理和周期性延迟处理,都是在等上一个任务消费完成之后,再把下一个任务推进队列中,等待线程执行。因此,对于scheduledAtFixedRate()方法当上一个任务耗时长于周期的时候,下一个任务放入队列之后通常会被马上执行。而对于scheduledWithFixedDelay()方法则不影响。
四、一图胜千言
五、F&Q
1、为什么用优先队列(小顶堆)而不是有序的数组或者链表?
因为优先队列只需要确保局部有序,它的插入、删除操作的复杂度都是O(log n);而有序数组的插入和删除复杂度为O(n);链表的插入复杂度为O(n),删除复杂度为O(1)。总体而言优先队列性能最好。
2、为什么自己重复实现了DelayedWorkQueue,而不对PriorityQueue进行封装或者直接用DelayQueue、PriorityBlockingQueue?
暂时没想到原因。按理说DelayedWorkQueue能做到的,DelayQueue基本都可以做到,实现不明白为何要重复造轮子。
对ScheduledExecutorService的初理解就先告一段落了,下面将会学习一下优先队列的原理。

