android创建googlemap基础教程和画导航线路图
GoogleMap android API v2:https://developers.google.com/maps/documentation/android/start?hl=zh-CN
链接里是官方给出的向导,我只是照着模拟做了一遍,希望E文不好的同学可以通过本文获取一些地图开发知识,同时记录自己的心得,仅此而已。
一、添加GoogleMap
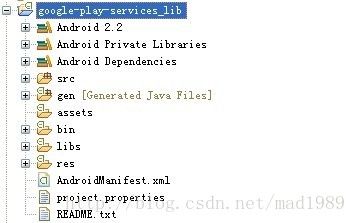
1,创建一个新的Project,在project.properties里添加googlePlayServices服务:
2,google play service lib在 android自带SDK下就有,这个我就不再赘述了,相当于添加一个第三方的lib库,有关此知识请网络搜索。
3,activityMain.xml里添加 GoogleMap 组件:
4,MainActivity.java中:
	protected void onCreate(Bundle savedInstanceState) {
		super.onCreate(savedInstanceState);
		setContentView(R.layout.activity_main);

		mGoogleMap = ((MapFragment) getFragmentManager().findFragmentById(
				R.id.mgooglemap)).getMap();

		routeBtn = (Button) findViewById(R.id.button1);
		routeBtn.setOnClickListener(new OnClickListener() {

			@Override
			public void onClick(View v) {
				LatLng start = new LatLng(40.036675, 116.32885);
				LatLng end = new LatLng(40.056675, 116.38885);
				String url = getDirectionsUrl(start, end);
				googleMapRouteTask task = new googleMapRouteTask(url);
				task.execute();

			}
		});

	}
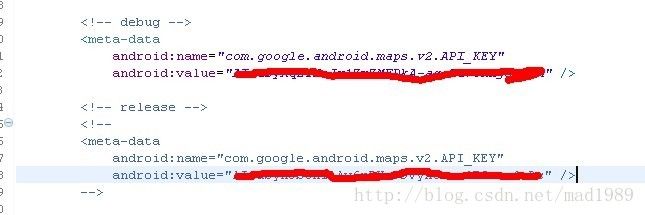
5,配置文件中添加permission
所以看到这里时,你一定是申请好了debug 和release的两个key,并且验证好了各自专用的keystroe,如果没有请点击本文开头的链接,阅读一下如何申请key和keystore。(如果是多人开发,已有他人申请并创建了google map,请找他索要 key 和keystore,自己替换之)
7,以上都搞定的话,就运行吧,如果mapviw显示一片空白,则看log把,肯定是google Map服务验证出错了,查看自己的key和keystore
二、添加导航线路图(路径规划)
1,把经纬度组合成向google请求的URL
【注意:本文请求的url是以xml形式为返回结果,如果想实现返回json结果,请移步我之前的一篇文章
http://blog.csdn.net/mad1989/article/details/9734667】
	/**
	 * 组合成googlemap direction所需要的url
	 *
	 * @param origin
	 * @param dest
	 * @return url
	 */
	private String getDirectionsUrl(LatLng origin, LatLng dest) {
		// Origin of route
		String str_origin = "origin=" + origin.latitude + ","
				+ origin.longitude;

		// Destination of route
		String str_dest = "destination=" + dest.latitude + "," + dest.longitude;

		// Sensor enabled
		String sensor = "sensor=false";

		// Travelling Mode
		String mode = "mode=driving";

		// String waypointLatLng = "waypoints="+"40.036675"+","+"116.32885";

		// 如果使用途径点,需要添加此字段
		// String waypoints = "waypoints=";

		String parameters = null;
		// Building the parameters to the web service

		parameters = str_origin + "&" + str_dest + "&" + sensor + "&" + mode;
		// parameters = str_origin + "&" + str_dest + "&" + sensor + "&"
		// + mode+"&"+waypoints;

		// Output format
		// String output = "json";
		String output = "xml";

		// Building the url to the web service
		String url = "https://maps.googleapis.com/maps/api/directions/"
				+ output + "?" + parameters;
		System.out.println("getDerectionsURL--->: " + url);
		return url;
	}
2,自定义AsynTask类,异步请求,实现导航。
/**
* 自定义class通过AsyncTask机制异步请求获取导航数据
*
* @author Administrator
*
*/
private class googleMapRouteTask extends
AsyncTask> {
HttpClient client;
String url;
List routes = null;
public googleMapRouteTask(String url) {
this.url = url;
}
@Override
protected List doInBackground(String... params) {
HttpGet get = new HttpGet(url);
try {
HttpResponse response = client.execute(get);
int statusecode = response.getStatusLine().getStatusCode();
System.out.println("response:" + response + " statuscode:"
+ statusecode);
if (statusecode == 200) {
String responseString = EntityUtils.toString(response
.getEntity());
int status = responseString.indexOf("OK ");
System.out.println("status:" + status);
if (-1 != status) {
int pos = responseString.indexOf("");
pos = responseString.indexOf("", pos + 1);
int pos2 = responseString.indexOf(" ", pos);
responseString = responseString
.substring(pos + 8, pos2);
routes = decodePoly(responseString);
} else {
// 错误代码,
return null;
}
} else {
// 请求失败
return null;
}
} catch (ClientProtocolException e) {
e.printStackTrace();
} catch (IOException e) {
e.printStackTrace();
}
System.out.println("doInBackground:"+routes);
return routes;
}
@Override
protected void onPreExecute() {
client = new DefaultHttpClient();
client.getParams().setParameter(
CoreConnectionPNames.CONNECTION_TIMEOUT, 15000);
client.getParams().setParameter(CoreConnectionPNames.SO_TIMEOUT,
15000);
super.onPreExecute();
}
@Override
protected void onPostExecute(List routes) {
super.onPostExecute(routes);
if (routes == null) {
// 导航失败
Toast.makeText(getApplicationContext(), "没有搜索到线路", Toast.LENGTH_LONG).show();
}
else{
//地图描点
PolylineOptions lineOptions = new PolylineOptions();
lineOptions.addAll(routes);
lineOptions.width(3);
lineOptions.color(Color.BLUE);
mGoogleMap.addPolyline(lineOptions);
//定位到第0点经纬度
mGoogleMap.animateCamera(CameraUpdateFactory.newLatLng(routes.get(0)));
}
}
} 3,返回的xml数据, google的points数据使用了其它格式的编码,需要我们解析出来。
	/**
	 * 解析返回xml中overview_polyline的路线编码
	 *
	 * @param encoded
	 * @return List
	 */
	private List decodePoly(String encoded) {
		List poly = new ArrayList();
		int index = 0, len = encoded.length();
		int lat = 0, lng = 0;
		while (index < len) {
			int b, shift = 0, result = 0;
			do {
				b = encoded.charAt(index++) - 63;
				result |= (b & 0x1f) << shift;
				shift += 5;
			} while (b >= 0x20);
			int dlat = ((result & 1) != 0 ? ~(result >> 1) : (result >> 1));
			lat += dlat;
			shift = 0;
			result = 0;
			do {
				b = encoded.charAt(index++) - 63;
				result |= (b & 0x1f) << shift;
				shift += 5;
			} while (b >= 0x20);
			int dlng = ((result & 1) != 0 ? ~(result >> 1) : (result >> 1));
			lng += dlng;
			LatLng p = new LatLng((((double) lat / 1E5)),
					(((double) lng / 1E5)));
			poly.add(p);
		}
		return poly;
	}
4,本文开头,创建GoogleMap第四步已经在onCreate()里添加了按钮监听事件,传递了两个经纬度,请求导航线路,有时候会 timeout,不过没关系,多试几次,看一下我的log日志:
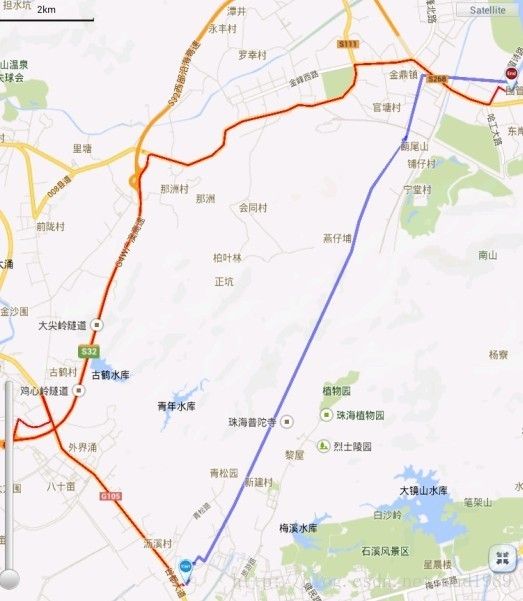
5,这么多数据,我知道你已经迫不及待想看一看效果图了:
(图中红色的线便是导航处的结果所描的点)
三、额外知识( HttpURLConnection和httpclient)
----------------------------------------------------------------------以下只是记录URLConnection和HttpClient的使用,跟googleMap没有关系--------------------------------------------------------------
1,代码
使用HttpClient已经在第二部分googleMapRouteTask 中体现出来了,接下来我把HttpURLConnection的用法也记录下来,还是以本文路径规划的代码为例:
	public String routeWithHttpURLConnection() {

		LatLng start = new LatLng(40.036675, 116.32885);
		LatLng end = new LatLng(40.056675, 116.38885);
		String url = getDirectionsUrl(start, end);

		// 保存请求结果
		String result = "";
		try {
			URL requestUrl = new URL(url);

			// 此处的urlConnection对象实际上是根据URL的,请求协议(此处是http)生成的
			// URLConnection类,的子类HttpURLConnection,故此处最好将其转化
			// 为HttpURLConnection类型的对象,以便用到HttpURLConnection更多的API.如下:
			HttpURLConnection connection = (HttpURLConnection) requestUrl
					.openConnection();
			// ***********************************************************************//
			// 设定传送的内容类型是可序列化的java对象
			// (如果不设此项,在传送序列化对象时,当WEB服务默认的不是这种类型时可能抛java.io.EOFException)
			connection.setRequestProperty("Content-type",
					"application/x-java-serialized-object");

			//设置超时时间
			connection.setConnectTimeout(3000);

			// 设定请求的方法为"POST",默认是GET
			connection.setRequestMethod("POST");

			// Post 请求不能使用缓存
			connection.setUseCaches(false);
			// ***********************************************************************//
			connection.connect();
			// 调用HttpURLConnection连接对象的getInputStream()函数,
			// 将内存缓冲区中封装好的完整的HTTP请求电文发送到服务端。
			InputStream is = connection.getInputStream();// <===注意,实际发送请求的代码段就在这里

			BufferedReader br = new BufferedReader(new InputStreamReader(is));

			StringBuffer buffer = new StringBuffer();
			String line = null;
			if ((line = br.readLine()) != null) {
				buffer.append(line);
			}
			result = buffer.toString();
			br.close();
			is.close();
			connection.disconnect();

		} catch (IOException e) {
			e.printStackTrace();
		}

		return result;

	}
2,效果
和使用HttpClient一样,同样都会得到数据,知识HttpURLConnection是java原生自带的,通过Input(out)Stream获取数据,使用起来比较麻烦,而Apache已经把它们都封装在了HttpClient中,使用responese.getEntity()便能得到数据,无需自己写各种流了。
3,总结
a:) HttpURLConnection的connect()函数,实际上只是建立了一个与服务器的tcp连接,并没有实际发送http请求。 无论是post还是get,http请求实际上直到HttpURLConnection的getInputStream()这个函数里面才正式发送出去。
b:) 在用POST方式发送URL请求时,URL请求参数的设定顺序是重中之重,对connection对象的一切配置(那一堆set函数) 都必须要在connect()函数执行之前完成。而对outputStream的写操作,又必须要在inputStream的读操作之前。 这些顺序实际上是由http请求的格式决定的。
如果inputStream读操作在outputStream的写操作之前,会抛出例外: java.net.ProtocolException: Cannot write output after reading input.......
c:) http请求实际上由两部分组成, 一个是http头,所有关于此次http请求的配置都在http头里面定义, 一个是正文content。connect()函数会根据HttpURLConnection对象的配置值生成http头部信息,因此在调用connect函数之前,就必须把所有的配置准备好。
d:) 在http头后面紧跟着的是http请求的正文,正文的内容是通过outputStream流写入的, 实际上outputStream不是一个网络流,充其量是个字符串流,往里面写入的东西不会立即发送到网络, 而是存在于内存缓冲区中,待outputStream流关闭时,根据输入的内容生成http正文。 至此,http请求的东西已经全部准备就绪。在getInputStream()函数调用的时候,就会把准备好的http请求正式发送到服务器了,然后返回一个输入流,用于读取服务器对于此次http请求的返回信息。由于http请求在getInputStream的时候已经发送出去了(包括http头和正文),因此在getInputStream()函数 之后对connection对象进行设置(对http头的信息进行修改)或者写入outputStream(对正文进行修改) 都是没有意义的了,执行这些操作会导致异常的发生。


