Spring Boot实战(八)8.3 Spring Data REST
8.3.1 点睛 Spring Data REST
(1)什么是Spring Data REST
Spring Data JPA是基于Spring Data的repository之上,可以将repository自动输出为REST资源。目前Spring Data REST支持将Spring Data JPA、Spring Data MongoDB、Spring Data Neo4j、Spring Data DemFire以及Spring Data Cassandra的repository自动转换成REST服务。
(2)Spring MVC中配置使用Spring Data REST
Spring Data REST的配置是定义在RepositoryRestMvcConfiguration(org.springframework.data.rest.webmvc.config.RepositoryRestMvcConfiguration)配置类中已经配置好了,我们可以通过继承此类或者直接在自己的配置类上@Import此配置类。
因在Spring MVC中使用Spring Data REST和在Spring Boot中使用方式是一样的,因此我们将在实战环节讲解Spring Data REST。
8.3.2 Spring Boot的支持
Spring Boot对 Spring Data REST的自动配置放置在Rest中,如图

通过SpringBootRepositoryRestMvcConfiguration类的源码我们可以得出,Spring Boot已经为我们自动配置了RepositoryRestConfiguration,所以在Spring Boot 中使用Spring Data REST只需引入 spring-boot-starter-data-rest的依赖,无须任何配置即可使用。
Spring Boot 通过在application.properties中配置以“spring.data.rest”为前缀的属性来配置RepositoryRestConfiguration
8.3.3 实战
(1)新建Spring Boot项目。
新建Spring Boot 项目,依赖为JPA(spring-boot-starter-data-jpa)和Rest Repositories(spring-boot-starter-data-rest)。
项目信息:
groupId:com.wisely
arctifactId:ch8_3
package:com.wisely.ch8_3
添加Oracle JDBC驱动,并在application.properties配置相关属性,与上例保持一致。
			com.oracle
			ojdbc6
			11.2.0.2.0


			org.springframework.boot
			spring-boot-starter-data-rest
(2)实体类:
package com.wisely.ch8_3.domain;

import javax.persistence.Entity;
import javax.persistence.GeneratedValue;
import javax.persistence.Id;

@Entity
public class Person {
	@Id
	@GeneratedValue
	private Long id;

	private String name;

	private Integer age;

	private String address;

	public Person() {
		super();
	}

	public Person(Long id,String name,Integer age,String address) {
		super();
		this.id=id;
		this.name=name;
		this.age=age;
		this.address=address;
	}

	public Long getId() {
		return id;
	}

	public void setId(Long id) {
		this.id = id;
	}

	public String getName() {
		return name;
	}

	public void setName(String name) {
		this.name = name;
	}

	public Integer getAge() {
		return age;
	}

	public void setAge(Integer age) {
		this.age = age;
	}

	public String getAddress() {
		return address;
	}

	public void setAddress(String address) {
		this.address = address;
	}


}
(3)实体类的Repository;
package com.wisely.ch8_3.dao;

import org.springframework.data.jpa.repository.JpaRepository;

import com.wisely.ch8_3.domain.Person;

public interface PersonRepository extends JpaRepository {
	Person findByNameStartsWith(String name);
}
(4)安装Postman REST Client。
参考POSTMAN
5.REST服务测试
在这里我们使用Postman测试REST资源服务。
(1)jQuery
在实际开发中,在jQuery我们使用$.ajax方法的type属性来修改提交方法:
$.ajax({
			type:"GET",
			dateTypeL"json",
			url:"http://localhost:8080/persons",
			success:function(data){
				alert(data);
			}
		)};
(2)AngularJS
在实际开发中,可以使用$http对象来操作:
$http.get(url)

$http.post(url,data)

$http.put(url,data)

$http.delete(url)
(3)列表
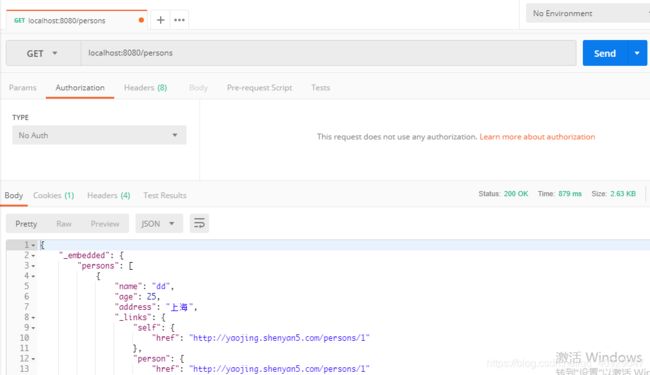
在实际开发中,在Postman中使用GET访问http://localhost:8080/persons,获得列表数据
(4)获取单一对象
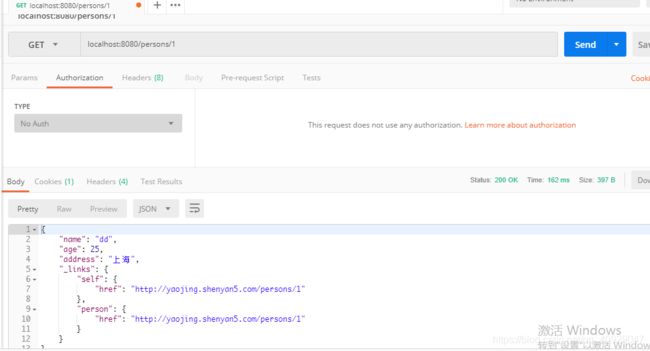
在Postman中使用GET访问http://localhost:8080/1,获得id为1的对象,如图
(5)查询
在上面的自定义实体类Repository定义了findByNameStartsWith方法,若想此方法也暴露为REST资源,需做如下修改:
public interface PersonRepository extends JpaRepository {
	@RestResource(path="nameStartsWith",rel = "nameStartsWith")
	Person findByNameStartsWith(@Param("name")String name);
}
(6)分页
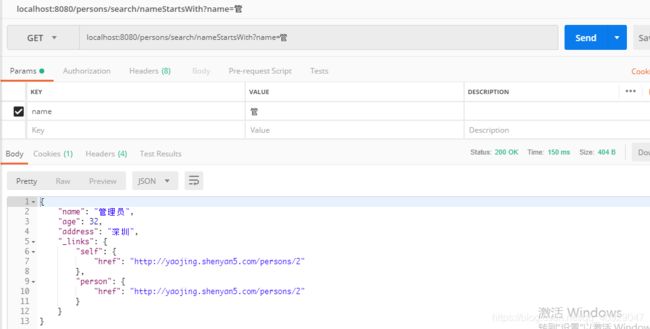
在Postman中使用GET访问http://localhost:8080/persons/search/nameStartsWith?name=管,可实现查询操作,如图
(6)分页
在Postman中使用GET访问http//localhost:8080/persons/?page=1&size=2,page=1即第二页,size=2即每页数量为2,如图

从返回结果可以看出,我们不仅能获得当前分页的对象,而且还给出了我们上一页、下一页、第一页、最后一页的REST资源路径。
(7)排序
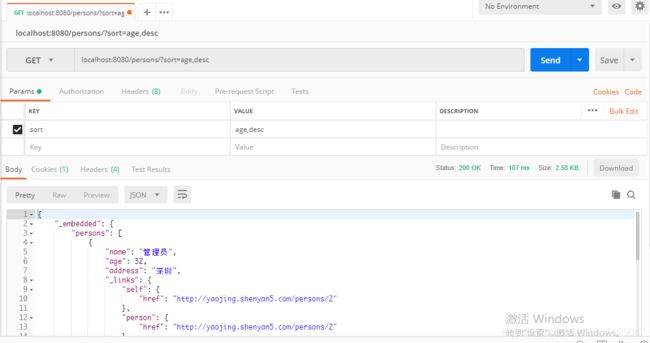
在Postman中使用GET访问localhost:8080/person/?sort=age,desc,即按照age属性倒序,如图
(8)保存
向http://localhost:8080/persons发起POST请求,将我们要保存的数据放置在请求体中,数据类型设置为JSON,JSON内容如图
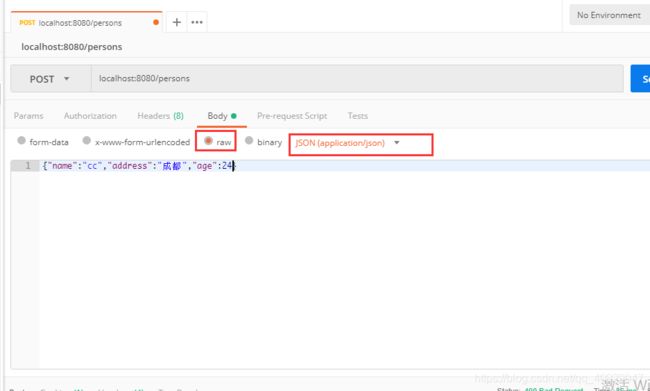
通过输出可以看出,保存成功后,我们的新数据的id为22.

(9)更新
现在我们更新新增的id为22的数据,用PUT方式访问http://localhost:8080/ persons/22,并修改提交的数据,如图
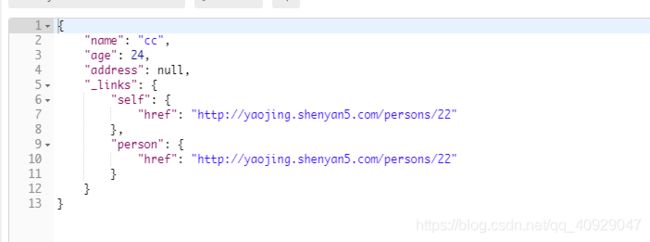
从输出我们可以看出,数据更新已成功。
(10)删除
使用DELETE方式访问http://localhost:8080/ persons/22