javaweb--JDBC
本文基于JDBC的讲解,演示登录注销案例
第一个JDBC程序
public class MyJDBC {
    public static void main(String[] args) throws ClassNotFoundException, SQLException {
        //1、加载驱动 连接信息
         Class.forName("com.mysql.jdbc.Driver");

        //2、连接数据库
        String url="jdbc:mysql://localhost:3306/smbms?useSSL=true&&useUnicode=true&characterEncoding=utf8";
        String username="root";
        String password="123456";
        Connection connection = DriverManager.getConnection(url, username, password);
        //3、获得执行对象statement
        Statement statement = connection.createStatement();
        String sql="select * from smbms.smbms_user";

        //4、获得返回的结果集
        ResultSet resultSet = statement.executeQuery(sql);
        while (resultSet.next()){
            System.out.println("id"+resultSet.getInt("id"));
            System.out.println("userName"+resultSet.getString("userName"));
            System.out.println("userCode"+resultSet.getString("userCode"));
            System.out.println("userPassword"+resultSet.getString("userPassword"));
            System.out.println("==================================");
        }
        //5、释放连接
        resultSet.close();
        statement.close();
        connection.close();

    }
本程序基于以下数据库:
CREATE DATABASE `smbms`;
USE `smbms`;
DROP TABLE IF EXISTS `smbms_user`;
CREATE TABLE `smbms_user` (
  `id` BIGINT(20) NOT NULL AUTO_INCREMENT COMMENT '主键ID',
  `userCode` VARCHAR(15) COLLATE utf8_unicode_ci DEFAULT NULL COMMENT '用户编码',
  `userName` VARCHAR(15) COLLATE utf8_unicode_ci DEFAULT NULL COMMENT '用户名称',
  `userPassword` VARCHAR(15) COLLATE utf8_unicode_ci DEFAULT NULL COMMENT '用户密码',
  `gender` INT(10) DEFAULT NULL COMMENT '性别(1:女、 2:男)',
  `birthday` DATE DEFAULT NULL COMMENT '出生日期',
  `phone` VARCHAR(15) COLLATE utf8_unicode_ci DEFAULT NULL COMMENT '手机',
  `address` VARCHAR(30) COLLATE utf8_unicode_ci DEFAULT NULL COMMENT '地址',
  `userRole` BIGINT(20) DEFAULT NULL COMMENT '用户角色(取自角色表-角色id)',
  `createdBy` BIGINT(20) DEFAULT NULL COMMENT '创建者(userId)',
  `creationDate` DATETIME DEFAULT NULL COMMENT '创建时间',
  `modifyBy` BIGINT(20) DEFAULT NULL COMMENT '更新者(userId)',
  `modifyDate` DATETIME DEFAULT NULL COMMENT '更新时间',
  PRIMARY KEY (`id`)
) ENGINE=INNODB AUTO_INCREMENT=16 DEFAULT CHARSET=utf8 COLLATE=utf8_unicode_ci;

INSERT  INTO `smbms_user`(`id`,`userCode`,`userName`,`userPassword`,`gender`,`birthday`,`phone`,`address`,`userRole`,`createdBy`,`creationDate`,`modifyBy`,`modifyDate`) VALUES (1,'admin','系统管理员','1234567',1,'1983-10-10','13688889999','北京市海淀区成府路207号',1,1,'2013-03-21 16:52:07',NULL,NULL),(2,'liming','李明','0000000',2,'1983-12-10','13688884457','北京市东城区前门东大街9号',2,1,'2014-12-31 19:52:09',NULL,NULL),(5,'hanlubiao','韩路彪','0000000',2,'1984-06-05','18567542321','北京市朝阳区北辰中心12号',2,1,'2014-12-31 19:52:09',NULL,NULL),(6,'zhanghua','张华','0000000',1,'1983-06-15','13544561111','北京市海淀区学院路61号',3,1,'2013-02-11 10:51:17',NULL,NULL),(7,'wangyang','王洋','0000000',2,'1982-12-31','13444561124','北京市海淀区西二旗辉煌国际16层',3,1,'2014-06-11 19:09:07',NULL,NULL),(8,'zhaoyan','赵燕','0000000',1,'1986-03-07','18098764545','北京市海淀区回龙观小区10号楼',3,1,'2016-04-21 13:54:07',NULL,NULL),(10,'sunlei','孙磊','0000000',2,'1981-01-04','13387676765','北京市朝阳区管庄新月小区12楼',3,1,'2015-05-06 10:52:07',NULL,NULL),(11,'sunxing','孙兴','0000000',2,'1978-03-12','13367890900','北京市朝阳区建国门南大街10号',3,1,'2016-11-09 16:51:17',NULL,NULL),(12,'zhangchen','张晨','0000000',1,'1986-03-28','18098765434','朝阳区管庄路口北柏林爱乐三期13号楼',3,1,'2016-08-09 05:52:37',1,'2016-04-14 14:15:36'),(13,'dengchao','邓超','0000000',2,'1981-11-04','13689674534','北京市海淀区北航家属院10号楼',3,1,'2016-07-11 08:02:47',NULL,NULL),(14,'yangguo','杨过','0000000',2,'1980-01-01','13388886623','北京市朝阳区北苑家园茉莉园20号楼',3,1,'2015-02-01 03:52:07',NULL,NULL),(15,'zhaomin','赵敏','0000000',1,'1987-12-04','18099897657','北京市昌平区天通苑3区12号楼',2,1,'2015-09-12 12:02:12',NULL,NULL);
//工具类 简化操作
public class JdbcUtils {
    //静态代码块实现,一调用该类就加载
    private static String driver=null;
    private static String url=null;
    private static String username=null;
    private static String password=null;
    static {
        try {
            //加载配置文件
            InputStream in = JdbcUtils.class.getClassLoader().getResourceAsStream("db.properties");
            Properties properties = new Properties();
            properties.load(in);
            driver=properties.getProperty("driver");
            url=properties.getProperty("url");
            username=properties.getProperty("username");
            password=properties.getProperty("password");
            Class.forName(driver);
        } catch (ClassNotFoundException e) {
            e.printStackTrace();
        } catch (IOException e) {
            e.printStackTrace();
        }
    }
    //获得连接
    public  static Connection getConnection(){
        Connection connection=null;
        try {
           connection = DriverManager.getConnection(url, username, password);

        } catch (SQLException e) {
            e.printStackTrace();
        }
        return connection;
    }
    //释放资源
    public static void closeResource(Connection connection, Statement statement, ResultSet  resultSet){
       if (resultSet!=null){
           try {
               resultSet.close();
           } catch (SQLException e) {
               e.printStackTrace();
           }
       }
        if (statement!=null){
            try {
                statement.close();
            } catch (SQLException e) {
                e.printStackTrace();
            }
        }
        if (connection!=null){
            try {
                connection.close();
            } catch (SQLException e) {
                e.printStackTrace();
            }
        }
    }
}
配置文件为
db.properties
driver=com.mysql.jdbc.Driver
url=jdbc:mysql://localhost:3306/smbms?useSSL=true&&useUnicode=true&characterEncoding=utf8
username=root
password=123456
则第一个程序改为以下程序:
public class JDBCTest {
    public static void main(String[] args) {
        Connection connection =null;
        Statement statement=null;
        ResultSet resultSet=null;
        try {
            connection= JdbcUtils.getConnection();
            statement= connection.createStatement();
            String sql="select * from smbms.smbms_user";
            resultSet = statement.executeQuery(sql);
            while (resultSet.next()){
                System.out.println("id"+resultSet.getInt("id"));
                System.out.println("userName"+resultSet.getString("userName"));
                System.out.println("userCode"+resultSet.getString("userCode"));
                System.out.println("userPassword"+resultSet.getString("userPassword"));
                System.out.println("==================================");
            }
            JdbcUtils.closeResource(connection,statement,resultSet);
        } catch (SQLException e) {
            e.printStackTrace();
        }
    }
}
上文基于的是statement对象,Jdbc中的statement对象用于向数据库发送SQL语句,想完成对数据库的增删改查,只需要通过这个对象向数据库发送增删改查语句即可。
Statement对象的executeUpdate方法,用于向数据库发送增、删、改的sql语句,executeUpdate执行完后,将会返回一个整数(即增删改语句导致了数据库几行数据发生了变化)。
Statement.executeQuery方法用于向数据库发送查询语句executeQuery方法返回代表查询结果的ResultSet对象。
但是存在sql注入的问题,故接下来使用PreparedStatement, 可以防止SQL注入。

PreparedStatement对象
PreparedStatement对象是继承的Statement,可以扩展优良特性,防止sql注入!
增加用户
public class JDBCTest3 {
    public static void main(String[] args) {
        Connection connection =null;
        PreparedStatement ps=null;
        ResultSet resultSet=null;
        try {
            connection= JdbcUtils.getConnection();
           //使用预编译
            String sql="insert into smbms_user(id,userCode,userPassword)values(?,?,?)";
            ps = connection.prepareStatement(sql);//先进行预编译,再进行赋值
            ps.setInt(1,2);//参数从1开始
            ps.setString(2,"zhouzhou");
            ps.setString(3,"112233");
            int i = ps.executeUpdate();
            if (i>0){
                System.out.println("插入成功");
            }
            JdbcUtils.closeResource(connection,ps,resultSet);
        } catch (Exception e) {
            e.printStackTrace();
        }
    }
}
public class JDBCTest4 {
    public static void main(String[] args) {
        Connection connection =null;
        PreparedStatement ps=null;
        ResultSet resultSet=null;
        try {
            connection= JdbcUtils.getConnection();
           //使用预编译
            String sql="delete from smbms.smbms_user where id=?";
            ps = connection.prepareStatement(sql);
            ps.setInt(1,2);
            int i = ps.executeUpdate();
            if (i>0){
                System.out.println("删除成功");
            }
            JdbcUtils.closeResource(connection,ps,resultSet);
        } catch (Exception e) {
            e.printStackTrace();
        }
    }
}
public class JDBCTest5 {
    public static void main(String[] args) {
        Connection connection =null;
        PreparedStatement ps=null;
        ResultSet resultSet=null;
        try {
            connection= JdbcUtils.getConnection();
           //使用预编译
            String sql="select * from smbms.smbms_user where id=?";
             ps = connection.prepareStatement(sql);
             ps.setInt(1,1);
             resultSet = ps.executeQuery();
             if (resultSet.next()){
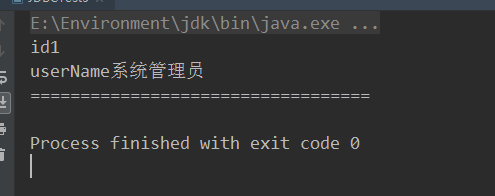
                 System.out.println("id"+resultSet.getInt("id"));
                 System.out.println("userName"+resultSet.getString("userName"));
                 System.out.println("==================================");

             }

            JdbcUtils.closeResource(connection,ps,resultSet);
        } catch (Exception e) {
            e.printStackTrace();
        }
    }
}

PreparedStatement与Statement最大的不同是先预编译sql,之后再讲参数一个个进行赋值,注意参数编号要从1开始!
登录注销项目
1、新建maven项目,然后导入一下依赖
由于mysql驱动无法导入成功,所以在后面手动建立了lib,并把驱动添加到了类库中.
  <dependencies>
        <dependency>
            <groupId>junitgroupId>
            <artifactId>junitartifactId>
            <version>4.12version>
        dependency>
        <dependency>
            <groupId>javax.servletgroupId>
            <artifactId>javax.servlet-apiartifactId>
            <version>3.0.1version>

        dependency>
        <dependency>
            <groupId>javax.servlet.jspgroupId>
            <artifactId>jsp-apiartifactId>
            <version>2.1version>

        dependency>

        <dependency>
            <groupId>javax.servlet.jsp.jstlgroupId>
            <artifactId>jstl-apiartifactId>
            <version>1.2version>
        dependency>

        <dependency>
            <groupId>taglibsgroupId>
            <artifactId>standardartifactId>
            <version>1.1.2version>
        dependency>


    dependencies>
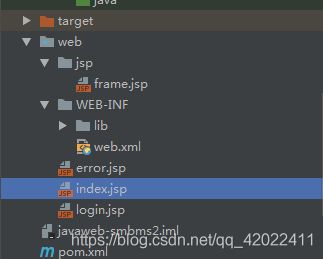
具体的包结构:

2、编写操作数据库的公共类
有了前面的基础,就很好编写了!
数据库配置文件db.properties:
# driver=com.mysql.jdbc.Driver
# driver=com.mysql.jdbc.Driver
url=jdbc:mysql://localhost:3306/smbms?useSSL=true&useUnicode=true&characterEncoding=utf-8
#user=root
password=123456
#号表示注释,可以直接在下面的程序中写成固定的
//操作数据库的公共类
public class BaseDao {

    private static String driver;
    private static String url;
    private static String username;
    private static String password;

    //静态代码块,类加载的时候就初始化了
    static {
        Properties properties = new Properties();
        //通过类加载器读取对应的资源
        InputStream is = BaseDao.class.getClassLoader().getResourceAsStream("db.properties");

        try {
            properties.load(is);
        } catch (IOException e) {
            e.printStackTrace();
        }

      //  driver = properties.getProperty("driver");
        driver="com.mysql.jdbc.Driver";
        url = properties.getProperty("url");
       // username = properties.getProperty("user");
        username="root";
        password = properties.getProperty("password");
    }

    //获取数据库的链接
    public static Connection getConnection(){
        Connection connection = null;
        try {
            Class.forName(driver);
            connection = DriverManager.getConnection(url, username, password);
        } catch (Exception e) {
            e.printStackTrace();
        }
        return connection;
    }

    //编写查询公共方法
    public static ResultSet execute(Connection connection, String sql, Object[] params, ResultSet resultSet, PreparedStatement preparedStatement) throws SQLException {
        //预编译的sql,在后面直接执行就可以了
        preparedStatement = connection.prepareStatement(sql);

        for (int i = 0; i < params.length; i++) {
            //setObject,占位符从1开始,但是我们的数组是从0开始!
            preparedStatement.setObject(i+1,params[i]);
        }

        resultSet = preparedStatement.executeQuery();
        return resultSet;
    }


    //编写增删改公共方法
    public static int execute(Connection connection,String sql,Object[] params,PreparedStatement preparedStatement) throws SQLException {
        preparedStatement = connection.prepareStatement(sql);

        for (int i = 0; i < params.length; i++) {
            //setObject,占位符从1开始,但是我们的数组是从0开始!
            preparedStatement.setObject(i+1,params[i]);
        }

        int updateRows = preparedStatement.executeUpdate();
        return updateRows;
    }


    //释放资源
    public static boolean closeResource(Connection connection,PreparedStatement preparedStatement,ResultSet resultSet){
        boolean flag = true;

        if (resultSet!=null){
            try {
                resultSet.close();
                //GC回收
                resultSet = null;
            } catch (SQLException e) {
                e.printStackTrace();
                flag = false;
            }
        }

        if (preparedStatement!=null){
            try {
                preparedStatement.close();
                //GC回收
                preparedStatement = null;
            } catch (SQLException e) {
                e.printStackTrace();
                flag = false;
            }
        }

        if (connection!=null){
            try {
                connection.close();
                //GC回收
                connection = null;
            } catch (SQLException e) {
                e.printStackTrace();
                flag = false;
            }
        }

        return flag;
    }

}
3、编写与数据库对应的实体类
package com.zhou.pojo;

import java.util.Date;

public class User {
    private Integer id; //id
    private String userCode; //用户编码
    private String userName; //用户名称
    private String userPassword; //用户密码
    private Integer gender;  //性别
    private Date birthday;  //出生日期
    private String phone;   //电话
    private String address; //地址
    private Integer userRole;    //用户角色
    private Integer createdBy;   //创建者
    private Date creationDate; //创建时间
    private Integer modifyBy;     //更新者
    private Date modifyDate;   //更新时间

    private Integer age;//年龄
    private String userRoleName;    //用户角色名称


    public String getUserRoleName() {
        return userRoleName;
    }
    public void setUserRoleName(String userRoleName) {
        this.userRoleName = userRoleName;
    }
    public Integer getAge() {
        Date date = new Date();
        Integer age = date.getYear()-birthday.getYear();
        return age;
    }
    public Integer getId() {
        return id;
    }
    public void setId(Integer id) {
        this.id = id;
    }
    public String getUserCode() {
        return userCode;
    }
    public void setUserCode(String userCode) {
        this.userCode = userCode;
    }
    public String getUserName() {
        return userName;
    }
    public void setUserName(String userName) {
        this.userName = userName;
    }
    public String getUserPassword() {
        return userPassword;
    }
    public void setUserPassword(String userPassword) {
        this.userPassword = userPassword;
    }
    public Integer getGender() {
        return gender;
    }
    public void setGender(Integer gender) {
        this.gender = gender;
    }
    public Date getBirthday() {
        return birthday;
    }
    public void setBirthday(Date birthday) {
        this.birthday = birthday;
    }
    public String getPhone() {
        return phone;
    }
    public void setPhone(String phone) {
        this.phone = phone;
    }
    public String getAddress() {
        return address;
    }
    public void setAddress(String address) {
        this.address = address;
    }
    public Integer getUserRole() {
        return userRole;
    }
    public void setUserRole(Integer userRole) {
        this.userRole = userRole;
    }
    public Integer getCreatedBy() {
        return createdBy;
    }
    public void setCreatedBy(Integer createdBy) {
        this.createdBy = createdBy;
    }
    public Date getCreationDate() {
        return creationDate;
    }
    public void setCreationDate(Date creationDate) {
        this.creationDate = creationDate;
    }
    public Integer getModifyBy() {
        return modifyBy;
    }
    public void setModifyBy(Integer modifyBy) {
        this.modifyBy = modifyBy;
    }
    public Date getModifyDate() {
        return modifyDate;
    }
    public void setModifyDate(Date modifyDate) {
        this.modifyDate = modifyDate;
    }

    @Override
    public String toString() {
        return "User{" +
                "id=" + id +
                ", userCode='" + userCode + '\'' +
                ", userName='" + userName + '\'' +
                ", userPassword='" + userPassword + '\'' +
                ", gender=" + gender +
                ", birthday=" + birthday +
                ", phone='" + phone + '\'' +
                ", address='" + address + '\'' +
                ", userRole=" + userRole +
                ", createdBy=" + createdBy +
                ", creationDate=" + creationDate +
                ", modifyBy=" + modifyBy +
                ", modifyDate=" + modifyDate +
                ", age=" + age +
                ", userRoleName='" + userRoleName + '\'' +
                '}';
    }
}
4、在dao层编写用户登录的接口和实现类
public interface UserDao {
    //得到要登录的用户
    public User getLoginUser(Connection connection, String userCode) throws SQLException;
}
package com.zhou.dao.User;

import com.zhou.dao.BaseDao;
import com.zhou.pojo.User;

import java.sql.Connection;
import java.sql.PreparedStatement;
import java.sql.ResultSet;
import java.sql.SQLException;

public class UserDaoImpl implements UserDao {
    //得到要登录的用户
    public User getLoginUser(Connection connection, String userCode) throws SQLException {

        PreparedStatement pstm = null;
        ResultSet rs = null;
        User user = null;

        if (connection!=null){
            String sql = "select * from smbms_user where userCode=?";
            Object[] params = {userCode};


            rs = BaseDao.execute(connection,sql, params,rs,pstm);

            if (rs.next()){
                user = new User();
                user.setId(rs.getInt("id"));
                user.setUserCode(rs.getString("userCode"));
                user.setUserName(rs.getString("userName"));
                user.setUserPassword(rs.getString("userPassword"));
                user.setGender(rs.getInt("gender"));
                user.setBirthday(rs.getDate("birthday"));
                user.setPhone(rs.getString("phone"));
                user.setAddress(rs.getString("address"));
                user.setUserRole(rs.getInt("userRole"));
                user.setCreatedBy(rs.getInt("createdBy"));
                user.setCreationDate(rs.getTimestamp("creationDate"));
                user.setModifyBy(rs.getInt("modifyBy"));
                user.setModifyDate(rs.getTimestamp("modifyDate"));
            }
            BaseDao.closeResource(null,pstm,rs);

        }
        return user;
    }
}
5、编写service层:
public interface UserService {
    //用户登录
    public User login(String userCode, String password);
}
package com.zhou.service.User;

import com.zhou.dao.BaseDao;
import com.zhou.dao.User.UserDao;
import com.zhou.dao.User.UserDaoImpl;
import com.zhou.pojo.User;

import java.sql.Connection;
import java.sql.SQLException;

public class UserServiceImpl implements UserService {

    //业务层都会调用dao层,所以我们要引入Dao层;
    private UserDao userDao;
    public UserServiceImpl(){
        userDao = new UserDaoImpl();
    }


    public User login(String userCode, String password) {
        Connection connection = null;
        User user = null;

        try {
            connection = BaseDao.getConnection();
            //通过业务层调用对应的具体的数据库操作
            user = userDao.getLoginUser(connection, userCode);
        } catch (SQLException e) {
            e.printStackTrace();
        }finally {
            BaseDao.closeResource(connection,null,null);
        }
        return user;
    }

}
6、编写控制层调用业务层:
登录:
public class LoginServlet extends HttpServlet {

    //Servlet:控制层,调用业务层代码

    @Override
    protected void doGet(HttpServletRequest req, HttpServletResponse resp) throws ServletException, IOException {

        System.out.println("LoginServlet--start....");

        //获取用户名和密码
        String userCode = req.getParameter("userCode");
        String userPassword = req.getParameter("userPassword");
        System.out.println("用户名和密码为"+userCode+"="+userPassword);
        //和数据库中的密码进行对比,调用业务层;
        UserService userService = new UserServiceImpl();
        User user = userService.login(userCode, userPassword);  //这里已经把登录的人给查出来了
        System.out.println("登录的用户为"+user);
        if (user!=null){ //查有此人,可以登录
            //将用户的信息放到Session中;
            req.getSession().setAttribute(Constants.USER_SESSION,user);
            //跳转到主页
            resp.sendRedirect("/jsp/frame.jsp");

        }else {
            //转发回登录页面,顺带提示它,用户名//查无此人,无法登录或者密码错误;
            req.setAttribute("error","用户名或者密码不正确");
            req.getRequestDispatcher("/login.jsp").forward(req,resp);
        }


    }

    @Override
    protected void doPost(HttpServletRequest req, HttpServletResponse resp) throws ServletException, IOException {
        doGet(req, resp);
    }
}
注册到web.xml 中
<servlet>
        <servlet-name>LoginServletservlet-name>
        <servlet-class>com.zhou.servlet.user.LoginServletservlet-class>
    servlet>
    <servlet-mapping>
        <servlet-name>LoginServletservlet-name>
        <url-pattern>/login.dourl-pattern>
    servlet-mapping>
注销:
public class LogoutServlet extends HttpServlet {
    @Override
    protected void doGet(HttpServletRequest req, HttpServletResponse resp) throws ServletException, IOException {
        //移除用户的Constants.USER_SESSION
        req.getSession().removeAttribute(Constants.USER_SESSION);
        resp.sendRedirect("/login.jsp");//返回登录页面
    }

    @Override
    protected void doPost(HttpServletRequest req, HttpServletResponse resp) throws ServletException, IOException {
        doGet(req, resp);
    }
}
<servlet>
        <servlet-name>LogoutServletservlet-name>
        <servlet-class>com.zhou.servlet.user.LogoutServletservlet-class>
    servlet>
    <servlet-mapping>
        <servlet-name>LogoutServletservlet-name>
        <url-pattern>/jsp/logout.dourl-pattern>
    servlet-mapping>
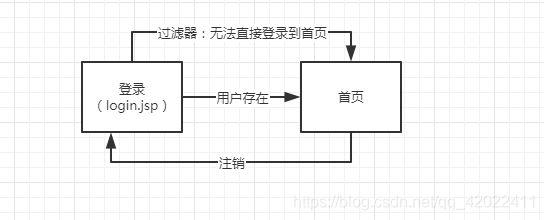
7、过滤器
字符乱码过滤器:
public class CharacterEncodingFilter implements Filter {
    public void doFilter(ServletRequest request, ServletResponse response, FilterChain chain) throws IOException, ServletException {
        request.setCharacterEncoding("utf-8");
        response.setCharacterEncoding("utf-8");
        chain.doFilter(request,response);
    }

    public void init(FilterConfig filterConfig) throws ServletException {

    }

    public void destroy() {

    }
}
 <filter>
        <filter-name>CharacterEncodingFilterfilter-name>
        <filter-class>com.zhou.filter.CharacterEncodingFilterfilter-class>
    filter>
    <filter-mapping>
        <filter-name>CharacterEncodingFilterfilter-name>
        <url-pattern>/*url-pattern>
    filter-mapping>
权限控制过滤器:
public class SysFilter implements Filter {
    public void init(FilterConfig filterConfig) throws ServletException {

    }

    public void doFilter(ServletRequest req, ServletResponse resp, FilterChain chain) throws IOException, ServletException {
        HttpServletRequest request = (HttpServletRequest) req;
        HttpServletResponse response = (HttpServletResponse) resp;

        //过滤器,从Session中获取用户,
        User user = (User) request.getSession().getAttribute(Constants.USER_SESSION);
        System.out.println("过滤器");
        if (user==null){ //已经被移除或者注销了,或者未登录
            response.sendRedirect("/error.jsp");
        }else {
            chain.doFilter(req,resp);
        }
    }

    public void destroy() {

    }
}
 <filter>
        <filter-name>SysFilterfilter-name>
        <filter-class>com.zhou.filter.SysFilterfilter-class>
    filter>
    <filter-mapping>
        <filter-name>SysFilterfilter-name>
        <url-pattern>/jsp/*url-pattern>
    filter-mapping>
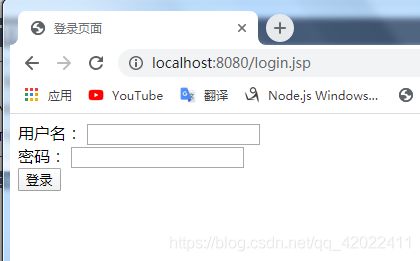
<%@ page contentType="text/html;charset=UTF-8" language="java" %>
登录页面
  <welcome-file-list>
        <welcome-file>login.jspwelcome-file>
    welcome-file-list>
首页:frame.jsp
<%@ page contentType="text/html;charset=UTF-8" language="java" %>
首页
错误页面:error.jsp
<%@ page contentType="text/html;charset=UTF-8" language="java" %>


    错误页面


错误页面
点我,返回首页


