Spring Cloud+ spring boot +mybatis+ mysql+ Eureka+ Ribbon实现 服务注册中心 服务提供 服务消费
一、spring cloud简介
spring cloud 为开发人员提供了快速构建分布式系统的一些工具,包括配置管理、服务发现、断路器、路由、微代理、事件总线、全局锁、决策竞选、分布式会话等等。它运行环境简单,可以在开发人员的电脑上跑。另外说明spring cloud是基于springboot的,所以需要开发中对springboot有一定的了解,另外对于“微服务架构” 不了解的话,可以通过搜索引擎搜索“微服务架构”了解下。
二、创建服务注册中心
在这里,我们需要用的的组件上Spring Cloud Netflix的Eureka ,eureka是一个服务注册和发现模块。
2.1 首先创建一个maven主工程。
New Maven Project:过程就不截图了 直接上pom.xml
	4.0.0
	spring-cloud
	spring-cloud
	0.0.1-SNAPSHOT
	pom


		UTF-8
		1.8
		3.1
		2.6
		1.3.2
		3.1.1
		1.2.0
		2.4.9
		3.4.5
		0.1
		0.2.6
		3.2.1


		org.springframework.boot
		spring-boot-starter-parent
		1.4.3.RELEASE


			javax.servlet
			javax.servlet-api
			provided


			commons-collections
			commons-collections
			${commons.version}


			org.springframework.boot
			spring-boot-starter


			org.springframework.boot
			spring-boot-starter-test
			test


				org.apache.maven.plugins
				maven-compiler-plugin

					${jdk.version}
					${jdk.version}
					UTF-8


				org.apache.maven.plugins
				maven-resources-plugin

					UTF-8


		spring-ykf-eureka-server
		spring-ykf-eureka-provide
		spring-ykf-eureka-consume
		spring-ykf-eureka-provide1
然后在这个Project下面新建4个Module
分别是:<1> spring-ykf-eureka-server 服务注册中心 目录结构如下

EureKaServcerMasterApplication.java
package spring.cloud.eureka.server.main;

import org.springframework.boot.SpringApplication;
import org.springframework.boot.autoconfigure.SpringBootApplication;
import org.springframework.cloud.netflix.eureka.server.EnableEurekaServer;
//标明当前是 注册中
@EnableEurekaServer
// 标明是springboot项目
@SpringBootApplication
public class EureKaServcerMasterApplication {
	public static void main(String[] args) {
		System.err.println("EureKaServcerMasterApplication Service Strat Success!");
		SpringApplication.run(EureKaServcerMasterApplication.class, args);
	}
}
application.properties
spring.application.name=spring-ykf-eureka-server
server.port=10001

eureka.client.register-with-eureka=false#由于我们目前创建的应用是一个服务注册中心,而不是普通的应用,默认情况下,这个应用会向注册中心(也是它自己)注册它自己,设置为false表示禁止这种默认行为
eureka.client.fetch-registry=false#,表示不去检索其他的服务,因为服务注册中心本身的职责就是维护服务实例,它也不需要去检索其他服务
eureka.client.service-url.defaultZone=http://localhost:10001/eureka
pom.xml
	4.0.0

		spring-cloud
		spring-cloud
		0.0.1-SNAPSHOT


	spring-ykf-eureka-server
	spring-ykf-eureka-server
	0.0.1-SNAPSHOT


		UTF-8
		UTF-8
		1.8


			org.springframework.cloud
			spring-cloud-starter-eureka-server


				org.springframework.cloud
				spring-cloud-dependencies
				Dalston.SR3
				pom
				import


				org.springframework.boot
				spring-boot-maven-plugin
然后就可以先测试一下了 启动EureKaServcerMasterApplication main localhost:10001访问界面如下:
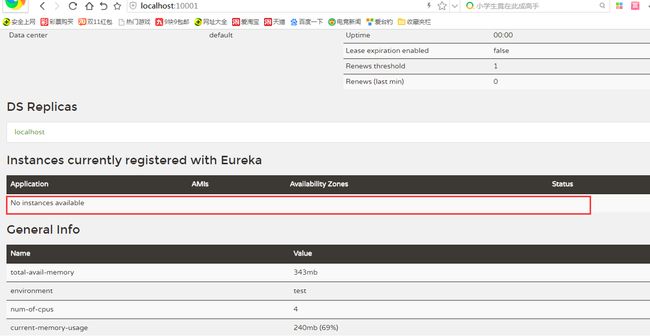
标红的那一行是没有 发现服务的,继续撸代码 编写
spring-ykf-eureka-provide 服务提供者 目录结构如下:

EurekaProvideApp.java
package spring.cloud.ykf.eureka.provide.main;

import org.mybatis.spring.annotation.MapperScan;
import org.springframework.boot.SpringApplication;
import org.springframework.boot.autoconfigure.SpringBootApplication;
import org.springframework.cloud.netflix.eureka.EnableEurekaClient;

//标明是服务提供者
@EnableEurekaClient
// springboot项目
@SpringBootApplication

public class EurekaProvideApp {

	public static void main(String[] args) {
		System.err.println("EurekaProvideApp  Service Strat Success!");
		SpringApplication.run(EurekaProvideApp.class, args);
	}

}
TestController.java
package spring.cloud.ykf.eureka.provide.main.controller;

import org.springframework.web.bind.annotation.GetMapping;
import org.springframework.web.bind.annotation.RestController;

@RestController
public class TestController {

	@GetMapping(value = "/aa")
	public String aa() {
		return "aa";
	}

}
application.properties
spring.application.name=spring-ykf-eureka-provide
server.port=20001
eureka.client.service-url.defaultZone=http://localhost:10001/eureka/
pom.xml
	4.0.0

		spring-cloud
		spring-cloud
		0.0.1-SNAPSHOT

	spring-ykf-eureka-provide
	spring-ykf-eureka-provide

		UTF-8
		UTF-8
		1.8


			org.springframework.cloud
			spring-cloud-starter-eureka


			org.springframework.boot
			spring-boot-starter-web


				org.springframework.cloud
				spring-cloud-dependencies
				Dalston.SR3
				pom
				import


				org.springframework.boot
				spring-boot-maven-plugin
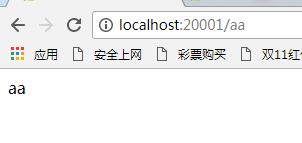
其实到了这里就可以 启动main 运行测试了:

服务已经被注册到 注册中心了,测试一下吧当前这个服务自己访问自己的时候通不通
接下继续撸代码,服务消费者:
spring-ykf-eureka-consume目录结构如下:

EurekaConsumeApp.java
package spring.cloud.ykf.eureka.consume.main;

import org.springframework.boot.SpringApplication;
import org.springframework.boot.autoconfigure.SpringBootApplication;
import org.springframework.cloud.client.loadbalancer.LoadBalanced;
import org.springframework.cloud.netflix.eureka.EnableEurekaClient;
import org.springframework.context.annotation.Bean;
import org.springframework.web.client.RestTemplate;

//标明是服务提供者
@EnableEurekaClient
// springboot项目
@SpringBootApplication
public class EurekaConsumeApp {

	@Bean
	@LoadBalanced//实现负载均衡
	RestTemplate restTemplate() {
		return new RestTemplate();
	}

	public static void main(String[] args) {
		System.err.println("EurekaConsumeApp  Service Strat Success!");
		SpringApplication.run(EurekaConsumeApp.class, args);

	}
}
TestController.java
package spring.cloud.ykf.eureka.consume.main.controller;

import org.springframework.beans.factory.annotation.Autowired;
import org.springframework.context.annotation.Configuration;
import org.springframework.stereotype.Controller;
import org.springframework.web.bind.annotation.GetMapping;
import org.springframework.web.bind.annotation.ResponseBody;
import org.springframework.web.client.RestTemplate;

@Controller
@Configuration
public class TestController {

	@Autowired
	private RestTemplate restTemplate;

	@GetMapping(value = "/aa")
	@ResponseBody
	public String add() {
		return restTemplate.getForEntity("http://spring-ykf-eureka-provide/aa/", String.class).getBody();
	}


}
application.properties
spring.application.name=spring-ykf-eureka-consume
server.port=30001
eureka.client.service-url.defaultZone=http://localhost:10001/eureka/
pom.xml
	4.0.0

		spring-cloud
		spring-cloud
		0.0.1-SNAPSHOT

	spring-ykf-eureka-consume
	spring-ykf-eureka-consume


		UTF-8
		UTF-8
		1.8


			org.springframework.cloud
			spring-cloud-starter-eureka


			org.springframework.cloud
			spring-cloud-starter-ribbon


			org.springframework.boot
			spring-boot-starter-web


				org.springframework.cloud
				spring-cloud-dependencies
				Dalston.SR3
				pom
				import


				org.springframework.boot
				spring-boot-maven-plugin
然后 启动注册中心的main 服务提供者的main 然后在是服务消费者的main 在去查看服务注册中:

多出来一个服务,然后继续访问 服务消费的者的url调用看是否能 连通

到这里一个简单的 服务注册中心 服务提供 服务消费就完事了, 下面开始继续撸代码 实现 数据库 增删查改
这里首先开始改造 服务提供spring-ykf-eureka-provide
1:首先在原来的pom.xml基础之上在添加新的依赖:
			mysql
			mysql-connector-java


			com.alibaba
			druid
			1.1.8


			org.springframework.boot
			spring-boot-starter-jdbc


		      org.mybatis.spring.boot
		      mybatis-spring-boot-starter
		      1.1.1


			org.springframework.boot
			spring-boot-starter-data-jpa


			org.mybatis.spring.boot
			mybatis-spring-boot-starter
			1.3.1
2:application.properties 也得改造 原来的基础上加上
#db
spring.datasource.url=jdbc:mysql://localhost:3306/springboot?useUnicode=true&characterEncoding=utf-8
spring.datasource.username=root
spring.datasource.password=1234
spring.datasource.driver-class-name=com.mysql.jdbc.Driver

mybatis.mapper-locations=classpath*:/mybatis-mapping/*Mapper.xml
# Specify the DBMS
spring.jpa.database = MYSQL
# Show or not log for each sql query
spring.jpa.show-sql = true
3:在原来的启动类:EurekaProvideApp.java上面加入注解
package spring.cloud.ykf.eureka.provide.main;

import org.mybatis.spring.annotation.MapperScan;
import org.springframework.boot.SpringApplication;
import org.springframework.boot.autoconfigure.SpringBootApplication;
import org.springframework.cloud.netflix.eureka.EnableEurekaClient;

//标明是服务提供者
@EnableEurekaClient
// springboot项目
@SpringBootApplication
@MapperScan("spring.cloud.ykf.eureka.provide.main.mapper")
public class EurekaProvideApp {

	public static void main(String[] args) {
		System.err.println("EurekaProvideApp  Service Strat Success!");
		SpringApplication.run(EurekaProvideApp.class, args);
	}

}
4:新建一个Userservice
package spring.cloud.ykf.eureka.provide.main.service;

import spring.cloud.ykf.eureka.provide.main.entry.User;

public interface UserService {

	User findUser(Integer id);

	int saveUser(User user);

	int deleteUser(Integer id);
}
5:实现类
package spring.cloud.ykf.eureka.provide.main.service.impl;

import org.springframework.beans.factory.annotation.Autowired;
import org.springframework.stereotype.Service;

import spring.cloud.ykf.eureka.provide.main.entry.User;
import spring.cloud.ykf.eureka.provide.main.mapper.UserMapper;
import spring.cloud.ykf.eureka.provide.main.service.UserService;

@Service
public class UserServiceImpl implements UserService {

	@Autowired
	UserMapper userMapper;

	@Override
	public User findUser(Integer id) {
		return this.userMapper.findUser(id);
	}

	@Override
	public int saveUser(User user) {
		this.userMapper.saveUser(user);
		return 1;
	}

	@Override
	public int deleteUser(Integer id) {
		this.userMapper.deleteUser(id);
		return 1;
	}

}
6:UserMapper
package spring.cloud.ykf.eureka.provide.main.mapper;

import spring.cloud.ykf.eureka.provide.main.entry.User;

public interface UserMapper {
	User findUser(Integer id);

	int saveUser(User user);

	int deleteUser(Integer id);
}
7:然后是mybatis的 mapper文件
UserMapper.xml
insert into user(uname,pwd)
values(#{uname},#{pwd})
delete from user where id
= #{id}
8:然后在是 controller控制层
package spring.cloud.ykf.eureka.provide.main.controller;

import org.springframework.beans.factory.annotation.Autowired;
import org.springframework.web.bind.annotation.PathVariable;
import org.springframework.web.bind.annotation.RequestMapping;
import org.springframework.web.bind.annotation.RestController;

import spring.cloud.ykf.eureka.provide.main.entry.User;
import spring.cloud.ykf.eureka.provide.main.service.UserService;

/**
 */

@RestController
public class UserController {

	@Autowired
	UserService userService;

	@RequestMapping(value = "/query/{id}")
	public User findByIdUser(@PathVariable("id") Integer id) {
		User us = userService.findUser(id);
		return us;
	}

	@RequestMapping(value = "/del/{id}")
	public String delUser(@PathVariable("id") Integer id) {
		int num = userService.deleteUser(id);
		return num == 1 ? "succ" : "err";
	}

	@RequestMapping(value = "/save/{uname}/{pwd}")
	public String delUser(@PathVariable("uname") String uname, @PathVariable("pwd") String pwd) {
		User user = new User();
		user.setPwd(pwd);
		user.setUname(uname);
		int num = userService.saveUser(user);
		return num == 1 ? "succ" : "err";
	}

}
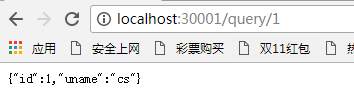
好了 到这里 就可以 进行一下测试了,先启动注册中心 在启动服务提供效果如下:

这说明当前这个服务通过mybatis进行数据库交互是正常的.可以正常提供服务 继续撸代码 改造服务消费者:
spring-ykf-eureka-consume
增加controller
UserController.java
package spring.cloud.ykf.eureka.consume.main.controller;

import org.springframework.beans.factory.annotation.Autowired;
import org.springframework.context.annotation.Configuration;
import org.springframework.stereotype.Controller;
import org.springframework.web.bind.annotation.GetMapping;
import org.springframework.web.bind.annotation.PathVariable;
import org.springframework.web.bind.annotation.ResponseBody;
import org.springframework.web.client.RestTemplate;

import spring.cloud.ykf.eureka.consume.main.entry.User;

/**
 * Created by majunwei on 2017/10/10.
 */
@Controller
@Configuration//说明当前这是个配置类  如果不写下面restTemplate调用的时候会告诉你找不到指定的服务的
public class UserController {

	@Autowired
	private RestTemplate restTemplate;

	@GetMapping(value = "/query/{id}")
	@ResponseBody
	public User add(@PathVariable("id") Integer id) {
		return restTemplate.getForEntity("http://spring-ykf-eureka-provide/query/{id}", User.class, id).getBody();
	}

	@GetMapping(value = "/del/{id}")
	@ResponseBody
	public String del(@PathVariable("id") Integer id) {
		return restTemplate.getForEntity("http://spring-ykf-eureka-provide/del/{id}", String.class, id).getBody();
	}

	@GetMapping(value = "/save/{id}")
	@ResponseBody
	public String save(@PathVariable("uname") String uname, @PathVariable("pwd") String pwd) {
		return restTemplate
				.getForEntity("http://spring-ykf-eureka-provide/save/{uname}/{pwd}", String.class, uname, pwd)
				.getBody();
	}

}
然后依次启动main 访问30001的url 结果如下
好了到这里 一个简单的 springcloud springboot mybatis mysql进行微服务开发就完成了
这里要说明上面 服务消费者main 里面的一个注解
@LoadBalanced 实现负载均衡
其实如果你是从上面依次看下来的 你会发现我少了一个 spring-ykf-eureka-provide1
对你们这边就自己 底下实现了吧 直接复制spring-ykf-eureka-provide 他把端口号改一下就行了 然后启动
然后再去 注册中心看的时候你会发现 如图:

一模一样 的服务多了一个 只是端口不一样 ,然后服务消费方 调用的时候 会根据负载均衡 随机调用这2个当中的一个, 你们可以试着关掉一个 消费方还是可以正常调用的,其实注册中心也是可以实现集群的 道理跟服务提供 差不多.
上面有什么不明白的 可以邮件:[email protected]一起讨论,我也是刚开始学习springcloud.
下面是整个案例的源码:https://download.csdn.net/download/wangbo54979/10375723
上面负载均衡采用的是ribbon 下面在补充一点用feign做负载均衡
直接更改上面spring-ykf-eureka-consume 消费者 其他的都不用动
在消费的pom.xml 增加feign的 依赖
			org.springframework.cloud
			spring-cloud-starter-feign
在main启动类 上添加feign 注解
@EnableEurekaClient
// springboot项目
@SpringBootApplication

@EnableFeignClients
public class EurekaConsumeApp {


	public static void main(String[] args) {
		System.err.println("EurekaConsumeApp  Service Strat Success!");
		SpringApplication.run(EurekaConsumeApp.class, args);

	}
}
然后继续 定义一个接口
package spring.cloud.ykf.eureka.consume.main.service;

import org.springframework.cloud.netflix.feign.FeignClient;
import org.springframework.web.bind.annotation.PathVariable;
import org.springframework.web.bind.annotation.RequestMapping;

import spring.cloud.ykf.eureka.consume.main.entry.User;

//直接在这里 指明我要调用哪个服务
@FeignClient(name = "spring-ykf-eureka-provide")
public interface UserService {

	//声明 调用上面服务 下面的  哪些接口
	@RequestMapping(value = "/query/{id}")
	User findByIdUser(@PathVariable("id") Integer id);

	@RequestMapping(value = "/del/{id}")
	String delUser(@PathVariable("id") Integer id);

	@RequestMapping(value = "/save/{uname}/{pwd}")
	String saveUser(@PathVariable("uname") String uname, @PathVariable("pwd") String pwd);

	@RequestMapping(value = "/delsave/{id}")
	String delsave(@PathVariable("id") Integer id);

}
然后 继续改造 UserController.java
package spring.cloud.ykf.eureka.consume.main.controller;

import org.springframework.beans.factory.annotation.Autowired;
import org.springframework.stereotype.Controller;
import org.springframework.web.bind.annotation.GetMapping;
import org.springframework.web.bind.annotation.PathVariable;
import org.springframework.web.bind.annotation.ResponseBody;

import spring.cloud.ykf.eureka.consume.main.entry.User;
import spring.cloud.ykf.eureka.consume.main.service.UserService;

@Controller
public class UserController {

	@Autowired
	UserService userService;

	@GetMapping(value = "/query/{id}")
	@ResponseBody
	public User findUser(@PathVariable("id") Integer id) {
		return userService.findByIdUser(id);
	}

	@GetMapping(value = "/del/{id}")
	@ResponseBody
	public String del(@PathVariable("id") Integer id) {
		String smg = userService.delUser(id);
		return smg + "";
	}

	@GetMapping(value = "/save/{uname}/{pwd}")
	@ResponseBody
	public String save(@PathVariable("uname") String uname, @PathVariable("pwd") String pwd) {
		return userService.saveUser(uname, pwd);
	}

	@GetMapping(value = "/delsave/{id}")
	@ResponseBody
	public String delsave(@PathVariable("id") Integer id) {
		return userService.delsave(id);
	}

}
然后启动依次 启动 注册中心 服务提供 服务消费 页面请求效果
是不是用feign 做调用 比ribbon 要方便多了 代码维护下要高一点啊, 不用每次调用 都得写 http :// 服务 ...等等了 只需要在指定的接口定义一次就好了
继续改造 消费者端, 当服务挂掉的时候 消费者发送请求 还能正常 返回:
pom.xml 添加依赖
			org.springframework.cloud
			spring-cloud-starter-hystrix
main 启动类 添加注解 开启断路由
//标明是服务提供者
@EnableEurekaClient
// springboot项目
@SpringBootApplication
// 开启 feign 做负载均衡
@EnableFeignClients
// 开启Hystrix断路器
@EnableCircuitBreaker
public class EurekaConsumeApp {

	public static void main(String[] args) {
		System.err.println("EurekaConsumeApp  Service Strat Success!");
		SpringApplication.run(EurekaConsumeApp.class, args);

	}
}
application.properties增加配置
feign.hystrix.enabled=true //开启断路由
然后是UserService接口改造 在原来的基础上增加后面的 配置断路由返回到这里处理
//直接在这里 指明我要调用哪个服务                                          fallback当这个服务挂掉的时候 返回提示 不让请求阻塞 导致整个集群挂掉
@FeignClient(name = "spring-ykf-eureka-provide",fallback = UserServiceHystrix.class)UserServiceHystrix实现类package spring.cloud.ykf.eureka.consume.main.hystrix;
import org.springframework.stereotype.Component;
import spring.cloud.ykf.eureka.consume.main.entry.User;
import spring.cloud.ykf.eureka.consume.main.service.UserService;
//断路由 当请求对应服务 挂掉的时候 这里处理返回
@Component
public class UserServiceHystrix implements UserService {
@Override
public User findByIdUser(Integer id) {
return new User();
}
@Override
public String delUser(Integer id) {
return "server invoker err";
}
@Override
public String saveUser(String uname, String pwd) {
return "server invoker err";
}
@Override
public String delsave(Integer id) {
return "server invoker err";
}
}
然后依次启动注册中心 服务提供 消费者 正常访问一波是 返回正常数据的, 这个时候 当你关掉服务端的时候
返回的是 server invoker err 是能正常返回的 并没有报错 我这里就不截图演示了