电商项目day13(消息中间件解决方案 JMS&ActiveMQ)
今日目标:
配置nginx反向代理
jms入门
spring整合jms
ActiveMQ应用到项目实现上下架同时更改索引库以及静态页面
一.nginx配置项目的反向代理
nginx是什么?
Nginx (engine x) 是一个高性能的HTTP和反向代理服务,也是一个IMAP/POP3/SMTP服务。Nginx是由伊戈尔·赛索耶夫为俄罗斯访问量第二的Rambler.ru站点(俄文:Рамблер)开发的,第一个公开版本0.1.0发布于2004年10月4日。
其将源代码以类BSD许可证的形式发布,因它的稳定性、丰富的功能集、示例配置文件和低系统资源的消耗而闻名。2011年6月1日,nginx 1.0.4发布。
Nginx是一款轻量级的Web 服务器/反向代理服务器及电子邮件(IMAP/POP3)代理服务器,并在一个BSD-like 协议下发行。其特点是占有内存少,并发能力强,事实上nginx的并发能力确实在同类型的网页服务器中表现较好,中国大陆使用nginx网站用户有:百度、京东、新浪、网易、腾讯、淘宝等
三个非常重要的作用:
1.加载静态页面
2.反向代理
3.负载均衡
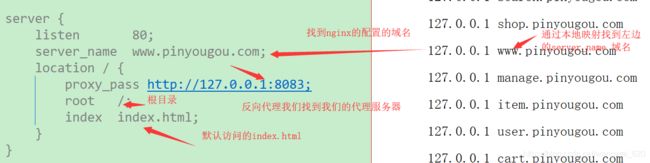
在这我们在本地进行配置相应的映射地址,不要让浏览器,通过网络搜索DNS服务器,配置的如下;
C:\Windows\System32\drivers\etc 这个是window下的目录
127.0.0.1 search.pinyougou.com
127.0.0.1 shop.pinyougou.com
127.0.0.1 www.pinyougou.com
127.0.0.1 manage.pinyougou.com
127.0.0.1 item.pinyougou.com
127.0.0.1 user.pinyougou.com
127.0.0.1 cart.pinyougou.com
安装window版的nginx步骤:
1.加压即用
2.配置核心文件nginx.conf
#user  nobody;
worker_processes  1;

#error_log  logs/error.log;
#error_log  logs/error.log  notice;
#error_log  logs/error.log  info;

#pid        logs/nginx.pid;


events {
    worker_connections  1024;
}


http {
    include       mime.types;
    default_type  application/octet-stream;

    #log_format  main  '$remote_addr - $remote_user [$time_local] "$request" '
    #                  '$status $body_bytes_sent "$http_referer" '
    #                  '"$http_user_agent" "$http_x_forwarded_for"';

    #access_log  logs/access.log  main;

    sendfile        on;
    #tcp_nopush     on;

    #keepalive_timeout  0;
    keepalive_timeout  65;

    #gzip  on;

   server {
        listen       80;
	server_name  manage.pinyougou.com;
        location / {
	    proxy_pass http://127.0.0.1:8081;
            root   admin/;
            index  admin/index.html;
        }
    }
   server {
        listen       80;
	server_name  shop.pinyougou.com;
        location / {
		 proxy_pass http://127.0.0.1:8082;
			root   admin/;
            index  admin/index.html;
        }
    }

    server {
        listen       80;
	server_name  www.pinyougou.com;
        location / {
	    proxy_pass http://127.0.0.1:8083;
            root   /;
            index  index.html;
        }
    }

	server {
        listen       80;
	server_name  search.pinyougou.com;
        location / {
	    proxy_pass http://127.0.0.1:8084;
            root   /;
            index  search.html;
        }
    }

	server {
        listen       80;
	server_name  user.pinyougou.com;
        location / {
	    proxy_pass http://127.0.0.1:8086;
            root   /;
            index  home-index.html;
        }
    }

	server {
        listen       80;
	server_name  cart.pinyougou.com;
        location / {
	    proxy_pass http://127.0.0.1:9107;
            root   /;
            index  cart.html;
        }
    }

	server {
        listen       80;
	server_name  item.pinyougou.com;
        location / {
            root   F:\\item;
            index  index.html;
        }
    }
}
3.重启Nginx命令: nginx.exe -s reload
加载过后我们就可以看到我们想看的页面:原理就是通过我们自己配置的本地映射域名 到nginx上的代理服务器
反向代理的作用是:
1.承受并发能力高
2.安全性高,不能够访问到项目的本地文件
二.jms入门
我们已经完成了 5 个 web 模块和 4 个服务模块。其中运营商后台的调用关系最多,用到了商家商品服务、广告内容服务、搜索服务和页面生成服务。这种模块之间的依赖也称之为耦合。而耦合越多,之后的维护工作就越困难。那么如果改善系统模块调用关系、减少模
块之间的耦合呢?我们接下来就介绍一种解决方案----消息中间件。
1.什么是消息中间件
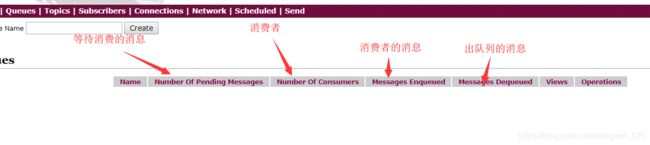
消息中间件利用高效可靠的消息传递机制进行平台无关的数据交流,并基于数据通信来进行分布式系统的集成。通过提供消息传递和消息排队模型,它可以在分布式环境下扩展进程间的通信。对于消息中间件,常见的角色大致也就有 Producer(生产者)、Consumer(消
费者)
常见的消息中间件: ActiveMQ RabbitMQ ZeroMQ Kafka
我们改造系统的调用关系:
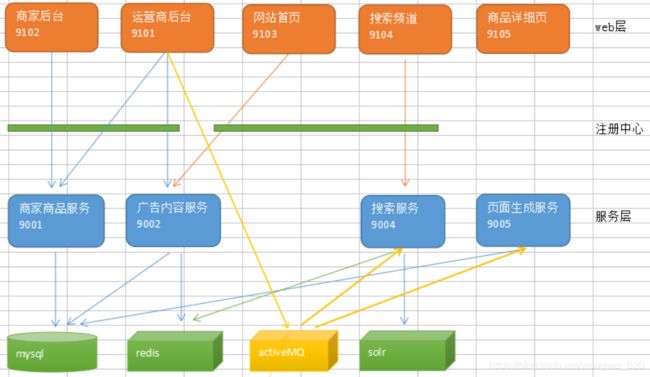
引入消息中间件的最重要的作用之一:就是模块之间解耦合
2.什么是jms?
JMS(Java Messaging Service)是 Java 平台上有关面向消息中间件的技术规范,它便于消息系统中的 Java 应用程序进行消息交换,并且通过提供标准的产生、发送、接收消息的接口简化企业应用的开发。
JMS 本身只定义了一系列的接口规范,是一种与厂商无关的 API,用来访问消息收发系统。它类似于 JDBC(java Database Connectivity):这里,JDBC 是可以用来访问许多不同关系数据库的 API,而 JMS 则提供同样与厂商无关的访问方法,以访问消息收发服务。许多厂商目前都支持 JMS,包括 IBM 的 MQSeries、BEA 的 Weblogic JMS service 和 Progress 的SonicMQ,这只是几个例子。 JMS 使您能够通过消息收发服务(有时称为消息中介程序或路由器)从一个 JMS 客户机向另一个 JML 客户机发送消息。消息是 JMS 中的一种类型对象,由两部分组成:报头和消息主体。报头由路由信息以及有关该消息的元数据组成。消息
主体则携带着应用程序的数据或有效负载。
JMS定义五种消息正文格式 :
.TextMessage--一个字符串对象
· MapMessage--一套名称-值对
· ObjectMessage--一个序列化的 Java 对象
· BytesMessage--一个字节的数据流
· StreamMessage -- Java 原始值的数据流
生产者消费者模式
JMS消息传递类型有两种:
A B C
点对点模式:一个生产者生产了消息,只能被一个消费者消费。
发布订阅模式:一个生产者生产了消息,可以被多个消费者消费。
A B C
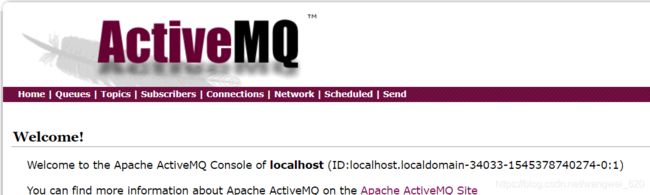
3.安装ActiveMQ
1)将 apache-activemq-5.12.0-bin.tar.gz 上传至服务器
(2)解压此文件
tar zxvf apache-activemq-5.12.0-bin.tar.gz
(3)为 apache-activemq-5.12.0 目录赋权
chmod 777 apache-activemq-5.12.0
(4)进入 apache-activemq-5.12.0\bin 目录
(5)赋与执行权限
启动: 进入bin目录下 ./activemq start
默认用户名和密码都是:admin
默认端口是:8161
jms底层实现见 day13-1
三.网站前台与搜索模块商品详情模块的系统对接
1.门户网站 通过 搜索 跳到 搜索模块 并完成搜索任务
需求分析:
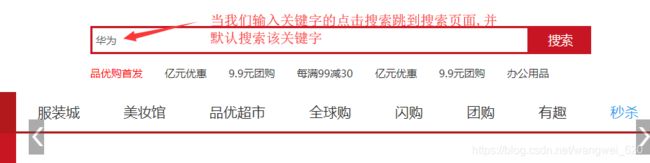
实现思路:我们通过在protal.html页面绑定搜索的keywords关键字,给搜索添加点击事件,携带关键字到搜索页面
注意:在这是通过路由传参 ,接受的时候我们$location 接受
页面实现:

indexController.js代码:
 //完成门户网站的搜索与搜索模块的对接
    $scope.search=function () {
        //angularjs页面传参时候要在问号前面添加#    这个路由传参   ng ngroute
        location.href="http://search.pinyougou.com/search.html#?keywords="+$scope.keywords
    }
一定要注意:在页面中传递参数要通过angularjs的路由传参 主要在传递参数的前边添加#
搜索模块实现:
我们一定要在searchController.js中添加$location

如果不输入值:

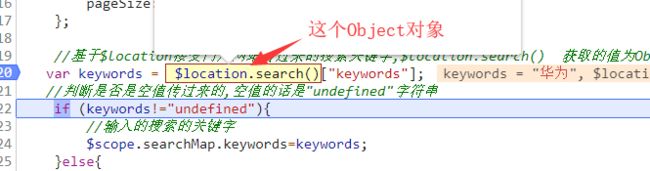
搜索模块我们接受值通过,通过searchController.js接受,不能通过页面接收
  //基于$location接受门户网站传过来的搜索关键字,$location.search()  获取的值为Object对象
   var keywords =  $location.search()["keywords"];
   //判断是否是空值传过来的,空值的话是"undefined"字符串
    if (keywords!="undefined"){
        //输入的搜索的关键字
        $scope.searchMap.keywords=keywords;
    }else{
        //反之没有输入关键字
        $scope.searchMap.keywords="手机";//给一个默认值作为搜索的关键字
    }
注意:一定要在封装对象searchMap的下面,如果不这样,则会清空keywords的值
还要映入$location

2.搜索模块到商品详情页面的对接
代码如下:
因为我们已经做了域名的映射,我们就可以通过id找到相应的页面

三.spring整合jms
1.创建一个工程
2.导入配置文件
点对点模式:
Producer的配置文件:
consumer的而配置文件
编写生产者和消费者
@Component
public class QueueProducer {

    @Autowired
    private JmsTemplate jmsTemplate;

    @Autowired
    private Destination queueTextDestination;

    public void sendMsg(){
        jmsTemplate.send(queueTextDestination, new MessageCreator() {
            public Message createMessage(Session session) throws JMSException {
                return session.createTextMessage("这是与spirng整合的第一个消息");
            }
        });
    }
}
public class MyMessageListener implements MessageListener {
public void onMessage(Message message) {
TextMessage textMessage = (TextMessage)message;
try {
System.out.println("接受到消息"+textMessage.getText());
} catch (JMSException e) {
e.printStackTrace();
}
}
}
测试:
//测试生产者
@RunWith(SpringJUnit4ClassRunner.class)
@ContextConfiguration(locations = "classpath:spring/applicationContext-activemq-producer.xml")
public class QueueProducerTest {


    @Autowired
    private QueueProducer queueProducer;

    @Test
    public  void sendMsg(){
        queueProducer.sendMsg();
    }
}

//测试消费者

@RunWith(SpringJUnit4ClassRunner.class)
@ContextConfiguration(locations = "classpath:spring/applicationContext-activemq-consumer.xml")
public class ConsumerTest {

    @Test
    public void getMeg(){
        while (true){}
    }
}
3.发布订阅模式
和点对点模式差不多,修改注入
topicTextDestination四.商品的上下架操作同时执行solr索引和网页静态化
1.首先我们通过上下架的操作通过同步到solr库中,注意我们写在selllergoods模块中
导包 编写 配置文件
 //activeMQ的创建消息
    @Autowired
    private JmsTemplate jmsTemplate;
    @Autowired
    private Destination addItemSolrTextDestination;
    @Autowired
    private Destination deleItemSolrTextDestination;
在servier层判断是否上架或者下架
//只有审核通过的才能上下架
            if ("1".equals(tbGoods.getAuditStatus())){

                //判断是否是上架
                if("1".equals(isMarketable)){
                    //同步商品到索引库
                    jmsTemplate.send(addItemSolrTextDestination, new MessageCreator() {
                        @Override
                        public Message createMessage(Session session) throws JMSException {
                            return session.createTextMessage(id+"");
                        }
                    });
                }else{
                    //删除商品到索引库;
                    jmsTemplate.send(deleItemSolrTextDestination, new MessageCreator() {
                        @Override
                        public Message createMessage(Session session) throws JMSException {
                            return session.createTextMessage(id+"");
                        }
                    });
                }
2.在search模块编写消费者
导包 编写配置文件
编写
com.pinyougou.search.listener.AddItemSolrMessageListener上架
public class AddItemSolrMessageListener implements MessageListener{

    @Autowired
    private TbItemMapper itemMapper;
    @Autowired
    private SolrTemplate solrTemplate;

    @Override
    public void onMessage(Message message) {
        //获取上架商品的id
        TextMessage textMessage = (TextMessage)message;
        //同步到索引库

        try {
            String goodsId = textMessage.getText();
            TbItemExample example = new TbItemExample();
            TbItemExample.Criteria criteria = example.createCriteria();
            criteria.andGoodsIdEqualTo(Long.parseLong(goodsId));
            List itemList = itemMapper.selectByExample(example);

            //保存到索引库
            solrTemplate.saveBeans(itemList);
            //提交
            solrTemplate.commit();
        }catch (Exception e) {
            e.printStackTrace();
        }
    }
}
下架:
public class DeleItemSolrMessageListener implements MessageListener {

    @Autowired
    private SolrTemplate solrTemplate;

    @Override
    public void onMessage(Message message) {
        //获取上架商品id
        TextMessage textMessage = (TextMessage)message;
        try {
            String goodsId = textMessage.getText();
            //商品下架时,同步删除索引库数据
            SolrDataQuery query = new SimpleQuery("item_goodsid:"+goodsId);
            solrTemplate.delete(query);
            solrTemplate.commit();

        } catch (JMSException e) {
            e.printStackTrace();
        }
    }
}
3.上下架的同时生成静态页面
首先我们配置上下架页面的生成静态页的消息,
1.配置文件
2.在sellergoods中编写判断是否上架,然后通过通过jmsTemplage发送消息
 //判断是否是上架
                if("1".equals(isMarketable)){
                    //同步商品到索引库
                    jmsTemplate.send(addItemSolrTextDestination, new MessageCreator() {
                        @Override
                        public Message createMessage(Session session) throws JMSException {
                            return session.createTextMessage(id+"");
                        }
                    });
                    //商家时添加相应的静态页面
                    jmsTemplate.send(addItemTextPageDestination, new MessageCreator() {
                        @Override
                        public Message createMessage(Session session) throws JMSException {
                            return session.createTextMessage(id+"");
                        }
                    });
                }else{
                    //删除商品到索引库;
                    jmsTemplate.send(deleItemSolrTextDestination, new MessageCreator() {
                        @Override
                        public Message createMessage(Session session) throws JMSException {
                            return session.createTextMessage(id+"");
                        }
                    });
                    //删除相应的静态页面
                    jmsTemplate.send(deleItemPageTextDestination, new MessageCreator() {
                        @Override
                        public Message createMessage(Session session) throws JMSException {
                            return session.createTextMessage(id+"");
                        }
                    });
                }
3.编写消费者,
思路分析:通过我们从消息中间件中获得我们需要的goodsId,然后 通过 itemMapper查找item表的id 删除这个id 就可以了
4.编写监听器
注意在这之前,一定要导入页面静态化的包,以及springmvc.xml中的
freemarker的模板配置
然后编写生成静态页面的监听页面
@Service
@Transactional
public class AddItemPageMessageListener implements MessageListener {
    @Autowired
    private PageService pageService;
    @Autowired
    private FreeMarkerConfigurer freeMarkerConfigurer;

    @Override
    public void onMessage(Message message) {
        TextMessage textMessage = (TextMessage)message;
        try {
            String goodsId = textMessage.getText();

            //生成静态页面
           // 第一步:创建一个 Configuration 对象,直接 new 一个对象。构造方法的参数就是
            freemarker.template.Configuration configuration = freeMarkerConfigurer.getConfiguration();
//        freemarker 的版本号。
//        第四步:加载一个模板,创建一个模板对象。
            Template template = configuration.getTemplate("item.ftl");
//        第五步:创建一个模板使用的数据集,可以是 pojo 也可以是 map。一般是 Map。
            Goods goods = pageService.findOne(Long.parseLong(goodsId));
            List items = goods.getItemList();
            for (TbItem item : items) {
                //      在这呢我们不要将组合实体类返回,因为返回还的遍历,取值,我们直接在这封装给map就可以了
                Map map = new HashMap<>();
                map.put("goods", goods);
                map.put("item", item);
//        第六步:创建一个 Writer 对象,一般创建一 FileWriter 对象,指定生成的文件名。
                Writer out = new FileWriter("F:\\item\\" + item.getId() + ".html");
//        第七步:调用模板对象的 process 方法输出文件。
                template.process(map, out);
//        第八步:关闭流
                out.close();
            }
        } catch (Exception e) {
            e.printStackTrace();
        }
    }
删除静态页面,通过goodsId获得item的id 然后new File("文件地址").delete()方法删除
@Service
@Transactional
public class DeleItemPageMessageListener implements MessageListener {
    @Autowired
    private TbItemMapper itemMapper;
    @Override
    public void onMessage(Message message) {
        TextMessage textMessage = (TextMessage)message;
        try {
            //获得商品id
            String goodsId = textMessage.getText();
            //在这我们通过生成静态页面的id序号删除页面
            TbItemExample example = new TbItemExample();
            TbItemExample.Criteria criteria = example.createCriteria();
            criteria.andGoodsIdEqualTo(Long.parseLong(goodsId));
            //获得item表的信息
            List itemList = itemMapper.selectByExample(example);
            //循环删除
            for (TbItem item : itemList) {
                new File("F:\\item\\"+item.getId()+".html").delete();
            }
        } catch (JMSException e) {
            e.printStackTrace();
        }
    }
}
五.总结
activeMQ的三个非常重要的作用:
1.项目应用间解耦合
2.异步通信
3.流量削峰