Cucumber之六Step Definition步骤定义
英文视频教程地址是百度网盘,后续会放到微信公众号:【软测小生】里面,请关注公号更新相关文章和视频资源。![]()
****************************分割线**********************************
本文目录:
Step Definition(步骤定义)
什么是步骤定义?(What is Step Definition?)
添加一个步骤定义文件 (Add a Step Definition file)
在步骤定义方法中添加Selenium Java代码
运行Cucumber测试
Step Definition(步骤定义)
下一个目标是测试或运行feature文件,为了测试feature文件,我们需要用java为feature文件中的每个步骤编写实现或步骤定义。当Cucumber在场景(Scenario)中执行一个步骤(Step)时,它会寻找一个匹配的步骤定义(Step Definition)来执行。
什么是步骤定义?(What is Step Definition?)
“步骤定义”是一小段代码,附加了一个模式,或者换句话说,“步骤定义”是类中带有注释的Java方法。 该模式后面的注释用于将步骤定义(Step Definition)链接到所有匹配的步骤(Steps),当Cucumber看到Gherkin步骤(Gherkin Step)时,它将执行这些代码。 Cucumber Options中的Glue代码帮助找到Step Definition文件。 我们将在下一章介绍不同的Cucumber Options。
添加一个步骤定义文件 (Add a Step Definition file)
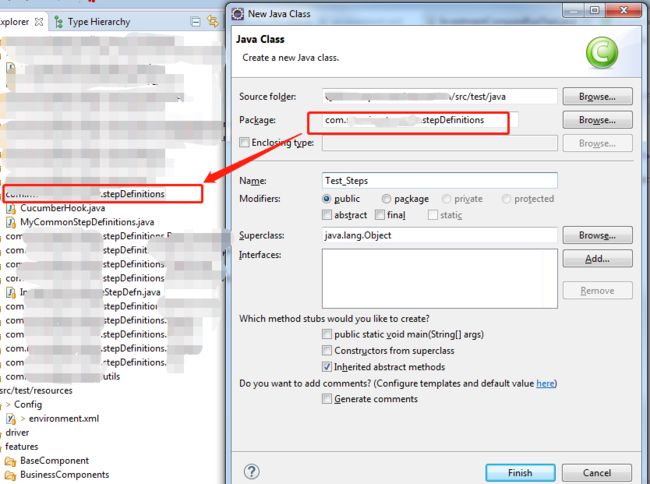
1)在“stepDefinition”包中创建一个新的类文件,命名为“Test_Steps”,右键单击包,选择new > Class。不要选中“public static void main”选项,然后单击Finish按钮。
2)查看控制台窗口中的消息。当我们运行Test_Runner类时,显示了这条消息。
注意:请通过 First Cucumber Selenium Test 来理解以上信息
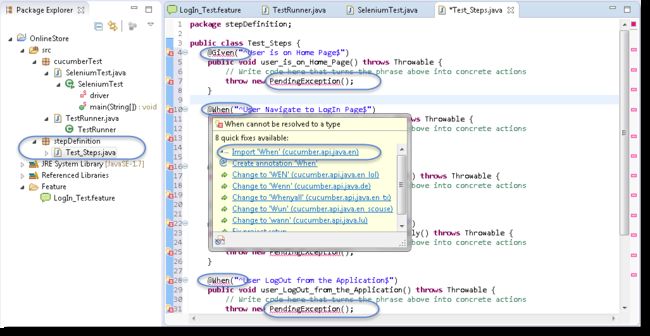
2)注意,eclipse console窗口显示“You can implement missing steps with the snippets below(您可以使用下面的代码片段实现缺少的步骤)”。实现所有步骤非常简单,您只需复制在蓝色框中标记的完整文本,并将其粘贴到上面创建的Test_Steps类中。
3)到目前为止,测试将显示 ‘@‘ 注释(annotations)有很多错误。鼠标悬停在注释上,导入“cucumber.api.java.en”为所有的注解。(也可以使用快捷键,Ctrl+Shift+O)
在步骤定义方法中添加Selenium Java代码
1)现在从“SeleniumTest”中取出以下步骤的Selenium Java代码,并将其粘贴到第一个方法“@Given(“^User is on Home Page$”)”中。
- 启动浏览器
- 导航到主页
方法现在看起来是这样的:
	@Given("^User is on Home Page$")
	public void user_is_on_Home_Page() throws Throwable {
		driver = new FirefoxDriver();
        driver.manage().timeouts().implicitlyWait(10, TimeUnit.SECONDS);
        driver.get("http://www.store.demoqa.com");
		}
2) 从SeleniumTest中取出以下步骤的Selenium Java代码,并将其粘贴到第二个方法“@When(“^User Navigate to LogIn Page$”)”中。
- 单击LogIn链接
方法现在看起来是这样的:
 @When("^User Navigate to LogIn Page$")
 public void user_Navigate_to_LogIn_Page() throws Throwable {
 driver.findElement(By.xpath(".//*[@id='account']/a")).click();
 }
3) 从SeleniumTest中取出以下步骤的Selenium Java代码,并将其粘贴到第二个方法“@When(“^User enters UserName and Password$”)”中。
- 输入用户名和密码
- 点击提交按钮
方法现在看起来是这样的:
	@When("^User enters UserName and Password$")
	public void user_enters_UserName_and_Password() throws Throwable {
		driver.findElement(By.id("log")).sendKeys("testuser_1");
	    driver.findElement(By.id("pwd")).sendKeys("Test@123");
	    driver.findElement(By.id("login")).click();
		}
4) 对其他方法也执行相同的步骤,完成Test_Steps类将如下所示:
Step Definition: Test_Steps Class
package stepDefinition;

import java.util.concurrent.TimeUnit;

import org.openqa.selenium.By;
import org.openqa.selenium.WebDriver;
import org.openqa.selenium.firefox.FirefoxDriver;

import cucumber.api.java.en.Given;
import cucumber.api.java.en.Then;
import cucumber.api.java.en.When;

public class Test_Steps {
	public static WebDriver driver;
	@Given("^User is on Home Page$")
	public void user_is_on_Home_Page() throws Throwable {
        driver = new FirefoxDriver();
        driver.manage().timeouts().implicitlyWait(10, TimeUnit.SECONDS);
        driver.get("http://www.store.demoqa.com");
		}

	@When("^User Navigate to LogIn Page$")
	public void user_Navigate_to_LogIn_Page() throws Throwable {
		driver.findElement(By.xpath(".//*[@id='account']/a")).click();
		}

	@When("^User enters UserName and Password$")
	public void user_enters_UserName_and_Password() throws Throwable {
		driver.findElement(By.id("log")).sendKeys("testuser_1");
	    driver.findElement(By.id("pwd")).sendKeys("Test@123");
	    driver.findElement(By.id("login")).click();
		}

	@Then("^Message displayed Login Successfully$")
	public void message_displayed_Login_Successfully() throws Throwable {
		System.out.println("Login Successfully");
	}

	@When("^User LogOut from the Application$")
	public void user_LogOut_from_the_Application() throws Throwable {
		driver.findElement (By.xpath(".//*[@id='account_logout']/a")).click();
	}

	@Then("^Message displayed Logout Successfully$")
	public void message_displayed_Logout_Successfully() throws Throwable {
        System.out.println("LogOut Successfully");
	}

}注意:请务必为测试创建您自己的用户名和密码,不要尝试用错误的凭证登录,因为您会被封锁数小时之后才可以演示网站。
其实你可以尝试着换一个网站做自己的登录测试,这个网站是在欧洲,有的或许访问不了,而且速度超慢!关键要学习改文章的思想。
运行Cucumber测试
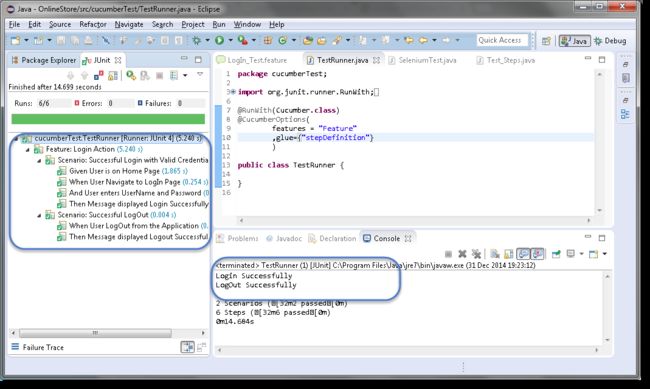
现在,我们已经准备好运行第一个Cucumber测试。右键单击TestRunner类,然后单击Run As > JUnit Test。Cucumber将以与Selenium WebDriver相同的方式运行脚本,结果将显示在JUnit选项卡的左侧project explorer窗口中。
Cucumber通过读取feature文件步骤开始执行。一旦Cucumber到达第一步,例如Given场景语句,它就会在步骤定义(Step Definition)文件中寻找相同的语句,一旦找到该语句,它就会执行函数中编写的代码。

