搭建Python3深度学习环境TensorFlow-GPU版本-全流程
搭建Python3深度学习环境TensorFlow-GPU
- 1开动!
- 1.1几个可选的查询指令
- 1.2显卡、CUDA相关
- **查看显卡信息**
- **Windows**
- **Linux**
- 根据驱动,对应支持的cuda python TensorFlow 版本
- 1.3全部指令(TFgpu1.12重装成功)
- 2其他方法
- 3检测代码
1开动!
采用与上一篇 搭建Python深度学习环境TensorFlow2.0避坑及全流程 相类似的方法,cmd+conda安装过程几乎没什么困难。如果本文对你有帮助,卑微求赞~
用anaconda创建环境的好处是,安装一个模块可能需要其它模块的支持,它会把支持的模块也一块下载好,当我们再次创建一个环境时,如果需要的模块之前已经装过,直接连接所需要的模块,而不会重新再重新下载。
也可直接下载miniconda
1.1几个可选的查询指令
//查看当前可用的tensorflow版本
conda search --full --name tensorflow

//查看tensorflow包信息及依赖关系(不常用)
conda info tensorflow

//查看环境(*位置是当前环境)
conda info --e

//安装完成后显示当前环境下的TF信息
pip show tensorflow

//显示当前环境的packages
conda list

//查询Python安装位置
where python

//查询当前Python安装位置
>>> import sys
>>> sys.executable
1.2显卡、CUDA相关
tensorflow-gpu1.13.0及以后版本支持CUDA10,需要查看显卡驱动.
查看显卡信息
Windows
方式1 NVIDIA显卡控制面板

方式二 win + r 打开 “运行命令行”,输入 “dxdiag”,点击确定

方式三 设备管理器

Linux
1)、lshw -C display
2)、lspci | grep -i vga
使用:“lshw -c video | grep configuration” 来查看驱动名称
然后再使用: “modinfo 驱动名称” 查看详细信息
若使用NVIDIA显卡,则可通过 nvidia-smi 查看更多信息
根据驱动,对应支持的cuda python TensorFlow 版本
显卡驱动版本确定后,可通过创建新的Python环境,安装指定版本CUDA、Cudnn,方法都是一样。使用时无需多余操作,不同版本CUDA、Cudnn相互之间没影响。
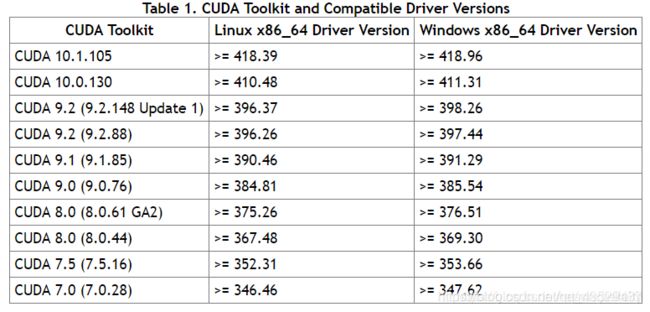
此链接涵盖Windows、Linux、macOS Tensorflow版本Python要求与CUDA及CUDNN版本对应关系
cuda、显卡驱动相关芝士…2019
1.3全部指令(TFgpu1.12重装成功)
C:\WINDOWS\system32>doskey /history
//自动安装完成后,会清屏仅显示done,以下为命令语句历史
conda info -e
conda create -n=gpuTF1.12 python=3.6.10
conda activate gpuTF1.12
conda list //查看Python版本
python
activate //Python版本不对应,激活环境失效时回到base
python
activate gpuTF1.12 //重新激活新环境
conda install tensorflow_gpu==1.12//名称错误,找不到
conda install tensorflow-gpu==1.12.0
conda install tensorflow-gpu==1.12.0
//部分包只下载了一半,会自动重下那个包
python
activate
activate gpuTF1.12
conda list
doskey /history
// 查看命令行输入历史
2其他方法
.1
如果没办法通过conda自动安装,这里贴出资源 tensorflow-windows-wheel,2020.2.3已经更新到tensorflow-gpu2.1.0
然后在whl文件路径下输入命令:
pip install tensorflow-2.0.0-cp37-cp37m-win_amd64.whl
.2
另外,还提供一种pip安装的命令行
pip install -i https://pypi.tuna.tsinghua.edu.cn/simple tensorflow-gpu==1.12.0
3检测代码
若可以成功import,并计算输出,则已经安装完成。
import tensorflow as tf
a = tf.constant(1)
b = tf.constant(2)
c = tf.add(a, b)
with tf.Session() as sess:
    print(sess.run(c))
如:
>>> import tensorflow as tf
>>> a = tf.constant(1)
>>> b = tf.constant(2)
>>> c = tf.add(a, b)
>>> with tf.Session() as sess:
... print(sess.run(c))
File "" , line 2
print(sess.run(c))
^
IndentationError: expected an indented block
>>> with tf.Session() as sess:
... print(sess.run(c))
...
2020-02-05 11:21:10.809841: I tensorflow/core/platform/cpu_feature_guard.cc:141] Your CPU supports instructions that this TensorFlow binary was not compiled to use: AVX AVX2
2020-02-05 11:21:12.378431: I tensorflow/core/common_runtime/gpu/gpu_device.cc:1432] Found device 0 with properties:
name: GeForce GTX 1060 major: 6 minor: 1 memoryClockRate(GHz): 1.6705
pciBusID: 0000:01:00.0
totalMemory: 6.00GiB freeMemory: 4.97GiB
2020-02-05 11:21:12.453492: I tensorflow/core/common_runtime/gpu/gpu_device.cc:1511] Adding visible gpu devices: 0
2020-02-05 11:21:22.887646: I tensorflow/core/common_runtime/gpu/gpu_device.cc:982] Device interconnect StreamExecutor with strength 1 edge matrix:
2020-02-05 11:21:22.920900: I tensorflow/core/common_runtime/gpu/gpu_device.cc:988] 0
2020-02-05 11:21:22.945148: I tensorflow/core/common_runtime/gpu/gpu_device.cc:1001] 0: N
2020-02-05 11:21:23.032179: I tensorflow/core/common_runtime/gpu/gpu_device.cc:1115] Created TensorFlow device (/job:localhost/replica:0/task:0/device:GPU:0 with 4720 MB memory) -> physical GPU (device: 0, name: GeForce GTX 1060, pci bus id: 0000:01:00.0, compute capability: 6.1)
3
>>> import numpy as np
>>> ^Z求赞!