企业实战04_redis-cluster集群搭建
接上一篇:企业实战_03_Redis基础命令https://blog.csdn.net/weixin_40816738/article/details/99213524
#安装gcc
yum install gcc-c++
#使用yum命令安装 ruby  (我们需要使用ruby脚本来实现集群搭建)
yum install ruby
yum install rubygems
#将redis源码包上传到 linux 系统  ,解压redis源码包
#编译redis源码  ,进入redis源码文件夹
make
看到以下输出结果,表示编译成功

创建目录/app/redis-cluster目录,  安装6个redis实例,分别安装在以下目录
mkdir /app/redis-cluster
/app/redis-cluster/redis-1
/app/redis-cluster/redis-2
/app/redis-cluster/redis-3
/app/redis-cluster/redis-4
/app/redis-cluster/redis-5
/app/redis-cluster/redis-6
以第一个redis实例为例,命令如下
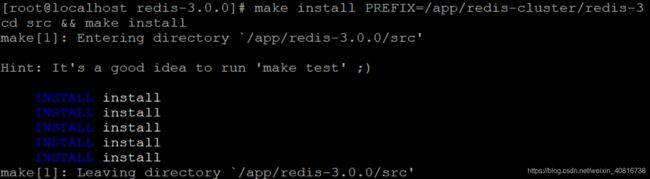
make install PREFIX=/app/redis-cluster/redis-cluster/redis-1
make install PREFIX=/app/redis-cluster/redis-cluster/redis-2
make install PREFIX=/app/redis-cluster/redis-cluster/redis-3
make install PREFIX=/app/redis-cluster/redis-cluster/redis-4
make install PREFIX=/app/redis-cluster/redis-cluster/redis-5
make install PREFIX=/app/redis-cluster/redis-cluster/redis-6


复制配置文件  将 /redis-3.0.0/redis.conf 复制到redis下的bin目录下
[root@localhost redis-3.0.0]# cp redis.conf /app/redis-cluster/redis-1/bin
[root@localhost redis-3.0.0]# cp redis.conf /app/redis-cluster/redis-2/bin
[root@localhost redis-3.0.0]# cp redis.conf /app/redis-cluster/redis-3/bin
[root@localhost redis-3.0.0]# cp redis.conf /app/redis-cluster/redis-4/bin
[root@localhost redis-3.0.0]# cp redis.conf /app/redis-cluster/redis-5/bin
[root@localhost redis-3.0.0]# cp redis.conf /app/redis-cluster/redis-6/bin

二、配置集群
修改每个redis节点的配置文件redis.conf
1、修改运行端口为7001 (7002 7003 …)
2、打开集群开关
[root@localhost src]# vim /app/redis-cluster/redis-1/bin/redis.conf
[root@localhost src]# vim /app/redis-cluster/redis-2/bin/redis.conf
[root@localhost src]# vim /app/redis-cluster/redis-3/bin/redis.conf
[root@localhost src]# vim /app/redis-cluster/redis-4/bin/redis.conf
[root@localhost src]# vim /app/redis-cluster/redis-5/bin/redis.conf
[root@localhost src]# vim /app/redis-cluster/redis-6/bin/redis.conf
将redis-1至redis-6的端口:port以次修改为7001-7006 前的注释去掉(45行)

将cluster-enabled yes 前的注释去掉(632行)
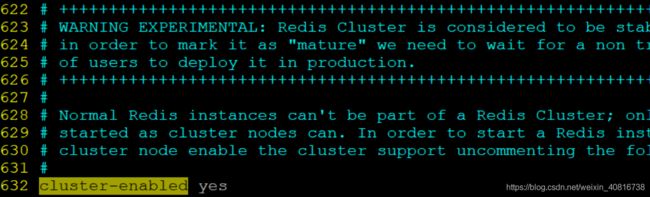
截图是redis-1的修改,其他5个和上面一样。
启动每个redis实例
以第一个实例为例,命令如下
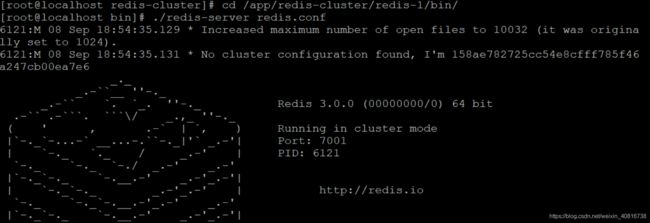
[root@localhost bin]# cd /app/redis-cluster/redis-1/bin/
[root@localhost bin]# ./redis-server redis.conf
[root@localhost bin]# cd /app/redis-cluster/redis-2/bin/
[root@localhost bin]# ./redis-server redis.conf

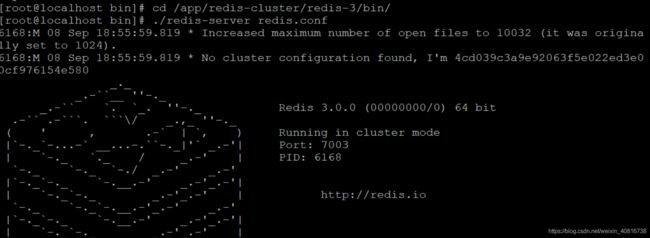
[root@localhost bin]# cd /app/redis-cluster/redis-3/bin/
[root@localhost bin]# ./redis-server redis.conf
[root@localhost bin]# cd /app/redis-cluster/redis-4/bin/
[root@localhost bin]# ./redis-server redis.conf

[root@localhost bin]# cd /app/redis-cluster/redis-5/bin/
[root@localhost bin]# ./redis-server redis.conf

[root@localhost bin]# cd /app/redis-cluster/redis-6/bin/
[root@localhost bin]# ./redis-server redis.conf

redis6个实例启动完成之后,查看一下是不是都启动起来了
ps -ef | grep redis

上传redis-3.0.0.gem ,安装 ruby用于搭建redis集群的脚本
#执行脚本安装脚本
gem install redis-3.0.0.gem

(4)使用 ruby 脚本搭建集群。
#进入redis源码目录中的src目录  执行下面的命令
./redis-trib.rb create --replicas 1 192.168.43.10:7001 192.168.43.10:7002 192.168.43.10:7003 192.168.43.10:7004 192.168.43.10:7005 192.168.43.10:7006
附上轨迹记录:
[root@localhost src]# ./redis-trib.rb create --replicas 1 192.168.43.10:7001 192.168.43.10:7002 192.168.43.10:7003 192.168.43.10:7004 192.168.43.10:7005 192.168.43.10:7006
>>> Creating cluster
Connecting to node 192.168.43.10:7001: OK
Connecting to node 192.168.43.10:7002: OK
Connecting to node 192.168.43.10:7003: OK
Connecting to node 192.168.43.10:7004: OK
Connecting to node 192.168.43.10:7005: OK
Connecting to node 192.168.43.10:7006: OK
>>> Performing hash slots allocation on 6 nodes...
Using 3 masters:
192.168.43.10:7001
192.168.43.10:7002
192.168.43.10:7003
Adding replica 192.168.43.10:7004 to 192.168.43.10:7001
Adding replica 192.168.43.10:7005 to 192.168.43.10:7002
Adding replica 192.168.43.10:7006 to 192.168.43.10:7003
M: 158ae782725cc54e8cfff785f46a247cb00ea7e6 192.168.43.10:7001
   slots:0-5460 (5461 slots) master
M: 885f422e2ab7cf25e317f005069f89283ee61e95 192.168.43.10:7002
   slots:5461-10922 (5462 slots) master
M: 4cd039c3a9e92063f5e022ed3e00cf976154e580 192.168.43.10:7003
   slots:10923-16383 (5461 slots) master
S: 707db54b36af29cd60e1bc8710b1d6c1123785e4 192.168.43.10:7004
   replicates 158ae782725cc54e8cfff785f46a247cb00ea7e6
S: b6d094831ecdccd78fb9b7d33c3893bc4ced650f 192.168.43.10:7005
   replicates 885f422e2ab7cf25e317f005069f89283ee61e95
S: 9cc2de16400334f0a4037ac15e672704cdbba890 192.168.43.10:7006
   replicates 4cd039c3a9e92063f5e022ed3e00cf976154e580
Can I set the above configuration? (type 'yes' to accept): yes
>>> Nodes configuration updated
>>> Assign a different config epoch to each node
>>> Sending CLUSTER MEET messages to join the cluster
  iting for the cluster to join..
>>> Performing Cluster Check (using node 192.168.43.10:7001)
M: 158ae782725cc54e8cfff785f46a247cb00ea7e6 192.168.43.10:7001
   slots:0-5460 (5461 slots) master
M: 885f422e2ab7cf25e317f005069f89283ee61e95 192.168.43.10:7002
   slots:5461-10922 (5462 slots) master
M: 4cd039c3a9e92063f5e022ed3e00cf976154e580 192.168.43.10:7003
   slots:10923-16383 (5461 slots) master
M: 707db54b36af29cd60e1bc8710b1d6c1123785e4 192.168.43.10:7004
   slots: (0 slots) master
   replicates 158ae782725cc54e8cfff785f46a247cb00ea7e6
M: b6d094831ecdccd78fb9b7d33c3893bc4ced650f 192.168.43.10:7005
   slots: (0 slots) master
   replicates 885f422e2ab7cf25e317f005069f89283ee61e95
M: 9cc2de16400334f0a4037ac15e672704cdbba890 192.168.43.10:7006
   slots: (0 slots) master
   replicates 4cd039c3a9e92063f5e022ed3e00cf976154e580
[OK] All nodes agree about slots configuration.
>>> Check for open slots...
>>> Check slots coverage...
[OK] All 16384 slots covered.
集群搭建完成之后,
监控redis-1控制台

监控redis-2控制台

监控redis-3控制台

监控redis-4控制台

监控redis-5控制台

监控redis-6控制台

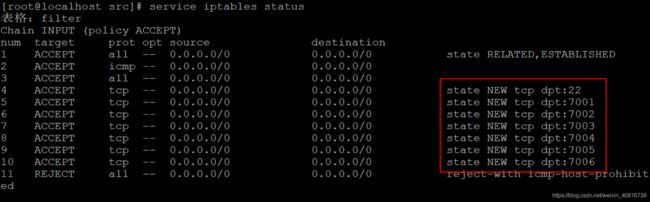
开放允许外界访问的端口号
vim /etc/sysconfig/iptables
添加内容如下
#redis-cluster
-A INPUT -m state --state NEW -m tcp -p tcp --dport 7001 -j ACCEPT
-A INPUT -m state --state NEW -m tcp -p tcp --dport 7002 -j ACCEPT
-A INPUT -m state --state NEW -m tcp -p tcp --dport 7003 -j ACCEPT
-A INPUT -m state --state NEW -m tcp -p tcp --dport 7004 -j ACCEPT
-A INPUT -m state --state NEW -m tcp -p tcp --dport 7005 -j ACCEPT
-A INPUT -m state --state NEW -m tcp -p tcp --dport 7006 -j ACCEPT

保存,
#重启防火墙,是配置生效
service iptables restart
#查看防火墙运行状态
service iptables status

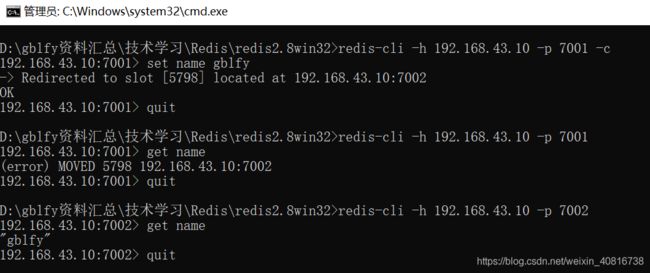
在windows环境下,使用redis客户端进行远程连接redis集群
#进入reids目录,执行以下命令
redis-cli -h 192.168.43.10 -p 7001 -c
| 命令 | 说明 |
|---|---|
| -h | 指定连接reids的ip地址 |
| -p | 指定远程连接redis的端口号 |
| -c | 指定客户端连接的是redis集群,如果不添加-c参数,相当于连接的redis单机 |

测试验证一下
#往reidis集群中添加一个name为gblfy的值
set name gblfy

从图中可以看出,成功的将name为gblfy的值添加到了卡槽为【5798】,卡槽范围属于【5461-10922】的7002节点上了。

演示连接集群和单机的区别
实现思路
1.连接集群redis-1 7001端口,添加name值为gblfy
2.连接单机,尝试获取上一步添加到集群中的name为gblfy的值
预测:
1.假设 :将name值为gblfy储存在7002节点上
2.单机连接7001节点,应该获取不到添加到集群中name值为gblfy
3.退出,单机远程连接7002,可以正常从redis集群中获取到name值为gblfy
- 测试场景1:
- 验证单机远程连接集群,单机登录非该节点的redis服务端,从其他节点中获取值
第一步:redis客户端远程连接redis集群
redis-cli -h 192.168.43.10 -p 7001 -c
第二步:向redis集群中添加name值为gblfy
192.168.43.10:7001> set name gblfy

第三步:退出集群,单机连接7001,尝试获取name值为gblfy
#退出集群
192.168.43.10:7001> quit
#单机连接redis
redis-cli -h 192.168.43.10 -p 7001
#从7001节点,尝试获取name值为gblfy
192.168.43.10:7001> get name
异常信息如下:
(error) MOVED 5798 192.168.43.10:7002

- 测试场景2:
- 验证单机远程连接集群,单机登录该节点的redis服务端,从该节点中获取值

结果总结:测试和我们预测的结果是一样的,在windows环境下,通过redis客户端远程连接redis-cluster集群,然后,向redis-cluster集群中添加值,最后,通过远程连接redis单机,获取添加到集群的值,只有储存到该节点下的值可以正常获取到,非该节点下的场景,获取不到添加到集群的值。
演示截图总览:
下一篇:企业实战_05_SpringBoot整合redis单机版本https://blog.csdn.net/weixin_40816738/article/details/100658608