企业—ansible的playbook应用
一.为什么要引入playbook
我们完成一个任务,例如安装部署一个httpd服务,我们需要多个模块(一个模块也可以称之为task)提供的功能来完成。而playbook就是组织多个task的容器,它的实质就是一个文件,有着特定的组织格式,它采用的语法格式是YAML(Yet Another Markup Language)。YAML语法能够简单的表示散列表,字典等数据结构。
二.yuml基本语法
1.列表:每一个列表成员都要有一个短横线和空格
fruits:
    - Apple
    - Orange
    - Strawberry
    - Mango

或者:
fruits: ['Apple', 'Orange', 'Strawberry', 'Mango']
2.字典:每一个成员由键值对组成,注意冒号后面要有空格
martin:
    name: Martin D'vloper
    job: Developer
    skill: Elite
或者
martin: {name: Martin D'vloper, job: Developer, skill: Elite}
列表和字典可以混用
3.yaml文件中短杠和冒号后面默认为2个空格,配置本地用户在yaml配置文件中使用tab自动补齐2个空格
[devops@server1 ~]$ vim .vimrc
autocmd filetype  yaml setlocal ai ts=2 sw=2 et
三.playbook的基础组件
Hosts:运行执行任务(task)的目标主机
remote_user:在远程主机上执行任务的用户
tasks:任务列表
handlers:任务,与tasks不同的是只有在接受到通知时才会被触发
templates:使用模板语言的文本文件,使用jinja2语法。
variables:变量,变量替换{{ variable_name }}
整个playbook是以task为中心,表明要执行的任务。hosts和remote_user表明在哪些远程主机以何种身份执行。其他组件让其能够更加灵活。
四.playbook的应用
部署httpd服务:
1.编辑yaml文件
[devops@server1 ansible]$ vim playbook.yml
文件编辑内容如下:
---     必须有的
#deploy apache   操作说明
- hosts:  webservers  定义主机
  tasks:   任务
    - name: install httpd    任务起名可任意
      yum:   任务调用的模块
        name: httpd
        state:  latest   安装最新版的
    - name: create index.html
      copy:
        content:  "www.westos.org\n"
        dest: /var/www/html/index.html
    - name: configure httpd
      copy:
        src:  files/httpd.conf    需要在当前目录下建立files目录并且将httpd.conf文件放入该目录
        dest: /etc/httpd/conf/httpd.conf
        owner:  root
        group:  root
        mode: 644
      notify: restart httpd

    - name: start httpd
      service:
        name: httpd
        state:  started
        enabled:  true
    - name: start firewalld
      service:
        name: firewalld
        state:  started
        enabled:  true
    - name: configure firewalld
      firewalld:
        service:  http
        state:  enabled
        permanent:  yes
        immediate:  yes
  handlers:
    - name: restart httpd
      service:
        name: httpd
        state:  restarted
iles目录下的httpd.conf文件的添加:
2.检查yaml文件的语法错误并playbook该文件
[devops@server1 ansible]$ ansible-playbook playbook.yml --syntax-check   检查语法
[devops@server1 ansible]$ ansible-playbook playbook.yml --list-hosts   列出文件中的操作主机
[devops@server1 ansible]$ ansible-playbook playbook.yml --list-tasks   列出文件中的任务
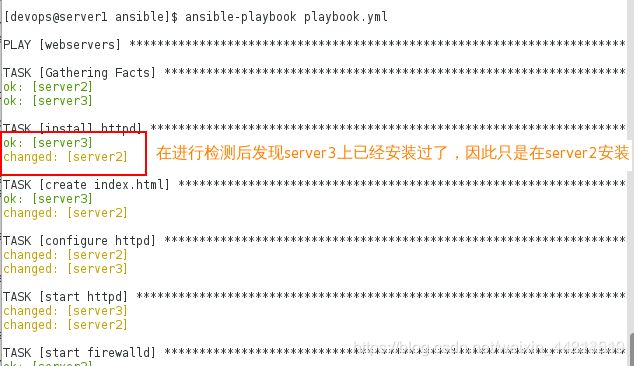
[devops@server1 ansible]$ ansible-playbook playbook.yml
变量:
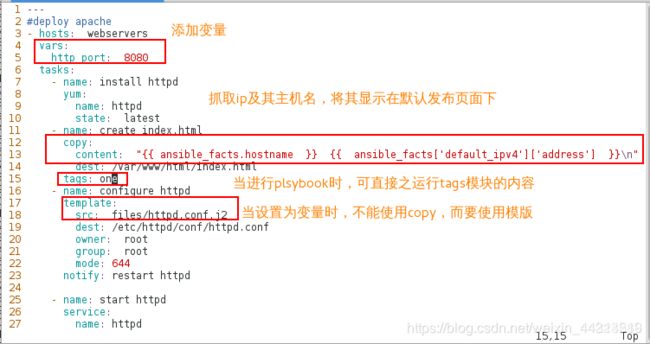
1.重新修改playbook.yaml文件,需要修改的内容如下:
[devops@server1 ansible]$ vim playbook.yml
2.创建变量模版,并playbook执行yaml文件
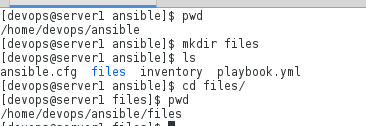
[devops@server1 ansible]$ pwd
/home/devops/ansible
[devops@server1 ansible]$ cd files/
[devops@server1 files]$ cp httpd.conf httpd.conf.j2
[devops@server1 files]$ vim httpd.conf.j2
文件编辑如下:
42 Listen {{ http_port }}
[devops@server1 files]$ ansible-playbook playbook.yml  #server2及其server3的端口变为指定的变量里面的监听端口
3.验证:
//server2及其server3上http监听端口为yaml文件中所指定的
//主机名及其ip抓取检测
//tag指定所要执行的
模版:
举例:主机名的详细解析
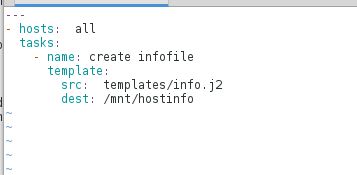
1.编写yaml文件
[devops@server1 ansible]$ vim hostinfo.yml
---
- hosts:  all
  tasks:
    - name: create infofile
      template:
        src:  templates/info.j2    //指定摸版存放路径
        dest: /mnt/hostinfo
2.创建模版目录并且在模版目录下创建模版文件
[devops@server1 ansible]$ mkdir templates
[devops@server1 ansible]$ cd tempaltes/
[devops@server1 tempaltes]$ vim info.j2
主机名:{{ ansible_facts['hostname'] }}
IP:{{ ansible_facts['default_ipv4']['address'] }}
根分区大小:{{ ansible_facts['devices']['dm-0']['size'] }}
内核:{{ ansible_facts['kernel'] }}
系统版本:{{ ansible_facts['distribution_version'] }}
DNS:{{ ansible_facts['dns']['nameservers'] }}
3.测试:
[devops@server1 ansible]$ ansible-playbook hostinfo.yml
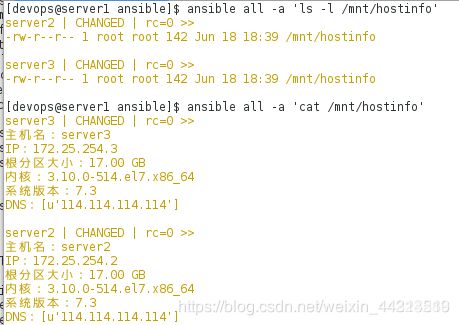
[devops@server1 ansible]$ ansible all -a 'ls -l /mnt/hostinfo'  ##查看
[devops@server1 ansible]$ ansible all -a 'cat /mnt/hostinfo'  ##查看内容
判断when
1.编写yaml文件添加判断
[devops@server1 ansible]$ vim install.yml
---
- hosts:  all
  tasks:
    - name: install httpd
      yum:
        name: "{{ item }}"   ##迭代简单列表
        state:  present
      when: ansible_facts['hostname'] == 'server2'   ##执行的时候server3会跳过
      loop:   ##与item共同使用
        - httpd
        - mariadb
        - php
        - php-mysql
    - name: install mariadb
      yum:
        name: mariadb
        state:  present
      when: ansible_facts['hostname'] == 'server3'
2.执行yaml文件
[devops@server1 ansible]$ ansible-playbook install.yml
节点的批量解析
item循环时是一个列表
作影射有多少台机器作多少台映射
1.创建模版
[devops@server1 ansible]$ cd templates/
[devops@server1 templates]$ vim hosts.j2
127.0.0.1   localhost localhost.localdomain localhost4 localhost4.localdomain4
::1         localhost localhost.localdomain localhost6 localhost6.localdomain6
{% for host in groups['webservers'] %}
{{ hostvars[host]['ansible_facts']['eth0']['ipv4']['address'] }}  {{ hostvars[host]['ansible_facts']['hostname'] }}
{% endfor %}
2.创建yaml文件
[devops@server1 ansible]$ vim hostinfo.yml
---
- hosts:  all
  tasks:
    - name: create infofile
      template:
        src:  templates/info.j2
        dest: /mnt/hostinfo
    - name: create hosts
      template:
        src:  templates/hosts.j2
        dest: /etc/hosts
        owner:  root
        group:  root
        mode: 644
3.验证
roles角色的应用:
1.在ansible的配置文件中添加角色的路径
[devops@server1 ansible]$ pwd
/home/devops/ansible
[devops@server1 ansible]$ vim ansible.cfg
[defaults]

inventory      = inventory
roles_path  =  roles


[privilege_escalation]
become=True
become_method=sudo
become_user=root
become_ask_pass=False

[devops@server1 ansible]$ mkdir roles
[devops@server1 ansible]$ cd roles/
2.使用ansible-glaxy创建角色,并且使用tree查看
3.在apache目录下的各个角色文件中添加相应的内容
//配置yml文件

    [devops@server1 apapche]$ cd tasks/
    [devops@server1 tasks]$ pwd
    /home/devops/ansible/roles/apapche/tasks
    [devops@server1 tasks]$ cp ../../../playbook.yml main.yml

//添加模版

    [devops@server1 apapche]$ cd templates/
    [devops@server1 templates]$ cp ../../../files/httpd.conf .
    [devops@server1 templates]$ mv httpd.conf httpd.conf.j2

    //添加变量
    ---
    # vars file for apapche
    http_port:  80

    //添加触发条件
    [devops@server1 apapche]$ cd handlers/
    [devops@server1 handlers]$ vim main.yml
    ---
    # handlers file for apapche
    - name: restart httpd
      service:
        name: httpd
        state:  restarted
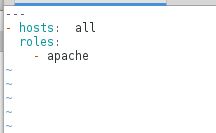
3.在ansible的相应目录下编写apache.yml文件调用roles下的角色
[devops@server1 ansible]$ pwd
/home/devops/ansible
[devops@server1 ansible]$ vim apache.yml
---
- hosts:  all
  roles:
    - apache
4.检查语法错误并执行apache.yml文件
[devops@server1 ansible]$ ansible-playbook apache.yml --syntax-check
[devops@server1 ansible]$ ansible-playbook apache.yml

从网上直接下载roles模版,以nginx为例
保证虚拟机可以上网:

ansible-galaxy  install  geerlingguy.nginx
