Android Binder实现示例(C/C++层)
本文参考前辈文章,记录自己学习了解Binder的一个过程;以一个例子来看下Binder的一个实现过程。
Java层的实现可参看另一篇文章:Android系统服务编写实例-Binder(Java层AIDL)
一、示例
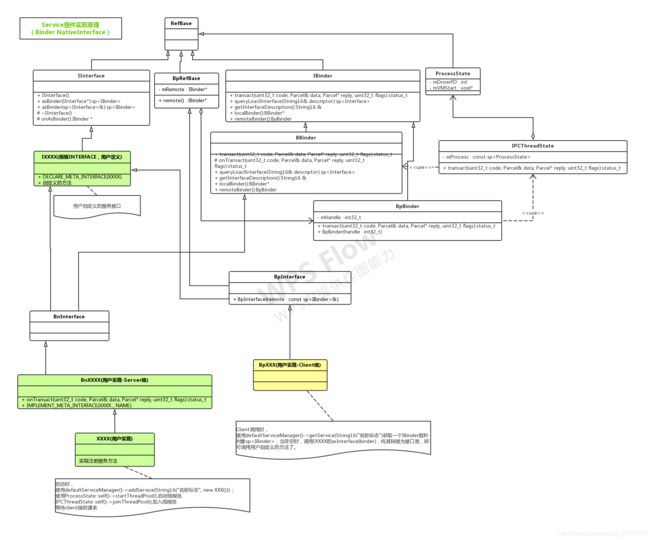
C层Binder开发的架构图
BinderTest
├── client//客户端目录
│ ├── Android.mk
│ ├── BpBinderTest.cpp
│ ├── BpBinderTest.h
│ └── main_client.cpp
├── common//通用接口
│ ├── IBinderTest.cpp
│ └── IBinderTest.h
└── server//服务端目录
├── Android.mk
├── BinderTestService.cpp
├── BinderTestService.h
├── BnBinderTest.cpp
├── BnBinderTest.h
└── main_server.cpp
1、common分析
1.1 IBinderTest.h
#ifndef ANDROID_IHELLOWORLDSERVICE_H
#define ANDROID_IHELLOWORLDSERVICE_H

#include

namespace android{

enum {
    HW_HELLOWORLD2=IBinder::FIRST_CALL_TRANSACTION,
};

class IBinderTest: public IInterface//继承自IInterface,用于提供C/S的统一接口
{
public:
    DECLARE_META_INTERFACE(BinderTest);//这是一个宏定义
    virtual status_t binderTest(const char *str)=0;//一个简单的测试函数
};

};

#endif
2、Server分析
2.1 BnBinderTest.h
#include "../common/IBinderTest.h"

namespace android{

class BnBinderTest: public BnInterface//继承BnInterface
{
public:
    //onTransact此函数在BnBinderTest.cpp中具体实现,它用于处理来自client端对应的请求
    virtual status_t onTransact(uint32_t code,const Parcel &data,Parcel *reply,uint32_t flags =0);
};
};
2.2 BnBinderTest.cpp
#include
#include "BnBinderTest.h"

namespace android {
//对BnBinderTest的onTransact实现,还会在后面其子类BnBinderTestService中重写此方法
status_t BnBinderTest::onTransact(uint32_t code,const Parcel &data,Parcel *reply,uint32_t flags)
{
    switch(code){
        case HW_HELLOWORLD2:{//在IBinderTest.h接口中定义
            CHECK_INTERFACE(IBinderTest,data,reply);//检查接口
            const char *str;
            str = data.readCString();
            reply->writeInt32(binderTest(str));//这里调用执行我们定义的binderTest函数
            return NO_ERROR;
        }break;
        default:
            return BBinder::onTransact(code,data,reply,flags);
    }
}
};
2.3 BinderTestService.h
#include
#include"BnBinderTest.h"
#include

namespace android {

class BinderTestService: public BnBinderTest//继承
{
public:
    static void instantiate();
    virtual status_t binderTest(const char *str);//实现接口IBinderTest的函数,这些是我们自己需要实现的一些功能函数
    virtual status_t onTransact(uint32_t code,const Parcel &data,Parcel *reply,uint32_t flags = 0);

private:
    BinderTestService();
    virtual ~BinderTestService();
};
};
2.4 BinderTestService.cpp
#include
#include
#include
#include"BinderTestService.h"

namespace android{
//这个函数是将自己注册进servicemanager
void BinderTestService::instantiate(){
    defaultServiceManager()->addService(String16("android.test.IBinderTest"),new BinderTestService);
}
//这个函数是我们要实现的功能,其在BnBinderTest的onTransact中被调用
status_t BinderTestService::binderTest(const char *str)
{
    ALOGI("receive string:%s\n",str);
    printf("print string:%s\n",str);//简单的打印一个字串
    return NO_ERROR;
}

BinderTestService::BinderTestService()
{
    ALOGI("BinderTestService is created");
    printf("BinderTestService is created\n");
}
BinderTestService::~BinderTestService()
{
    ALOGI("BinderTestService is destroyed");
    printf("BinderTestService is destroyed\n");
}

status_t BinderTestService::onTransact(uint32_t code,const Parcel &data,Parcel *reply,uint32_t flags)
{
    ALOGI("BinderTestService onTransact");
    printf("BinderTestService onTransact\n");
    return BnBinderTest::onTransact(code,data,reply,flags);//调用父类的函数
}
};
2.5 main_server.cpp(server端的启动程序)
#define LOG_TAG "main_server"

#include
#include
#include
#include
#include"BinderTestService.h"

using namespace android;

int main(int argc,char *argv[]){
    BinderTestService::instantiate();//注册进servicemanager中
    //开启线程池,接收处理Client发送的进程间通信请求
    ProcessState::self()->startThreadPool();
    IPCThreadState::self()->joinThreadPool();
    return 0;
}
2.6 Android.mk
LOCAL_PATH:=$(call my-dir)
include $(CLEAR_VARS)

LOCAL_SRC_FILES:=\
	../common/IBinderTest.cpp\
	BnBinderTest.cpp\
	BinderTestService.cpp\
	main_server.cpp

LOCAL_SHARED_LIBRARIES:=\
	libcutils\
	libutils\
	libbinder

LOCAL_MODULE:= main_server

include $(BUILD_EXECUTABLE)
3、Client分析
3.1 BpBinderTest.h
#include "../common/IBinderTest.h"

namespace android{

class BpBinderTest: public BpInterface
{
public:
    BpBinderTest(const sp& impl);
    virtual status_t binderTest(const char *str);
};
};
3.2 BpBinderTest.cpp
#include
#include "BpBinderTest.h"
#include

namespace android{

status_t BpBinderTest::binderTest(const char *str)
{
    Parcel data,reply;
    data.writeInterfaceToken(IBinderTest::getInterfaceDescriptor());
    data.writeCString(str);
    //通过code调用远程BinderTest方法,传递data
    status_t status = remote()->transact(HW_HELLOWORLD2,data,&reply);
    if(status != NO_ERROR){
        ALOGE("BinderTest error: %s",strerror(-status));
    }else{
        status = reply.readInt32();
    }
    return status;
}

BpBinderTest::BpBinderTest(const sp& impl): BpInterface(impl){}

};
3.3 main_client.cpp
#define LOG_TAG "main_helloworldclient"

#include
#include
#include
#include
#include
#include "../common/IBinderTest.h"

using namespace android;

int main(int argc,char *argv[])
{
    ALOGI("HelloWorldSevice client is starting now");
    //获取ServiceManager,从而能得到远程IBinder,实现通信
    sp sm =defaultServiceManager();
    sp b;
    sp sBinderTest;

    do{
        b=sm->getService(String16("android.test.IBinderTest"));
        if(b != 0){
            break;
        }
        ALOGI("BinderTest is not working,waiting...");
        printf("BinderTest is not working,waiting...\n");
        usleep(500000);
    }while(true);
    sBinderTest = interface_cast(b);
    sBinderTest->binderTest("Hello,World!\n");
    return 0;
}
3.4 Android.mk
LOCAL_PATH:=$(call my-dir)
include $(CLEAR_VARS)

LOCAL_SRC_FILES:=\
	../common/IBinderTest.cpp\
	BpBinderTest.cpp\
	main_client.cpp

LOCAL_SHARED_LIBRARIES:=\
	libcutils\
	libutils\
	libbinder

LOCAL_MODULE:= main_client

include $(BUILD_EXECUTABLE)
DEMO下载:https://download.csdn.net/download/qq_25269161/10918706
如下参考
https://www.cnblogs.com/samchen2009/p/3316001.html
归纳一下,
- BBinder 实现了大部分的IBinder 接口,除了onTransact() 和 queryLocalInterface(), getInterfaceDescriptor();
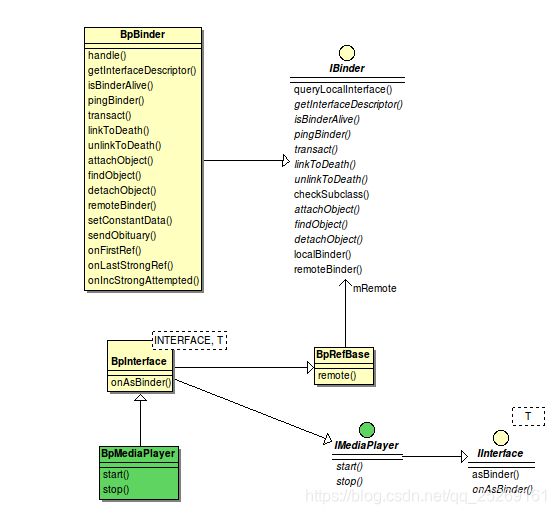
- BnInterface 实现了IBinder的queryLocalInterface()和getInterfaceDescriptor(), 但是其必须借助实际的接口类。
- BnMediaPlayer只是定义了onTransact(), 没有实现。
- onTransact()的具体实现在Client类。
为什么搞得那么复杂?Google 是希望通过这些封装尽可能减少开发者的工作量,开发一个native的service 开发者只需要做这么几件事(上图中深色部分):
- 定义一个接口文件, IXXXService, 继承IInterface
- 定义BnXXX(), 继承 BnInterface
- 实现一个XXXService类,继承BnXXX(), 并具体实现onTransact() 函数。

Client端的实现:
- 使用和Server端同一个 IXXXService, 继承IInterface
- 定义BpXXX(), 继承 BpInterface
- 实现一个XXXService类,继承BpXXX(), 并具体实现transact() 函数。
Java层Binder的实现是采用了AIDL的方式。
| Native | Java | Note(Java侧说明) |
|---|---|---|
| IBinder | IBinder | |
| IInterface | IInterface | |
| IXXX | IXXX | AIDL文件接口定义 |
| BBinder | Binder | 通过JavaVBBinder类作为桥梁 |
| BpBinder | BinderProxy | 通过JNI访问Native的实现 |
| BnInterface | N/A | |
| BpInterface | N/A | |
| BnXXX | Stub | AIDL自动生成,需用户继承在子类中实现真正的服务端操作 |
| BpXXX | Proxy | AIDL自动生成,用于Client端调用 |


