RemoteViews在桌面小部件和通知栏的使用
(《Android开发艺术探索》读书笔记)
什么是RemoteViews:
它所表示的是一个View结构,可以在其他进程中显示,也就是可以跨进程更新它的界面。
RemoteViews的应用场景:
通知栏和桌面小部件(都运行在系统的SystemServer进程)。
首先说明桌面小部件的开发步骤:
1、定义小部件界面:
/桌面小部件/res/layout/widget.xml
<LinearLayout xmlns:android="http://schemas.android.com/apk/res/android"
    android:layout_width="match_parent"
    android:layout_height="match_parent"
    android:orientation="vertical" >

    <ImageView
        android:id="@+id/iv_img"
        android:layout_width="wrap_content"
        android:layout_height="wrap_content"
        android:src="@drawable/ic_launcher" />

LinearLayout>
2、定义小部件配置信息:
/桌面小部件/res/xml/appwidget_provider_info.xml
<appwidget-provider xmlns:android="http://schemas.android.com/apk/res/android"
    android:initialLayout="@layout/widget"
    android:minHeight="84dp"
    android:minWidth="84dp"
    android:updatePeriodMillis="86400000" >

appwidget-provider>
3、定义小部件的实现类:
/桌面小部件/src/com/example/remoteviews/MyAppWidgetProvider.java
/**
 * 桌面小部件演示
 * @author Administrator
 *
 */
public class MyAppWidgetProvider extends AppWidgetProvider {
    public static final String TAG = "MyAppWidgetProvider";
    public static final String CLICK_ACTION = "com.example.remoteviews";

    public MyAppWidgetProvider() {
        super();
    }

    @Override
    public void onEnabled(Context context) {
        super.onEnabled(context);
        Toast.makeText(context, "第一次添加小部件会调用我", Toast.LENGTH_SHORT).show();
    }

    @Override
    public void onDisabled(Context context) {
        super.onDisabled(context);
        Toast.makeText(context, "最后一个小部件已被删除!", Toast.LENGTH_SHORT).show();
    }

    @Override
    public void onDeleted(Context context, int[] appWidgetIds) {
        super.onDeleted(context, appWidgetIds);
        Toast.makeText(context, "小部件已被删除!", Toast.LENGTH_SHORT).show();
    }

    @Override
    public void onReceive(final Context context, Intent intent) {
        super.onReceive(context, intent);
        Log.i(TAG, "onReceive:action=" + intent.getAction());
        // 这里判断自己的action,做自己的事情
        if (intent.getAction().equals(CLICK_ACTION)) {
            Toast.makeText(context, "我在旋转", Toast.LENGTH_SHORT).show();
            new Thread(new Runnable() {

                @Override
                public void run() {
                    Bitmap bitmap = BitmapFactory.decodeResource(context.getResources(),
                            R.drawable.ic_launcher);

                    AppWidgetManager appWidgetManager = AppWidgetManager.getInstance(context);

                    for (int i = 0; i < 37; i++) {
                        float degree = (i * 10) % 360;
                        RemoteViews remoteViews = new RemoteViews(context.getPackageName(),
                                R.layout.widget);

                        remoteViews.setImageViewBitmap(R.id.iv_img,
                                rotateBitmap(context, bitmap, degree));

                        Intent intent = new Intent();
                        intent.setAction(CLICK_ACTION);
                        PendingIntent pendingIntent = PendingIntent.getBroadcast(
                                context, 0, intent, 0);

                        remoteViews.setOnClickPendingIntent(R.id.iv_img, pendingIntent);
                        appWidgetManager.updateAppWidget(
                                new ComponentName(context, MyAppWidgetProvider.class), remoteViews);
                        SystemClock.sleep(30);
                    }
                }

            }).start();
        }
    }

    /**
     * 每次桌面小部件更新时都调用一次该方法
     */
    @Override
    public void onUpdate(Context context, AppWidgetManager appWidgetManager, int[] appWidgetIds) {
        super.onUpdate(context, appWidgetManager, appWidgetIds);
        Toast.makeText(context, "每次更新小部件会调用我!", Toast.LENGTH_SHORT).show();

        final int counter = appWidgetIds.length;
        Log.i(TAG, "counter = "+ counter);
        for (int i = 0; i < counter; i++) {
            int appWidgetId = appWidgetIds[i];
            onWidgetUpdate(context, appWidgetManager, appWidgetId);
        }
    }

    /**
     * 桌面小部件更新
     * @param context
     * @param appWidgetManager
     * @param appWidgetId
     */
    private void onWidgetUpdate(Context context, AppWidgetManager appWidgetManager, int appWidgetId) {
        Log.i(TAG, "appWidgetId = " + appWidgetId);
        RemoteViews remoteViews = new RemoteViews(context.getPackageName(), R.layout.widget);

        // 桌面小部件单击事件发送的Intent广播
        Intent intent = new Intent();
        intent.setAction(CLICK_ACTION);
        PendingIntent pendingIntent = PendingIntent.getBroadcast(context, 0, intent, 0);
        remoteViews.setOnClickPendingIntent(R.id.iv_img, pendingIntent);
        appWidgetManager.updateAppWidget(appWidgetId, remoteViews);
    }

    /**
     * 旋转
     * @param context
     * @param bitmap
     * @param degree
     * @return
     */
    private Bitmap rotateBitmap(Context context, Bitmap bitmap, float degree) {
        Matrix matrix = new Matrix();
        matrix.reset();
        matrix.setRotate(degree);
        Bitmap tmpBitmap = Bitmap.createBitmap(bitmap, 0, 0,
                bitmap.getWidth(), bitmap.getHeight(),
                matrix, true);
        return tmpBitmap;
    }
}
4、在AndroidManifest.xml中声明小部件:
        <receiver android:name=".MyAppWidgetProvider" >
            <meta-data
                android:name="android.appwidget.provider"
                android:resource="@xml/appwidget_provider_info" />

            <intent-filter>
                <action android:name="com.example.remoteviews" />
                <action android:name="android.appwidget.action.APPWIDGET_UPDATE" />
            intent-filter>
        receiver>
第一个action用于识别小部件的单击行为;
第二个action作为小部件的标识必须存在,这是系统的规范。
运行后,在主界面添加桌面小部件,点击后会发现小部件旋转一周。
重复添加后就特别壮观:

然后说明RemoteViews在通知栏上的应用:
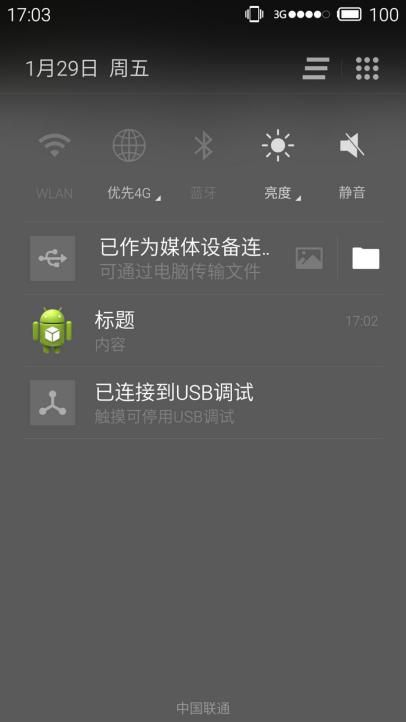
系统默认的通知:
        Notification notification = new Notification();
        notification.icon = R.drawable.ic_launcher;
        notification.tickerText = "hello world";
        notification.when = System.currentTimeMillis();
        notification.flags = Notification.FLAG_AUTO_CANCEL;

        Intent intent = new Intent(this, MainActivity.class);
        PendingIntent pendingIntent = PendingIntent.getActivity(this, 0, intent, PendingIntent.FLAG_UPDATE_CURRENT);
        notification.setLatestEventInfo(this, "标题", "内容", pendingIntent);

        NotificationManager manager = (NotificationManager) getSystemService(Context.NOTIFICATION_SERVICE);
        manager.notify(1, notification);
上述代码会弹出一个系统默认样式的通知,点击后会清除本身。

使用RemoteViews实现自定义通知:
<LinearLayout xmlns:android="http://schemas.android.com/apk/res/android"
    android:layout_width="match_parent"
    android:layout_height="match_parent"
    android:orientation="horizontal" >

    <TextView
        android:id="@+id/tv_text"
        android:layout_width="wrap_content"
        android:layout_height="wrap_content"
        android:text="TextView"
        android:textSize="25sp" />

    <ImageView
        android:id="@+id/iv_img"
        android:layout_width="wrap_content"
        android:layout_height="wrap_content"
        android:src="@drawable/ic_launcher" />

LinearLayout>
代码实现:
        Notification notification = new Notification();
        notification.icon = R.drawable.ic_launcher;
        notification.tickerText = "hello world";
        notification.when = System.currentTimeMillis();
        notification.flags = Notification.FLAG_AUTO_CANCEL;

        Intent intent = new Intent(this, MainActivity.class);
        PendingIntent pendingIntent = PendingIntent.getActivity(this, 0, intent, PendingIntent.FLAG_UPDATE_CURRENT);

        RemoteViews remoteViews = new RemoteViews(getPackageName(), R.layout.my_notification);
        remoteViews.setTextViewText(R.id.tv_text, "自定义通知栏");
        remoteViews.setImageViewResource(R.id.iv_img, R.drawable.ic_launcher);

        PendingIntent pendingIntent2 = PendingIntent.getActivity(this, 0, intent, PendingIntent.FLAG_UPDATE_CURRENT);
        remoteViews.setOnClickPendingIntent(R.id.tv_text, pendingIntent2);
        notification.contentView = remoteViews;
        notification.contentIntent = pendingIntent;

        NotificationManager manager = (NotificationManager) getSystemService(Context.NOTIFICATION_SERVICE);
        manager.notify(2, notification);
RemoteViews所支持的View类型:
Layout: FrameLayout、RelativeLayout、LinearLaout、GridLayout
View: AnalogClock、Button、Chronometer、ImageButton、ImageView、ProgressBar、TextView、ViewFlipper、ListView、GridView、StackView、AdapterViewFlipper、ViewStub。