How to make 9-patch image downloaded from the Network
Probably everyone, who is in touch with the Android world dealt with 9-patch term. It is an image in PNG format, enhanced by the ability to define zones for the enlargement or reduction or the zone in which should be the future content. It is very useful feature considering different resolution and pixel density, big fragmentation of devices with OS Android and screen sizes variability (see the example http://on.fb.me/1eRFVjW). New Android version 4.3 has possibility to define the borders of the picture even for his alignment with surrounding (seehttp://bit.ly/16S47zZ).
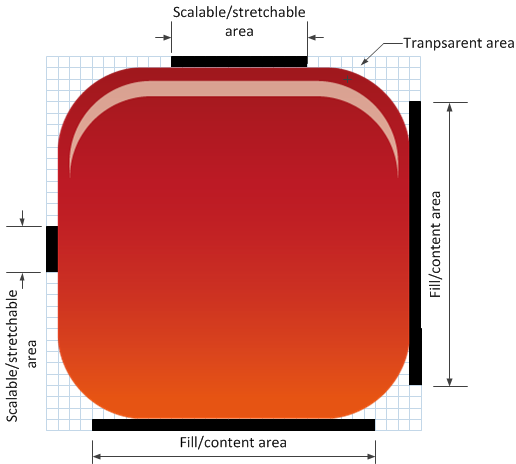
In practice it is working that around the default image is drawn one-pixel transparent border. In this frame are with black colour on top left signed areas which should repeat or miss depending on the image future flexibility – expansion or shrinking. In down right part of the frame is signed area where should be placed the future content.
The Tool Draw 9-patch is done for easy making 9-patch images and is a part of Android SDK (can be found on address book \android-sdk\tools\). Tool creates a file with 9.png suffix, which you can use straight in your project. But this is working so far you do not decide that the image will not be a part of the project, but will be downloaded from server after switching on application. The reasons for this are changes of graphical interface which user can maintain alone or without necessity repeatedly setting up application and its placing on application shops Google Play or SamsungApps.
If the 9-patch image suffix is recognized during setting up application the file is additionally compiled. This recognition run only in address book drawable and Android will correctly show only pictures which had been changed this way. Therefore you cannot use images downloaded from the server, which are output from Draw 9-patch or other graphics editor. Images for downloading can be of course manually copied from created apk archive, but this solution is heavy. There is much quicker way how to process 9-patch images, separately or together, from the command line using the Android Asset Packaging Tool (aapt):
aapt c[runch] [-v] -S input-folder -C output-folder
aapt s[ingleCrunch] [-v] -i input-file -o output-file
After downloading the file is no need to change anything, class BitmapFactory will proceed it alone. To verify whether it is indeed a 9-patch image you can make the following checks:
Bitmap bitmap = BitmapFactory.decodeStream(stream);
byte[] chunks = bitmap.getNinePatchChunk();
boolean result = NinePatch.isNinePatchChunk(chunks);
