序言
本文通过一个初熟的小栗子来实践2.0与1.0的不同之处,最终的效果如下图所示:

提示
- 可作为vue2.0+vuex入门参考
- 只粘贴核心代码,看源码建议直接下载demo 其实只有sass没有贴上啦
- demo在移动端亲测可用
搭建项目
知识点
这个栗子将涉及以下知识点:
- vue2.0
- vue-cli脚手架
- vuex状态管理库
- webpack
版本声明
本篇文章的版本:
- node: v6.2.0
- vue: v2.1.0
- vuex: v2.0.0
- vue-router: v2.1.1
- webpack: v1.13.2
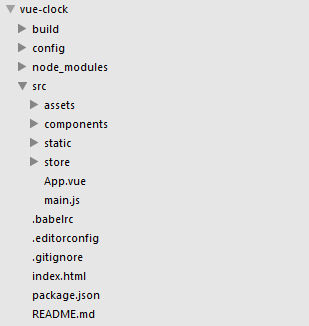
文件目录

安装
首先请确保已安装了node、npm、webpack。
安装vue脚手架。
选择一个目录并执行。
1
|
vue init webpack 项目名字 或者vue init webpack-simple 项目名字 <注意不能用中文>
|
然后根据命令行的相关提示输入信息;
webpack与webpack-simple两者的区别在于webpack-simple没有包括eslint等功能,普通的项目用simple就好了;
我使用的是前者。
进入项目目录下载相关依赖。
启动。
这一行命令会自动启动浏览器并运行项目(如果你不想占用8080端口,可通过 项目 /config/index.js 中的port修改)。

初始化
初始化入口js文件 main.js
main.js是应用入口文件,可以在这里
- 配置路由vue-router
- 引入路由子组件
- 引入状态管理store(注入所有子组件)
- 实例化Vue
- 引入公共样式等
已完成的main.js如下: 懒癌患者可直接拷贝
1
2
3
4
5
6
7
8
9
10
11
12
13
14
15
16
17
18
19
20
21
22
23
24
25
26
27
28
29
30
31
32
33
34
35
36
37
38
39
|
import Vue from 'vue'
import store from './store'
import VueRouter from 'vue-router'
import App from './App'
import Home from './components/Home'
import Clocklist from './components/Clocklist'
import './static/css/reset.css'
Vue.use(VueRouter)
const routes = [
{
path : '/',
component : Home
},
{
path : '/home',
component : Home
},
{
path : '/clocklist',
component : Clocklist
},
]
const router = new VueRouter({
routes
})
new Vue({
store,
router,
...App
}).$mount('#app')
|
与1.0的不同
- 映射路由:1.0是通过router的map方法映射路由,并且map接收的是一个对象,2.0中map()被替换了,通过实例化VueRouter并定义一个数组来映射路由;
- 初始化路由:1.0通过router.start()来初始化路由,2.0中router.start()被替换了,直接通过挂载到vue根实例进行初始化
初始化根组件App.vue
在App.vue中添加路由,并引入Sidebar.vue组件,对应的样式直接写在每个独立的组件下,注意这里使用了sass语法,需在 ./build/webpack.base.conf.js 中配置,如下所示:
1
2
3
4
5
6
7
8
9
10
11
12
|
vue: {
loaders: utils.cssLoaders({ sourceMap: useCssSourceMap }),
postcss: [
require('autoprefixer')({
browsers: ['last 2 versions']
}),
require('postcss-import'),
require('postcss-sass-extend'),
require('postcss-simple-vars'),
require('postcss-nested')
]
}
|
下面附上整个App.vue的代码,注意看注释掉的部分哦。 从这里开始后面的sass不贴出来了
1
2
3
4
5
6
7
8
9
10
11
12
13
14
15
16
17
18
19
20
21
22
23
24
25
26
27
28
29
30
31
32
33
34
35
36
37
38
39
40
41
42
43
44
45
46
47
48
49
50
51
52
53
54
55
56
57
58
59
60
61
62
63
64
65
66
67
68
69
70
71
72
73
74
75
76
77
78
79
80
81
82
83
84
85
86
87
88
89
90
91
92
93
94
95
96
97
98
99
100
101
102
103
104
105
106
107
108
109
110
111
112
113
114
115
116
117
118
119
120
121
122
123
124
125
126
127
128
129
130
131
132
133
134
135
136
137
138
139
140
141
142
143
144
145
146
147
148
149
150
|
<template>
<div class="clock_wrap">
<section class="clock_header">
<h1>计时器h1>
section>
<section class="clock_container">
<nav class="clock_nav">
<router-link to="/home">首页router-link>
<router-link to="/clocklist">计时列表router-link>
nav>
<div class="clock_sidebar">
<sidebar>sidebar>
div>
<div class="clock_router">
<transition :name="transitionName">
<router-view class="clock_router_inner">router-view>
transition>
div>
section>
div>
template>
<script>
import Sidebar from './components/Sidebar.vue'
export default {
data:function(){
return {
transitionName: 'slide-left'
}
},
mounted:function(){
if(this.$route.name==undefined){
this.$router.push('home');
}
},
/*watch: {
'$route' (to, from) {
console.log(to.path)
}
},*/
components: {
Sidebar
}
}
script>
<style>
@import './static/sass/_function.scss';
body {
overflow: hidden;
}
.clock_header {
height: 42px;
line-height: 42px;
background: #39383e;
h1 {
font-size: 18px;
color: #fff;
text-align: center;
&::before {
content: '';
width: 18px;
height: 18px;
display: inline-block;
vertical-align: middle;
margin: -2px 5px 0 5px;
background: url(./static/img/logo.png) no-repeat;
background-size: 100% 100%;
}
}
}
.clock_nav {
height: 36px;
line-height: 36px;
background: #f0eff5;
padding-left: 5px;
font-size: 0;
a {
display: inline-block;
padding: 0 10px;
position: relative;
font-size: 14px;
&.router-link-active {
color: $color_red;
}
&:not(:last-child) {
&::after {
content: '';
width: 1px;
background: #e1e0e6;
position: absolute;
right: 0;
top: 12px;
bottom: 12px;
}
}
}
}
.clock_container {
@extend %clearfix;
}
.clock_sidebar {
width: 30%;
float: left;
box-sizing: border-box;
border: 1px solid #ddd;
margin-top: 10px;
}
.clock_router {
width: 70%;
float: left;
position: relative;
&_inner {
position: absolute;
left: 0;
right: 0;
top: 0;
transition: all .3s linear;
}
}
.slide-left-enter{
opacity: 0;
transform: translate3d(60px, 0, 0);
}
.slide-left-leave-active {
opacity: 0;
transform: translate3d(-60px, 0);
}
style>
|
这里我将路由样式设置为相对定位,路由的子组件设置为绝对定位,可以解决切换路由的时候页面抖动问题。
与1.0的不同
- 根元素:在2.0中template下需要有一个根元素(clock_wrap),否则会报错;
- 路由导航:在1.0中我们通过v-link来指定导航链接,在2.0中可以直接使用router-link组件来导航,在浏览器中渲染后是一个a标签,并且会自动设置选中的class属性值.router-link-active, 然后通过to 属性指定链接;
- 过渡:在1.0中通过在目标元素(router-view)使用transition与transition-mode添加过渡,在2.0中,则改成了使用transition标签包裹目标元素,可以自定义name过渡,也可以使用自带的mode添加过渡动效(如mode=”out-in”),2.0中也支持通过$route设置基于路由的动态过渡;
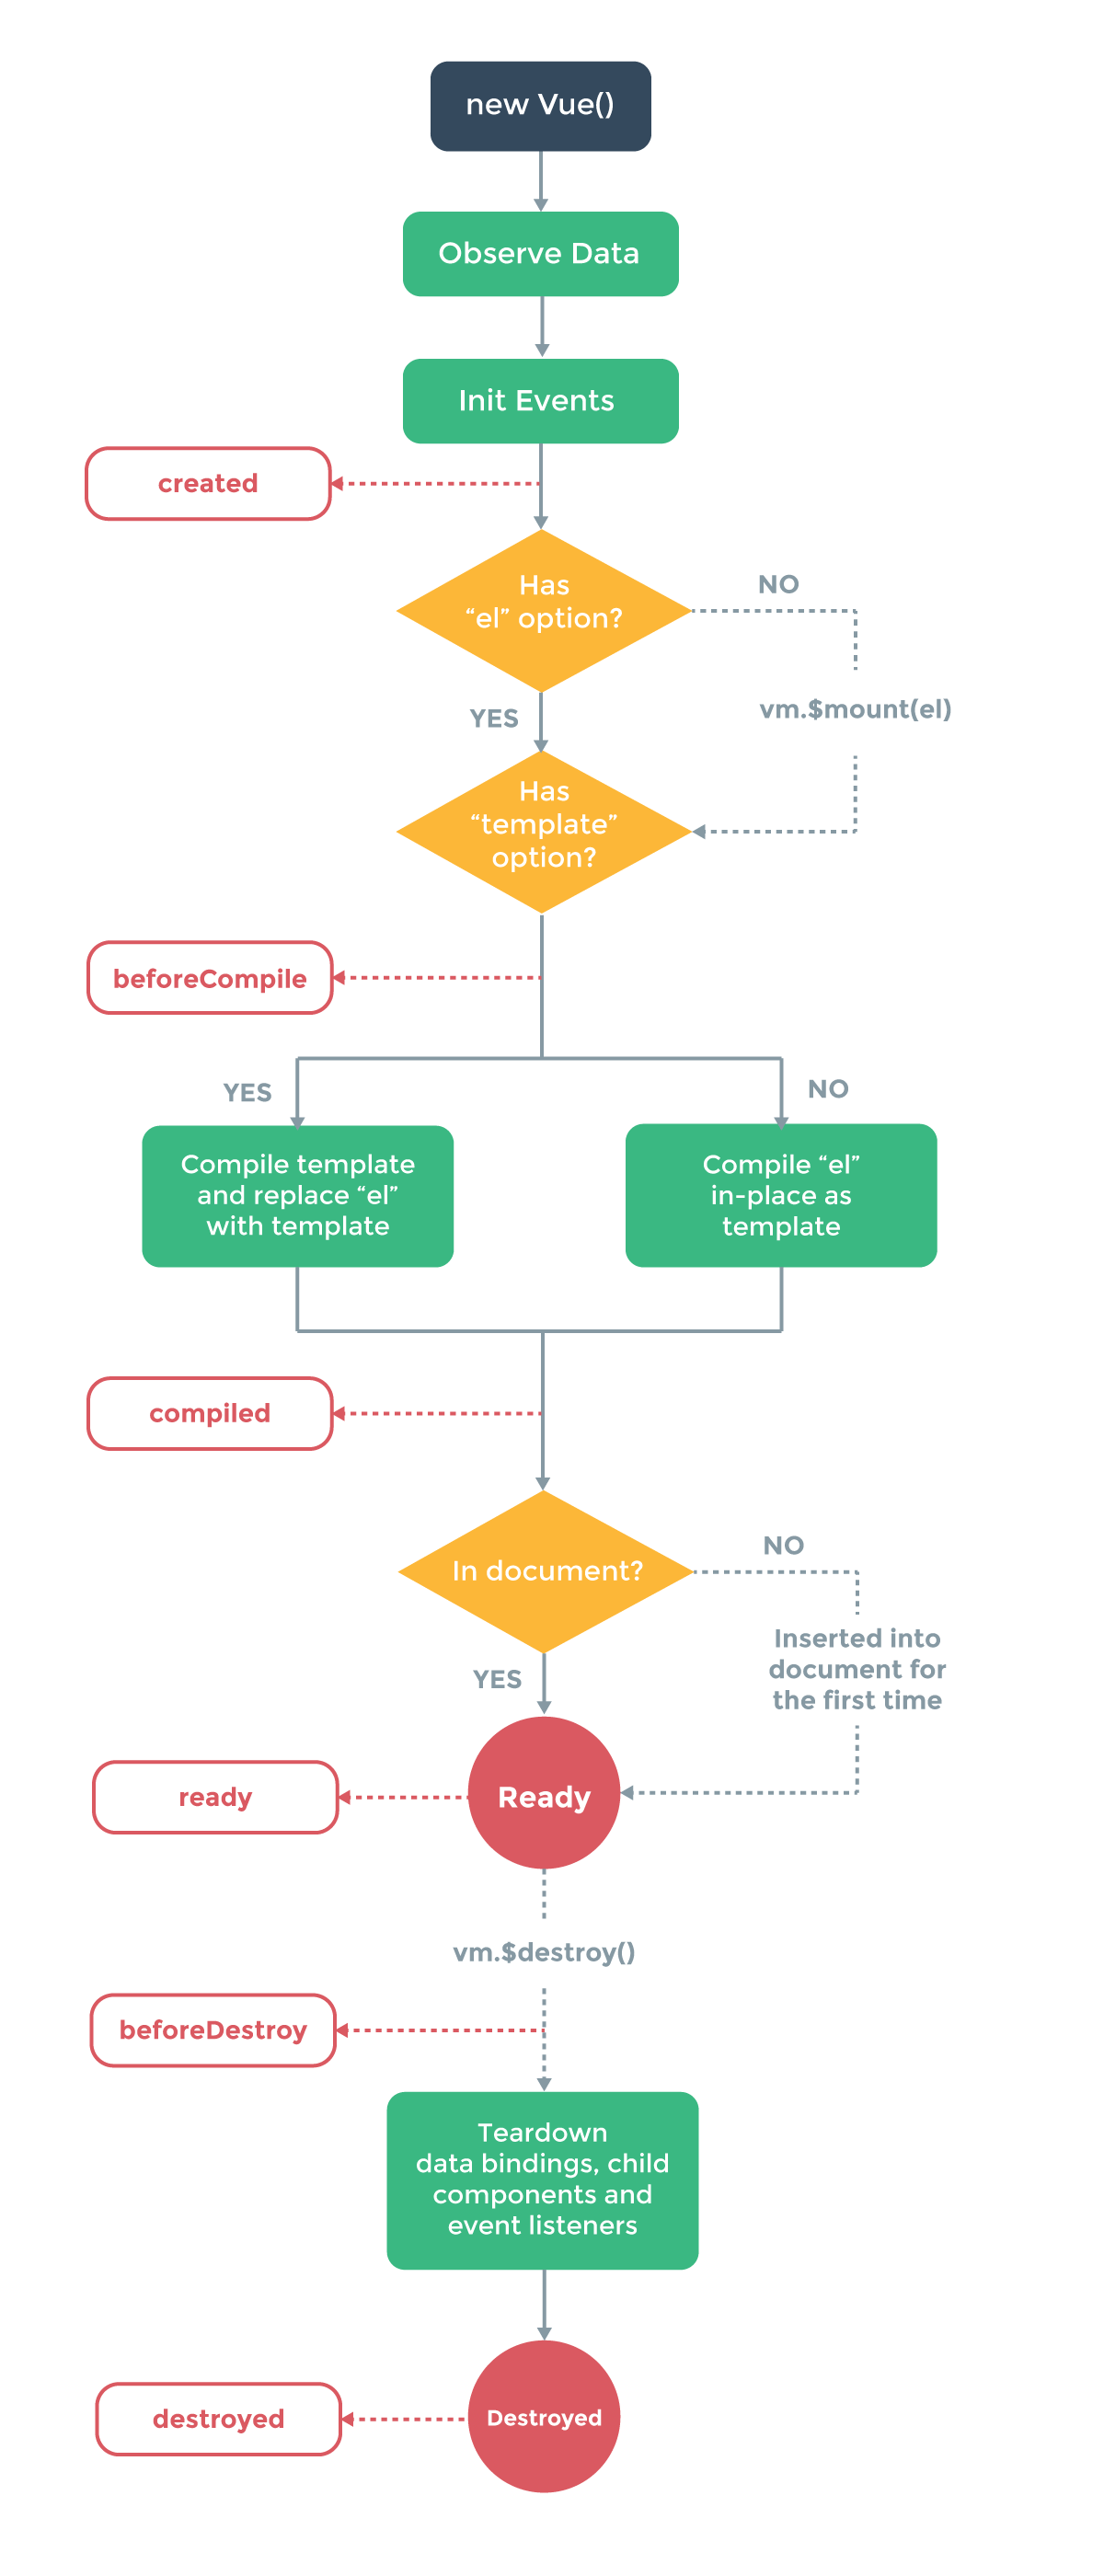
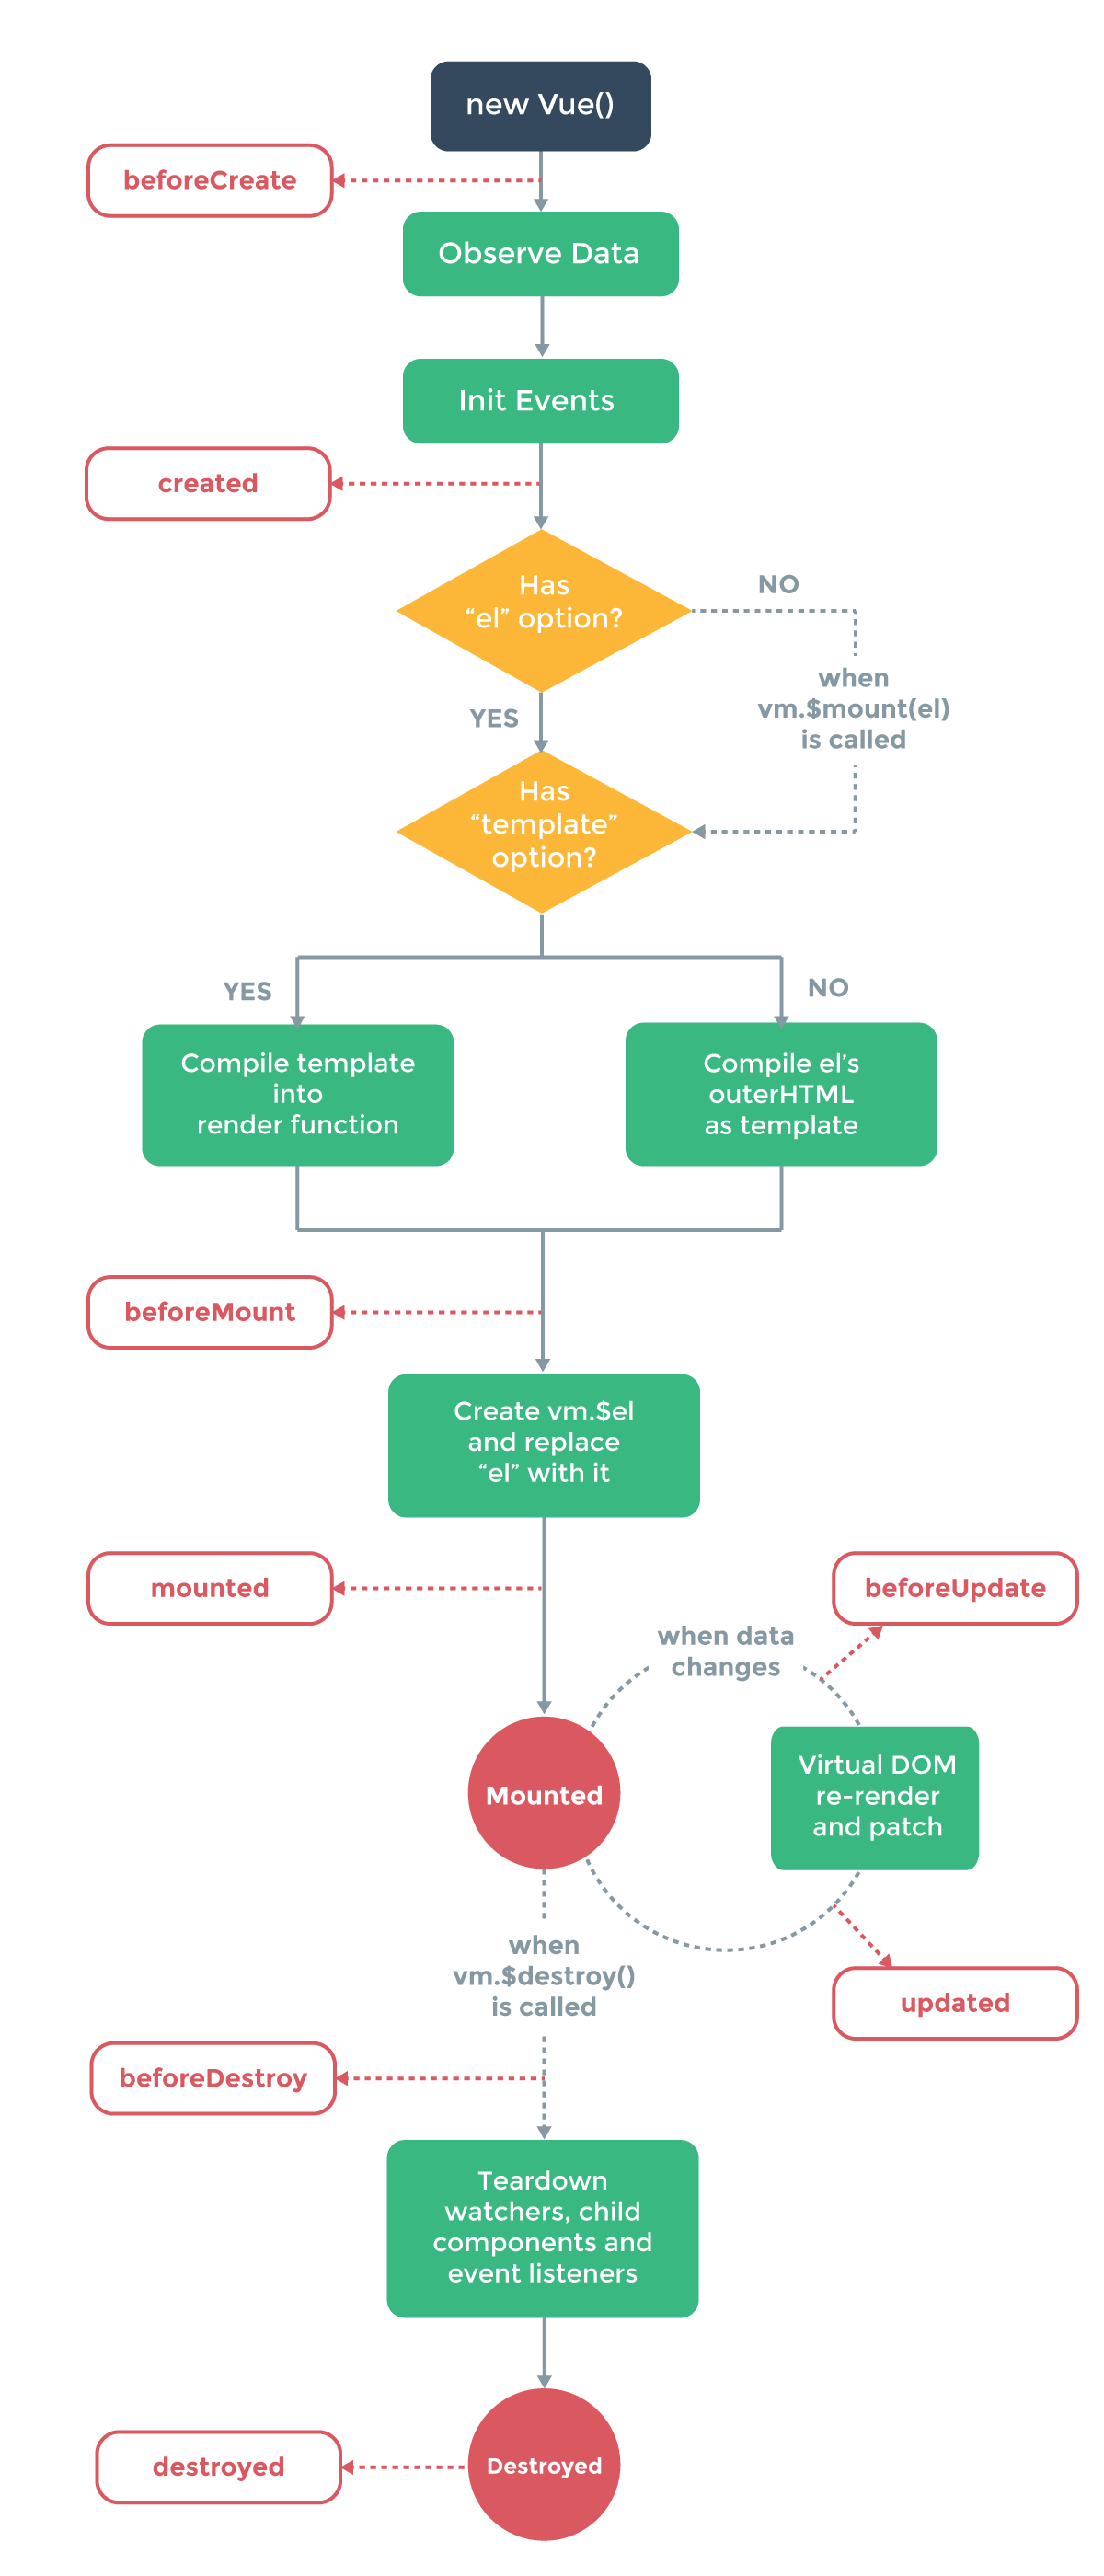
- 钩子:在1.0中的ready已经被mounted取代,此外2.0还新增了beforeMount、beforeUpdate、update等,下面是1.0与2.0生命周期示意图
1.0

2.0

创建首页Home.vue
1
2
3
4
5
6
7
8
9
10
11
12
13
14
15
16
17
18
19
20
21
22
23
24
25
26
27
28
29
30
31
32
33
34
35
36
37
38
39
40
41
42
43
44
45
46
47
48
49
50
51
52
53
54
55
56
57
58
|
<template>
    <div class="clock_time">

        <div class="clock_time_inner">
            <i>{{hour}}i>
            <span>:span>
            <i>{{minute}}i>
            <span>:span>
            <i>{{second}}i>
        div>
        <div class="clock_time_btn">
            <span @click = 'doClock' v-bind:id="clockId">开始计时span>
        div>
    div>
template>

<script>
    export default {
        data() {
            return {
                //time: '',
                hour: '',
                minute: '',
                second: '',
                clockId: 'clock_time'
            }
        },
        mounted () {
            this.nowTime()
        },
        methods: {
            nowTime () {
                const t = new Date(),
                    h = t.getHours(),
                    m = t.getMinutes(),
                    s = t.getSeconds()
                //this.$data.time =  '<i>' + h +'i><span>:span><i>' + m +'i><span>:span><i>' + s + 'i>'
                this.$data.hour = h
                this.$data.minute = m
                this.$data.second = s

                setTimeout(() => {
                    this.nowTime()
                }, 1000)
            },
            doClock () {
                const nowTime = new Date()

                //状态
                this.$store.dispatch('changeStatus')
                //时长
                this.$store.dispatch('addDuration')
                //计时列表
                this.$store.dispatch('saveClockList', nowTime)
            }
        }
    }
script>
|
通过nowTime ()方法获取当前的时间,doClock ()分别变更状态、时长以及存储计时记录,后面会讲到vuex部分。
与1.0的不同
- 数据绑定:与1.0一样绑定数据的形式都使用“Mustache” 语法,但2.0不能在html属性中使用了,比如栗子中的绑定id 的方法v-bind:id=”clockId”而不能直接使用
{{clockId}},否则会报错;
- 真实的html:1.0中输出真实的html是使用三个大括号
{{{ }}},2.0之后需要使用v-html指令,如上面注释掉的部分所示;
1
2
3
4
5
6
7
8
9
10
11
12
13
14
15
16
17
18
19
20
21
22
23
24
25
|
<template>
    <div class="clock_sidebar_inner">
        <div class="clock_sidebar_item">
            <span class="clock_sidebar_title">状态span>
            <span class="clock_sidebar_desc" :class = "{ 'green': status == '已计时', 'red': status == '已结束'  }">{{ status }}span>
        div>
        <div class="clock_sidebar_item">
            <span class="clock_sidebar_title">时长span>
            <span class="clock_sidebar_desc">{{ duration }}span>
        div>
    div>
template>

<script>
    export default {
        computed: {
            status() {
                return this.$store.getters.getStatus
            },
            duration() {
                return this.$store.getters.getDuration
            }
        }
    }
script>
|
通过计算属性computed去获取状态与时长。
继续创建打卡列表Clocklist.vue
1
2
3
4
5
6
7
8
9
10
11
12
13
14
15
16
17
18
19
20
|
    <div class="clock_record">
        <div class="clock_record_nothing" v-if = "!list.length">没有记录div>
        <div class="clock_record_item" v-else = "list.length > 0" v-for = "(item, index) in list">
            <div class="clock_record_name">{{index + 1}}{{ item.date }}div>
            <div class="clock_record_desc">计时开始 {{ item.gotowork }}div>
            <div class="clock_record_desc">计时结束 {{ item.gooffwork }}div>
        div>
    div>


<script>
    export default {
        computed: {
            list () {
                return this.$store.getters.switchTime
            }
        }
    }
script>
|
与1.0的不同
- v-else-if:在2.0中新增了v-else-if,类似于js中的else if,不能单独使用,需跟在v-if之后;
- v-for:在使用v-for遍历对象的时候,当存在index时,1.0的参数顺序是(index, value),2.0变成了(value, index);
- v-for:1.0中,v-for块内有一个隐性的特殊变量$index可以获取当前数组的索引,在2.0中移除了,改为了以上这种显式的定义方式;
- key:key替代track-by
vuex部分
vuex是为vue.js设计的一个状态管理模式,主要是用来存储共享状态、实现数据通信,简单理解就是统一管理和维护各个vue组件的状态 ,它可以解决多层嵌套组件的传参、兄弟组件的状态传递等难题, 代码更结构化且容易维护。核心概念包括State、Getters、Mutations、Actions、Modules。
创建index.js
在src目录新建store文件夹用来存放共享数据(vuex),然后新建index.js,用来初始化并导出 store。 store已经在main.js中引入
1
2
3
4
5
6
7
8
9
10
11
12
13
14
15
16
|
import Vue from 'vue'
import Vuex from 'vuex'
import state from './state'
import getters from './getters'
import mutations from './mutations'
import actions from './actions'
Vue.use(Vuex)
export default new Vuex.Store({
state,
getters,
mutations,
actions
strict: process.env.NODE_ENV !== 'production',
})
|
strict为是否开启严格模式,在这种模式下任何状态变更不是由Mutation函数触发的都会报错,但是为了避免性能损失,不要在发布环境开启严格模式;
在构建大型应用时,store对象会变的非常臃肿,Vuex允许将store分割为模块(module),每个模块有自己个State、Mutations、Actions、Getters。
1
2
3
4
5
6
7
8
9
10
11
12
13
14
15
16
17
18
19
|
const moduleA = {
  state: { ... },
  mutations: { ... },
  actions: { ... },
  getters: { ... }
}

const moduleB = {
  state: { ... },
  mutations: { ... },
  actions: { ... }
}

const store = new Vuex.Store({
  modules: {
    a: moduleA,
    b: moduleB
  }
})
|
创建state.js
在store目录下继续创建state.js,代码如下
1
2
3
4
5
6
7
8
9
|
const state = {
    status: '已结束',
    duration: '0',
    timer: null,
    len: 0,
    clockList: []
}

export default state
|
Vuex使用一个state包含了全部的应用层级状态–也就是一个单一状态树;
通常在计算属性(computed)返回(检测到数据发生变动时就会执行对相应数据有引用的函数),如下:
1
2
3
4
5
|
computed: {
  list () {
        return this.$store.state.status
    }
}
|
创建mutations.js
在store目录下继续创建mutations.js。
1
2
3
4
5
6
7
8
9
10
11
12
13
14
15
16
17
18
19
20
21
22
23
24
25
26
27
28
29
30
31
|
import * as types from './mutation-types'

export default {
    [ types.CHANGE_STATUS ] ( state) {
        if( state.status === '已结束' ) {
            state.status = '已计时'
        }else if(state.status === '已计时') {
            state.status = '已结束'
        }
    },
    [ types.ADD_DURATION ] ( state, obj ) {
           if( state.status === '已计时' ) {
                state.duration = obj.time
                state.timer = obj.timer
           }else {
                clearInterval(obj.timer)
           }

    },
    [ types.SAVE_CLOCK_LIST] (state, nowTime) {
        if( state.status === '已计时' ) {
            console.log(state.clockList.length)
            state.len = state.clockList.length
            state.clockList.push({"gotowork": nowTime, 'gooffwork': ''})
        }

        if( state.status === '已结束' ) {
            state.clockList[state.len].gooffwork = nowTime
        }
    }
}
|
mutations是注册各种数据变化的方法,它接受state作为第一个参数,需注意以下几点
- 变更state必须通过mutation提交,这样使得我们可以方便地跟踪每一个状态的变化
- mutation 必须是同步函数,异步应在action操作
- 通常使用常量替代mutation事件类型,在实际操作中通常会建立一个mutation-types.js来存储mutation常量,这样的好处是可以对整个 app 包含的 mutation 一目了然
创建mutation-types.js
在store目录下继续创建mutation-types.js,用来存储mutation事件名
1
2
3
|
export const CHANGE_STATUS = 'CHANGE_STATUS'
export const ADD_DURATION = 'ADD_DURATION'
export const SAVE_CLOCK_LIST = 'SAVE_CLOCK_LIST'
|
创建actions.js
action类似autation,与之不同的是:
- action不能直接变更state,而是提交mutation
- action可包含异步操作,而mutation不能(严格模式下报错)
Action基本语法如下:
1
2
3
4
5
|
actions: {
  someMethod (context) {
    context.commit('someMethod')
  }
}
|
action 函数接受一个与 store 实例具有相同方法和属性的 context 对象,因此可以调用 context.commit 提交一个 mutation,或者通过 context.state 和 context.getters 来获取 state 和 getters。
在实践中,通常使用 ES2015 的 参数解构简化代码,如下:
1
2
3
4
5
|
actions: {
  someMethod ({ commit }) {
    commit('someMethod')
  }
}
|
最后附上actions.js的所有代码
1
2
3
4
5
6
7
8
9
10
11
12
13
14
15
16
17
18
19
20
21
22
23
24
25
26
27
28
29
30
31
32
33
34
35
|
import * as types from './mutation-types'

export default {
    changeStatus({ commit }) {
        commit(types.CHANGE_STATUS)
    },
    addDuration(context) {
        let num = 1, obj = {}

        if(context.state.status === '已计时') {
            obj.timer = setInterval(() => {
                let h = parseInt(num / 3600),
                    m = parseInt(num / 60),
                    s = num

                    if(s >= 60) {
                        s = s % 60
                    }

                    if(m >= 60) {
                        m = m % 60
                    }

                obj.time = h + '时' + m + '分' + s + '秒'
                context.commit(types.ADD_DURATION, obj)
                num ++
            }, 1000)
        }else {
            context.commit(types.ADD_DURATION, obj)
        }
    },
    saveClockList({ commit }, nowTime) {
        commit(types.SAVE_CLOCK_LIST, nowTime)
    }
}
|
创建getters.js
1
2
3
4
5
6
7
8
9
10
11
12
13
14
15
16
17
18
19
20
21
22
23
24
25
26
27
28
|
export default {
getStatus:state => state.status,
getDuration:state => state.duration,
switchTime:state => {
let date = '',
toTime = '',
offTime = '',
list = []
let switchDate = '',
switchToTime = '',
switchOffTime = ''
state.clockList.forEach(function (v, i) {
switchDate = v.gotowork.getFullYear() + '年' + ( v.gotowork.getMonth() + 1 ) + '月' + v.gotowork.getDate()
switchToTime = v.gotowork.getHours() + ':' + v.gotowork.getMinutes() + ':' + v.gotowork.getSeconds()
if(v.gooffwork !== '') {
switchOffTime = v.gooffwork.getHours() + ':' + v.gooffwork.getMinutes() + ':' + v.gooffwork.getSeconds()
}else {
switchOffTime = ''
}
list.push({'date': switchDate, 'gotowork': switchToTime, 'gooffwork': switchOffTime})
})
return list
}
}
|
getter接收state作为第一个参数,我们可以通过它
- 获取state的状态
- 对需要返回的数据进行处理,如过滤、转换等
关于代码结构
只要遵守了vuex的规则,如何组织代码可根据项目的实际情况以及个人、团队的使用习惯,vuex并不会限制你的代码结构。所以,放开手脚一起搞事吧!
以上就是整篇文章的所有内容,如有错误,恳请指正! 反正咱也不改
写在最后
不得不说前端的技术更新真是快啊,从来没有哪个行业像前端这样繁荣却又令人不安。作为前端人,我们唯有保持对新技术敏锐的嗅觉与热情,才能避免被技术前进的浪潮拍在沙滩上,正所谓路漫漫其修远兮,吾将…好了好了,搬砖去了…
参考资料
http://cn.vuejs.org/v2/guide/
http://vuex.vuejs.org/zh-cn/getting-started.html
https://gold.xitu.io/post/583d1fe00ce463006baca2fa
https://aotu.io/notes/2016/10/13/vue2/
vue vue2.0 vue2.0与1.0的区别 栗子
Web开发
感谢您的阅读,本文由 凹凸实验室 版权所有。如若转载,请注明出处:凹凸实验室( https://aotu.io/notes/2016/12/28/vue-clock/)
上次更新:2019-04-20 19:28:31


