Jenkins企业微信通知开发
Jenkins企业微信通知开发
整个的开发过程我自己分为了两步
	1:调用微信接口,可以进行自定义的消息推送.
	2:获取到jenkins构建完成之后的构建结果.
	3:代码方面有做一些调整,没有贴出最后的代码,整理之后的代码会简单很多,几乎不用自己进行手写代码,在文章后面会提到有哪些方面进行了改动
首先贴上pom文件
  4.0.0


    org.jenkins-ci.plugins
    plugin
    1.580.1


  com.jysong.jenkins
  newplugon
  1.0-SNAPSHOT
  hpi
  TODO Plugin
  TODO
  https://wiki.jenkins-ci.org/display/JENKINS/TODO+Plugin


      MIT License
      http://opensource.org/licenses/MIT


      repo.jenkins-ci.org
      http://repo.jenkins-ci.org/public/


    com.google.code.gson
    gson
    2.8.2


	    org.apache.httpcomponents
	    httpclient
	    4.5.2


	    org.apache.httpcomponents
	    httpcore
	    4.4.5


	    org.slf4j
	    slf4j-api
	    1.8.0-beta2


      repo.jenkins-ci.org
      http://repo.jenkins-ci.org/public/
其中调用微信接口进行消息通知,比较简单,直接贴上代码
public class urlData {
	String corpid;
	String corpsecret;
	String Get_Token_Url;
	String SendMessage_Url;

	public String getCorpid() {
		return corpid;
	}

	public void setCorpid(String corpid) {
		this.corpid = corpid;
	}

	public String getCorpsecret() {
		return corpsecret;
	}

	public void setCorpsecret(String corpsecret) {
		this.corpsecret = corpsecret;
	}

	public void setGet_Token_Url(String corpid, String corpsecret) {
		this.Get_Token_Url = "https://qyapi.weixin.qq.com/cgi-bin/gettoken?corpid=" + corpid + 			"&corpsecret="+ corpsecret;
	}

	public String getGet_Token_Url() {
		return Get_Token_Url;
	}

	public String getSendMessage_Url() {
		SendMessage_Url = "https://qyapi.weixin.qq.com/cgi-bin/message/send?access_token=";
		return SendMessage_Url;
	}

}
public class weChatData {
		 String touser;
	     String msgtype;
	     int agentid;
	     Object text;//实际接收Map类型数据

	     public Object getText() {
	         return text;
	     }
	     public void setText(Object text) {
	         this.text = text;
	     }
	     public String getMsgtype() {
	         return msgtype;
	     }
	     public void setMsgtype(String msgtype) {
	         this.msgtype = msgtype;
	     }
	     public int getAgentid() {
	         return agentid;
	     }
	     public void setAgentid(int agentid) {
	         this.agentid = agentid;
	     }
	     public String getTouser() {
	         return touser;
	     }
	     public void setTouser(String touser) {
	         this.touser = touser;
	     }
}
这为两个实体类,对一些简单的信息进行了封装
import java.io.IOException;
import java.text.SimpleDateFormat;
import java.util.Date;
import java.util.HashMap;
import java.util.Map;

import org.apache.http.HttpEntity;
import org.apache.http.client.methods.CloseableHttpResponse;
import org.apache.http.client.methods.HttpGet;
import org.apache.http.client.methods.HttpPost;
import org.apache.http.entity.StringEntity;
import org.apache.http.impl.client.CloseableHttpClient;
import org.apache.http.impl.client.HttpClients;
import org.apache.http.util.EntityUtils;
import org.slf4j.LoggerFactory;

import com.google.gson.Gson;
import com.google.gson.reflect.TypeToken;

import net.sf.json.JSONArray;
import net.sf.json.JSONObject;

public class send_weChatMsg {
	private CloseableHttpClient httpClient;
	private HttpPost httpPost;// 用于提交登陆数据
	private HttpGet httpGet;// 用于获得登录后的页面
	public static final String CONTENT_TYPE = "Content-Type";
	SimpleDateFormat df = new SimpleDateFormat("yyyy-MM-dd HH:mm:ss");//

	private static Gson gson = new Gson();

	/**
	 * 微信授权请求,GET类型,获取授权响应,用于其他方法截取token
	 *
	 * @param Get_Token_Url
	 * @return String 授权响应内容
	 * @throws IOException
	 */
	protected String toAuth(String Get_Token_Url) throws IOException {

		httpClient = HttpClients.createDefault();
		httpGet = new HttpGet(Get_Token_Url);
		CloseableHttpResponse response = httpClient.execute(httpGet);
		String resp;
		try {
			HttpEntity entity = response.getEntity();
			resp = EntityUtils.toString(entity, "utf-8");
			EntityUtils.consume(entity);
		} finally {
			response.close();
		}
		LoggerFactory.getLogger(getClass()).info(" resp:{}", resp);
		return resp;
	}

	/**
	 * 获取toAuth(String Get_Token_Url)返回结果中键值对中access_token键的值
	 *
	 * @param corpid应用组织编号
	 *            corpsecret应用秘钥
	 */
	protected String getToken(String corpid, String corpsecret) throws IOException {
		send_weChatMsg sw = new send_weChatMsg();
		urlData uData = new urlData();
		uData.setGet_Token_Url(corpid, corpsecret);
		String resp = sw.toAuth(uData.getGet_Token_Url());

		Map map = gson.fromJson(resp, new TypeToken>() {
		}.getType());
		return map.get("access_token").toString();
	}

	/**
	 * @Title:创建微信发送请求post数据
	 * @param touser发送消息接收者
	 *            ,msgtype消息类型(文本/图片等),
	 * @param application_id应用编号。
	 * @param 本方法适用于text型微信消息,contentKey和contentValue只能组一对
	 * @return String
	 */
	protected String createpostdata(String touser, String msgtype, int application_id, String contentKey,
			String contentValue) {
		weChatData wcd = new weChatData();
		wcd.setTouser(touser);
		wcd.setAgentid(application_id);
		wcd.setMsgtype(msgtype);
		Map content = new HashMap();
		content.put(contentKey, contentValue + "\n--------\n" + df.format(new Date()));
		wcd.setText(content);
		return gson.toJson(wcd);
	}

	/**
	 * @Title 创建微信发送请求post实体
	 * @param charset消息编码
	 *            ,contentType消息体内容类型,
	 * @param url微信消息发送请求地址,data为post数据,token鉴权token
	 * @return String
	 */
	public String post(String charset, String contentType, String url, String data, String token) throws IOException {
		CloseableHttpClient httpclient = HttpClients.createDefault();
		httpPost = new HttpPost(url + token);
		httpPost.setHeader(CONTENT_TYPE, contentType);
		httpPost.setEntity(new StringEntity(data, charset));
		CloseableHttpResponse response = httpclient.execute(httpPost);
		String resp;
		try {
			HttpEntity entity = response.getEntity();
			resp = EntityUtils.toString(entity, charset);
			EntityUtils.consume(entity);
		} finally {
			response.close();
		}
		LoggerFactory.getLogger(getClass()).info("call [{}], param:{}, resp:{}", url, data, resp);
		return resp;
	}

}
上面的createpostdata方法中的touser为向谁进行消息的推送,需要填写的为企业用户id.
1:如果有多个用户需要进行推送,用|分开  如:zhangsan|lisi 即可向两人分别进行推送

2:或者这个值为 @all  即为向所有成员进行推送
这样微信的消息推送即完成了,但是这里面也有考虑到一点就是当我们获取token时有一个需要注意的事情就是,我们需要对token进行缓存起来,防止频繁的调用接口而出现一些问题

我自己用的是单例模式全局缓存token,这里直接贴上代码
import java.util.Date;
import java.util.HashMap;
import java.util.Map;

public class Singleton {
	  //缓存accessToken 的Map,map中包含 一个accessToken 和 缓存的时间戳
    private Map map = new HashMap();

    private Singleton() {

    }

    private static Singleton single = null;

    // 静态工厂方法
    public static Singleton getInstance() {
        if (single == null) {
            single = new Singleton();
        }
        return single;
    }

    public Map getMap() {
        return map;
    }

    public void setMap(Map map) {
        this.map = map;
    }

    public static Singleton getSingle() {
        return single;
    }

    public static void setSingle(Singleton single) {
        Singleton.single = single;
    }

    /**
     * 获取 accessToken Jsapi_ticket 已加入缓存机制
     * @param appid
     * @param appsecret
     * @return
     */
    public  Map getAccessTokenAndJsapiTicket(String appid, String appsecret) {
    		Map result = new HashMap();
        try {
			Singleton singleton = Singleton.getInstance();
			Map map = singleton.getMap();
			String time = map.get("time");//从缓存中拿数据
			String accessToken = map.get("access_token");//从缓存中拿数据
			Long nowDate = new Date().getTime();
			//这里设置过期时间 5400 * 1000就好了 一个半小时
			if (accessToken != null && time != null && nowDate - Long.parseLong(time) < 5400 * 1000) {
			    System.out.println("-----从缓存读取access_token:"+accessToken);
			    //从缓存中拿数据为返回结果赋值
			    result.put("access_token", accessToken);
			} else {
			    send_weChatMsg sw = new send_weChatMsg();
			    String token = sw.getToken(appid, appsecret);
			    //将信息放置缓存中
			    map.remove("time");//将key删掉
			    map.put("time", nowDate + "");//重新添加time
			    map.put("access_token", token);
			    //为返回结果赋值
			    result.put("access_token", token);
			    }
			return result;
		} catch (Exception e) {
			e.printStackTrace();
		}
        return result;
    }

}
这里就基本上完成了微信的推送,是否正确的完成,就需要写一个test测试类进行测试了
import java.util.Map;

public class Test {
	 public static void main(String[] args) {
         send_weChatMsg sw = new send_weChatMsg();
         try {
        	 Singleton singleton = Singleton.getInstance();
        	 Map map = singleton.getAccessTokenAndJsapiTicket(你的企业微信id,
        			 应用私钥);
        	 String token = (String) map.get("access_token");
             String postdata = sw.createpostdata(推送人员id, "text", 应用id, "content","消息提醒");
             String resp = sw.post("utf-8", send_weChatMsg.CONTENT_TYPE,(new urlData()).getSendMessage_Url(), postdata, token);
             System.out.println(token);
             String a = sw.getDep(token);
             System.out.println(a);
         } catch (Exception e) {
             e.printStackTrace();
         }
     }
}
将上面需要修改的进行相对应的修改,我相信不会出现什么问题
那么现在我们已经完成了第一步,向企业微信中的某一个部门进行消息推送,接下来需要做的是 获取jenkins构建之后的构建结果,然后通过微信的接口向相关的人员进行通知
接下来我们就来完成jenkins的插件开发
需要的环境为
1:maven 版本3以上, 开始我的maven版本低了所以会出现一些莫名其妙的错误,
  后来换成了3.6,一切问题就都没了.所以maven的版本需要进行注意一下.
2:Jdk 需要在1.6以上,我自己用的为1.8,没有出现问题
在cmd输入命令 最好是选择一个空的文件夹进行执行
mvn -Uorg.jenkins-ci.tools:maven-hpi-plugin:create
运行中间需要输入你的groupId和artifactId,前面的为包名,后面的插件的名称
然后在文件夹下面就会出现一个maven工程,然后将工程导入自己的开发工具,我用的是eclipse.
会有一个类为HelloWorldBuilder 这里我就不进行一个介绍了,因为我自己也不特别的懂,以免误导到大家了
先贴上自己代码
package com.jysong.jenkins.newplugon;

import java.io.IOException;
import java.util.Map;

import javax.servlet.ServletException;

import org.kohsuke.stapler.DataBoundConstructor;
import org.kohsuke.stapler.QueryParameter;
import org.kohsuke.stapler.StaplerRequest;

import hudson.Extension;
import hudson.FilePath;
import hudson.Launcher;
import hudson.model.AbstractProject;
import hudson.model.Run;
import hudson.model.TaskListener;
import hudson.tasks.BuildStepDescriptor;
import hudson.tasks.BuildStepMonitor;
import hudson.tasks.Builder;
import hudson.tasks.Notifier;
import hudson.tasks.Publisher;
import hudson.util.FormValidation;
import jenkins.model.Jenkins;
import jenkins.tasks.SimpleBuildStep;
import net.sf.json.JSONObject;

/**
 * Sample {@link Builder}.
 *
 *
 * When the user configures the project and enables this builder,
 * {@link DescriptorImpl#newInstance(StaplerRequest)} is invoked and a new
 * {@link HelloWorldBuilder} is created. The created instance is persisted to
 * the project configuration XML by using XStream, so this allows you to use
 * instance fields (like {@link #name}) to remember the configuration.
 *
 *
 * When a build is performed, the {@link #perform} method will be invoked.
 *
 * @author Kohsuke Kawaguchi
 */
public class HelloWorldBuilder extends Notifier implements SimpleBuildStep {

	private final String name;
	public String getName() {
		return name;
	}

	private final String corpid;
	private final String secret;
	private final int pushdepid;
	private final int agentid;
	private final String push;

	public String getCorpid() {
		return corpid;
	}

	public String getSecret() {
		return secret;
	}

	public int getPushdepid() {
		return pushdepid;
	}

	public int getAgentid() {
		return agentid;
	}

	public String getPush() {
		return push;
	}

	@DataBoundConstructor
	public HelloWorldBuilder(String name, String corpid, String secret, int pushdepid, int agentid, String push) {
		super();
		this.name = name;
		this.corpid = corpid;
		this.secret = secret;
		this.pushdepid = pushdepid;
		this.agentid = agentid;
		this.push = push;
	}

	@SuppressWarnings("deprecation")
	@Override
	public void perform(Run build, FilePath workspace, Launcher launcher, TaskListener listener) {
			send_weChatMsg sw = new send_weChatMsg();
//			String fullDisplayName = build.getFullDisplayName();
//			String[] split = fullDisplayName.split("#");
//			String name1 = split[1].trim();
		try {
			//获取构建结果
			String string = build.getResult().toString();
			int number = build.getNumber();
			String resuit = null;
			if(string.equals("SUCCESS")){
				resuit="构建结果:成功";
			}else if(string.equals("FAILURE")){
				resuit="构建结果:失败";
			}else if(string.equals("UNSTABLE")){
				resuit="构建结果:不稳定";
			}else if(string.equals("ABORTED")){
				resuit="构建结果:中断构建";
			}
			String url = build.getAbsoluteUrl();
			Singleton singleton = Singleton.getInstance();
       	    Map map = singleton.getAccessTokenAndJsapiTicket(corpid,secret);
       	    String token = (String) map.get("access_token");
			String postdata = sw.createpostdata(push, "text", agentid,
					"content", name+"任务"+resuit+"\n--------\n"+"构建结果信息:"+url,pushdepid);

			String resp = sw.post("utf-8", send_weChatMsg.CONTENT_TYPE, (new urlData()).getSendMessage_Url(), postdata,
					token);
			} catch (Exception e) {
				e.printStackTrace();
			}
	}


	@Override
	public BuildStepMonitor getRequiredMonitorService() {
		return BuildStepMonitor.NONE;
	}

	@Extension
	public static final class DescriptorImpl extends BuildStepDescriptor {
		private boolean useFrench;

		public DescriptorImpl() {
			load();
		}

		public FormValidation doCheckName(@QueryParameter String value) throws IOException, ServletException {
			if (value.length() == 0)
				return FormValidation.error("Please set a name");
			if (value.length() < 4)
				return FormValidation.warning("Isn't the name too short?");
			return FormValidation.ok();
		}

		public boolean isApplicable(Class aClass) {
			return true;
		}

		public String getDisplayName() {
			return "微信配置通知";
		}

		public String getDefaultURL() {
            Jenkins instance = Jenkins.getInstance();
            assert instance != null;
            if(instance.getRootUrl() != null){
                return instance.getRootUrl();
            }else{
                return "";
            }
        }

		@Override
		public boolean configure(StaplerRequest req, JSONObject formData) throws FormException {
			useFrench = formData.getBoolean("useFrench");
			save();
			return super.configure(req, formData);
		}

		public boolean getUseFrench() {
			return useFrench;
		}
	}


}
会有一个类为HelloWorldBuilder 这里我就不进行一个介绍了,因为我自己也不特别的懂,以免误导到你了,其实自己写的代码也没有几行
我觉得只需要了解到几个点就行
1:在jenkins每次构建时都会调用上面perform这个方法,所以我们的逻辑只需要在这里面进行完成.
     里面的参数我在参考别的帖子时,感觉上去是很厉害的.可能自己的方式不对,基本上没用到那几个参数
2:我们需要让HelloWorldBuilder 这个类继承Notifier这个类 ,
     Notifier这个类就为通知类,简单直观的区别在于如果不是继承这个我们的插件在使用时只能在构建中那个环节使用,
     如果继承了这个类就可以在构建后这个环节进行使用
3:就是当我们需要什么参数时,我们都可以进行自定义,参数是非常的灵活

在这里填写我们需要的参数,jenkins可以在构建时获取到这些参数,当然也是要进行相对应的配置
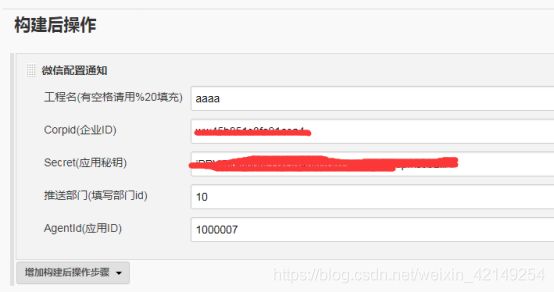
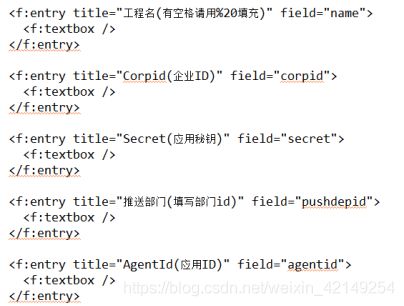
在我们导入的工程的配置文件里有一个文件为config.jelly,在这里就可以自定义参数


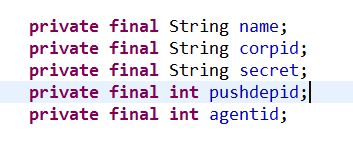
需要注意的是类里面的参数名与配置文件里面的参数名需要一样
然后在类里面重新生成有参构造,不能把构建函数上面的注解弄没了
既然已经可以获取到jenkins的构建结果,在这里我们的整个微信插件的编写基本上是已经完成了.我们就需要进到工程目录进行对项目的打包 mvn clean package,会生成一个target文件夹,里面就会有一个hpi的文件我们要的就是这个
后面进行了一些代码的整改
1:向部门推送消息,在接口里面有参数,可以直接填入部门id就行

2:添加了一个插件参数,用于除了部门以外的人员进行消息的推送