Sign In With Apple前端和后端
文章目录
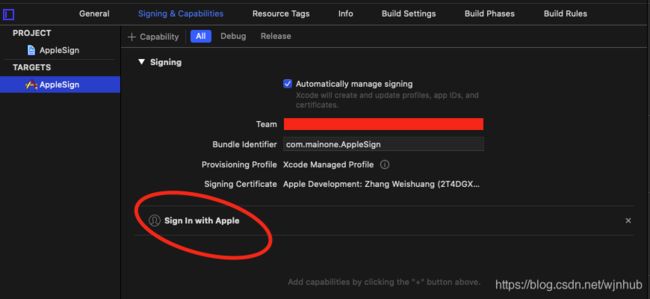
- 前端配置
-
- 集成
- 实现
-
- 1. 添加登录按钮
- 2. appleid请求
- 3. 实现ASAuthorizationControllerDelegate代理
- 4. 实现ASAuthorizationControllerPresentationContextProviding协议
- 5. 监听授权状态
- 后端配置
-
- 获取Apple的公共密钥以验证ID令牌签名:
- 生成和验证令牌
在2019年的WWDC 上, 苹果要求使用第三方登录的应用也必须接入苹果账号登录,从2020年6月30日开始,应用程序更新必须遵循这些指导方针,否则影响上架。
Sign in with Apple
Sign in with Apple makes it easy for users to sign in to your apps and websites using their Apple ID. Instead of filling out forms, verifying email addresses, and choosing new passwords, they can use Sign in with Apple to set up an account and start using your app right away. All accounts are protected with two-factor authentication for superior security, and Apple will not track users’ activity in your app or website.
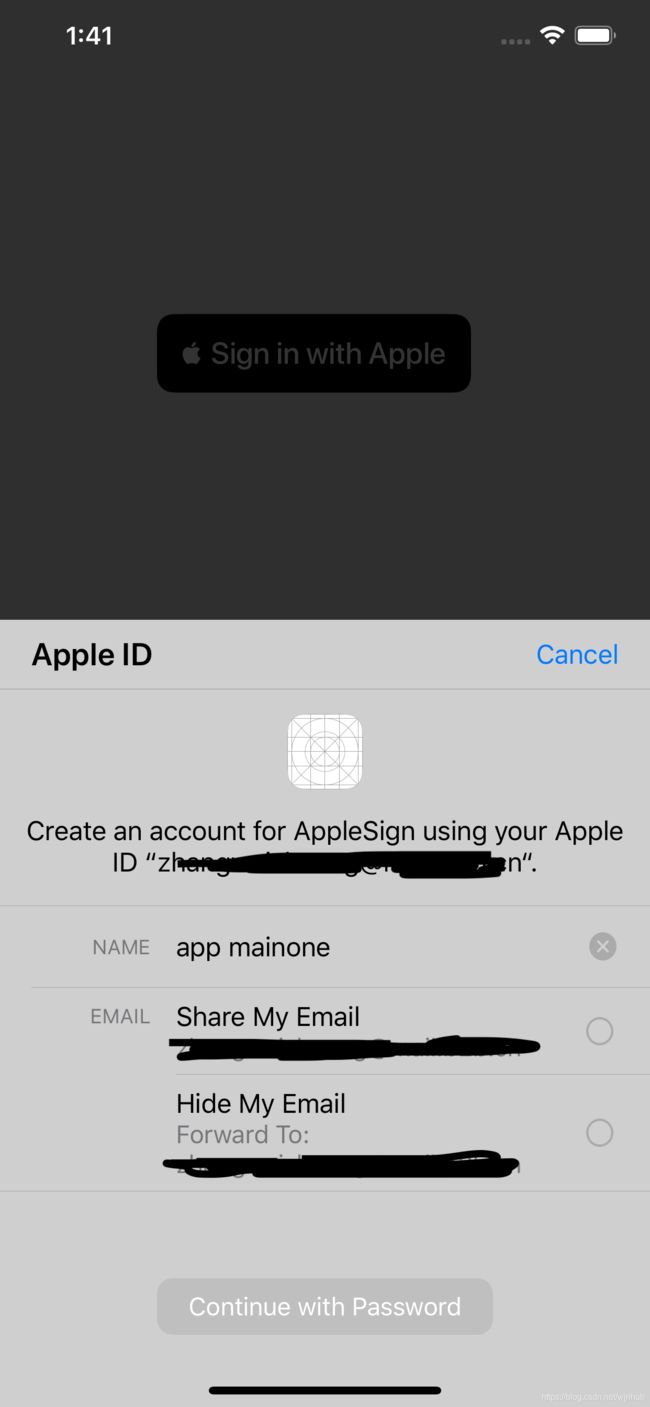
Apple登录开发者可以获取到用户名称(Name), 用户唯一标识符(ID)以及经过验证的电子邮件地址(email)
前端配置
集成
实现
1. 添加登录按钮
func setupProviderLoginView() {

    let appleButton = ASAuthorizationAppleIDButton(type: .signIn, style: .whiteOutline)
    appleButton.addTarget(self, action: #selector(handleAuthorizationAppleIDButtonPress), for: .touchUpInside)
    appleButton.frame = CGRect(x: 100, y: 200, width: 200, height: 50)
    appleButton.cornerRadius = 10
    self.view.addSubview(appleButton)
}
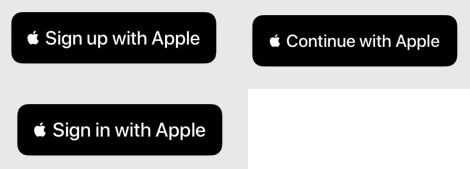
- ButtonType
 @available(iOS 13.0, *)
  public enum ButtonType : Int {

      case signIn = 0
      case `continue` = 1
      @available(iOS 13.2, *)
      case signUp = 2
  }
- Style
@available(iOS 13.0, *)
public enum Style : Int {

    case white = 0
    case whiteOutline = 1
    case black = 2
}
2. appleid请求
@objc
func handleAuthorizationAppleIDButtonPress() {

    // 基于用户的Apple ID授权用户,生成用户授权请求机制
    let appleIDProvider = ASAuthorizationAppleIDProvider()
    // 创建Apple ID授权请求
    let request = appleIDProvider.createRequest()
    // 请求的Apple用户信息类型
    request.requestedScopes = [.fullName, .email]

    // 管理授权请求控制器
    let authorizationController = ASAuthorizationController(authorizationRequests: [request])
    // 请求回调 成功/失败的代理
    authorizationController.delegate = self
    //显示上下文的代理,系统可以在上下文中展示授权页面
    authorizationController.presentationContextProvider = self
    // 控制器初始化期间启动授权
    authorizationController.performRequests()
}
3. 实现ASAuthorizationControllerDelegate代理
extension ViewController: ASAuthorizationControllerDelegate {

    // 授权成功回调
    func authorizationController(controller: ASAuthorizationController, didCompleteWithAuthorization authorization: ASAuthorization) {

        switch authorization.credential {

        case let appleIDCredential as ASAuthorizationAppleIDCredential:
            // 用户的详细信息
            let userIdentifier = appleIDCredential.user
            let fullName = appleIDCredential.fullName
            let email = appleIDCredential.email
            let authorizationCode = appleIDCredential.authorizationCode!
            let identityToken = appleIDCredential.identityToken!

            // 将userIdentifier保存到钥匙串中
            self.saveUserInKeychain(userIdentifier)

            print("userIdentifier: \(userIdentifier) \n fullName: \(String(describing: fullName)) \n email: \(String(describing: email))  authorizationCode: \(String(describing: String(data: authorizationCode, encoding: String.Encoding.utf8)))  identityToken: \(String(describing: String(data: identityToken, encoding: String.Encoding.utf8))) \(appleIDCredential)")

        case let passwordCredential as ASPasswordCredential:

            // 密码凭证的用户唯一表示
            let username = passwordCredential.user
            // 密码凭证的密码
            let password = passwordCredential.password

            print("username: \(username)  \n password: \(password)")

        default:
            break
        }
    }
    // 授权失败回调
    func authorizationController(controller: ASAuthorizationController, didCompleteWithError error: Error) {

        print("授权错误: \(error)")
        var errorText = ""
        if let authError = error as? ASAuthorizationError {

            let code = authError.code
            switch code {

            case .canceled:
                errorText = "用户取消了授权请求"
            case .failed:
                errorText = "授权请求失败"
            case .invalidResponse:
                errorText = "授权请求响应无效"
            case .notHandled:
                errorText = "未能处理授权请求"
            case .unknown:
                errorText = "授权请求失败, 未知的错误原因"
            default:
                errorText = "其他未知的错误原因"
            }
        }
        print(errorText)
    }
}
ASAuthorizationAppleIDCredential
@available(iOS 13.0, *)
open class ASAuthorizationAppleIDCredential : NSObject, ASAuthorizationCredential {

	// AppleID关联的用户ID
    open var user: String {
      get }
	// 创送给ASAuthorizationRequest的字符串
    open var state: String? {
      get }
	// 户授权的可访问的联系信息的种类
    open var authorizedScopes: [ASAuthorization.Scope] {
      get }
	// 为APP提供的授权证明的有效token
    open var authorizationCode: Data? {
      get }
	// JSON Web Token (JWT), 用于以安全的方式向应用程序传递关于用户身份的信息
    open var identityToken: Data? {
      get }
	// 用户email
    open var email: String? {
      get }
	// 用户名
    open var fullName: PersonNameComponents? {
      get }
	// 用户是否是真实用户状态
    open var realUserStatus: ASUserDetectionStatus {
      get }
}
ASPasswordCredential
@available(iOS 12.0, *)
open class ASPasswordCredential : NSObject, ASAuthorizationCredential {

	// 初始化方法
    public init(user: String, password: String)
 	// 用户名
    open var user: String {
      get }
	// 用户密码
    open var password: String {
      get }
}
4. 实现ASAuthorizationControllerPresentationContextProviding协议
当需要向用户展示授权页面时,需要遵守该协议
extension ViewController: ASAuthorizationControllerPresentationContextProviding {

    // 代理应该在哪个window 展示内容给用户
    func presentationAnchor(for controller: ASAuthorizationController) -> ASPresentationAnchor {

        return self.view.window!
    }
}
5. 监听授权状态
- 当用户终止在App中使用Sign in with Apple功能
- 用户在设置中注销Apple ID
这类特殊情况下,我们需要对授权状态的改变进行监听
当用户状态是.notFound和.revoked时需要进行重新登录操作
func application(_ application: UIApplication, didFinishLaunchingWithOptions launchOptions: [UIApplication.LaunchOptionsKey: Any]?) -> Bool {

    // Override point for customization after application launch.

    let appleIDProvider = ASAuthorizationAppleIDProvider()
    appleIDProvider.getCredentialState(forUserID: KeychainItem.currentUserIdentifier) {
      (credentialState, error) in
        switch credentialState {

        case .authorized:
            print("授权状态有效")
        case .notFound:
            print("授权凭证缺失(可能是使用AppleID 登录过App)")
        case .revoked:
            print("上次使用苹果账号登录的凭据已被移除,需解除绑定并重新引导用户使用苹果登录")
        default:
            print("未知状态")
        }
    }
    return true
}
示例代码
后端配置
官网介绍
客户端会向后端 传递 userId identityToken email 等参数
后端必须要验证 identityToken 的有效性,合法性;
identityToken 是 JWT算法格式
获取Apple的公共密钥以验证ID令牌签名:
GET https://appleid.apple.com/auth/keys
{

  "keys": [
    {

      "kty": "RSA",
      "kid": "86D88Kf",
      "use": "sig",
      "alg": "RS256",
      "n": "iGaLqP6y-SJCCBq5Hv6pGDbG_SQ11MNjH7rWHcCFYz4hGwHC4lcSurTlV8u3avoVNM8jXevG1Iu1SY11qInqUvjJur--hghr1b56OPJu6H1iKulSxGjEIyDP6c5BdE1uwprYyr4IO9th8fOwCPygjLFrh44XEGbDIFeImwvBAGOhmMB2AD1n1KviyNsH0bEB7phQtiLk-ILjv1bORSRl8AK677-1T8isGfHKXGZ_ZGtStDe7Lu0Ihp8zoUt59kx2o9uWpROkzF56ypresiIl4WprClRCjz8x6cPZXU2qNWhu71TQvUFwvIvbkE1oYaJMb0jcOTmBRZA2QuYw-zHLwQ",
      "e": "AQAB"
    },
    {

      "kty": "RSA",
      "kid": "eXaunmL",
      "use": "sig",
      "alg": "RS256",
      "n": "4dGQ7bQK8LgILOdLsYzfZjkEAoQeVC_aqyc8GC6RX7dq_KvRAQAWPvkam8VQv4GK5T4ogklEKEvj5ISBamdDNq1n52TpxQwI2EqxSk7I9fKPKhRt4F8-2yETlYvye-2s6NeWJim0KBtOVrk0gWvEDgd6WOqJl_yt5WBISvILNyVg1qAAM8JeX6dRPosahRVDjA52G2X-Tip84wqwyRpUlq2ybzcLh3zyhCitBOebiRWDQfG26EH9lTlJhll-p_Dg8vAXxJLIJ4SNLcqgFeZe4OfHLgdzMvxXZJnPp_VgmkcpUdRotazKZumj6dBPcXI_XID4Z4Z3OM1KrZPJNdUhxw",
      "e": "AQAB"
    }
  ]
}
| 参数 | 说明 |
|---|---|
| kid | 密钥id标识,签名算法采用的是RS256(RSA 256 + SHA 256) |
| kty | 常量标识使用RSA签名算法 |
| n和e | 公钥参数 |
生成和验证令牌
POST https://appleid.apple.com/auth/token
针对identityToken后端验证做简要说明:
// jwt 格式 该token的有效期是10分钟
eyJraWQiOiJBSURPUEsxIiwiYWxnIjoiUlMyNTYifQ.eyJpc3MiOiJodHRwczovL2FwcGxlaWQuYXBwbGUuY29tIiwiYXVkIjoiY29tLnNreW1pbmcuZGV2aWNlbW9uaXRvciIsImV4cCI6MTU2NTY2ODA4NiwiaWF0IjoxNTY1NjY3NDg2LCJzdWIiOiIwMDEyNDcuOTNiM2E3OTlhN2M4NGMwY2I0NmNkMDhmMTAwNzk3ZjIuMDcwNCIsImNfaGFzaCI6Ik9oMmFtOWVNTldWWTNkcTVKbUNsYmciLCJhdXRoX3RpbWUiOjE1NjU2Njc0ODZ9.e-pdwK4iKWErr_Gcpkzo8JNi_MWh7OMnA15FvyOXQxTx0GsXzFT3qE3DmXqAar96nx3EqsHI1Qgquqt2ogyj-lLijK_46ifckdqPjncTEGzVWkNTX8uhY7M867B6aUnmR7u-cf2HsmhXrvgsJLGp2TzCI3oTp-kskBOeCPMyTxzNURuYe8zabBlUy6FDNIPeZwZXZqU0Fr3riv2k1NkGx5MqFdUq3z5mNfmWbIAuU64Z3yKhaqwGd2tey1Xxs4hHa786OeYFF3n7G5h-4kQ4lf163G6I5BU0etCRSYVKqjq-OL-8z8dHNqvTJtAYanB3OHNWCHevJFHJ2nWOTT3sbw

// header 解码
{
     "kid":"AIDOPK1","alg":"RS256"} 其中kid对应上文说的密钥id

// claims 解码
{

"iss":"https://appleid.apple.com",  // 苹果签发的标识
"aud":"com.skyming.devicemonitor", // 接收者的APP ID
"exp":1565668086,"iat":1565667486,
"sub":"001247.93b3a799a7c84c0cb46cd08f100797f2.0704", //用户的唯一标识
"c_hash":"Oh2am9eMNWVY3dq5JmClbg",
"auth_time":1565667486
}
其中 iss标识是苹果签发的,aud是接收者的APP ID,该token的有效期是10分钟,sub就是用户的唯一标识
如何验证?
#首先通过identityToken中的header中的kid,然后结合苹果获取公钥的接口,拿到相应的n和e的值,然后通过下面这个方法构建RSA公钥
public RSAPublicKeySpec build(String n, String e) {

    BigInteger modulus = new BigInteger(1, Base64.decodeBase64(n));
    BigInteger publicExponent = new BigInteger(1, Base64.decodeBase64(e));
    return new RSAPublicKeySpec(modulus, publicExponent);
}

#获取验证所需的PublicKey
public PublicKey getPublicKey(String n,String e)throws NoSuchAlgorithmException, InvalidKeySpecException {

         BigInteger bigIntModulus = new BigInteger(1,Base64.decodeBase64(n));
         BigInteger bigIntPrivateExponent = new BigInteger(1,Base64.decodeBase64(e));
        RSAPublicKeySpec keySpec = new RSAPublicKeySpec(bigIntModulus, bigIntPrivateExponent);
        KeyFactory keyFactory = KeyFactory.getInstance("RSA");
        PublicKey publicKey = keyFactory.generatePublic(keySpec);
        return publicKey;
 }

#通过下面这个方法验证JWT的有效性
# jwt 就是 identityToken:授权用户的JWT凭证
# audience就是APPID
# subject 就是 就是userId
public int verify(PublicKey key, String jwt, String audience, String subject) {

    JwtParser jwtParser = Jwts.parser().setSigningKey(key);
    jwtParser.requireIssuer("https://appleid.apple.com");
    jwtParser.requireAudience(audience);
    jwtParser.requireSubject(subject);
    try {

       Jws<Claims> claim = jwtParser.parseClaimsJws(jwt);
       if (claim != null && claim.getBody().containsKey("auth_time")) {

          return GlobalCode.SUCCESS;
       }
       return GlobalCode.THIRD_AUTH_CODE_INVALID;
    } catch (ExpiredJwtException e) {

       log.error("apple identityToken expired", e);
       return GlobalCode.THIRD_AUTH_CODE_INVALID;
    } catch (Exception e) {

       log.error("apple identityToken illegal", e);
       return GlobalCode.FAIL_ILLEGAL_REQ;
    }
}

#使用的JWT工具库为:
<dependency>
    <groupId>io.jsonwebtoken</groupId>
    <artifactId>jjwt</artifactId>
    <version>0.9.1</version>
</dependency>
参考
Sign in with Apple
API Reference and Sample Code apps和 websites
About Sign in with Apple
https://www.jianshu.com/p/655972b0e7da


