MongoDB分片+副本集部署(Shard+ReplicaSet单机多节点部署)
Mongodb-单机多节点部署 【亲测】
一、集群规划
1.普通分片集,没有数据冗余能力,如果任意分片节点出现故障,则会数据丢失,所以在生产中一般都采用分片+副本集的方式,该方式即解决读写负载均衡高可用,也解决了数据冗余高可用的问题;
2.主机充裕的情况下分片副本集集群,至少需要9台主机节点,其中每三台组成一组副本集,然后再把三组副本集的主节点组合成分片集群,这样当用户或应用程序请求操作数据库时,mongos会把请求分流到不同分片节点(也就是每组副本集的主节点),当某一个分片节点挂掉后,也就是相当于某组副本集的主节点挂掉了,此时副本集中的其他节点会重新选举出新的主节点,从而实现了数据冗余;
3.在主机资源富裕的情况下,除了9台数据节点外,还需要部署6台configserver(3台)和mongos(3台),当然在流量请求量不大的情况下,也可以部署到数据节点主机上;
4.本次使用三台主机,模拟15个节点的分片副本集集群,模拟方式就是每台主机上启动3个不同端口的mongod服务,另外每台主机是各部署configserver和mongos服务组件,这样就达到了3台完成部署分片+副本集的高可用集群;
为了不影响操作,读者可忽略文中10开头的ip地址,本文介绍单机安装,ip一律使用127.0.0.1
环境:
CentOS Linux release 7.6.1810 (Core)
MongoDB4.2.2 (4.2版本开始支持强大的跨分片事务和其他更多特性,详见官网)
1.1、主机节点以及应用组件规划
| hostname | k8s-mongodb-01 | k8s-mongodb-02 | k8s-mongodb-03 |
|---|---|---|---|
| IP | 127.0.0.1 | 127.0.0.1 | 127.0.0.1 |
| shard01 | shard_replset_01=27018 | shard_replset_01=28018 | shard_replset_01=29018 |
| shard02 | shard_replset_02=27028 | shard_replset_02=28028 | shard_replset_02=29028 |
| shard03 | shard_replset_03=27038 | shard_replset_03=28038 | shard_replset_03=29038 |
| configsvr | configserver=27019 | configserver=28019 | configserver=29019 |
| mongos | mongos=27017 | mongos=28017 | mongos=29017 |
1.2、主机节点基本配置
官方内核优化:
https://docs.mongodb.com/manual/reference/ulimit/
# 命令别名
echo "alias ll='ls -l --color=auto'" >> /etc/profile && source /etc/profile

# 内核优化
echo -e "* soft noproc 64000\n* hard noproc 64000\n* soft nofile 64000\n* hard nofile 64000" >> /etc/security/limits.conf && sysctl -p
1.3、安装基础软件
apt-get install ntpdate tree lrzsz
1.4、时间同步
# 改为上海市时区;
timedatectl set-timezone Asia/Shanghai
# 时间同步每5分钟;
cat<>/var/spool/cron/crontabs/root
*/5 * * * * /usr/sbin/ntpdate 169.254.169.123 >/dev/null 2>&1
EOF
1.5、升级openssl
升级到openssl v1.1.1d 版本,使其支持 TLS/SSL V3 和国密标准;
# 安装编译环境
apt-get install build-essential
# 下载openssl 1.1.1d
wget https://www.openssl.org/source/openssl-1.1.1d.tar.gz -P /shared/download
# 解压
cd /shared/download/ &&  tar -xf openssl-1.1.1d.tar.gz
# 编译前配置
cd /shared/download/openssl-1.1.1d &&  ./config --prefix=/opt/openssl-1.1.1d --openssldir=/opt/openssl-1.1.1d/ssl
# 编译并安装;
make -j4 && make install
# 创建软连接
ln -fs /opt/openssl-1.1.1d/ /opt/openssl
# 配置系统库文件,是系统可以找到刚编译的openssl的lib库;
echo '/opt/openssl-1.1.1d/lib' >> /etc/ld.so.conf.d/openssl-1.1.1d.conf && ldconfig
# 测试openssl命令;
/opt/openssl/bin/openssl version
/opt/openssl/bin/openssl version -a
# 备份源openssl
mv $(which openssl) $(which openssl).bak
# 添加PATH变量
echo 'export PATH=$PATH:/opt/openssl/bin' >> /etc/profile && source /etc/profile
1.6、规划集群IP和主机名
解决debian不能修改resovle.conf的问题
https://wiki.debian.org/resolv.conf
echo ‘make_resolv_conf() { :; }’ > /etc/dhcp/dhclient-enter-hooks.d/leave_my_resolv_conf_alone
chmod 755 /etc/dhcp/dhclient-enter-hooks.d/leave_my_resolv_conf_alone
# 修改主机名
hostnamectl set-hostname k8s-mongodb-01

# 各主机添加主机名ip映射
cat</etc/hosts
127.0.1.1 ip-10-20-1-101.ap-southeast-1.compute.internal ip-10-20-1-101
127.0.0.1 localhost
# The following lines are desirable for IPv6 capable hosts
::1 ip6-localhost ip6-loopback
fe00::0 ip6-localnet
ff00::0 ip6-mcastprefix
ff02::1 ip6-allnodes
ff02::2 ip6-allrouters
ff02::3 ip6-allhosts

## MongoDB_host映射
127.0.0.1 k8s-mongodb-01
127.0.0.1 k8s-mongodb-02
127.0.0.1 k8s-mongodb-03

## 多台机器host映射方式
#10.20.1.101    k8s-mongodb-01
#10.20.1.102    k8s-mongodb-02
#10.20.1.103    k8s-mongodb-03
EOF
二、部署mongodb
官方资料:
https://www.mongodb.com/download-center/community
# wget下载mongodb-x86_64-debian92-4.2.3.tgz
wget -P /shared/download/ https://fastdl.mongodb.org/linux/mongodb-linux-x86_64-rhel70-4.2.2.tgz
# 解压到指定目录
tar -xf /shared/download/mongodb-linux-x86_64-rhel70-4.2.2.tgz -C /usr/local
# 更改目录名 【和软连接二选一】
cd /usr/local && mv mongodb-linux-x86_64-rhel70-4.2.2 mongodb	# 也可通过下面的创建软连接:ln -nfs /usr/local/mongodb-linux-x86_64-rhel70-4.2.2/ /usr/local/mongodb


# 添加PATH环境变量
echo 'export PATH=$PATH:/usr/local/mongodb/bin' >> /etc/profile && source /etc/profile

# 每个主机均创建所需目录
mkdir -p /usr/local/mongodb/{etc,keyfile,cert}
mkdir -p /data/mongodb/cluster/{shard{01,02,03}/{data,logs},configserver/{data,logs},mongos/logs}

# 复制两份数据目录结构
cp -a /data/mongodb/cluster/ /data/mongodb/cluster2 && cp -a /data/mongodb/cluster/ /data/mongodb/cluster3
cp -a /usr/local/mongodb/etc /usr/local/mongodb/etc2 && cp -a /usr/local/mongodb/etc /usr/local/mongodb/etc3


# 软连接 【】
ln -s /usr/local/mongodb/bin/mongod /etc/default/mongod
2.1、创建用户并授权
# 创建系统用户
useradd -s /usr/sbin/nologin -M mongodb
# 修改目录数主数据组
chown -R mongodb:mongodb /data/mongodb /usr/local/mongodb/
2.2、创建集群通信密钥
# 创建并复制密钥到所有主机相同目录
openssl rand -base64 756  > /usr/local/mongodb/keyfile/secret.key \
&& chmod 400 /usr/local/mongodb/keyfile/secret.key \
&& chown mongodb:mongodb /usr/local/mongodb/keyfile/secret.key

# 修改各主机节点权限
chmod 400 /usr/local/mongodb/keyfile/secret.key

# 复制两份
cp -a /usr/local/mongodb/keyfile/secret.key /usr/local/mongodb/keyfile/secret2.key && cp -a /usr/local/mongodb/keyfile/secret.key /usr/local/mongodb/keyfile/secret3.key

# 查看文件
ll /usr/local/mongodb/keyfile
2.3、创建配置组件的配置文件
# 每台主机节点都创建配置服务器配置文件
cat</usr/local/mongodb/etc/configserver.yaml
sharding:
  clusterRole: configsvr
replication:
  replSetName: configserver
net:
  bindIp: 0.0.0.0
  port: 27019
  wireObjectCheck: true
processManagement:
  fork: false
  pidFilePath: "/data/mongodb/cluster/configserver/configserver.pid"
  timeZoneInfo: "/usr/share/zoneinfo"
storage:
  dbPath: "/data/mongodb/cluster/configserver/data"
  journal:
    enabled: true
  wiredTiger:
    engineConfig:
      cacheSizeGB: 1
systemLog:
  destination: file
  path: "/data/mongodb/cluster/configserver/logs/configserver.log"
  logAppend: true
setParameter:
   enableLocalhostAuthBypass: true
security:
   keyFile: "/usr/local/mongodb/keyfile/secret.key"
   clusterAuthMode: keyFile
   authorization: enabled
EOF
# -----------


# 每台主机节点都创建配置服务器配置文件【02节点】
cat</usr/local/mongodb/etc2/configserver.yaml
sharding:
  clusterRole: configsvr
replication:
  replSetName: configserver
net:
  bindIp: 0.0.0.0
  port: 28019
  wireObjectCheck: true
processManagement:
  fork: false
  pidFilePath: "/data/mongodb/cluster2/configserver/configserver.pid"
  timeZoneInfo: "/usr/share/zoneinfo"
storage:
  dbPath: "/data/mongodb/cluster2/configserver/data"
  journal:
    enabled: true
  wiredTiger:
    engineConfig:
      cacheSizeGB: 1
systemLog:
  destination: file
  path: "/data/mongodb/cluster2/configserver/logs/configserver.log"
  logAppend: true
setParameter:
   enableLocalhostAuthBypass: true
security:
   keyFile: "/usr/local/mongodb/keyfile/secret2.key"
   clusterAuthMode: keyFile
   authorization: enabled
EOF
# -----------


# 每台主机节点都创建配置服务器配置文件 [03节点]
cat</usr/local/mongodb/etc3/configserver.yaml
sharding:
  clusterRole: configsvr
replication:
  replSetName: configserver
net:
  bindIp: 0.0.0.0
  port: 29019
  wireObjectCheck: true
processManagement:
  fork: false
  pidFilePath: "/data/mongodb/cluster3/configserver/configserver.pid"
  timeZoneInfo: "/usr/share/zoneinfo"
storage:
  dbPath: "/data/mongodb/cluster3/configserver/data"
  journal:
    enabled: true
  wiredTiger:
    engineConfig:
      cacheSizeGB: 1
systemLog:
  destination: file
  path: "/data/mongodb/cluster3/configserver/logs/configserver.log"
  logAppend: true
setParameter:
   enableLocalhostAuthBypass: true
security:
   keyFile: "/usr/local/mongodb/keyfile/secret3.key"
   clusterAuthMode: keyFile
   authorization: enabled
EOF
# -----------


# 授权
chown -R mongodb:mongodb /data/mongodb /usr/local/mongodb/
2.4、创建配置组件的启动脚本
# 配置systemctl服务,启动开机自启动+守护进程
cat</lib/systemd/system/configsevr.service \
&& systemctl daemon-reload && systemctl enable configsevr.service \
&& systemctl start configsevr.service && systemctl status configsevr.service
[Unit]
Description=MongoDB Database Server
Documentation=https://docs.mongodb.org/manual
After=network.target

[Service]
User=mongodb
Group=mongodb
EnvironmentFile=-/etc/default/mongod
ExecStart=/usr/local/mongodb/bin/mongod --config /usr/local/mongodb/etc/configserver.yaml
PermissionsStartOnly=true
Type=simple
Restart=always
# file size
LimitFSIZE=infinity
# cpu time
LimitCPU=infinity
# virtual memory size
LimitAS=infinity
# open files
LimitNOFILE=64000
# processes/threads
LimitNPROC=64000
# locked memory
LimitMEMLOCK=infinity
# total threads (user+kernel)
TasksMax=infinity
TasksAccounting=false

# Recommended limits for mongod as specified in
# https://docs.mongodb.com/manual/reference/ulimit/#recommended-ulimit-settings

[Install]
WantedBy=multi-user.target
EOF
# -----------


# 配置systemctl服务,启动开机自启动+守护进程 【02节点】
cat</lib/systemd/system/configsevr2.service \
&& systemctl daemon-reload && systemctl enable configsevr2.service \
&& systemctl start configsevr2.service && systemctl status configsevr2.service
[Unit]
Description=MongoDB Database Server
Documentation=https://docs.mongodb.org/manual
After=network.target

[Service]
User=mongodb
Group=mongodb
EnvironmentFile=-/etc/default/mongod
ExecStart=/usr/local/mongodb/bin/mongod --config /usr/local/mongodb/etc2/configserver.yaml
PermissionsStartOnly=true
Type=simple
Restart=always
# file size
LimitFSIZE=infinity
# cpu time
LimitCPU=infinity
# virtual memory size
LimitAS=infinity
# open files
LimitNOFILE=64000
# processes/threads
LimitNPROC=64000
# locked memory
LimitMEMLOCK=infinity
# total threads (user+kernel)
TasksMax=infinity
TasksAccounting=false

# Recommended limits for mongod as specified in
# https://docs.mongodb.com/manual/reference/ulimit/#recommended-ulimit-settings

[Install]
WantedBy=multi-user.target
EOF
# -----------


# 配置systemctl服务,启动开机自启动+守护进程 【03节点】
cat</lib/systemd/system/configsevr3.service \
&& systemctl daemon-reload && systemctl enable configsevr3.service \
&& systemctl start configsevr3.service && systemctl status configsevr3.service
[Unit]
Description=MongoDB Database Server
Documentation=https://docs.mongodb.org/manual
After=network.target

[Service]
User=mongodb
Group=mongodb
EnvironmentFile=-/etc/default/mongod
ExecStart=/usr/local/mongodb/bin/mongod --config /usr/local/mongodb/etc3/configserver.yaml
PermissionsStartOnly=true
Type=simple
Restart=always
# file size
LimitFSIZE=infinity
# cpu time
LimitCPU=infinity
# virtual memory size
LimitAS=infinity
# open files
LimitNOFILE=64000
# processes/threads
LimitNPROC=64000
# locked memory
LimitMEMLOCK=infinity
# total threads (user+kernel)
TasksMax=infinity
TasksAccounting=false

# Recommended limits for mongod as specified in
# https://docs.mongodb.com/manual/reference/ulimit/#recommended-ulimit-settings

[Install]
WantedBy=multi-user.target
EOF
# -----------

# 查看
ll /lib/systemd/system | grep configsevr
2.5、创建配置组件的管理账户
如果首次启用副本集使用了keyfile参数,则自动启用auth账户认证功能,这会造成无法初始化副本集也不能创建管理账户,因为只有账户认证后才能初始化。所以一般是先不加载keyfile参数,启动后创建账户并初始化后再添加keyfile参数。
不过现在有个参数,可以让我们使用keyfile启动后,通127.0.0.1连接配置副本集,绕过安全认证,创建管理账户和初始化副本集;
# 首次创建账户使用127.0.0.1连接configserver
mongo --host=127.0.0.1 --port=27019
# 初始化副本集 ["127.0.0.1:27019"为“PRIMARY”主节点]
rs.initiate(
  {
    _id: "configserver",
    configsvr: true,
    members: [
      { _id : 1, host : "127.0.0.1:27019" },
      { _id : 2, host : "127.0.0.1:28019" },
      { _id : 3, host : "127.0.0.1:29019" }
    ]
  }
)

# 查看configserver副本集状态,确认当前连接节点为“PRIMARY”节点
rs.status()
# 在“PRIMARY”节点创建root管理员;
use admin
admin = db.getSiblingDB("admin")
admin.createUser(
  {
    user: "root",
    pwd: "pwd123456",
    roles: [ { role: "root", db: "admin" } ]
  }
)

# 使用非127.0.0.1登录
mongo --host=127.0.0.1 --port=27019
# 使用账户认证
db.getSiblingDB("admin").auth("root", passwordPrompt())	// 回车,并输入密码
show dbs
2.6、创建分片副本集配置文件
每个主机节点创建配置文件;
注意:如果使用systemd启动mongod,无比将配置文件中设置长fork: false或者修改systemd启动脚本,配置为Type=focking
#### 【01节点】######
# host-01、host-02、host-03
cat</usr/local/mongodb/etc/shard_replset_01.yaml
# shard_replset_01
sharding:
  clusterRole: shardsvr
replication:
  replSetName: shard_replset_01
net:
  bindIp: 0.0.0.0
  port: 27018
  maxIncomingConnections: 1024
  wireObjectCheck: true
processManagement:
  fork: false
  pidFilePath: "/data/mongodb/cluster/shard01/shard_replse.pid"
  timeZoneInfo: "/usr/share/zoneinfo"
storage:
  dbPath: "/data/mongodb/cluster/shard01/data"
  journal:
    enabled: true
systemLog:
  destination: file
  path: "/data/mongodb/cluster/shard01/logs/shardsvr.log"
  logAppend: true
setParameter:
   enableLocalhostAuthBypass: true
security:
   keyFile: "/usr/local/mongodb/keyfile/secret.key"
   clusterAuthMode: keyFile
   authorization: enabled
EOF
# -----------
# host-01、host-02、host-03
cat</usr/local/mongodb/etc/shard_replset_02.yaml
# shard_replset_02
sharding:
  clusterRole: shardsvr
replication:
  replSetName: shard_replset_02
net:
  bindIp: 0.0.0.0
  port: 27028
  maxIncomingConnections: 1024
  wireObjectCheck: true
processManagement:
  fork: false
  pidFilePath: "/data/mongodb/cluster/shard02/shard_replse.pid"
  timeZoneInfo: "/usr/share/zoneinfo"
storage:
  dbPath: "/data/mongodb/cluster/shard02/data"
  journal:
    enabled: true
  engine: wiredTiger
  wiredTiger:
    engineConfig:
      cacheSizeGB: 3
systemLog:
  destination: file
  path: "/data/mongodb/cluster/shard02/logs/shardsvr.log"
  logAppend: true
setParameter:
   enableLocalhostAuthBypass: true
security:
   keyFile: "/usr/local/mongodb/keyfile/secret.key"
   clusterAuthMode: keyFile
   authorization: enabled
EOF
# ----------
# host-01、host-02、host-03
cat</usr/local/mongodb/etc/shard_replset_03.yaml
# shard_replset_03
sharding:
  clusterRole: shardsvr
replication:
  replSetName: shard_replset_03
net:
  bindIp: 0.0.0.0
  port: 27038
  maxIncomingConnections: 1024
  wireObjectCheck: true
processManagement:
  fork: false
  pidFilePath: "/data/mongodb/cluster/shard03/shard_replse.pid"
  timeZoneInfo: "/usr/share/zoneinfo"
storage:
  dbPath: "/data/mongodb/cluster/shard03/data"
  journal:
    enabled: true
  engine: wiredTiger
  wiredTiger:
    engineConfig:
      cacheSizeGB: 3
systemLog:
  destination: file
  path: "/data/mongodb/cluster/shard03/logs/shardsvr.log"
  logAppend: true
setParameter:
   enableLocalhostAuthBypass: true
security:
   keyFile: "/usr/local/mongodb/keyfile/secret.key"
   clusterAuthMode: keyFile
   authorization: enabled
EOF
# ------------

#### 【02节点】######
# host-01、host-02、host-03 【02节点】
cat</usr/local/mongodb/etc2/shard_replset_01.yaml
# shard_replset_01
sharding:
  clusterRole: shardsvr
replication:
  replSetName: shard_replset_01
net:
  bindIp: 0.0.0.0
  port: 28018
  maxIncomingConnections: 1024
  wireObjectCheck: true
processManagement:
  fork: false
  pidFilePath: "/data/mongodb/cluster2/shard01/shard_replse.pid"
  timeZoneInfo: "/usr/share/zoneinfo"
storage:
  dbPath: "/data/mongodb/cluster2/shard01/data"
  journal:
    enabled: true
systemLog:
  destination: file
  path: "/data/mongodb/cluster2/shard01/logs/shardsvr.log"
  logAppend: true
setParameter:
   enableLocalhostAuthBypass: true
security:
   keyFile: "/usr/local/mongodb/keyfile/secret2.key"
   clusterAuthMode: keyFile
   authorization: enabled
EOF
# -----------
# host-01、host-02、host-03
cat</usr/local/mongodb/etc2/shard_replset_02.yaml
# shard_replset_02
sharding:
  clusterRole: shardsvr
replication:
  replSetName: shard_replset_02
net:
  bindIp: 0.0.0.0
  port: 28028
  maxIncomingConnections: 1024
  wireObjectCheck: true
processManagement:
  fork: false
  pidFilePath: "/data/mongodb/cluster2/shard02/shard_replse.pid"
  timeZoneInfo: "/usr/share/zoneinfo"
storage:
  dbPath: "/data/mongodb/cluster2/shard02/data"
  journal:
    enabled: true
  engine: wiredTiger
  wiredTiger:
    engineConfig:
      cacheSizeGB: 3
systemLog:
  destination: file
  path: "/data/mongodb/cluster2/shard02/logs/shardsvr.log"
  logAppend: true
setParameter:
   enableLocalhostAuthBypass: true
security:
   keyFile: "/usr/local/mongodb/keyfile/secret2.key"
   clusterAuthMode: keyFile
   authorization: enabled
EOF
# ----------
# host-01、host-02、host-03
cat</usr/local/mongodb/etc2/shard_replset_03.yaml
# shard_replset_03
sharding:
  clusterRole: shardsvr
replication:
  replSetName: shard_replset_03
net:
  bindIp: 0.0.0.0
  port: 28038
  maxIncomingConnections: 1024
  wireObjectCheck: true
processManagement:
  fork: false
  pidFilePath: "/data/mongodb/cluster2/shard03/shard_replse.pid"
  timeZoneInfo: "/usr/share/zoneinfo"
storage:
  dbPath: "/data/mongodb/cluster2/shard03/data"
  journal:
    enabled: true
  engine: wiredTiger
  wiredTiger:
    engineConfig:
      cacheSizeGB: 3
systemLog:
  destination: file
  path: "/data/mongodb/cluster2/shard03/logs/shardsvr.log"
  logAppend: true
setParameter:
   enableLocalhostAuthBypass: true
security:
   keyFile: "/usr/local/mongodb/keyfile/secret2.key"
   clusterAuthMode: keyFile
   authorization: enabled
EOF
# ------------

#### 【03节点】######
# host-01、host-02、host-03 【03节点】
cat</usr/local/mongodb/etc3/shard_replset_01.yaml
# shard_replset_01
sharding:
  clusterRole: shardsvr
replication:
  replSetName: shard_replset_01
net:
  bindIp: 0.0.0.0
  port: 29018
  maxIncomingConnections: 1024
  wireObjectCheck: true
processManagement:
  fork: false
  pidFilePath: "/data/mongodb/cluster3/shard01/shard_replse.pid"
  timeZoneInfo: "/usr/share/zoneinfo"
storage:
  dbPath: "/data/mongodb/cluster3/shard01/data"
  journal:
    enabled: true
systemLog:
  destination: file
  path: "/data/mongodb/cluster3/shard01/logs/shardsvr.log"
  logAppend: true
setParameter:
   enableLocalhostAuthBypass: true
security:
   keyFile: "/usr/local/mongodb/keyfile/secret3.key"
   clusterAuthMode: keyFile
   authorization: enabled
EOF
# -----------
# host-01、host-02、host-03
cat</usr/local/mongodb/etc3/shard_replset_02.yaml
# shard_replset_02
sharding:
  clusterRole: shardsvr
replication:
  replSetName: shard_replset_02
net:
  bindIp: 0.0.0.0
  port: 29028
  maxIncomingConnections: 1024
  wireObjectCheck: true
processManagement:
  fork: false
  pidFilePath: "/data/mongodb/cluster3/shard02/shard_replse.pid"
  timeZoneInfo: "/usr/share/zoneinfo"
storage:
  dbPath: "/data/mongodb/cluster3/shard02/data"
  journal:
    enabled: true
  engine: wiredTiger
  wiredTiger:
    engineConfig:
      cacheSizeGB: 3
systemLog:
  destination: file
  path: "/data/mongodb/cluster3/shard02/logs/shardsvr.log"
  logAppend: true
setParameter:
   enableLocalhostAuthBypass: true
security:
   keyFile: "/usr/local/mongodb/keyfile/secret3.key"
   clusterAuthMode: keyFile
   authorization: enabled
EOF
# ----------
# host-01、host-02、host-03
cat</usr/local/mongodb/etc3/shard_replset_03.yaml
# shard_replset_03
sharding:
  clusterRole: shardsvr
replication:
  replSetName: shard_replset_03
net:
  bindIp: 0.0.0.0
  port: 29038
  maxIncomingConnections: 1024
  wireObjectCheck: true
processManagement:
  fork: false
  pidFilePath: "/data/mongodb/cluster3/shard03/shard_replse.pid"
  timeZoneInfo: "/usr/share/zoneinfo"
storage:
  dbPath: "/data/mongodb/cluster3/shard03/data"
  journal:
    enabled: true
  engine: wiredTiger
  wiredTiger:
    engineConfig:
      cacheSizeGB: 3
systemLog:
  destination: file
  path: "/data/mongodb/cluster3/shard03/logs/shardsvr.log"
  logAppend: true
setParameter:
   enableLocalhostAuthBypass: true
security:
   keyFile: "/usr/local/mongodb/keyfile/secret3.key"
   clusterAuthMode: keyFile
   authorization: enabled
EOF
# ------------


# 授权
chown -R mongodb:mongodb /data/mongodb /usr/local/mongodb/
2.7、创建分片副本集启动脚本
每个主机节点创建配置文件 【****注意:单机多节点部署模式下,只需将下列配置中,执行3遍】
##### 【节点01】 #####
# host-01、host-02、host-03 【节点01分片01】
cat</lib/systemd/system/shard01.service \
&& systemctl daemon-reload && systemctl enable shard01.service \
&& systemctl start shard01.service && systemctl status shard01.service
[Unit]
Description=MongoDB Database Server
Documentation=https://docs.mongodb.org/manual
After=network.target

[Service]
User=mongodb
Group=mongodb
ExecStart=/usr/local/mongodb/bin/mongod --config /usr/local/mongodb/etc/shard_replset_01.yaml
PermissionsStartOnly=true
Type=simple
Restart=always
LimitFSIZE=infinity
LimitCPU=infinity
LimitAS=infinity
LimitNOFILE=64000
LimitNPROC=64000
LimitMEMLOCK=infinity
# total threads (user+kernel)
TasksMax=infinity
TasksAccounting=false

[Install]
WantedBy=multi-user.target
EOF
# -------------------
# host-01、host-02、host-03 【节点01分片02】
cat</lib/systemd/system/shard02.service \
&& systemctl daemon-reload && systemctl enable shard02.service \
&& systemctl start shard02.service && systemctl status shard02.service
[Unit]
Description=MongoDB Database Server
Documentation=https://docs.mongodb.org/manual
After=network.target

[Service]
User=mongodb
Group=mongodb
ExecStart=/usr/local/mongodb/bin/mongod --config /usr/local/mongodb/etc/shard_replset_02.yaml
PermissionsStartOnly=true
Type=simple
Restart=always
LimitFSIZE=infinity
LimitCPU=infinity
LimitAS=infinity
LimitNOFILE=64000
LimitNPROC=64000
LimitMEMLOCK=infinity
# total threads (user+kernel)
TasksMax=infinity
TasksAccounting=false

[Install]
WantedBy=multi-user.target
EOF
# -------------------
# host-01、host-02、host-03 【节点01分片03】
cat</lib/systemd/system/shard03.service \
&& systemctl daemon-reload && systemctl enable shard03.service \
&& systemctl start shard03.service && systemctl status shard03.service
[Unit]
Description=MongoDB Database Server
Documentation=https://docs.mongodb.org/manual
After=network.target

[Service]
User=mongodb
Group=mongodb
ExecStart=/usr/local/mongodb/bin/mongod --config /usr/local/mongodb/etc/shard_replset_03.yaml
PermissionsStartOnly=true
Type=simple
Restart=always
LimitFSIZE=infinity
LimitCPU=infinity
LimitAS=infinity
LimitNOFILE=64000
LimitNPROC=64000
LimitMEMLOCK=infinity
# total threads (user+kernel)
TasksMax=infinity
TasksAccounting=false

[Install]
WantedBy=multi-user.target
EOF
# -------------------


##### 【节点02】 #####
# host-01、host-02、host-03 【节点02分片01】
cat</lib/systemd/system/shard01_2.service \
&& systemctl daemon-reload && systemctl enable shard01_2.service \
&& systemctl start shard01_2.service && systemctl status shard01_2.service
[Unit]
Description=MongoDB Database Server
Documentation=https://docs.mongodb.org/manual
After=network.target

[Service]
User=mongodb
Group=mongodb
ExecStart=/usr/local/mongodb/bin/mongod --config /usr/local/mongodb/etc2/shard_replset_01.yaml
PermissionsStartOnly=true
Type=simple
Restart=always
LimitFSIZE=infinity
LimitCPU=infinity
LimitAS=infinity
LimitNOFILE=64000
LimitNPROC=64000
LimitMEMLOCK=infinity
# total threads (user+kernel)
TasksMax=infinity
TasksAccounting=false

[Install]
WantedBy=multi-user.target
EOF
# -------------------
# host-01、host-02、host-03 【节点02分片02】
cat</lib/systemd/system/shard02_2.service \
&& systemctl daemon-reload && systemctl enable shard02_2.service \
&& systemctl start shard02_2.service && systemctl status shard02_2.service
[Unit]
Description=MongoDB Database Server
Documentation=https://docs.mongodb.org/manual
After=network.target

[Service]
User=mongodb
Group=mongodb
ExecStart=/usr/local/mongodb/bin/mongod --config /usr/local/mongodb/etc2/shard_replset_02.yaml
PermissionsStartOnly=true
Type=simple
Restart=always
LimitFSIZE=infinity
LimitCPU=infinity
LimitAS=infinity
LimitNOFILE=64000
LimitNPROC=64000
LimitMEMLOCK=infinity
# total threads (user+kernel)
TasksMax=infinity
TasksAccounting=false

[Install]
WantedBy=multi-user.target
EOF
# -------------------
# host-01、host-02、host-03 【节点02分片03】
cat</lib/systemd/system/shard03_2.service \
&& systemctl daemon-reload && systemctl enable shard03_2.service \
&& systemctl start shard03_2.service && systemctl status shard03_2.service
[Unit]
Description=MongoDB Database Server
Documentation=https://docs.mongodb.org/manual
After=network.target

[Service]
User=mongodb
Group=mongodb
ExecStart=/usr/local/mongodb/bin/mongod --config /usr/local/mongodb/etc2/shard_replset_03.yaml
PermissionsStartOnly=true
Type=simple
Restart=always
LimitFSIZE=infinity
LimitCPU=infinity
LimitAS=infinity
LimitNOFILE=64000
LimitNPROC=64000
LimitMEMLOCK=infinity
# total threads (user+kernel)
TasksMax=infinity
TasksAccounting=false

[Install]
WantedBy=multi-user.target
EOF
# -------------------
##### 【节点03】 #####
# host-01、host-02、host-03 【节点03分片01】
cat</lib/systemd/system/shard01_3.service \
&& systemctl daemon-reload && systemctl enable shard01_3.service \
&& systemctl start shard01_3.service && systemctl status shard01_3.service
[Unit]
Description=MongoDB Database Server
Documentation=https://docs.mongodb.org/manual
After=network.target

[Service]
User=mongodb
Group=mongodb
ExecStart=/usr/local/mongodb/bin/mongod --config /usr/local/mongodb/etc3/shard_replset_01.yaml
PermissionsStartOnly=true
Type=simple
Restart=always
LimitFSIZE=infinity
LimitCPU=infinity
LimitAS=infinity
LimitNOFILE=64000
LimitNPROC=64000
LimitMEMLOCK=infinity
# total threads (user+kernel)
TasksMax=infinity
TasksAccounting=false

[Install]
WantedBy=multi-user.target
EOF
# -------------------
# host-01、host-02、host-03 【节点03分片02】
cat</lib/systemd/system/shard02_3.service \
&& systemctl daemon-reload && systemctl enable shard02_3.service \
&& systemctl start shard02_3.service && systemctl status shard02_3.service
[Unit]
Description=MongoDB Database Server
Documentation=https://docs.mongodb.org/manual
After=network.target

[Service]
User=mongodb
Group=mongodb
ExecStart=/usr/local/mongodb/bin/mongod --config /usr/local/mongodb/etc3/shard_replset_02.yaml
PermissionsStartOnly=true
Type=simple
Restart=always
LimitFSIZE=infinity
LimitCPU=infinity
LimitAS=infinity
LimitNOFILE=64000
LimitNPROC=64000
LimitMEMLOCK=infinity
# total threads (user+kernel)
TasksMax=infinity
TasksAccounting=false

[Install]
WantedBy=multi-user.target
EOF
# -------------------
# host-01、host-02、host-03 【节点03分片03】
cat</lib/systemd/system/shard03_3.service \
&& systemctl daemon-reload && systemctl enable shard03_3.service \
&& systemctl start shard03_3.service && systemctl status shard03_3.service
[Unit]
Description=MongoDB Database Server
Documentation=https://docs.mongodb.org/manual
After=network.target

[Service]
User=mongodb
Group=mongodb
ExecStart=/usr/local/mongodb/bin/mongod --config /usr/local/mongodb/etc3/shard_replset_03.yaml
PermissionsStartOnly=true
Type=simple
Restart=always
LimitFSIZE=infinity
LimitCPU=infinity
LimitAS=infinity
LimitNOFILE=64000
LimitNPROC=64000
LimitMEMLOCK=infinity
# total threads (user+kernel)
TasksMax=infinity
TasksAccounting=false

[Install]
WantedBy=multi-user.target
EOF
# -------------------
# 查看是否文件有遗漏
ll /lib/systemd/system/ | grep shard
2.8、初始化分片副本集 [注意IP/端口的顺序,是为了节点错开分布,容灾效果最大化]
# 首次请使用127.0.0.1连接,初始化集群并创建管理员账号
mongo --host=127.0.0.1 --port=27018
# 主机节点host-01上初始化"shard_replset_01"副本集
mongo --host=10.20.1.101 --port=27018
# 初始化分片副本集 【IP/端口正序排列】
rs.initiate(
  {
    _id : "shard_replset_01",
    members: [
      { _id : 1, host : "127.0.0.1:27018",priority : 2  },
      { _id : 2, host : "127.0.0.1:28018",priority : 1  },
      { _id : 3, host : "127.0.0.1:29018",priority : 0  }
    ]
  }
)
# 查看分片副本集状态,确认当前连接节点为“PRIMARY”节点
rs.status()
# 在“PRIMARY”节点创建root管理员;
use admin
admin = db.getSiblingDB("admin")
admin.createUser(
  {
    user: "root",
    pwd: "pwd123456",
    roles: [ { role: "root", db: "admin" } ]
  }
)
-------------
# 主机节点host-02上初始化"shard_replset_02"副本集,127.0.0.1连接,初始化集群并创建管理员账号
mongo --host=127.0.0.1 --port=28028
# 主机节点host-02上初始化"shard_replset_02"副本集
mongo --host=10.20.1.102 --port=27028
# 初始化分片副本集【IP/端口正序排列】
rs.initiate(
  {
    _id : "shard_replset_02",
    members: [
      { _id : 1, host : "127.0.0.1:29028",priority : 2  },
      { _id : 2, host : "127.0.0.1:27028",priority : 1  },
      { _id : 3, host : "127.0.0.1:28028",priority : 0  }
    ]
  }
)
# 查看分片副本集状态,确认当前连接节点为“PRIMARY”节点(***注:需反复多次quit()重新连接,才能找到“PRIMARY”节点)
rs.status()
# 在“PRIMARY”节点创建root管理员;
use admin
admin = db.getSiblingDB("admin")
admin.createUser(
  {
    user: "root",
    pwd: "pwd123456",
    roles: [ { role: "root", db: "admin" } ]
  }
)
-----------
# 主机节点host-02上初始化"shard_replset_02"副本集,127.0.0.1连接,初始化集群并创建管理员账号
mongo --host=127.0.0.1 --port=29038
# 主机节点host-02上初始化"shard_replset_02"副本集
mongo --host=10.20.1.103 --port=27038
# 初始化分片副本集
rs.initiate(
  {
    _id : "shard_replset_03",
    members: [
      { _id : 1, host : "127.0.0.1:29038",priority : 2  },
      { _id : 2, host : "127.0.0.1:28038",priority : 1  },
      { _id : 3, host : "127.0.0.1:27038",priority : 0  }
    ]
  }
)
# 查看分片副本集状态,确认当前连接节点为“PRIMARY”节点
rs.status()
# 在“PRIMARY”节点创建root管理员;
use admin
admin = db.getSiblingDB("admin")
admin.createUser(
  {
    user: "root",
    pwd: "pwd123456",
    roles: [ { role: "root", db: "admin" } ]
  }
)
------------------

# 登录各shard_replset节点(9个节点),查看副本集状态;
mongo --host=127.0.0.1 --port=27018
db.getSiblingDB("admin").auth("root", passwordPrompt())
rs.status()
# 查看用户的权限 [-------->>>>>>>>>可忽略]
db.getUser("root")
# 给用户授权
db.grantRolesToUser(
  "SuperAdmin",
  [{role:"readWrite",db:"reporting"}]
)
2.9、部署mongos组件
mongos 直接使用密钥启动即可,登录mongos后,使用configserver的用户密码认证;
# 各主机节点,创建mongos配置文件
#####	节点01	#######
cat</usr/local/mongodb/etc/mongos.yaml
sharding:
  configDB: configserver/127.0.0.1:27019,127.0.0.1:28019,127.0.0.1:29019
net:
  bindIp: 0.0.0.0
  port: 27017
processManagement:
  fork: false
  pidFilePath: "/data/mongodb/cluster/mongos/mongos.pid"
systemLog:
  destination: file
  path: "/data/mongodb/cluster/mongos/logs/mongos.log"
  logAppend: true
security:
   keyFile: "/usr/local/mongodb/keyfile/secret.key"
   clusterAuthMode: keyFile
EOF
# -------------------

#####	节点02	#######
cat</usr/local/mongodb/etc2/mongos.yaml
sharding:
  configDB: configserver/127.0.0.1:27019,127.0.0.1:28019,127.0.0.1:29019
net:
  bindIp: 0.0.0.0
  port: 28017
processManagement:
  fork: false
  pidFilePath: "/data/mongodb/cluster2/mongos/mongos.pid"
systemLog:
  destination: file
  path: "/data/mongodb/cluster2/mongos/logs/mongos.log"
  logAppend: true
security:
   keyFile: "/usr/local/mongodb/keyfile/secret2.key"
   clusterAuthMode: keyFile
EOF
# -------------------

#####	节点03	#######
cat</usr/local/mongodb/etc3/mongos.yaml
sharding:
  configDB: configserver/127.0.0.1:27019,127.0.0.1:28019,127.0.0.1:29019
net:
  bindIp: 0.0.0.0
  port: 29017
processManagement:
  fork: false
  pidFilePath: "/data/mongodb/cluster3/mongos/mongos.pid"
systemLog:
  destination: file
  path: "/data/mongodb/cluster3/mongos/logs/mongos.log"
  logAppend: true
security:
   keyFile: "/usr/local/mongodb/keyfile/secret3.key"
   clusterAuthMode: keyFile
EOF
# -------------------

# 授权
chown -R mongodb:mongodb /usr/local/mongodb/
2.10、创建mongos启动脚本
# 各主机节点,创建mongos配置文件
####### 节点01  ########
cat</lib/systemd/system/mongos.service \
&& systemctl daemon-reload && systemctl enable mongos.service \
&& systemctl start mongos.service && systemctl status mongos.service
[Unit]
Description=mongos Database Server
Documentation=https://docs.mongodb.org/manual
After=network.target

[Service]
User=mongodb
Group=mongodb
ExecStart=/usr/local/mongodb/bin/mongos --config /usr/local/mongodb/etc/mongos.yaml
PermissionsStartOnly=true
Type=simple
Restart=always
LimitFSIZE=infinity
LimitCPU=infinity
LimitAS=infinity
LimitNOFILE=64000
LimitNPROC=64000
LimitMEMLOCK=infinity
# total threads (user+kernel)
TasksMax=infinity
TasksAccounting=false

[Install]
WantedBy=multi-user.target
EOF
# -------------------

####### 节点02  ########
cat</lib/systemd/system/mongos2.service \
&& systemctl daemon-reload && systemctl enable mongos2.service \
&& systemctl start mongos2.service && systemctl status mongos2.service
[Unit]
Description=mongos Database Server
Documentation=https://docs.mongodb.org/manual
After=network.target

[Service]
User=mongodb
Group=mongodb
ExecStart=/usr/local/mongodb/bin/mongos --config /usr/local/mongodb/etc2/mongos.yaml
PermissionsStartOnly=true
Type=simple
Restart=always
LimitFSIZE=infinity
LimitCPU=infinity
LimitAS=infinity
LimitNOFILE=64000
LimitNPROC=64000
LimitMEMLOCK=infinity
# total threads (user+kernel)
TasksMax=infinity
TasksAccounting=false

[Install]
WantedBy=multi-user.target
EOF
# -------------------

####### 节点03  ########
cat</lib/systemd/system/mongos3.service \
&& systemctl daemon-reload && systemctl enable mongos3.service \
&& systemctl start mongos3.service && systemctl status mongos3.service
[Unit]
Description=mongos Database Server
Documentation=https://docs.mongodb.org/manual
After=network.target

[Service]
User=mongodb
Group=mongodb
ExecStart=/usr/local/mongodb/bin/mongos --config /usr/local/mongodb/etc3/mongos.yaml
PermissionsStartOnly=true
Type=simple
Restart=always
LimitFSIZE=infinity
LimitCPU=infinity
LimitAS=infinity
LimitNOFILE=64000
LimitNPROC=64000
LimitMEMLOCK=infinity
# total threads (user+kernel)
TasksMax=infinity
TasksAccounting=false

[Install]
WantedBy=multi-user.target
EOF
# -------------------

# 查看文件是否创建成功
ll /lib/systemd/system | grep mongos
2.11、修改配置组件和分片副本集IP绑定 [***此步骤可忽略]
因为没有使用单独步骤创建管理账户,所以组件启动时绑定了0.0.0.0,这样可以让我们通过127.0.0.1登录组件,从而可以创建管理员账号和初始化分片副本集集群;
由于绑定到0.0.0.0安全方面的考虑,还是尽量缩小绑定范围;
# host-01上修改所有组件的绑定IP
sed -i "s#bindIp: 0.0.0.0#bindIp: 10.20.1.101#g" configserver.yaml shard_replset_{01,02,03}.yaml mongos.yaml \
&& systemctl restart configsevr.service shard01.service shard02.service shard03.service mongos.service \
&& systemctl status configsevr.service shard01.service shard02.service shard03.service mongos.service

# host-02上修改所有组件的绑定IP
sed -i "s#bindIp: 0.0.0.0#bindIp: 10.20.1.102#g" configserver.yaml shard_replset_{01,02,03}.yaml mongos.yaml \
&& systemctl restart configsevr.service shard01.service shard02.service shard03.service mongos.service \
&& systemctl status configsevr.service shard01.service shard02.service shard03.service mongos.service

# host-03上修改所有组件的绑定IP
sed -i "s#bindIp: 0.0.0.0#bindIp: 10.20.1.103#g" configserver.yaml shard_replset_{01,02,03}.yaml mongos.yaml \
&& systemctl restart configsevr.service shard01.service shard02.service shard03.service mongos.service \
&& systemctl status configsevr.service shard01.service shard02.service shard03.service mongos.service


#################	单机多端口	######################
# host-01上修改所有组件的绑定IP
sed -i "s#bindIp: 0.0.0.0#bindIp: 127.0.0.1#g" configserver.yaml shard_replset_{01,02,03}.yaml mongos.yaml \
&& systemctl restart configsevr.service shard01.service shard02.service shard03.service mongos.service \
&& systemctl status configsevr.service shard01.service shard02.service shard03.service mongos.service

# host-02上修改所有组件的绑定IP
sed -i "s#bindIp: 0.0.0.0#bindIp: 127.0.0.1#g" configserver.yaml shard_replset_{01,02,03}.yaml mongos.yaml \
&& systemctl restart configsevr2.service shard01_2.service shard02_2.service shard03_2.service mongos_2.service \
&& systemctl status configsevr2.service shard01_2.service shard02_2.service shard03_2.service mongos2.service

# host-03上修改所有组件的绑定IP
sed -i "s#bindIp: 0.0.0.0#bindIp: 127.0.0.1#g" configserver.yaml shard_replset_{01,02,03}.yaml mongos.yaml \
&& systemctl restart configsevr3.service shard01_3.service shard02_3.service shard03_3.service mongos_3.service \
&& systemctl status configsevr3.service shard01_3.service shard02_3.service shard03_3.service mongos_3.service
2.12、mongos添加分片副本集路由
负载路由
mongos的账号认证信息,使用configserver的管理员账号密码,以后创建的数据库账号密码均存储在configserver上;
因更新过config节点,故先重启mongos服务,防止mongos登录失败
***注意:
1) mongoShell 每个session只能密码登录一次,若需切换用户,必须quit后重新登录; 如:错误信息为“too many users are authenticated”时,则表示一个session反复多次切换用户,只需重新登录即可
2) 操作时,务必在密码登录后,先切换到需操作的数据库(use dbName)
3) mongo操作失败时,可尝试重启mongos服务(若涉及配置修改,则需先重启config节点,再重启mongos服务)
4) 操作出错时(尤其是分片操作),首先检查命令是否写错,其次检查服务是否仍存活(分片节点,config节点,mongos节点;可查看进程,如:ps -ef | grep shard0)
# 登录任意mongos 【***注:防止mongos登录失败,重启mongos服务】
systemctl restart mongos.service mongos2.service mongos3.service
mongo --host=127.0.0.1
db.getSiblingDB("admin").auth("root", passwordPrompt())	// 回车输入密码
use admin
db.runCommand({addshard:"shard_replset_01/127.0.0.1:27018,127.0.0.1:28018,127.0.0.1:29018"})
db.runCommand({addshard:"shard_replset_02/127.0.0.1:27028,127.0.0.1:28028,127.0.0.1:29028"})
db.runCommand({addshard:"shard_replset_03/127.0.0.1:27038,127.0.0.1:28038,127.0.0.1:29038"})

# 添加分片后查看分片 [下列两行命令都可查看]
sh.status()
db.adminCommand({ listShards: 1 })
2.12、创建测试数据库和管理账号
# 登录任意mongos
mongo --host=127.0.0.1
db.getSiblingDB("admin").auth("root", passwordPrompt())
# 切换数据库,不存在自动创建
use testdb
# 创建管理账户
use testdb
db.createUser(
  {
    user: "testadmin",
    pwd: passwordPrompt(),
    roles: [ { "role" : "readWrite", "db" : "testdb" },{ role: "dbAdmin", db: "testdb" } ]
  }
)

# 账号信息
mongodb:127.0.0.1:27017,127.0.0.1:28017,127.0.0.1:29017
databases:testdb
user:testadmin
pass:pwd123456
2.13、数据库启用分片
# 登录任意mongos
mongo --host=127.0.0.1
db.getSiblingDB("admin").auth("root", passwordPrompt())
# 设置数据库分片
use admin
db.runCommand( { enablesharding : "testdb" } )
# 使用区间本片键方式,其他哈希、标签方式根据需求配置
db.runCommand( { shardcollection : "testdb.users",key : {id: 1} } )

# 或使用以下数据库分片
use admin
sh.enableSharding("mytest")
# 使用区间本片键方式,其他哈希、标签方式根据需求配置
sh.shardCollection("mytest.student", { _id : 1 } )
2.14、插入数据测试分片副本集集群
##**** 注:机器配置不够,可适当降低写入的数据量(笔者开始用1核2GB,写入200w数据失败) ****##
# 登录任意mongos [默认使用27017端口,可指定端口:--port=29017]
mongo --host=127.0.0.1
db.getSiblingDB("testdb").auth("testadmin", passwordPrompt())
# 测试插入数据2
use testdb
var arr=[];
for(var i=0;i<2000000;i++){
var uid = i;
var name = "mongodb"+i;
arr.push({"id":uid,"name":name});
}
db.users.insertMany(arr)

# 测试插入数据2
use testdb
for(var i=1;i<=2000000;i++){
	db.users.insert({age:i,name:"mary",addr:"guangzhou",country:"China"})
}

# 写入数据后,查看数据库状态;
db.users.stats()

# 查看分片状态,切换到root用户,testadmin没有查看分片的权限;
db.getSiblingDB("admin").auth("root", passwordPrompt())
sh.status()
testdb.users
chunks:
  shard_replset_01	2root
  shard_replset_02	2
  shard_replset_03	3
{ "id" : { "$minKey" : 1 } } -->> { "id" : 1 } on : shard_replset_02 Timestamp(3, 0)
{ "id" : 1 } -->> { "id" : 500001 } on : shard_replset_01 Timestamp(4, 0)
{ "id" : 500001 } -->> { "id" : 750002 } on : shard_replset_01 Timestamp(5, 0)
{ "id" : 750002 } -->> { "id" : 1000003 } on : shard_replset_03 Timestamp(7, 1)
{ "id" : 1000003 } -->> { "id" : 1250003 } on : shard_replset_03 Timestamp(6, 1)
{ "id" : 1250003 } -->> { "id" : 1627703 } on : shard_replset_03 Timestamp(6, 2)
{ "id" : 1627703 } -->> { "id" : { "$maxKey" : 1 } } on : shard_replset_02 Timestamp(7, 0)
2.15、分片+副本集启动成功示例
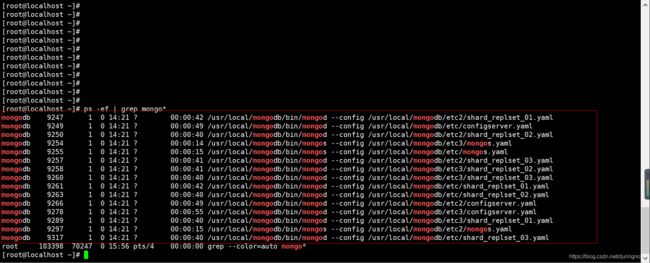
图片说明:
	1) ps -ef |grep mongo*  // 查询mongodb相关服务进程
	2) 共15个服务:
		mongos*3,shard*3*3,config*3,
		config配置节点,shard分片节点+副本集节点,mongos为连接服务