shell编程中常用的语句if,case语句,expect用法,脚本语句控制器break,continue的区别
一,if语句
1,格式一:比较常用的格式(elif-then数量可以加)
if
then
elif
then
else
fi
格式二:也会用到
if
then
fi
2,shell编程
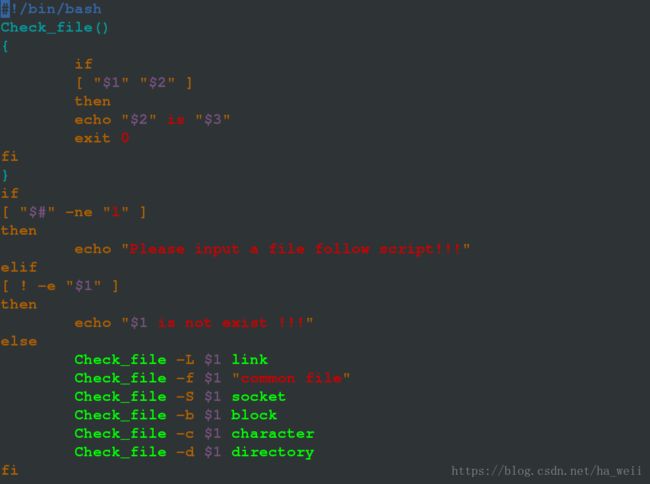
示例:判断文件是否存在,如果存在判断类型
#### “common file”是一个整体,如果不加引号,那么会误以为这是两个参数!!!
####[ ! -e "$1" ]是不等于,-e前面加上!和空格
#### -eq是判断纯数字是否相等
#### =是判断字符是否相等
注意:1,if语句里面调用了函数,这个函数执行完了要写上exit退出脚本,防止继续向下执行
2,要保证if语句的完整性,函数里面有if必须要写上fi,否则会报错
check_file.sh: line 9: syntax error near unexpected token `}'
check_file.sh: line 9: `}'
测试
[root@localhost mnt]# sh check_file.sh
Please input a file follow script!!!
[root@localhost mnt]# sh check_file.sh /mnt/
/mnt/ is directory
[root@localhost mnt]# sh check_file.sh /etc/passwd
/etc/passwd is common file
[root@localhost mnt]# sh check_file.sh /etc/system-release
/etc/system-release is link
[root@localhost mnt]# sh check_file.sh /dev/vdb1
/dev/vdb1 is not exist !!!
[root@localhost mnt]# sh check_file.sh /dev/vda1
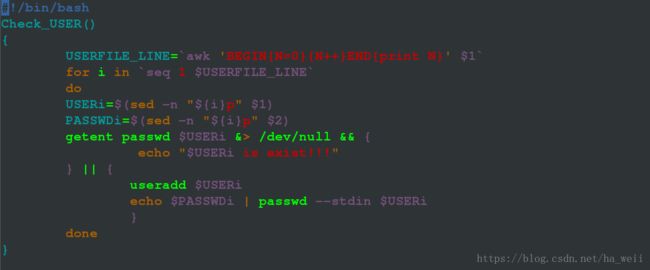
/dev/vda1 is block示例:用给定的userfile和passwdfile创建用户,如果文件数量不对报错,如果文件不存在报错,文件行数差异报错,用户存在显示用户存在,但是不改变此用户密码,当用户不存在时建立用户并设定相应密码
#!/bin/bash
Check_USER()                 检查用户是否存在,创建用户的函数
{
        USERFILE_LINE=`awk 'BEGIN{N=0}{N++}END{print N}' $1`   查看有多少个用户
        for i in `seq 1 $USERFILE_LINE`
        do
        USERi=$(sed -n "${i}p" $1)   第i个用户
        PASSWDi=$(sed -n "${i}p" $2)  对应第i个密码
        getent passwd $USERi &> /dev/null && {      getent passwd是查看/etc/passwd有没有第i个用户的信息并把结果放在垃圾箱
                 echo "$USERi is exist!!!"  如果存在,打印用户存在
        } || {                               如果不存在,建立用户
                useradd $USERi
                echo $PASSWDi | passwd --stdin $USERi
                }
        done
}

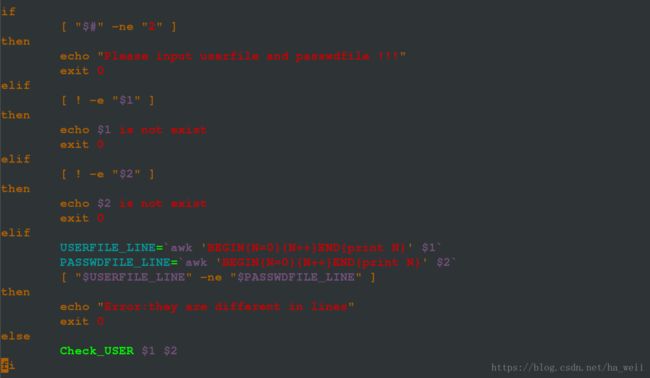
if
        [ "$#" -ne "2" ]         判断文件数量是否正确
then
        echo "Please input userfile and passwdfile !!!"
        exit 0
elif
        [ ! -e "$1" ]           判断第一个文件是否存在
then
        echo $1 is not exist
        exit 0
elif
        [ ! -e "$2" ]            判断第二个文件是否存在
then
        echo $2 is not exist
        exit 0
elif
        USERFILE_LINE=`awk 'BEGIN{N=0}{N++}END{print N}' $1`    ####虽然这里是条件的判断,但是这里还是可以做一些简单的变量定义
        PASSWDFILE_LINE=`awk 'BEGIN{N=0}{N++}END{print N}' $2`
        [ "$USERFILE_LINE" -ne "$PASSWDFILE_LINE" ]           awk打印行数,判断两个文件的行数是否相等
then
        echo "Error:they are different in lines"
        exit 0
else
        Check_USER $1 $2     直接调用函数
fi
测试
[root@localhost scripts]# cat userfile
user1
user2
user3
[root@localhost scripts]# cat passwdfile
user11
user22
user33
[root@localhost scripts]# sh user_create.sh    测试脚本后面所跟数量
Please input userfile and passwdfile !!!
[root@localhost scripts]# sh user_create.sh userfile
Please input userfile and passwdfile !!!
[root@localhost scripts]# sh user_create.sh userfile pass  测试文件是否存在
pass is not exist
[root@localhost scripts]# sh user_create.sh user
Please input userfile and passwdfile !!!
[root@localhost scripts]# sh user_create.sh userfile passwdfile  建立用户
Changing password for user user1.
passwd: all authentication tokens updated successfully.
Changing password for user user2.
passwd: all authentication tokens updated successfully.
Changing password for user user3.
passwd: all authentication tokens updated successfully.
[root@localhost scripts]# id user1      查看用户
uid=1001(user1) gid=1001(user1) groups=1001(user1)
[root@localhost scripts]# id user2
uid=1002(user2) gid=1002(user2) groups=1002(user2)
[root@localhost scripts]# id user3
uid=1003(user3) gid=1003(user3) groups=1003(user3)
[root@localhost scripts]# vim userfile
[root@localhost scripts]# cat userfile
user2
user3
[root@localhost scripts]# userdel -r user1
[root@localhost scripts]# userdel -r user2
[root@localhost scripts]# userdel -r user3
[root@localhost scripts]# sh user_create.sh userfile passwdfile   测试文件的行数不一样
Error:they are different in lines
[root@localhost scripts]# vim userfile
[root@localhost scripts]# sh user_create.sh userfile passwdfile
Changing password for user user1.
passwd: all authentication tokens updated successfully.
Changing password for user user2.
passwd: all authentication tokens updated successfully.
Changing password for user user3.
passwd: all authentication tokens updated successfully.
[root@localhost scripts]# sh user_create.sh userfile passwdfile   测试用户存在时打印用户存在
user1 is exist!!!
user2 is exist!!!
user3 is exist!!!
成功!!!
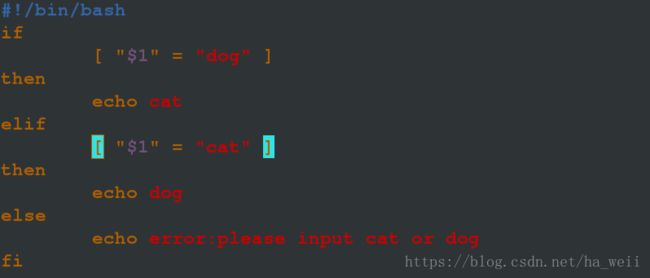
示例:脚本后面跟cat,输出dog,脚本后面跟dog,输出cat,其他报错
测试:
[root@localhost mnt]# sh dogcat.sh
error:please input cat or dog
[root@localhost mnt]# sh dogcat.sh haha
error:please input cat or dog
[root@localhost mnt]# sh dogcat.sh dog
cat
[root@localhost mnt]# sh dogcat.sh cat
dog
[root@localhost mnt]# sh -x dogcat.sh       这里要判断两次,虽然成功了,但是效率很低
+ '[' '' = dog ']'
+ '[' '' = cat ']'
+ echo error:please input cat or dog
error:please input cat or dog
[root@localhost mnt]# sh -x dogcat.sh cat   这里要判断两次,虽然成功了,但是效率很低
+ '[' cat = dog ']'
+ '[' cat = cat ']'
+ echo dog
dog
[root@localhost mnt]# sh -x dogcat.sh dog   这里只判断了一次
+ '[' dog = dog ']'
+ echo cat
cat
二,case语句
1,格式
case
word1 )
action1
;;
word2)
action2
;;
........
*)
action_last
esac
2,shell编程
示例:脚本后面跟cat,输出dog,脚本后面跟dog,输出cat,其他报错
不用if语句,用case语句
*是匹配所有,也就是除了dog,cat之外的其他情况
测试:
[root@localhost mnt]# sh catdog.sh
error:please input cat or dog
[root@localhost mnt]# sh catdog.sh haha
error:please input cat or dog
[root@localhost mnt]# sh catdog.sh cat
dog
[root@localhost mnt]# sh catdog.sh dog
cat
[root@localhost mnt]# sh -x catdog.sh       在if语句中要判断两次,case只需要匹配一次,提高了效率
+ case $1 in
+ echo 'error:please input cat or dog'
error:please input cat or dog
[root@localhost mnt]# sh -x catdog.sh haha  在if语言中要判断两次,case只需要匹配一次,提高了效率
+ case $1 in
+ echo 'error:please input cat or dog'
error:please input cat or dog
[root@localhost mnt]# sh -x catdog.sh cat
+ case $1 in
+ echo dog
dog
[root@localhost mnt]# sh -x catdog.sh dog
+ case $1 in
+ echo cat
cat注意:case和if语句都可以用来做条件判断,但是一般来说,case用来做简单的字符,数字匹配判断,而if语言通常做条件判断,强调条件!!!
三,EOF标准输入重定向
1,格式
commend <
answer
EOF ####注意:这里不一定必须是EOF,其他的也可以,但是开始和结尾必须一样,特别注意有时候前面会有tab键导致格式不一样,颜色一样就没问题了。
2,shell编程
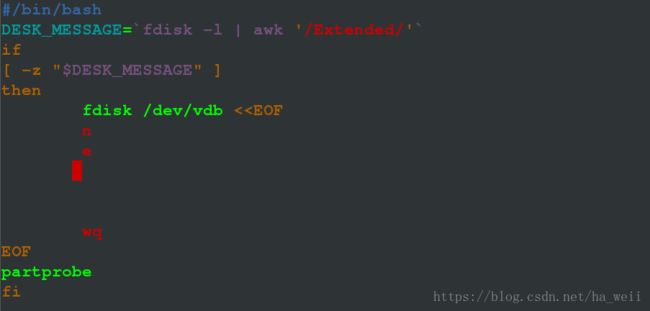
示例:已知磁盘有第三主分区,建立自动应答脚本删除磁盘的第三个主分区,并同步分区表
这个应答过程是按照执行fdisk /dev/vdb之后的过程写的,d 3 wq 都是在执行这条命令之后,我们和系统的交互应答,partprobe是在执行fdisk /dev/vdb交互应答之后的才执行的,所以要放在EOF外面
测试:
[root@localhost mnt]# fdisk -l /dev/vdb

Disk /dev/vdb: 10.7 GB, 10737418240 bytes, 20971520 sectors
Units = sectors of 1 * 512 = 512 bytes
Sector size (logical/physical): 512 bytes / 512 bytes
I/O size (minimum/optimal): 512 bytes / 512 bytes
Disk label type: dos
Disk identifier: 0x2b9adf21

   Device Boot      Start         End      Blocks   Id  System
/dev/vdb1            2048      206847      102400   83  Linux
/dev/vdb2          206848      411647      102400   83  Linux
/dev/vdb3          411648      616447      102400   83  Linux        ####原来有第三个分区
[root@localhost mnt]# sh del_disk.sh                                 ####执行脚本
Welcome to fdisk (util-linux 2.23.2).

Changes will remain in memory only, until you decide to write them.
Be careful before using the write command.


Command (m for help): Partition number (1-3, default 3): Partition 3 is deleted

Command (m for help): The partition table has been altered!

Calling ioctl() to re-read partition table.
Syncing disks.
Warning: Unable to open /dev/sr0 read-write (Read-only file system).  /dev/sr0 has been opened read-only.
Warning: Unable to open /dev/sr0 read-write (Read-only file system).  /dev/sr0 has been opened read-only.
Warning: Unable to open /dev/sr0 read-write (Read-only file system).  /dev/sr0 has been opened read-only.
[root@localhost mnt]# fdisk -l /dev/vdb

Disk /dev/vdb: 10.7 GB, 10737418240 bytes, 20971520 sectors
Units = sectors of 1 * 512 = 512 bytes
Sector size (logical/physical): 512 bytes / 512 bytes
I/O size (minimum/optimal): 512 bytes / 512 bytes
Disk label type: dos
Disk identifier: 0x2b9adf21

   Device Boot      Start         End      Blocks   Id  System
/dev/vdb1            2048      206847      102400   83  Linux
/dev/vdb2          206848      411647      102400   83  Linux        ####第三个分区被删除
示例:如果不存在扩展分区,建立扩展分区
注意:1,这里用到了if-then-fi语句,并不一定要求出现elif
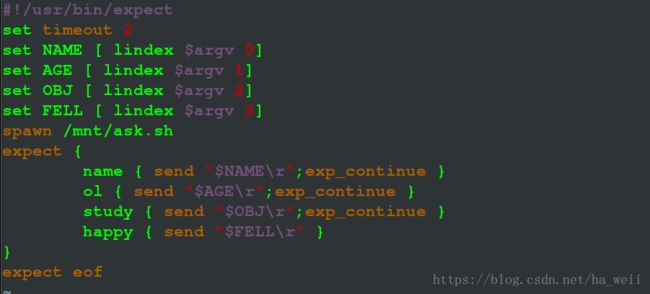
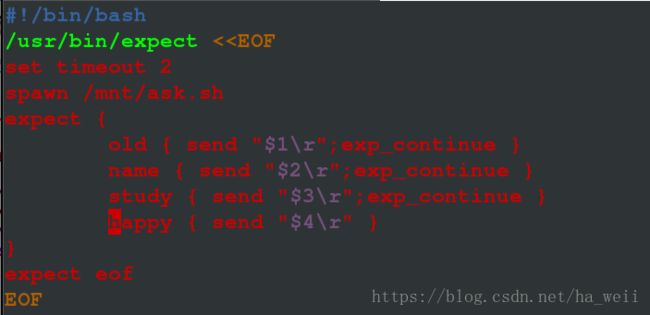
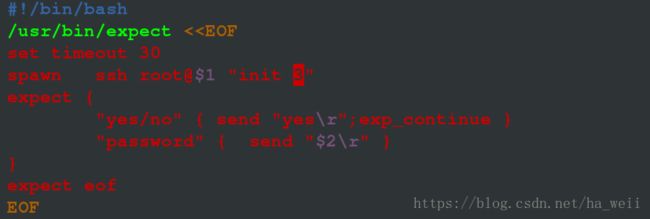
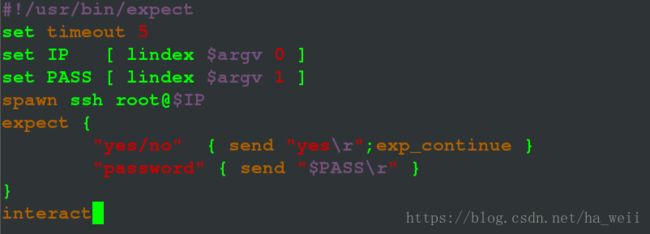
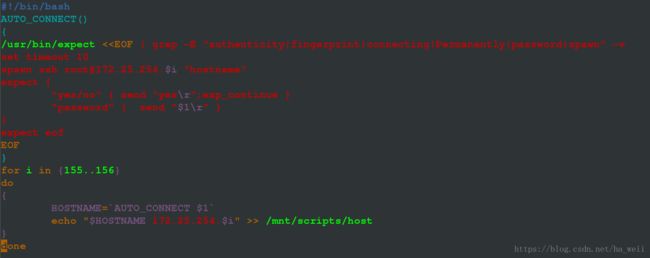
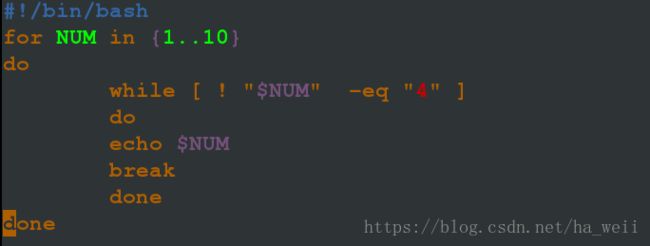
2,< 3,DESK_MESSAGE是awk查看有没有扩展分区 测试 1,概述 expect 是自动应答命令,用于交互式命令的自动执行 注意:1,使用expect时要下载工具yum install expect.x86_64 2,expect不是脚本,不能使用脚本的那些命令 3,使用expect的文件后缀为.exp,幻数为#!/usr/bin/expect ,用expect而不是sh调用 4,如果.exp文件里面调用了.sh脚本,注意给脚本可执行权限 5,expect { } 里面的关键字只要不重复九行,但是顺序不能变,因为每一个关键字对应一个答案,每一个答案对应一个问题。 2,shell编程 示例;建立ask.sh问题脚本,answer.exp自动应答,答案已知 测试: 示例:示例;建立ask.sh问题脚本,answer.exp自动应答,答案跟在.exp后面 注意:1,调用的脚本要加上可执行权限!!! 2,set NAME [ lindex $argv 0] 表示把.exp之后的第一个参数给NAME这个值,set AGE [ lindex $argv 1] 表示把.exp之后的第二个参数给AGE这个值 3,name { send "$NAME\r";exp_continue } 这里$NAME是调用NAME这个参数的值,与脚本里面用法类似,表示把NAME这个值作为答案给关键字是name的这个问题 测试: 示例:在上一个问题的基础上,把.exp文件改为.sh文件,并且可以执行(用EOF导入) 修改幻数 > EOF标准输入重定向 > 修改后缀 > 删除expect变量 > 修改变量 测试: 示例:写一个auto_connect.sh,要求脚本后面跟ip 和 密码,登陆该主机 注意:1,这两个关键字中“yes/no”是当我们第一次连接别的主机时,~/.ssh/known_hosts没有记录信息,所以会询问,这个一定要写上,我们第二次连接时,虽然不用输入yes,写上不影响第二次连接的使用 2,set timeout 30 是延长等待时间,如果不写这个,连接时间如果稍长,就会误以为失败。 3,init 3是为了进入文本编辑模式,因为这个脚本无论是expect eof 还是interect执行脚本之后,都无法在连接的主机上面执行命令,会卡住,Iinit 3只是为了证明登陆成功,也可以输入hostname,显示值。 测试: 拓展: 注意:1,这个文件以.exp结尾,不是脚本,但是如果是interact模式,那么登陆上可以执行命令,expect eof模式下则会卡住 2,注意以expect调用 测试 示例:写一个脚本,导出指定主机的域名和ip(已知密码,主机ssh都可访问) 注意:1,做过滤时在< 2,在linux系统中,文字换行默认加\n 在windows中,文字换行默认加\n\r 在unix系统中,文字换行默认加\r 由于grep是unix中的命令,所以会加\r,用sh -x auto_connect.sh redha 可以看见每行后面都加了\r 测试: 注意:这里虽然采集到了,看起来只有ip,没有域名,但是vim查看 需要进行后期全局替换处理,ctrl+v ctrl+m =^M !!!直接在脚本中修改,写入全局替换 再次测试: 五,脚本语句控制器continue,break的区别 exit n 脚本退出,退出值为 n,其中0是正常结束退出,其他都是非正常结束退出 示例:打印0-10中除去4的数字 ###注意:1,不等于的!的位置在最前面!!! 2,当NUM不等于4时,[ ]条件为真,开始执行循环体里面的内容do-done,即打印$NUM,然后break退出本次循环。 3,当NUM等于4时,[ ]条件为假,不做循环体里面的内容 4,如果把break换成continue,那么只会不停的输出1.因为当NUM=1时,条件为真,开始执行循环体里面的内容,即打印NUM的值1,然后continue提前结束循环,不再看continue之后的所有语句,直接进入下一个循环,NUM还是为1,所以会一直循环[root@localhost mnt]# fdisk /dev/vdb
Device Boot Start End Blocks Id System
/dev/vdb1 2048 206847 102400 83 Linux
/dev/vdb2 206848 411647 102400 83 Linux ###没有扩展分区
[root@localhost mnt]# sh create_disk.sh ###执行脚本
Welcome to fdisk (util-linux 2.23.2).
Changes will remain in memory only, until you decide to write them.
Be careful before using the write command.
Command (m for help): Partition type:
p primary (2 primary, 0 extended, 2 free)
e extended
Select (default p): Partition number (3,4, default 3): First sector (411648-20971519, default 411648): Using default value 411648
Last sector, +sectors or +size{K,M,G} (411648-20971519, default 20971519): Using default value 20971519
Partition 3 of type Extended and of size 9.8 GiB is set
Command (m for help): The partition table has been altered!
Calling ioctl() to re-read partition table.
Syncing disks.
Warning: Unable to open /dev/sr0 read-write (Read-only file system). /dev/sr0 has been opened read-only.
Warning: Unable to open /dev/sr0 read-write (Read-only file system). /dev/sr0 has been opened read-only.
Warning: Unable to open /dev/sr0 read-write (Read-only file system). /dev/sr0 has been opened read-only.
[root@localhost mnt]# fdisk /dev/vdb ####出现扩展分区
Device Boot Start End Blocks Id System
/dev/vdb1 2048 206847 102400 83 Linux
/dev/vdb2 206848 411647 102400 83 Linux
/dev/vdb3 411648 20971519 10279936 5 Extended
成功!!!
[root@localhost mnt]# sh create_disk.sh           ####再次执行,扩展分区已经存在,没有执行结果
[root@localhost mnt]# sh  -x create_disk.sh
++ fdisk -l
++ awk /Extended/
+ DESK_MESSAGE='/dev/vdb3          411648    20971519    10279936    5  Extended'
+ '[' -z '/dev/vdb3          411648    20971519    10279936    5  Extended' ']'
四,expect的用法
spawn 是 expect 中的监控程序,运行后会监控命令提出的交互问题
send发送问题答案给交互命令
"\r"表示回车
exp_continue 表示当问题不存在时继续回答下面的问题
expect eof 表示问题回答完毕退出 expect 环境
interact 表示问题回答完毕留在交互界面 这个一般用在ssh连接里面,自动连接上了可以保持ssh的环境
set NAME [ lindex $argv n ] 定义变量 n从0开始,set NAME [ lindex $argv 0 ] 和脚本里面$1类似[root@localhost mnt]# sh ask.sh
What is your name: minz
How old are you: 6
Which obj do you study: linux
Are you happy ? : happy
minz is 6's years old and study linux feel happy
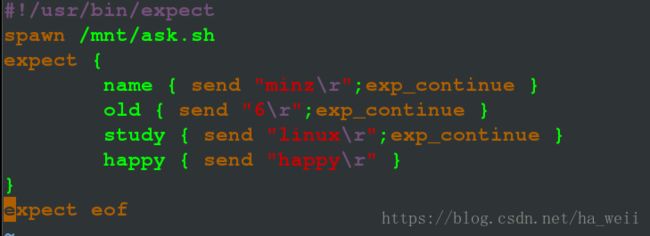
#!/usr/bin/expect                     注意幻数
#####这一行也可以设定等待时间如果执行错误,等待多长时间set timeout 2 等待2秒
spawn /mnt/ask.sh                     spawn是监控程序,监控/mnt/ask.sh执行之后的交互问题
expect {                              注意变量的定义方法
        name { send "minz\r";exp_continue }       name是关键字,就是第一个问题what is your name的一个关键字
换成其他的也行,只要不和下面的重复,minz就是这个问题的答案,\r就是敲回车,由于下面还有问题需要回答,所以执行exp_continue
        old { send "6\r";exp_continue }
        study { send "linux\r";exp_continue }
        happy { send "happy\r" }          happy是Are you happy? 问题的关键字,happy是问题的答案,由于问题到此结束,所以不用写exp_continue
}
expect eof     表示回答完毕问题,退出expect环境
成功!!!
[root@localhost mnt]# chmod +x /mnt/ask.sh   ###调用了脚本,所以要加上可执行权限
[root@localhost mnt]# expect answer.exp      ###注意是expect调用.exp文件
spawn /mnt/ask.sh
What is your name: minz
How old are you: 6
Which obj do you study: linux
Are you happy ? : happy
minz is 6's years old  and study linux feel happy ###自动应答生效
[root@localhost mnt]# expect answer.exp   不加任何参数
spawn /mnt/ask.sh
What is your name:
How old are you:
Which obj do you study:
Are you happy ? :
 is 's years old  and study  feel
[root@localhost mnt]# expect answer.exp haha 1 html sad   带上参数
spawn /mnt/ask.sh
What is your name: haha
How old are you: 1
Which obj do you study: html
Are you happy ? : sad
haha is 1's years old  and study html feel sad
成功!!!
[root@localhost mnt]# mv answer.exp answer.sh    修改后缀
[root@localhost mnt]# sh answer.sh   不带参数
spawn /mnt/ask.sh
What is your name:
How old are you:
Which obj do you study:
Are you happy ? :
 is 's years old  and study  feel
[root@localhost mnt]# sh answer.sh tom 2 java bad  带参数
spawn /mnt/ask.sh
What is your name: 2
How old are you: tom
Which obj do you study: java
Are you happy ? : bad
2 is tom's years old  and study java feel bad
[root@localhost scripts]# sh auto_connect.sh 172.25.254.156 redhat
spawn ssh [email protected]
[email protected]'s password:
Last login: Sun Jun 24 21:26:36 2018 from www.westos.com
[root@156 ~]#     ###此时执行命令会卡住
[root@localhost scripts]# expect auto_connect.exp 172.25.254.156 redhat
spawn ssh [email protected]
[email protected]'s password:
Last login: Sun Jun 24 21:38:59 2018 from www.westos.com
[root@156 ~]# ls        ###可以执行命令
anaconda-ks.cfg  Downloads                   gropu  Pictures  rht-ks-post.log  Templates
Desktop          file                        group  PM        rht-ks-pre.log   Videos
Documents        foundation-config-post.log  Music  Public    software
[root@example100 scripts]# sh -x auto_connect.sh redhat
+ for i in '{155..156}'
++ AUTO_CONNECT redhat
++ grep -E 'authenticity|fingerprint|connecting|Permanently|password|spawn' -v
++ /usr/bin/expect
+ HOSTNAME=$'155.example.com\r'      #####这里被加上了\r
 172.25.254.155'ple.com
+ for i in '{155..156}'
++ AUTO_CONNECT redhat
++ /usr/bin/expect
++ grep -E 'authenticity|fingerprint|connecting|Permanently|password|spawn' -v
+ HOSTNAME=$'156.example.com\r'      #####这里被加上了\r
 172.25.254.156'ple.com
[root@example100 scripts]# cat /mnt/scripts/host
 172.25.254.155
 172.25.254.156
![]()
成功!!!
[root@example100 scripts]# > /mnt/scripts/host
[root@example100 scripts]# sh auto_connect.sh redhat
[root@example100 scripts]# cat /mnt/scripts/host
155.example.com 172.25.254.155
156.example.com 172.25.254.156
break 退出当前循环,循环体中在break之后的内容不会执行,但是在循环语句之后的语句会执行
continue 提前结束当前循环,进入下一个循环,循环体中continue之后的内容不会执行,并且循环语句之后的语句也不会执行
