- MyBatis简单配置
T何必当初
Java后端框架mybatisjavamysql
1、在Maven的pom.xml中导入Mybatis和MySQL数据库驱动依赖org.mybatismybatis3.5.5mysqlmysql-connector-java5.1.382、在Maven项目中的resources下创建mybatis-config.xml配置文件-->3、在com.tyh.utils下创建MybatisUtils.java工具类packagecom.tyh.util
- Mmybatis xml 连接数据库的方法
墨香染城城
xml数据库
1.添加依赖(Maven项目)在pom.xml中添加MyBatis和数据库驱动的依赖(以MySQL为例):org.mybatismybatis3.5.13mysqlmysql-connector-java8.0.332.配置MyBatis核心文件在resources目录下创建mybatis-config.xml,配置数据库连接和全局设置:3.创建实体类定义与数据库表对应的实体类,例如User:pu
- Maven 插件
先睡
mavenjava
为Maven插件配置环境变量通常涉及到设置Java环境变量以及Maven相关的环境变量。以下是一些基本步骤:1.设置Java环境变量Maven需要Java运行环境,因此您需要确保Java的环境变量已经正确设置。-**JAVA_HOME**:指向您的Java安装目录。-**PATH**:包含`%JAVA_HOME%\bin`,使得`java`和`javac`命令可以在命令行中直接使用。在Window
- Maven的依赖管理
百香果果ccc
Mavenmaven数据库java
maven相关依赖的官网:https://mvnrepository.com/pom.xml是项目依赖的配置文件maven首先会去本地仓库下载相关依赖,如果没有,则会去私服下载,再没有,就去中央仓库或镜像下载。自定义properties,可使用${}将属性作为变量引入5.10.2org.junit.jupiterjunit-jupiter-api${junit.version}test依赖范围sc
- Maven继承和聚合特性
青山^
mavenjava
目录Maven继承关系1.继承概念父POM子模块2.继承机制3.示例4.继承作用背景需求5.注意事项Maven聚合关系1.定义与概念2.实现方式3.特性与优势4.示例5.注意事项Maven继承关系1.继承概念Maven继承是指在Maven的项目中,定义一个父POM(ProjectObjectModel),然后让其他Maven项目(称为子模块或子项目)继承这个父POM的配置,即让一个项目从另一个项目
- Maven 的核心包
旷野说
mavenjava
由于前端项目不是核心,阅读nexus-public源代码似乎绕远路了。nexus-oss社区版主要就是集成maven的上传包、认证、包解析、包存储这几个核心功能,前端实现重新可以使用新的现代前端工具来提高生产力。故重新疏理一下maven的核心机制,即要深入解析Maven的源代码,需要结合其核心设计思想、模块架构和实际运行机制。一、前置知识准备Maven基础熟悉pom.xml结构、生命周期(Life
- Maven的继承和聚合
百香果果ccc
Mavenmavenhivejava
Maven继承指的是,子项目继承父级Maven项目的配置信息(pom.xml)在父级pom.xml中,使用标签包裹的依赖,将会无条件传递给子级,与依赖范围无关com.alibabadruid1.2.8org.junit.jupiterjunit-jupiter-api5.10.2testjavax.servletjavax.servlet-api3.1.0provided在父级pom.xml中,使
- 代码构建-maven-排除某些大的依赖lib
勤则弊除
mavenjava
${project.artifactId}org.springframework.bootspring-boot-maven-plugin ZIP具体包名具体artifact名repackageorg.apache.maven.pluginsmaven-dependency-plugin 3.1.2copy-dependenciespackagecop
- java监听mq消息_Java ActiveMQ 讲解(二)Spring ActiveMQ整合+注解消息监听
清风明月人间
java监听mq消息
对于ActiveMQ消息的发送,原声的api操作繁琐,而且如果不进行二次封装,打开关闭会话以及各种创建操作也是够够的了。那么,Spring提供了一个很方便的去收发消息的框架,springjms。整合Spring后,代码不仅变得非常优雅,而且易用性和扩展性更好。废话不多说,直接开搞。1.maven依赖org.apache.xbeanxbean-spring3.16org.springframewor
- 用maven生成springboot多模块项目
tan_jianhui
软件开发springbootmavenjava
用Maven生成SpringBoot多模块项目,可以按照以下步骤操作:1.创建父项目首先,使用Maven的archetype插件创建一个空的Maven项目作为父项目。打开终端,执行以下命令:mvnarchetype:generate-DgroupId=com.example-DartifactId=springboot-multi-module-demo-DarchetypeArtifactId=
- Mybaties中配置C3P0连接池
yuren_xia
后端技术mybatiesC3P0JAVA
在MyBatis中配置C3P0连接池,你需要确保已经添加了C3P0和MyBatis的依赖,并在MyBatis的配置文件中正确配置了数据源。以下是一个基本的步骤指南:1.添加依赖如果你使用Maven,可以在pom.xml中添加以下依赖:org.mybatismybatis3.5.7com.mchangec3p00.9.5.5mysqlmysql-connector-java8.0.232.创建数据源
- Java对接DeepSeek全攻略:从0到1小白无忧
古龙飞扬
java开发语言ai
本文将带你从零开始,详细讲解如何在Java中对接DeepSeekAPI,适合小白用户。我们将从环境搭建、API调用、数据处理等方面逐步展开,并提供完整的代码示例。目录准备工作获取DeepSeekAPI密钥创建Java项目添加依赖使用Maven引入HTTP和JSON库编写代码创建请求和响应类发送HTTP请求处理API响应完整代码示例运行与测试常见问题与解决方案1.准备工作1.1获取DeepSeekA
- 如何使用Jsoup提取商品信息:实战指南
数据小爬虫@
python爬虫java
在使用Java进行Web爬虫开发时,Jsoup是一个非常强大的HTML解析库,可以帮助你轻松地提取网页中的数据。本文将详细介绍如何使用Jsoup提取商品信息,包括商品标题、价格、描述和图片链接等。一、环境准备(一)Java开发环境确保你的系统中已安装Java开发环境,推荐使用JDK11或更高版本。(二)安装所需库使用Maven管理项目依赖,主要包括以下库:Jsoup:用于解析HTML内容。在pom
- 利用Java爬虫根据关键词获取商品列表:实战指南
数据小爬虫@
java爬虫开发语言
在电商领域,通过关键词搜索商品并获取商品列表是常见的需求。本文将详细介绍如何使用Java编写爬虫程序,根据关键词获取商品列表,并确保爬虫行为符合平台规范。为了确保代码的准确性和实用性,我们将提供详细的代码示例和解释。一、环境准备(一)Java开发环境确保你的系统中已安装Java开发环境,推荐使用JDK11或更高版本。(二)安装所需库使用Maven管理项目依赖,主要包括以下库:Jsoup:用于解析H
- SpringBoot 整合 Avro 与 Kafka
m0_74823408
面试学习路线阿里巴巴springbootkafkalinq
优质博文:IT-BLOG-CN【需求】:生产者发送数据至kafka序列化使用Avro,消费者通过Avro进行反序列化,并将数据通过MyBatisPlus存入数据库。一、环境介绍【1】ApacheAvro1.8;【2】SpringKafka1.2;【3】SpringBoot1.5;【4】Maven3.5;4.0.0com.codenotfoundspring-kafka-avro0.0.1-SNAP
- 订单管理系统 大学生数据库大作业/数据库实践MYSQL
陌路物是人非
数据库课程设计
订单管理系统从入门到入土下载Maven,Nodejs创建一个数据库sql_end,创建四个数据库表,并确保用户名为root用户密码为123456再IDEA中加载Springboot依赖(可以直接新建一个任意名称的文件夹,项目导入spring的框架),启动spring项目打开index.html输入用户名和密码,点击注册,再点击登录点击个人中心,点击修改用户信息,修改自己的余额点击逛店铺,选择一个商
- Java与Elasticsearch集成详解,以及使用指南
qzw1210
javaelasticsearchjenkins
Java与Elasticsearch集成详解1.环境配置首先,你需要在Maven项目中添加ElasticsearchJava客户端依赖:co.elastic.clientselasticsearch-java8.10.0com.fasterxml.jackson.corejackson-databind2.15.2jakarta.jsonjakarta.json-api2.1.12.客户端初始化E
- 如何应对Maven中的依赖导入挑战?
程序员总部
javamaven数据库sql
在软件开发的世界里,Maven作为一个流行的项目管理工具,为开发者提供了便利,特别是在管理依赖方面。不过,在使用Maven的过程中,依赖导包问题常常困扰着很多开发者。这些问题可能会导致项目构建失败、运行时错误,甚至是难以追踪的bug!那么,如何巧妙地解决这些依赖导入问题呢?理解依赖的作用依赖在Maven中的作用非常关键。它们是项目中所需要的库或框架,比如Spring、JUnit等。每个Maven项
- IDEA下载依赖慢
最懒的菜鸟
intellij-ideajava
因为是境外所以慢,像kafka依赖这些等半天有时还出错,怎么决绝呢?切换阿里云镜像源即可首先找到settings.xml文件,位置一般在于C:\Users\你的用户名\.m2\settings.xmalimavenaliyunmavenhttps://maven.aliyun.com/repository/publiccentral找不到settings.xml文件打开idea,到项目中pom.x
- JAVA面试常见题_基础部分_springboot面试题
茂茂在长安
JAVAjava面试springboot
问题一什么是SpringBoot?多年来,随着新功能的增加,spring变得越来越复杂。只需访问https://spring.io/projects页面,我们就会看到可以在我们的应用程序中使用的所有Spring项目的不同功能。如果必须启动一个新的Spring项目,我们必须添加构建路径或添加Maven依赖关系,配置应用程序服务器,添加spring配置。因此,开始一个新的spring项目需要很多努力,
- Maven中的依赖管理: <dependencies>与<dependencyManagement>的区别
Fhoro
mavenjavaspringboot后端
在Java项目的构建过程中,依赖管理是一个至关重要的部分,特别是当使用Maven作为构建工具时。Maven提供了多种方式来管理项目的依赖,而和是最常用的两个概念。本文将详细探讨这两者的区别及其应用场景。什么是?dependencies是Maven项目中直接声明所需依赖的方式。在pom.xml文件中,我们可以通过标签列出项目所需的所有库和组件。每个依赖项都包括groupId、artifactId和v
- maven--依赖的搜索顺序
IT利刃出鞘
构建工具(后端)mavenjava
原文网址:maven--依赖的搜索顺序-CSDN博客简介本文介绍maven中依赖的搜索顺序。依赖搜索顺序maven项目使用的仓库的方式中央仓库。这是默认的仓库。对应url为:http://repo1.maven.org/maven2/镜像仓库。通过settings.xml中的settings.mirrors.mirror配置全局profile仓库。通过settings.xml中的settings.
- 零基础小白如何系统学习Spring Boot
Victoria Zhu
学习springboot后端
零基础小白如何系统学习SpringBoot一、学习前的准备1.必备基础知识✅Java基础:掌握Java8+的核心语法(类/对象/集合/异常处理)✅Maven/Gradle:理解依赖管理工具的基本使用(pom.xml配置)✅HTTP协议:了解RESTfulAPI设计理念(GET/POST/PUT/DELETE)环境要求公式环境要求公式环境要求公式推荐配置:JDK≥11,IDE=IntelliJIDE
- classfinal加密失败,踩坑了,不妨进来看看
行云的逆袭
classfinalspringbootjar包加密踩坑加密失败
最近在使用classfinal加密springboot,执行成功了,但是反编译后还是能看到源码,很郁闷!加密之后,反编译还是能看到源码,头疼我采用的加密方式是插件方式,放上配置net.roseboyclassfinal-maven-plugin${classfinal.version}#org.springxingyunapplication.yml,application-dev.yml,app
- Maven的安装配置
2301_82243979
作者\/mavenjava
(注:文章是前段时间写的忘记发了,防止丢失在此记录一下)Maven是Apache下的纯Java开发的开源项目,是一个项目管理工具,使用Maven对项目进行构建,依赖管理。依赖管理就是一个项目中要使用第三方jar包才可以运行。Maven正是对这些jar包进行规范化管理,所以在Maven的项目中只需要在pom.xml中添加jar包的坐标,自动从Maven仓库中下载jar包,运行即可。Maven项目对比
- 微信小程序点餐系统的设计与实现(开题报告+源码+论文)_在线点餐外卖系统设计与实现文献
2301_82243979
程序员微信小程序小程序
二.技术环境jdk版本:1.8及以上ide工具:Eclipse或者IDEA,微信小程序开发工具数据库:mysql5.7(必须5.7)编程语言:Javajava框架:ssmmaven:3.6.1详细技术:HTML+CSS+JAVA+SSM+MYSQL+VUE+MAVEN+微信开发工具三.功能设计本基于微信小程序的外卖点餐系统的设计与实现有管理员,外卖员,餐厅,用户共四个角色。管理员功能有个人中心,外
- 使用Nexus从私服上传和下载依赖
北省1332
java服务器
从私服中下载依赖【第一步】在maven的settings.xml中标签中配置,此时就需要注释掉aliyun的配置。nexus-heima*http://localhost:8081/repository/maven-public/【第二步】在nexus中设置允许匿名下载,如果不允许将不会从私服中下载依赖如果私服中没有对应的jar,会去中央仓库下载,速度很慢。可以配置让私服去阿里云中下载依赖。从私服
- IDEA项目maven project没有出现plugins和Dependencies
冬瓜生鲜
IDEAMaven
背景:今天学习Springboot,但是用的apache-maven3.0,导入springboot1.5.19,Maven项目老是爆红线,还没有plugins和Dependencies方案一:方案二:jdk+SpringBoot+maven版本不对《我把maven版本换高,就成功解决了》Springboot版本SpringFrameworkjdk版本maven版本1.2.0版本之前63.01.2
- Java短信模块开发-腾讯云短信服务
Hbb123654
腾讯云java
1、提前配置1、已有腾讯云账号和服务器2、开通短信服务,创建签名和模板并通过审核,如:国内短信快速入门3、需要先购买国内短信套餐包。4、在访问管理控制台>API密钥管理页面获取SecretID和SecretKey。5、安装最新版本的Maven依赖com.tencentcloudapitencentcloud-sdk-java3.1.10002、Java代码逻辑实例1、短信工具类方法/***Tenc
- DevOps工具链
zhangpeng455547940
devops运维
DevOps工具链的核心组成部分包括:代码编辑和版本控制工具svn、git自动化构建工具Jenkins、GitLabCI/CD、TravisCI持续集成和持续部署工具Jenkins、Ansible容器编排工具K8S、DockerSwarm持续监控工具Prometheus,Grafana,InfluxDB服务配置管理工具Ansible,Chef,PuppetGit:代码管理Maven:依赖管理、项目
- Algorithm
香水浓
javaAlgorithm
冒泡排序
public static void sort(Integer[] param) {
for (int i = param.length - 1; i > 0; i--) {
for (int j = 0; j < i; j++) {
int current = param[j];
int next = param[j + 1];
- mongoDB 复杂查询表达式
开窍的石头
mongodb
1:count
Pg: db.user.find().count();
统计多少条数据
2:不等于$ne
Pg: db.user.find({_id:{$ne:3}},{name:1,sex:1,_id:0});
查询id不等于3的数据。
3:大于$gt $gte(大于等于)
&n
- Jboss Java heap space异常解决方法, jboss OutOfMemoryError : PermGen space
0624chenhong
jvmjboss
转自
http://blog.csdn.net/zou274/article/details/5552630
解决办法:
window->preferences->java->installed jres->edit jre
把default vm arguments 的参数设为-Xms64m -Xmx512m
----------------
- 文件上传 下载 解析 相对路径
不懂事的小屁孩
文件上传
有点坑吧,弄这么一个简单的东西弄了一天多,身边还有大神指导着,网上各种百度着。
下面总结一下遇到的问题:
文件上传,在页面上传的时候,不要想着去操作绝对路径,浏览器会对客户端的信息进行保护,避免用户信息收到攻击。
在上传图片,或者文件时,使用form表单来操作。
前台通过form表单传输一个流到后台,而不是ajax传递参数到后台,代码如下:
<form action=&
- 怎么实现qq空间批量点赞
换个号韩国红果果
qq
纯粹为了好玩!!
逻辑很简单
1 打开浏览器console;输入以下代码。
先上添加赞的代码
var tools={};
//添加所有赞
function init(){
document.body.scrollTop=10000;
setTimeout(function(){document.body.scrollTop=0;},2000);//加
- 判断是否为中文
灵静志远
中文
方法一:
public class Zhidao {
public static void main(String args[]) {
String s = "sdf灭礌 kjl d{';\fdsjlk是";
int n=0;
for(int i=0; i<s.length(); i++) {
n = (int)s.charAt(i);
if((
- 一个电话面试后总结
a-john
面试
今天,接了一个电话面试,对于还是初学者的我来说,紧张了半天。
面试的问题分了层次,对于一类问题,由简到难。自己觉得回答不好的地方作了一下总结:
在谈到集合类的时候,举几个常用的集合类,想都没想,直接说了list,map。
然后对list和map分别举几个类型:
list方面:ArrayList,LinkedList。在谈到他们的区别时,愣住了
- MSSQL中Escape转义的使用
aijuans
MSSQL
IF OBJECT_ID('tempdb..#ABC') is not null
drop table tempdb..#ABC
create table #ABC
(
PATHNAME NVARCHAR(50)
)
insert into #ABC
SELECT N'/ABCDEFGHI'
UNION ALL SELECT N'/ABCDGAFGASASSDFA'
UNION ALL
- 一个简单的存储过程
asialee
mysql存储过程构造数据批量插入
今天要批量的生成一批测试数据,其中中间有部分数据是变化的,本来想写个程序来生成的,后来想到存储过程就可以搞定,所以随手写了一个,记录在此:
DELIMITER $$
DROP PROCEDURE IF EXISTS inse
- annot convert from HomeFragment_1 to Fragment
百合不是茶
android导包错误
创建了几个类继承Fragment, 需要将创建的类存储在ArrayList<Fragment>中; 出现不能将new 出来的对象放到队列中,原因很简单;
创建类时引入包是:import android.app.Fragment;
创建队列和对象时使用的包是:import android.support.v4.ap
- Weblogic10两种修改端口的方法
bijian1013
weblogic端口号配置管理config.xml
一.进入控制台进行修改 1.进入控制台: http://127.0.0.1:7001/console 2.展开左边树菜单 域结构->环境->服务器-->点击AdminServer(管理) &
- mysql 操作指令
征客丶
mysql
一、连接mysql
进入 mysql 的安装目录;
$ bin/mysql -p [host IP 如果是登录本地的mysql 可以不写 -p 直接 -u] -u [userName] -p
输入密码,回车,接连;
二、权限操作[如果你很了解mysql数据库后,你可以直接去修改系统表,然后用 mysql> flush privileges; 指令让权限生效]
1、赋权
mys
- 【Hive一】Hive入门
bit1129
hive
Hive安装与配置
Hive的运行需要依赖于Hadoop,因此需要首先安装Hadoop2.5.2,并且Hive的启动前需要首先启动Hadoop。
Hive安装和配置的步骤
1. 从如下地址下载Hive0.14.0
http://mirror.bit.edu.cn/apache/hive/
2.解压hive,在系统变
- ajax 三种提交请求的方法
BlueSkator
Ajaxjqery
1、ajax 提交请求
$.ajax({
type:"post",
url : "${ctx}/front/Hotel/getAllHotelByAjax.do",
dataType : "json",
success : function(result) {
try {
for(v
- mongodb开发环境下的搭建入门
braveCS
运维
linux下安装mongodb
1)官网下载mongodb-linux-x86_64-rhel62-3.0.4.gz
2)linux 解压
gzip -d mongodb-linux-x86_64-rhel62-3.0.4.gz;
mv mongodb-linux-x86_64-rhel62-3.0.4 mongodb-linux-x86_64-rhel62-
- 编程之美-最短摘要的生成
bylijinnan
java数据结构算法编程之美
import java.util.HashMap;
import java.util.Map;
import java.util.Map.Entry;
public class ShortestAbstract {
/**
* 编程之美 最短摘要的生成
* 扫描过程始终保持一个[pBegin,pEnd]的range,初始化确保[pBegin,pEnd]的ran
- json数据解析及typeof
chengxuyuancsdn
jstypeofjson解析
// json格式
var people='{"authors": [{"firstName": "AAA","lastName": "BBB"},'
+' {"firstName": "CCC&
- 流程系统设计的层次和目标
comsci
设计模式数据结构sql框架脚本
流程系统设计的层次和目标
- RMAN List和report 命令
daizj
oraclelistreportrman
LIST 命令
使用RMAN LIST 命令显示有关资料档案库中记录的备份集、代理副本和映像副本的
信息。使用此命令可列出:
• RMAN 资料档案库中状态不是AVAILABLE 的备份和副本
• 可用的且可以用于还原操作的数据文件备份和副本
• 备份集和副本,其中包含指定数据文件列表或指定表空间的备份
• 包含指定名称或范围的所有归档日志备份的备份集和副本
• 由标记、完成时间、可
- 二叉树:红黑树
dieslrae
二叉树
红黑树是一种自平衡的二叉树,它的查找,插入,删除操作时间复杂度皆为O(logN),不会出现普通二叉搜索树在最差情况时时间复杂度会变为O(N)的问题.
红黑树必须遵循红黑规则,规则如下
1、每个节点不是红就是黑。 2、根总是黑的 &
- C语言homework3,7个小题目的代码
dcj3sjt126com
c
1、打印100以内的所有奇数。
# include <stdio.h>
int main(void)
{
int i;
for (i=1; i<=100; i++)
{
if (i%2 != 0)
printf("%d ", i);
}
return 0;
}
2、从键盘上输入10个整数,
- 自定义按钮, 图片在上, 文字在下, 居中显示
dcj3sjt126com
自定义
#import <UIKit/UIKit.h>
@interface MyButton : UIButton
-(void)setFrame:(CGRect)frame ImageName:(NSString*)imageName Target:(id)target Action:(SEL)action Title:(NSString*)title Font:(CGFloa
- MySQL查询语句练习题,测试足够用了
flyvszhb
sqlmysql
http://blog.sina.com.cn/s/blog_767d65530101861c.html
1.创建student和score表
CREATE TABLE student (
id INT(10) NOT NULL UNIQUE PRIMARY KEY ,
name VARCHAR
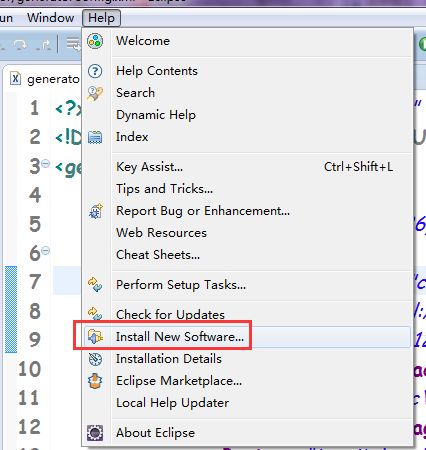
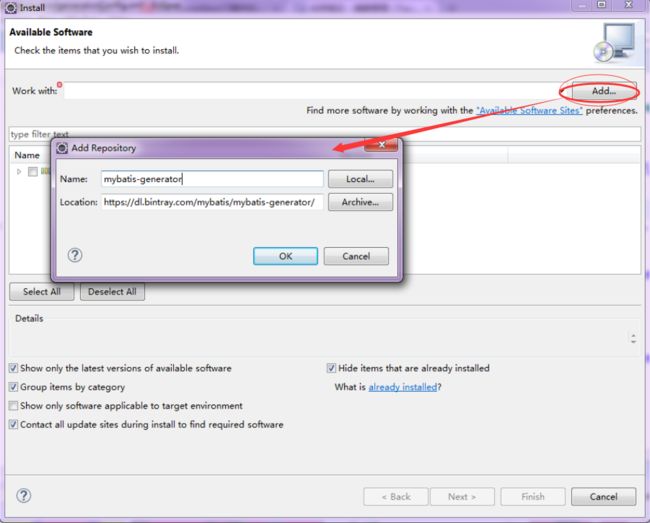
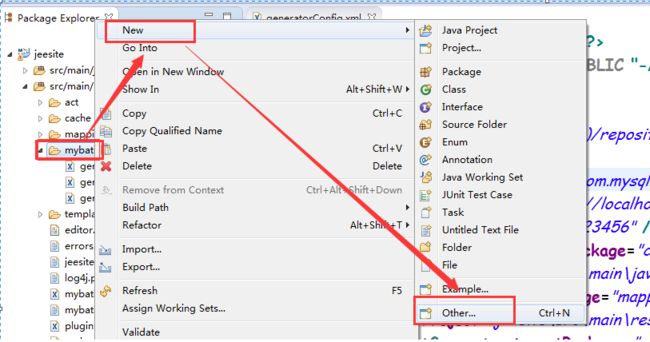
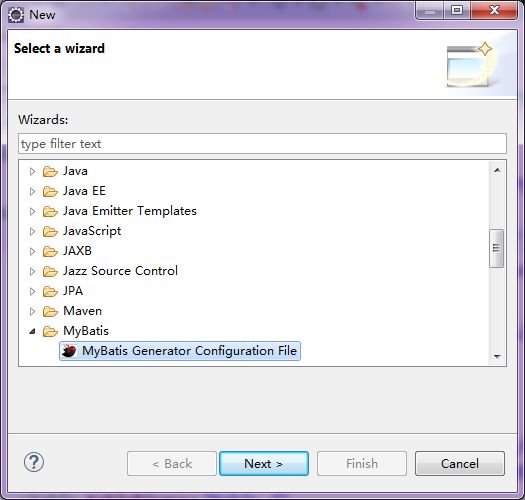
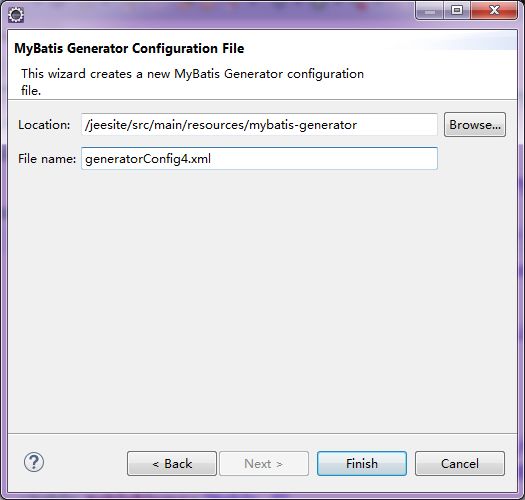
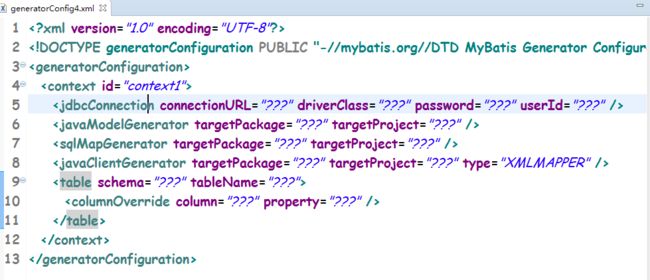
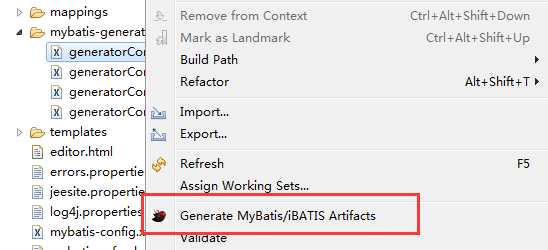
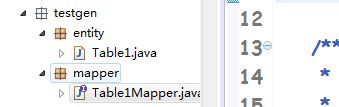
- 转:MyBatis Generator 详解
happyqing
mybatis
MyBatis Generator 详解
http://blog.csdn.net/isea533/article/details/42102297
MyBatis Generator详解
http://git.oschina.net/free/Mybatis_Utils/blob/master/MybatisGeneator/MybatisGeneator.
- 让程序员少走弯路的14个忠告
jingjing0907
工作计划学习
无论是谁,在刚进入某个领域之时,有再大的雄心壮志也敌不过眼前的迷茫:不知道应该怎么做,不知道应该做什么。下面是一名软件开发人员所学到的经验,希望能对大家有所帮助
1.不要害怕在工作中学习。
只要有电脑,就可以通过电子阅读器阅读报纸和大多数书籍。如果你只是做好自己的本职工作以及分配的任务,那是学不到很多东西的。如果你盲目地要求更多的工作,也是不可能提升自己的。放
- nginx和NetScaler区别
流浪鱼
nginx
NetScaler是一个完整的包含操作系统和应用交付功能的产品,Nginx并不包含操作系统,在处理连接方面,需要依赖于操作系统,所以在并发连接数方面和防DoS攻击方面,Nginx不具备优势。
2.易用性方面差别也比较大。Nginx对管理员的水平要求比较高,参数比较多,不确定性给运营带来隐患。在NetScaler常见的配置如健康检查,HA等,在Nginx上的配置的实现相对复杂。
3.策略灵活度方
- 第11章 动画效果(下)
onestopweb
动画
index.html
<!DOCTYPE html PUBLIC "-//W3C//DTD XHTML 1.0 Transitional//EN" "http://www.w3.org/TR/xhtml1/DTD/xhtml1-transitional.dtd">
<html xmlns="http://www.w3.org/
- FAQ - SAP BW BO roadmap
blueoxygen
BOBW
http://www.sdn.sap.com/irj/boc/business-objects-for-sap-faq
Besides, I care that how to integrate tightly.
By the way, for BW consultants, please just focus on Query Designer which i
- 关于java堆内存溢出的几种情况
tomcat_oracle
javajvmjdkthread
【情况一】:
java.lang.OutOfMemoryError: Java heap space:这种是java堆内存不够,一个原因是真不够,另一个原因是程序中有死循环; 如果是java堆内存不够的话,可以通过调整JVM下面的配置来解决: <jvm-arg>-Xms3062m</jvm-arg> <jvm-arg>-Xmx
- Manifest.permission_group权限组
阿尔萨斯
Permission
结构
继承关系
public static final class Manifest.permission_group extends Object
java.lang.Object
android. Manifest.permission_group 常量
ACCOUNTS 直接通过统计管理器访问管理的统计
COST_MONEY可以用来让用户花钱但不需要通过与他们直接牵涉的权限
D