开源项目shopxo电商平台的部署(腾讯云平台centos7.3)
一、平台搭建在LNMP上,所以应该先搭建LNMP架构
首先建立目录:
[root@VM_0_13_centos ~]# mkdir /usr/local/lnmp
1.首先安装nginx
这里时用的版本是nginx-1.14.0,解压
[root@VM_0_13_centos ~]# tar zxf nginx-1.14.0.tar.gz
[root@VM_0_13_centos ~]# cd nginx-1.14.0/
修改配置文件,使无法看到nginx的具体版本,防止利用版本漏洞恶意破坏
[root@VM_0_13_centos nginx-1.14.0]# vim src/core/nginx.h
#define NGINX_VER          "nginx/"
添加配置,首先下载gcc
[root@VM_0_13_centos nginx-1.14.0]# yum install -y gcc
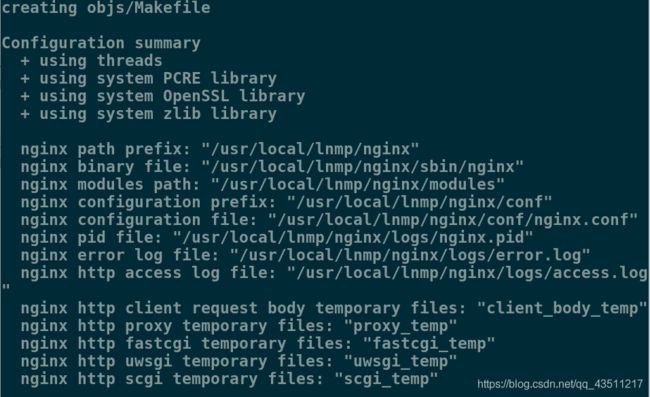
[root@VM_0_13_centos nginx-1.14.0]# ./configure --prefix=/usr/local/lnmp/nginx --with-threads --with-file-aio --with-http_ssl_module --with-http_stub_status_module --user=nginx --group=nginx
出现错误:
./configure: error: the HTTP rewrite module requires the PCRE library.
[root@VM_0_13_centos nginx-1.14.0]# yum install pcre-devel -y
再次执行
出现错误:
./configure: error: SSL modules require the OpenSSL library.
解决办法:
[root@VM_0_13_centos nginx-1.14.0]# yum -y install openssl openssl-devel
[root@VM_0_13_centos nginx-1.14.0]# make && make install
[root@VM_0_13_centos nginx-1.14.0]# vim /usr/local/lnmp/nginx/conf/nginx.conf
  1
  2 user  nginx nginx;
  3 worker_processes  auto;
[root@VM_0_13_centos sbin]# useradd nginx
检查配置文件是否出错
[root@VM_0_13_centos nginx-1.14.0]# cd /usr/local/lnmp/nginx/sbin
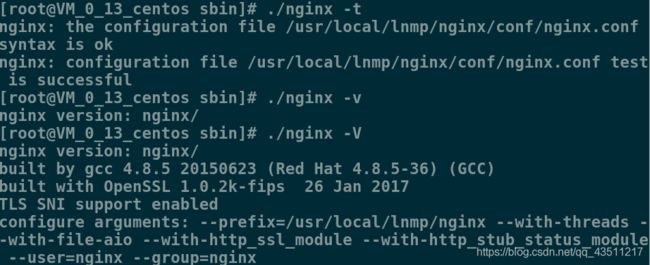
[root@VM_0_13_centos sbin]# ./nginx -t
查看版本
[root@VM_0_13_centos sbin]# ./nginx -v
nginx version: nginx/
查看添加配置时使用参数
[root@VM_0_13_centos sbin]# ./nginx -V
nginx version: nginx/
built by gcc 4.8.5 20150623 (Red Hat 4.8.5-36) (GCC)
built with OpenSSL 1.0.2k-fips  26 Jan 2017
TLS SNI support enabled
configure arguments: --prefix=/usr/local/lnmp/nginx --with-threads --with-file-aio --with-http_ssl_module --with-http_stub_status_module --user=nginx --group=nginx
[root@VM_0_13_centos sbin]# ln -s /usr/local/lnmp/nginx/sbin/nginx /usr/local/sbin/
[root@VM_0_13_centos sbin]# nginx -t
nginx: the configuration file /usr/local/lnmp/nginx/conf/nginx.conf syntax is ok
nginx: configuration file /usr/local/lnmp/nginx/conf/nginx.conf test is successful
[root@VM_0_13_centos sbin]# nginx
[root@VM_0_13_centos sbin]# netstat -antlp
2.安装php
这里使用的是php-5.6.35
首先解压
[root@VM_0_13_centos ~]# tar jxf php-5.6.35.tar.bz2
解决依赖性
[root@VM_0_13_centos php-5.6.35]# yum install -y net-snmp-devel libmcrypt-* gmp-devel-4.3.1-7.el6_2.2.x86_64 freetype-devel 2:libpng-devel-1.2.49-1.el6_2.x86_64 libjpeg-turbo-devel-1.2.1-1.el6.x86_64 libcurl-devel openssl-devel libxml2-devel
添加配置
[root@VM_0_13_centos php-5.6.35]# ./configure --prefix=/usr/local/lnmp/php --with-config-file-path=/usr/local/lnmp/php/etc --with-openssl --with-snmp --with-gd --with-zlib --with-curl --with-libxml-dir --with-png-dir --with-jpeg-dir --with-freetype-dir --with-gmp --with-gettext --with-pear --enable-mysqlnd --with-mysql=mysqlnd --with-mysqli=mysqlnd --with-pdo-mysql=mysqlnd --enable-inline-optimization --enable-soap --enable-ftp --enable-sockets --enable-mbstring --enable-fpm --with-fpm-user=nginx --with-fpm-group=nginx --with-mcrypt --with-mhash
出现错误:
configure: error: jpeglib.h not found.
解决方法:
[root@VM_0_13_centos php-5.6.35]# yum install -y libjpeg-devel
再次尝试,出现错误:
configure: error: Unable to locate gmp.h
解决方法:
[root@VM_0_13_centos php-5.6.35]# yum install -y gmp-devel
[root@VM_0_13_centos php-5.6.35]# make && make install
[root@VM_0_13_centos ~]# cd /usr/local/lnmp/php/etc/
[root@VM_0_13_centos etc]# cp php-fpm.conf.default php-fpm.conf
[root@VM_0_13_centos etc]# vim php-fpm.conf
复制文件,修改时区
[root@VM_0_13_centos etc]# cp ~/php-5.6.35/php.ini-production /usr/local/lnmp/php/etc/php.ini
[root@VM_0_13_centos etc]# vim /usr/local/lnmp/php/etc/php.ini
 936 date.timezone =Asia/Shanghai
配置启动脚本
[root@VM_0_13_centos etc]# cd ~/php-5.6.35/sapi/fpm/
[root@VM_0_13_centos fpm]# cp init.d.php-fpm /etc/init.d/php-fpm
[root@VM_0_13_centos fpm]# chmod +x /etc/init.d/php-fpm
启动服务,查看端口
[root@VM_0_13_centos fpm]# /etc/init.d/php-fpm start
Starting php-fpm  done
[root@VM_0_13_centos fpm]# netstat -antlup
3.修改nginx的配置文件使默认发布.php
[root@VM_0_13_centos ~]# vim /usr/local/lnmp/nginx/conf/nginx.conf
 43         location / {
 44             root   html;
 45             index  index.php index.html index.htm;
 46         }
 65         location ~ \.php$ {
 66             root           html;
 67             fastcgi_pass   127.0.0.1:9000;
 68             fastcgi_index  index.php;
 69             #fastcgi_param  SCRIPT_FILENAME  /scripts$fastcgi_scrip    t_name;
 70             include        fastcgi_params;
 71         }
编写默认发布页
[root@VM_0_13_centos ~]# vim /usr/local/lnmp/nginx/html/index.php
4、安装mysql
这里使用的是mysql-boost-5.7.17
解压
[root@VM_0_13_centos ~]# tar zxf mysql-boost-5.7.17.tar.gz
解决依赖性
[root@VM_0_13_centos ~]# yum install -y cmake gcc gcc-c++ ncurses-devel bison
添加配置
[root@VM_0_13_centos mysql-5.7.17]# cmake -DCMAKE_INSTALL_PREFIX=/usr/local/lnmp/mysql -DMYSQL_DATADIR=/usr/local/lnmp/mysql/data -DMYSQL_UNIX_ADDR=/usr/local/lnmp/mysql/data/mysql.sock -DWITH_MYISAM_STORAGE_ENGINE=1 -DWITH_INNOBASE_STORAGE_ENGINE=1 -DDEFAULT_CHARSET=utf8 -DDEFAULT_COLLATION=utf8_general_ci -DEXTRA_CHARSETS=all -DWITH_BOOST=boost/boost_1_59_0/
编译:
[root@VM_0_13_centos mysql-5.7.17]# make
[root@VM_0_13_centos mysql-5.7.17]# make install
添加用户
[root@VM_0_13_centos mysql-5.7.17]# groupadd -g 27 mysql
[root@VM_0_13_centos mysql-5.7.17]# useradd -u 27 -g 27 mysql -s /sbin/nologin
[root@VM_0_13_centos mysql-5.7.17]# id mysql
uid=27(mysql) gid=27(mysql) groups=27(mysql)
配置环境变量
[root@VM_0_13_centos mysql-5.7.17]# vim ~/.bash_profile
PATH=$PATH:$HOME/bin
PATH=$PATH:$HOME/bin:/usr/local/lnmp/mysql/bin
[root@VM_0_13_centos mysql-5.7.17]# source ~/.bash_profile
配置文件
[root@VM_0_13_centos mysql-5.7.17]# cd support-files/
[root@VM_0_13_centos support-files]# cp my-default.cnf /etc/my.cnf
cp: overwrite ‘/etc/my.cnf’? y
[root@VM_0_13_centos support-files]# vim /etc/my.cnf
# These are commonly set, remove the # and set as required.
basedir = /usr/local/lnmp/mysql
datadir = /usr/local/lnmp/mysql/data
# port = .....
# server_id = .....
socket = /usr/local/lnmp/mysql/data/mysql.sock
[root@VM_0_13_centos support-files]# chown root.mysql /usr/local/lnmp/mysql/ -R
制作启动脚本
[root@VM_0_13_centos support-files]# cd /usr/local/lnmp/mysql/support-files/
[root@VM_0_13_centos support-files]# cp mysql.server /etc/init.d/mysqld
[root@VM_0_13_centos support-files]# cd /etc/init.d/
[root@VM_0_13_centos init.d]# chmod +x mysqld
[root@VM_0_13_centos init.d]# ll
total 48
-rwxr-xr-x 1 root root 10916 Aug  6 10:04 mysqld
初始化并启动
[root@VM_0_13_centos init.d]# mysqld --user=mysql --initialize
[root@VM_0_13_centos init.d]# chown mysql.mysql /usr/local/lnmp/mysql/data/ -R
[root@VM_0_13_centos init.d]# /etc/init.d/mysqld start
Starting MySQL.Logging to '/usr/local/lnmp/mysql/data/VM_0_13_centos.err'.
 SUCCESS!
安全初始化:
[root@VM_0_13_centos init.d]# mysql_secure_installation		##首先要复制上面生成的密码,修改成自己需要的密码

Securing the MySQL server deployment.

Enter password for user root:

The existing password for the user account root has expired. Please set a new password.

New password:

Re-enter new password:

VALIDATE PASSWORD PLUGIN can be used to test passwords
and improve security. It checks the strength of password
and allows the users to set only those passwords which are
secure enough. Would you like to setup VALIDATE PASSWORD plugin?

Press y|Y for Yes, any other key for No: No
Using existing password for root.
Change the password for root ? ((Press y|Y for Yes, any other key for No) :

 ... skipping.
By default, a MySQL installation has an anonymous user,
allowing anyone to log into MySQL without having to have
a user account created for them. This is intended only for
testing, and to make the installation go a bit smoother.
You should remove them before moving into a production
environment.

Remove anonymous users? (Press y|Y for Yes, any other key for No) : y
Success.


Normally, root should only be allowed to connect from
'localhost'. This ensures that someone cannot guess at
the root password from the network.

Disallow root login remotely? (Press y|Y for Yes, any other key for No) : y
Success.

By default, MySQL comes with a database named 'test' that
anyone can access. This is also intended only for testing,
and should be removed before moving into a production
environment.


Remove test database and access to it? (Press y|Y for Yes, any other key for No) : y
 - Dropping test database...
Success.

 - Removing privileges on test database...
Success.

Reloading the privilege tables will ensure that all changes
made so far will take effect immediately.

Reload privilege tables now? (Press y|Y for Yes, any other key for No) : y
Success.

All done!
测试
[root@VM_0_13_centos init.d]# mysql -p
Enter password:
Welcome to the MySQL monitor.  Commands end with ; or \g.
Your MySQL connection id is 8
Server version: 5.7.17 Source distribution

Copyright (c) 2000, 2016, Oracle and/or its affiliates. All rights reserved.

Oracle is a registered trademark of Oracle Corporation and/or its
affiliates. Other names may be trademarks of their respective
owners.

Type 'help;' or '\h' for help. Type '\c' to clear the current input statement.

mysql> show databases;
+--------------------+
| Database           |
+--------------------+
| information_schema |
| mysql              |
| performance_schema |
| sys                |
+--------------------+
4 rows in set (0.00 sec)
完成
二、在shopxo官网下载压缩包并按照流程安装
官网地址:https://shopxo.net/
这里选择的版本是gongfuxiang-shopxo-v1.5.0.zip
解压到发布目录
[root@VM_0_13_centos ~]# unzip gongfuxiang-shopxo-v1.5.0.zip -d /usr/local/lnmp/nginx/html/
修改权限
[root@VM_0_13_centos ~]# cd /usr/local/lnmp/nginx/html/
[root@VM_0_13_centos html]# ls
50x.html  index.html  index.php  shopxo
[root@VM_0_13_centos html]# cd shopxo/
[root@VM_0_13_centos shopxo]# ls
admin.php    changelog.txt  extend     public      route    thinkphp
application  composer.json  index.php  README.md   runtime  vendor
build.php    config         LICENSE    robots.txt  think
[root@VM_0_13_centos shopxo]# chmod 777 runtime/ -R
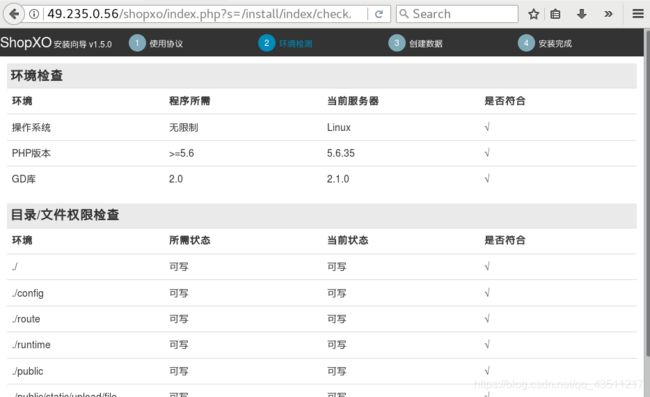
在浏览器直接访问http://49.235.0.56/shopxo/
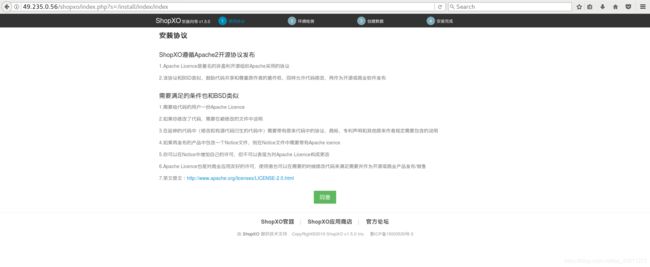
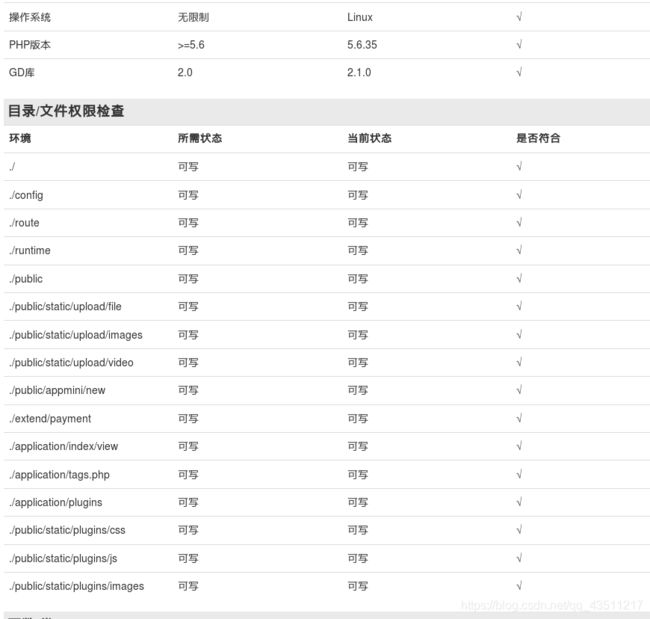
按照要求调整权限
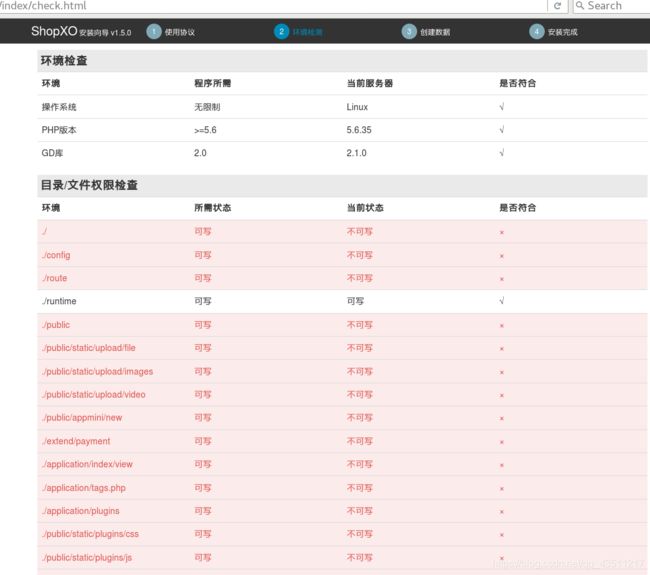
[root@VM_0_13_centos html]# chmod 777 shopxo/
[root@VM_0_13_centos html]# cd shopxo/
[root@VM_0_13_centos shopxo]# chmod 777 config/
[root@VM_0_13_centos shopxo]# chmod 777 route/
[root@VM_0_13_centos shopxo]# chmod 777 public/ -R
[root@VM_0_13_centos shopxo]# chmod 777 extend/ -R
[root@VM_0_13_centos shopxo]# chmod 777 application/ -R
cd /usr/src
wget http://pecl.php.net/get/zip
tar -zxvf zip
cd zip-1.15.4/
[root@VM_0_13_centos zip-1.15.4]#  /usr/local/lnmp/php/bin/phpize
Configuring for:
PHP Api Version:         20131106
Zend Module Api No:      20131226
Zend Extension Api No:   220131226
Cannot find autoconf. Please check your autoconf installation and the
$PHP_AUTOCONF environment variable. Then, rerun this script.
遇到问题,解决:
[root@VM_0_13_centos zip-1.15.4]# yum install autoconf -y
再次尝试:
[root@VM_0_13_centos zip-1.15.4]# /usr/local/lnmp/php/bin/phpize
Configuring for:
PHP Api Version:         20131106
Zend Module Api No:      20131226
Zend Extension Api No:   220131226
添加配置:
[root@VM_0_13_centos zip-1.15.4]# ./configure --with-php-config=/usr/local/lnmp/php/bin/php-config
出现错误:
configure: error: Please reinstall the libzip distribution
需要安装libzip
[root@VM_0_13_centos ~]# wget https://nih.at/libzip/libzip-1.2.0.tar.gz
[root@VM_0_13_centos ~]# tar -zxvf libzip-1.2.0.tar.gz
[root@VM_0_13_centos ~]# cd libzip-1.2.0/
[root@VM_0_13_centos libzip-1.2.0]# ./configure
[root@VM_0_13_centos libzip-1.2.0]# make && make install
安装成功!
继续解决zip的问题
[root@VM_0_13_centos libzip-1.2.0]# cd /usr/src/zip-1.15.4/
[root@VM_0_13_centos zip-1.15.4]# ./configure --with-php-config=/usr/local/lnmp/php/bin/php-config
[root@VM_0_13_centos zip-1.15.4]# make
出现问题:
/usr/local/include/zip.h:59:21: fatal error: zipconf.h: No such file or directory
 #include
                     ^
compilation terminated.
make: *** [php5/php_zip.lo] Error 1
[root@VM_0_13_centos zip-1.15.4]# find /usr/local -iname 'zipconf.h'
[root@VM_0_13_centos zip-1.15.4]# ln -s /usr/local/lib/libzip/include/zipconf.h /usr/local/include
再次尝试:
[root@VM_0_13_centos zip-1.15.4]# make
[root@VM_0_13_centos zip-1.15.4]# make install
Installing shared extensions:     /usr/local/lnmp/php/lib/php/extensions/no-debug-non-zts-20131226/
这里提示了zip.so的位置,需要写进php.ini
[root@VM_0_13_centos zip-1.15.4]# vim  /usr/local/lnmp/php/etc/php.ini
 912 extension=/usr/local/lnmp/php/lib/php/extensions/no-debug-non-zts          -20131226/zip.so
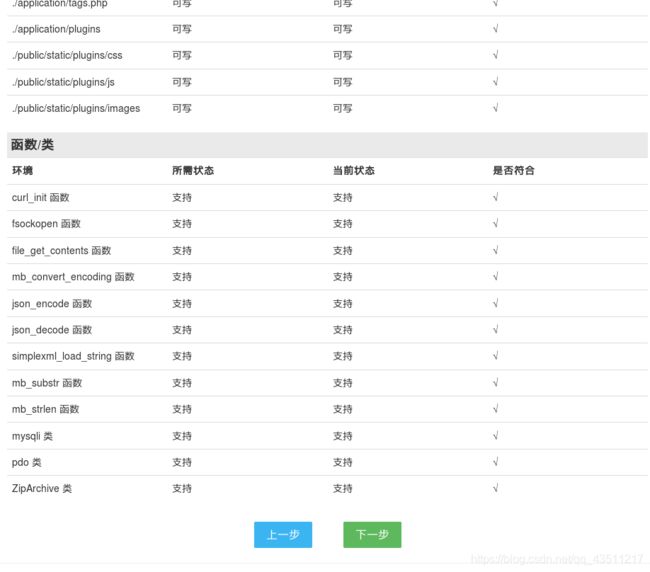
[root@VM_0_13_centos ~]# curl -I http://49.235.0.56/
HTTP/1.1 200 OK
Server: nginx/
Date: Tue, 06 Aug 2019 17:04:12 GMT
Content-Type: text/html; charset=UTF-8
Connection: keep-alive
X-Powered-By: PHP/5.6.35
修改文件/usr/local/lnmp/nginx/conf/fastcgi_params,
在首行添加fastcgi_param SCRIPT_FILENAME $document_root$fastcgi_script_name;
并在php.ini文件中,将 zlib.output_compression = Off 改为 zlib.output_compression = On ;
重启服务
[root@VM_0_13_centos ~]# vim /usr/local/lnmp/nginx/conf/fastcgi_params
  1 fastcgi_param  SCRIPT_FILENAME    $document_root$fastcgi_script_na    me;
  261 zlib.output_compression = On
[root@VM_0_13_centos ~]# nginx  -s stop
[root@VM_0_13_centos ~]# nginx

