ASP.NET Core Web 支付功能接入 微信-扫码支付篇
这篇文章将介绍ASP.NET Core中使用 开源项目 Payment,实现接入微信-扫码支付及异步通知功能。
开发环境:Win 10 x64、VS2017 15.6.4、.NET Core SDK 2.1.101、.NET Core Runtime 2.0.6
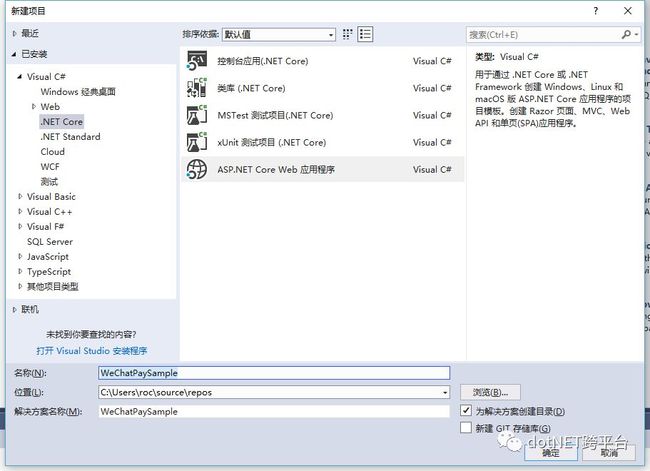
1.新建"ASP.NET Core Web 应用程序"项目,我将它命名为WeChatPaySample.
2. 引入安装Nuget包 "Essensoft.AspNetCore.WeChatPay". 目前(2018/03/23)版本为 1.1.0
3. 在Startup.cs文件内 添加依赖注入、设置参数(微信支付商户平台 - API安全)
代码:
public void ConfigureServices(IServiceCollection services)
{
services.AddMvc();
// 添加微信支付客户端依赖注入
services.AddWeChatPay();
// 可在添加依赖注入时设置参数 一般设置 AppId、MchId、Key,其余默认即可.
// 退款、转账等需要双向证书的API 需要配置 Certificate 参数,将.p12证书文件转成base64串写入即可.
// 如:
//services.AddWeChatPay(opt =>
//{
// // 此处为 公众号AppId、小程序AppId、企业号corpid、微信开放平台应用AppId
// opt.AppId = "";
// // 微信支付商户号
// opt.MchId = "";
// // API密钥
// opt.Key = "";
// // .p12证书文件的base64串
// opt.Certificate = "";
//});
// 具体参数见 WeChatPayOptions
// 注册配置实例
services.Configure
// 两种方式设置注册配置实例参数
// 1.默认配置文件(开发环境/正式环境):
// appsettings.Development.json / appsettings.json
// 2.用户机密配置文件(VS2017 15.6.4 中,右键项目 => 管理用户机密):
// Windows: % APPDATA %\microsoft\UserSecrets\< userSecretsId >\secrets.json
// Linux: ~/.microsoft / usersecrets /< userSecretsId >/ secrets.json
// macOS: ~/.microsoft / usersecrets /< userSecretsId >/ secrets.json
// 配置文件内容如下('...'为省略的项目其他配置内容,若有的情况下 -_-!):
//{
// ...
// ...
//
// "WeChatPay": {
// "AppId": "",
// "MchId": "",
// "Key": ""
// "Certificate": ""
// }
//}
}
4. 添加一个控制器, 我将其命名为 WeChatPayController.cs
代码:
using Essensoft.AspNetCore.WeChatPay;
using Essensoft.AspNetCore.WeChatPay.Notify;
using Essensoft.AspNetCore.WeChatPay.Request;
using Microsoft.AspNetCore.Mvc;
using System.Threading.Tasks;
namespace WeChatPaySample.Controllers
{
public class WeChatPayController : Controller
{
// 微信支付请求客户端(用于处理请求与其响应)
private readonly WeChatPayClient _client = null;
// 微信证书请求客户端(用于处理双向证书请求与其响应)
// private readonly WeChatPayCertificateClient _certClient = null;
// 微信支付通知客户端(用于解析异步通知)
private readonly WeChatPayNotifyClient _notifyClient = null;
// 赋值依赖注入对象
public WeChatPayController(WeChatPayClient client, WeChatPayNotifyClient notifyClient)
{
_client = client;
_notifyClient = notifyClient;
}
///
/// 统一下单
///
///
///
///
///
///
///
///
///
[HttpPost]
public async Task
{
var request = new WeChatPayUnifiedOrderRequest()
{
OutTradeNo = out_trade_no,
Body = body,
TotalFee = total_fee,
SpbillCreateIp = spbill_create_ip,
NotifyUrl = notify_url,
TradeType = trade_type,
ProductId = product_id,
OpenId = openid,
};
// 发起请求
var response = await _client.ExecuteAsync(request);
// 将response.CodeUrl生成为二维码即可使用.
return Ok(response.Body);
}
///
/// 支付结果通知
///
///
[HttpPost]
public async Task
{
try
{
// 以 WeChatPayUnifiedOrderNotifyResponse 类型 解析请求
var notify = await _notifyClient.ExecuteAsync
if (!notify.IsError)
{
if (notify.ResultCode == "SUCCESS")
{
// 业务代码
// ...
// ...
//返回给微信支付成功内容,停止继续通知
return Content("
}
}
// 订单其他状态均返回给微信支付空内容.
return NoContent();
}
catch
{
// 参数异常/验签失败均返回给微信支付空内容.
return NoContent();
}
}
}
}
5. 修改 Views/Home/Index 页面,用于网站提交支付请求.
代码:
@{
ViewData["Title"] = "Home Page";
}
实现页面如下:
有疑问可以在 https://github.com/Essensoft/Payment 提交Issue ,也可以加入Payment 交流群:522457525
本篇文章到此结束,具体效果可自行测试。感谢各位观看。
原文地址:http://www.cnblogs.com/essenroc/p/8630730.html
.NET社区新闻,深度好文,欢迎访问公众号文章汇总 http://www.csharpkit.com
![]()


