hexo4.0 - Next7.2.4 主题优化配置
文章目录
- Next主题的安装
- Next主题优化配置
- 1.Next主题风格:
- 2.添加博客自定义图标
- 3.添加动态背景
- 4.添加看板娘
- 5.鼠标点击特效
- 6.设置头像
- 7.设置RSS订阅
- 8.侧边栏社交小图标设置
- 9.Tag 标签前图标修改
- 10.访问量统计
- 11.实现文章统计功能
- 12.添加网页顶部进度加载条
- 13.添加站内搜索
- 14.Footer / 页脚设置
- 15.Creative Commons / 文章版权
- 16.设置阅读全文
- 17.开启文章目录
- 18.GitHub Fork Me
- 19.bookmark
- 20. 添加lazyload
- 21.代码复制
- 22.SEO支持
- 23.显示当前浏览进度
- 第三方服务
- 1.支持数学公式
- 2.添加APlayer音乐播放器
- 3.DaoVoice在线联系功能
- 自定义样式支持
- 1.文章末尾统一添加“本文结束”标记
- 2.主题及标题栏背景图
- 3.修改主副标题字体颜色
- 4.修改按钮,选择区域,代码块,表格等样式
- 速度优化
- 托管 Hexo 博客到 Coding
- gulp 4.0实现静态资源压缩
Next主题的安装
cd hexo_blog
git clone https://github.com/theme-next/hexo-theme-next themes/next
然后设置站点配置文件_config.yml,Hexo博客主题替换为Next主题。
 .
.
Next主题优化配置
1.Next主题风格:
Next提供了四中主题风格scheme,可以在主题配置文件blog/themes/next/_config.yml文件中进行选择,分别是Muse、Mist、Pisces、Gemini:

- Next主题一般配置:
# Allow to cache content generation. Introduced in NexT v6.0.0.
cache:
  enable: true #表示添加缓存功能,这样浏览器后续打开我们的博客网站会更快
menu:
  home: / || home
  #about: /about/ || user
  tags: /tags/ || tags
  categories: /categories/ || th
  archives: /archives/ || archive
  #schedule: /schedule/ || calendar
  #sitemap: /sitemap.xml || sitemap
  #commonweal: /404/ || heartbeat

# Enable/Disable menu icons / item badges.
menu_settings:
  icons: true  #是否显示各个页面的图标
  badges: false #是否显示分类/标签/归档页的内容量
相应的站点配置blog/_config.yml文件的基本配置为:
2.添加博客自定义图标
选择或者创建相应大小的图标文件,放置在blog/themes/next/sources/images目录下,并在主题配置文件中进行如下配置,只需要设置small和medium两个就可以:

3.添加动态背景
打开 next/layout/_layout.swig
在 < /body>之前添加代码(注意不要放在< /head>的后面)
{% if theme.canvas_nest %}
<script type="text/javascript" src="//cdn.bootcss.com/canvas-nest.js/1.0.0/canvas-nest.min.js"></script>
{% endif %}
修改配置文件,打开 /next/_config.yml,在里面添加如下代码:
 .
.
4.添加看板娘
sudo npm install -save hexo-helper-live2d
下载模型
sudo npm install live2d-widget-model-wanko
5.鼠标点击特效
鼠标的点击红心特效
在/themes/next/source/js/src下新建文件clicklove.js ,接着把下面的代码拷贝粘贴到 love.js 文件中:
7.4 next没有src文件夹,先建一个src文件夹
!function(e,t,a){function n(){c(".heart{width: 10px;height: 10px;position: fixed;background: #f00;transform: rotate(45deg);-webkit-transform: rotate(45deg);-moz-transform: rotate(45deg);}.heart:after,.heart:before{content: '';width: inherit;height: inherit;background: inherit;border-radius: 50%;-webkit-border-radius: 50%;-moz-border-radius: 50%;position: fixed;}.heart:after{top: -5px;}.heart:before{left: -5px;}"),o(),r()}function r(){for(var e=0;e<d.length;e++)d[e].alpha<=0?(t.body.removeChild(d[e].el),d.splice(e,1)):(d[e].y--,d[e].scale+=.004,d[e].alpha-=.013,d[e].el.style.cssText="left:"+d[e].x+"px;top:"+d[e].y+"px;opacity:"+d[e].alpha+";transform:scale("+d[e].scale+","+d[e].scale+") rotate(45deg);background:"+d[e].color+";z-index:99999");requestAnimationFrame(r)}function o(){var t="function"==typeof e.onclick&&e.onclick;e.onclick=function(e){t&&t(),i(e)}}function i(e){var a=t.createElement("div");a.className="heart",d.push({el:a,x:e.clientX-5,y:e.clientY-5,scale:1,alpha:1,color:s()}),t.body.appendChild(a)}function c(e){var a=t.createElement("style");a.type="text/css";try{a.appendChild(t.createTextNode(e))}catch(t){a.styleSheet.cssText=e}t.getElementsByTagName("head")[0].appendChild(a)}function s(){return"rgb("+~~(255*Math.random())+","+~~(255*Math.random())+","+~~(255*Math.random())+")"}var d=[];e.requestAnimationFrame=function(){return e.requestAnimationFrame||e.webkitRequestAnimationFrame||e.mozRequestAnimationFrame||e.oRequestAnimationFrame||e.msRequestAnimationFrame||function(e){setTimeout(e,1e3/60)}}(),n()}(window,document);
在\themes\next\layout_layout.swig文件末尾添加:
<!-- 页面点击小红心 -->
<script type="text/javascript" src="/js/src/clicklove.js"></script>
6.设置头像
在主题配置文件中设置头像,将其放置到 themes/next/source/images/avatar.png 路径,rounded是否设置成圆形,rotated是否设置成可旋转的。

7.设置RSS订阅
博客一般是需要 RSS 订阅的,如果要开启 RSS 订阅,这里需要安装一个插件,叫做 hexo-generator-feed,安装完成之后,站点会自动生成 RSS Feed 文件,安装命令如下:
npm install hexo-generator-feed --save
打开根目录配置文件_config.yml
# Extensions
## Plugins: http://hexo.io/plugins/
plugins: hexo-generate-feed
然后设置主题配置文件:
# Set rss to false to disable feed link.
# Leave rss as empty to use site's feed link.
# Set rss to specific value if you have burned your feed already.
rss: /atom.xml
8.侧边栏社交小图标设置
打开主题配置文件_config.yml,command+f搜索 Social,将你有的社交账号前面的 # 号去掉。

9.Tag 标签前图标修改
文章标签的显示默认前面“#”号,可以通过设置将“#”换为图标。
tag_icon: true
10.访问量统计
- 打开themes/next/下的_config.yml,查找busuanzi
# Show Views / Visitors of the website / page with busuanzi.
# Get more information on http://ibruce.info/2015/04/04/busuanzi
busuanzi_count:
  enable: true
  total_visitors: true
  total_visitors_icon: user
  total_views: true
  total_views_icon: eye
  post_views: true
  post_views_icon: eye
当前版本的NexT集成的不蒜子,总访问人数和人次只是分别用icon来表示,故取消显示,自行改动
- 打开/themes/next/layout/_partials/footer.swig,在最后添加如下内容:
<span id="busuanzi_container_site_uv">
  本站访问次数:<span class="busuanzi-value" id="busuanzi_value_site_pv"></span>
</span>
11.实现文章统计功能
统计字数和阅读分钟数
安装 hexo-symbols-count-time,命令如下:
sudo npm install hexo-symbols-count-time --save
在站点配置文件 hexo _config.yaml添加:
symbols_count_time:
  symbols: true                # 文章字数统计
  time: true                   # 文章阅读时长
  total_symbols: true          # 站点总字数统计
  total_time: true             # 站点总阅读时长
  exclude_codeblock: false     # 排除代码字数统计
具体可查看:https://github.com/theme-next/hexo-symbols-count-time
效果如下:

12.添加网页顶部进度加载条
下载安装Progress module,如下
git clone https://github.com/theme-next/theme-next-pace source/lib/pace
编辑主题配置文件,command+F 搜索 pace,将其值改为 ture 就可以了。
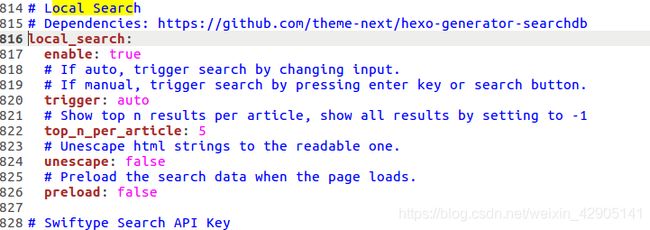
13.添加站内搜索
安装 hexo-generator-search
sudo npm install hexo-generator-search --save
安装 hexo-generator-searchdb
sudo npm install hexo-generator-searchdb --save
编辑站点配置文件,添加以下内容
search:
  path: search.xml
  field: post
  format: html
  limit: 10000
编辑主题配置文件,设置 local_search为 ture

14.Footer / 页脚设置
footer:
  # Specify the date when the site was setup. If not defined, current year will be used.
  #since: 2015

  # Icon between year and copyright info.
  icon:
    # Icon name in Font Awesome. See: https://fontawesome.com/v4.7.0/icons/
    # `heart` is recommended with animation in red (#ff0000).
    name: user
    # If you want to animate the icon, set it to true.
    ## 图标的一个动画效果,类似于心跳
    animated: true
    # Change the color of icon, using Hex Code.
    # 图标颜色,可格局需要自行修改
    color: "#808080"

  # If not defined, `author` from Hexo `_config.yml` will be used.
  copyright:

  # Powered by Hexo 字样,不喜欢可以设置为 false
  powered:
    # Hexo link (Powered by Hexo).
    enable: true
    # Version info of Hexo after Hexo link (vX.X.X).
    version: true

  # 主题字样,不喜欢可以 false
  theme:
    # Theme & scheme info link (Theme - NexT.scheme).
    enable: true
    # Version info of NexT after scheme info (vX.X.X).
    version: true

  # Beian ICP and gongan information for Chinese users. See: http://www.beian.miit.gov.cn, http://www.beian.gov.cn
  # 备案信息,如果网站有备案号,可以在这里填写备案号
  beian:
    enable: false
    icp:
15.Creative Commons / 文章版权
# Creative Commons 4.0 International License.
# See: https://creativecommons.org/share-your-work/licensing-types-examples
# Available values of license: by | by-nc | by-nc-nd | by-nc-sa | by-nd | by-sa | zero
# You can set a language value if you prefer a translated version of CC license, e.g. deed.zh
# CC licenses are available in 39 languages, you can find the specific and correct abbreviation you need on https://creativecommons.org
creative_commons:
  license: by-nc-nd
  post: true
  language: deed.zh
在文章 .md 文件中的上部,添加 copyright: true。
16.设置阅读全文
打开主题配置文件,修改auto_excerpt:字段为true,length表示显示文本的长度
在想要隐藏的位置加入以下代码:
<!--more-->
17.开启文章目录
修改主题配置文件
# Table of Contents in the Sidebar
toc:
  enable: true
  # Automatically add list number to toc.
  number: true
  # If true, all words will placed on next lines if header width longer then sidebar width.
  wrap: true
  # If true, all level of TOC in a post will be displayed, rather than the activated part of it.
  expand_all: false
  # Maximum heading depth of generated toc. You can set it in one post through `toc_max_depth` in Front-matter.
  max_depth: 6
18.GitHub Fork Me
修改主题配置文件:
# `Follow me on GitHub` banner in the top-right corner.
github_banner:
  enable: true
  permalink: https://github.com/Xiao-Hu-Z
  title: Follow me on GitHub
19.bookmark
Bookmark是一个插件,允许用户保存他们的阅读进度。用户只需单击页面左上角的书签图标即可保存滚动位置。当他们下次访问您的博客时,他们可以自动恢复每个页面的最后滚动位置。
bookmark:
  enable: true
  # Customize the color of the bookmark.
  color: "#222"
  # If auto, save the reading progress when closing the page or clicking the bookmark-icon.
  # If manual, only save it by clicking the bookmark-icon.
  save: auto
20. 添加lazyload
对于图片进行延迟加载,访问到图片位置时才去请求图片资源,这样可以提高博客的访问速度,节省流量。
git clone https://github.com/theme-next/theme-next-jquery-lazyload source/lib/jquery_lazyload
主题配置文件:
# Vanilla JavaScript plugin for lazyloading images.
# For more information: https://github.com/ApoorvSaxena/lozad.js
lazyload: true
21.代码复制
  # Add copy button on codeblock
  copy_button:
    enable: true
22.SEO支持
SEO(Search Engine Optimization)意为搜索引擎优化,利用搜索引擎的规则提高网站在有关搜索引擎内的自然排名。
- 安装站点地图(sitemap)插件
npm install hexo-generator-sitemap --save
npm install hexo-generator-baidu-sitemap --save
- 站点配置文件修改/添加
# SEO
sitemap:
  path: sitemap.xml
baidusitemap:
  path: baidusitemap.xml
启用百度推送功能,博客会自动将网址推送到百度,这对搜索引擎优化非常有帮助。
主题配置文件修改 baidu_push: true
23.显示当前浏览进度
打开 themes/next/_config.yml ,搜索关键字 scrollpercent ,把 false 改为 true ,如下:
  # Scroll percent label in b2t button.# # 是否显示页面浏览百分比
  scrollpercent: true
第三方服务
1.支持数学公式
可能在一些情况下我们需要写一个公式,makdown是支持的,next也支持。
Next 主题提供了两个渲染引擎,分别是 mathjax 和katex,后者相对前者来说渲染速度更快,而且不需要 JavaScript 的额外支持,但后者支持的功能现在还不如前者丰富,具体的对比可以看官方文档:https://theme-next.org/docs/third-party-services/math-equations。
这里选择 mathjax ,通过修改配置即可启用:
sudo npm uninstall hexo-renderer-marked --save
sudo npm install hexo-renderer-kramed --save
注意:使用的时候需要在 文章开头加上mathjax: true
2.添加APlayer音乐播放器
为博客添加音乐播放器功能
download
点击访问Aplayer源码:GitHub Aplayer。下载到本地,解压后将dist文件夹复制到themes\next\source文件夹下。
music.js
新建themes\next\source\dist\music.js文件,添加内容:
const ap = new APlayer({
    container: document.getElementById('aplayer'),
    fixed: true,
    autoplay: true,
    audio: [
      {
        name: "暗涌",
        artist: '王菲',
        url: 'http://www.ytmp3.cn/down/52980.mp3',
        cover: 'http://p1.music.126.net/w8RFsMH8VJfPsBmVudYGsA==/109951163020569833.jpg?param=130y130',
      },
      {
        name: 'Wonderful U',
        artist: 'AGA',
        url: 'http://www.ytmp3.cn/down/51181.mp3',
        cover: 'http://p1.music.126.net/Blb_Gi0AJTWIEBLr189F4A==/18791753232142320.jpg?param=130y130',
      },
      {
        name: '浮夸',
        artist: '陈奕迅',
        url: 'http://www.ytmp3.cn/down/49639.mp3',
        cover: 'http://p1.music.126.net/Bl1hEdJbMSj5YJsTqUjr-w==/109951163520311175.jpg?param=130y130',
      }
    ]
});
源码参数解释APlayer 中文文档
audio对应的便是音频文件,所以音乐播放器需要播放的音乐是需要自己进行相关信息(如歌曲链接、歌词、封面等)的配置。这里放一个mp3音乐外链网站:http://up.mcyt.net/ ,搜索对应的音乐,然后复制url和右击封面图片链接粘贴到对应的位置上就行了。
_layout.swig
打开themes\next\layout_layout.swig文件,在 里面添加以下代码:
<link rel="stylesheet" href="/dist/APlayer.min.css">
<div id="aplayer"></div>
<script type="text/javascript" src="/dist/APlayer.min.js"></script>
<script type="text/javascript" src="/dist/music.js"></script>
重新生成,访问页面,就能看到左下角的音乐播放器了。
3.DaoVoice在线联系功能
https://yfzhou.coding.me/2018/08/08/Hexo-Next%E6%90%AD%E5%BB%BA%E4%B8%AA%E4%BA%BA%E5%8D%9A%E5%AE%A2%EF%BC%88%E9%9B%86%E6%88%90DaoVoice%E5%9C%A8%E7%BA%BF%E8%81%94%E7%B3%BB%E5%8A%9F%E8%83%BD%EF%BC%89/
自定义样式支持
1.文章末尾统一添加“本文结束”标记
主题配置文件取消注释
custom_file_path:
  postBodyEnd: source/_data/post-body-end.swig
接着打开\themes\next\layout_macro\post.swig文件
<div>
  {% if not is_index %}
    {% include 'passage-end-tag.swig' %}
  {% endif %}
</div>
在路径 /source/_data 下创建/修改 post-body-end.swig文件,并添加以下内容
<div>
    {% if not is_index %}
        <div style="text-align:center;color: #ccc;font-size:14px;">-------------本文结束<i class="fa fa-paw"></i>感谢您的阅读-------------</div>
    {% endif %}
</div>
2.主题及标题栏背景图
首先主题配置文件取消注释
custom_file_path:
  style: source/_data/styles.styl
在路径~/hexo_blog/source/_data创建/修改 styles.styl文件,并添加以下内容
// 添加背景图片
body {
      background: url(https://source.unsplash.com/random/1600x900?wallpapers);//自己喜欢的图片地址
      background-size: cover;
      background-repeat: no-repeat;
      background-attachment: fixed;
      background-position: 50% 50%;
}


// 标题栏背景
.site-meta {
    padding: 20px 0;
    color: #fff;
    background: $blue;
    background-repeat: no-repeat;
    background-attachment:fixed;
    background-position:center;
    background-size:cover;
}

// 修改主体透明度
.main-inner{
    background: #fff;
    opacity: 0.95;
}

// 修改菜单栏透明度,会引起本地搜索菜单bug
//.header-inner {
//    opacity: 0.95;
//}

// 主页文章添加阴影效果
.post {
   margin-top: 60px;
   margin-bottom: 60px;
   padding: 25px;
   -webkit-box-shadow: 0 0 5px rgba(202, 203, 203, .5);
   -moz-box-shadow: 0 0 5px rgba(202, 203, 204, .5);
}
3.修改主副标题字体颜色
继续在/source/_data/styles.styl文件中添加,帮你挑选颜色的网站: color-hex
//主标题颜色
.brand{
    color: $white
}

//副标题颜色
.site-subtitle {
    margin-top: 10px;
    font-size: 13px;
    color: #ffffff;
}
4.修改按钮,选择区域,代码块,表格等样式
首先主题配置文件取消注释
custom_file_path:
  style: source/_data/variables.styl
在路径 /source/_data 下创建/修改 variables.styl文件(相当于修改主题文件 next/source/css/_variables/base.styl),并添加以下内容
// Buttons
// --------------------------------------------------
$btn-default-bg                 = white;
$btn-default-color              = #49b1f5;
$btn-default-font-size          = $font-size-small;
$btn-default-border-width       = 2px;
$btn-default-border-color       = #49b1f5;
$btn-default-hover-bg           = #49b1f5;
$btn-default-hover-color        = white;
$btn-default-hover-border-color = #49b1f5;

// Selection
$selection-bg                 = #49b1f5;
$selection-color              = white;

// Code & Code Blocks
// --------------------------------------------------
$code-font-family               = $font-family-monospace;
$code-border-radius             = 3px;
$code-foreground                = $black-light;
$code-background                = #edf1ff;

// Table
// --------------------------------------------------
$table-width                    = normal;  //next默认100%
$table-border-color             = $gray-lighter;
$table-font-size                = $font-size-small;
$table-content-alignment        = left;
$table-content-vertical         = middle;
$table-th-font-weight           = 700;
$table-cell-padding             = 8px;
$table-cell-border-right-color  = $gainsboro;
$table-cell-border-bottom-color = $gray-lighter;
$table-row-odd-bg-color         = #f9f9f9;
$table-row-hover-bg-color       = $whitesmoke;
速度优化
托管 Hexo 博客到 Coding
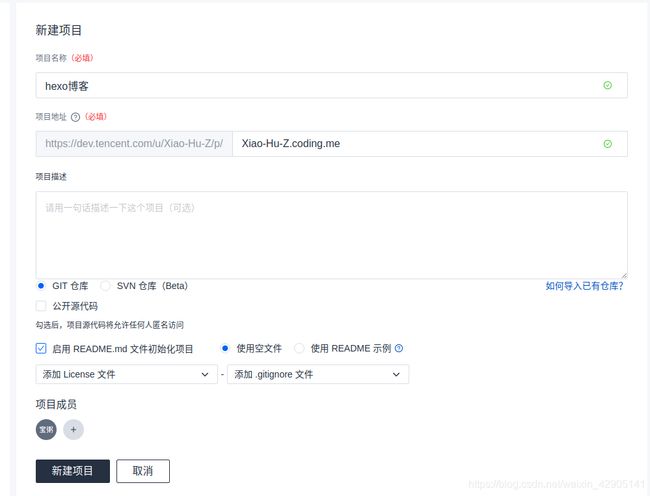
注意:coding账号注册时请选择个人版(如果注册了团队版,你会发现跟网上给的教程不太一样,而且,部署出来的网页地址无法修改成xxx.coding.me)。
# Deployment
## Docs: https://hexo.io/docs/deployment.html
deploy:
  type: git
  repo:
    github: https://github.com/Xiao-Hu-Z/Xiao-Hu-Z.github.io.git
    coding: [email protected]:Xiao-Hu-Z/Xiao-Hu-Z.coding.me.git
  branch: master
该配置指定了Coding仓库的地址,并通过HTTPS方式进行连接。同样我们也可以通过SSH方式。
安装完成后,开始项目的部署操作,用的是HTTPS方式,会弹出输入用户名密码的输入框,键入你的coding用户名密码即可。
gulp 4.0实现静态资源压缩
sudo npm install gulp
- 安装这些功能模块
sudo npm install gulp-htmlclean gulp-htmlmin gulp-minify-css gulp-uglify --save
- 创建任务在站点根目录下新建gulpfile.js文件
var gulp = require('gulp');

//Plugins模块获取
var minifycss = require('gulp-minify-css');
var uglify = require('gulp-uglify');
var htmlmin = require('gulp-htmlmin');
var htmlclean = require('gulp-htmlclean');
//压缩css
gulp.task('minify-css', function () {
return gulp.src('./public/**/*.css')
.pipe(minifycss())
.pipe(gulp.dest('./public'));
});
//压缩html
gulp.task('minify-html', function () {
return gulp.src('./public/**/*.html')
.pipe(htmlclean())
.pipe(htmlmin({
removeComments: true,
minifyJS: true,
minifyCSS: true,
minifyURLs: true,
}))

.pipe(gulp.dest('./public'))
});
//压缩js 不压缩min.js
gulp.task('minify-js', function () {
return gulp.src(['./public/**/*.js', '!./public/**/*.min.js'])
.pipe(uglify())
.pipe(gulp.dest('./public'));
});

//4.0以前的写法
//gulp.task('default', [
  //  'minify-html', 'minify-css', 'minify-js'
//]);
//4.0以后的写法
// 执行 gulp 命令时执行的任务
gulp.task('default', gulp.parallel('minify-html', 'minify-css', function() {
  // Do something after a, b, and c are finished.
}));
参考:NexT主题进阶
Hexo Theme NexT 主题个性化配置最佳实践
Hexo+Coding搭建自己的博客网站系列4-加速Hexo博客
Hexo+Coding搭建自己的博客网站系列2-部署博客到Coding上
使用coding加快博客网站访问速度
托管 Hexo 博客到 Coding
2019hexo博客部署到coding该绕的坑


