SSM Spring 入门(二) Spring 配置文件介绍
延迟加载
applicationContext.xml配置的所有bean都会在容器被创建的时候被创建出来,如果配置的bean较多,那么在创建容器的 时候,会产生内存过大的问题(这种情况下机器硬件性能较为落后的时候体现的比较名明显);为了解决这种问题就出现了延迟加载
需要注意的地方:Spring容器帮我们创建的User是通过空参构造器创建的,假如我们的User类中只含有含参构造器而不含有无参构造器,那么我们在创建容器(也就是执行 ApplicationContext ac=new ClassPathXmlApplicationContext(“applicationContext.xml”);的时候)会报错,因为我们的Spring容器没办法找到无参构造器并初始化一个User对象
scope 属性
- scope=“singleton”
scope属性的默认值,表示单例
@Test
	public void Test3() {


		ClassPathXmlApplicationContext ac=new ClassPathXmlApplicationContext("applicationContext.xml");

		User u1=ac.getBean(User.class);
		User u2=ac.getBean(User.class);

		System.out.println(u1==u2);
	}
输出结果为 true 说明我们创建的两个引用u1 u2指向了同一个对象,这说明了Spring容器只为我们创建了一个User对象
- scope=“prototype”
用同样的方式检查,我们发现容器创建了多个不同的User对象 - scope=“request”
request 在web 环境下如果scope 属性为request 独享的生命周期和request请求一致 - scope=“session”
session 同理 ,生命周期和session 一致
一般情况下使用的singleton
init-method和destroy-method
- 在User类中创建两个方法
	//initMethod
	public void initMethod() {

		System.out.println("userInit");
	}
	//destroyMethod
	public void destroyMethod() {

		System.out.println("destroyMethod");
	}
	@Test
	public void Test3() {

		ClassPathXmlApplicationContext ac = new ClassPathXmlApplicationContext("applicationContext.xml");

		User user=ac.getBean(User.class);

		ac.close();
	}
因为将容器关闭不是ApplicationContext的方法,所以这里我们创建ClassPathXmlApplicationContext对象的时候并不需要向上转型
由实验结果可以发现,(假设是延迟加载)我们从容器中获取User对象的时候,因为延迟加载,我们请求获取User对象的时候容器才会创建,这个时候先调用User对象的无参构造器,然后执行initMethod,当我们执行ac.close();之后才会调用destroyMethod(当使用 init-method 和 destroy-method 的时候,使用 prototype 时 Spring 不会负责销毁容器对象,即 Spring 不会调用 destroy-method 所指定的方法,所以需要去掉 scope 属性,使用默认的 singleton)
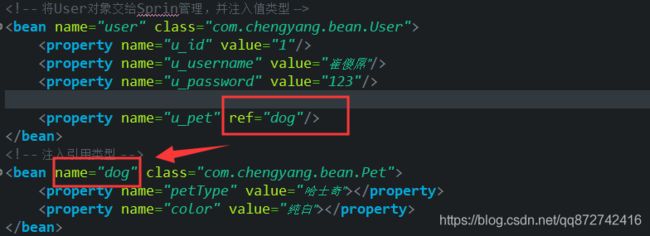
set方式注入
普通类型和引用类型的注入
<bean name="user" class="com.chengyang.bean.User">
	<property name="u_id" value="1"/>
	<property name="u_username" value="崔傻屌"/>
	<property name="u_password" value="123"/>

	<property name="u_pet" ref="dog"/>
bean>

<bean name="dog" class="com.chengyang.bean.Pet">
	<property name="petType" value="哈士奇">property>
	<property name="color" value="纯白">property>
bean>
构造器注入
- 在User类中创建构造器
	public User(String u_username, Pet u_pet) {

		System.out.println("method 1:String ,Pet");
		this.u_username = u_username;
		this.u_pet = u_pet;
	}
- 在配置文件中配置
<bean name="dog" class="com.chengyang.bean.Pet">
	<property name="petType" value="哈士奇">property>
	<property name="color" value="纯白">property>
bean>

<bean name="user" class="com.chengyang.bean.User">
	<constructor-arg  name="u_username" value="崔仓豪"/>
	<constructor-arg name="u_pet" ref="dog"/>
bean>
引用类型使用ref 否则使用value 这里配置参数顺序可以改变
- 在测试类中
@Test
	public void Test4() {


		ClassPathXmlApplicationContext ac=new ClassPathXmlApplicationContext("applicationContext_injection.xml");

		User user=(User) ac.getBean("user");

		System.out.println(user);

	}
复杂类型引入
- 配置文件
<bean name="collection" class="com.chengyang.bean.MyCollection">

	<property name="array">
		<array>
			<value>123value>
			<value>abcvalue>
		array>
	property>

	<property name="list">
		<list>
			<value>123value>
			<value>abcvalue>
		list>
	property>

	<property name="set">
		<set>
			<value>123212value>
			<value>absacvalue>
		set>
	property>

	<property name="map">
		<map>
			<entry key="username" value="root"/>
			<entry key="password" value="123"/>
		map>
	property>

	<property name="properties">
		<props>
			<prop key="username">崔傻屌prop>
		props>
	property>
bean>
- bean/MyCollection
package com.chengyang.bean;

import java.util.*;

public class MyCollection {

	//数组
	private Object[] array;
	//list
	private List list;
	//set
	private Set set;
	//map
	private Map map;
	//properties
	private Properties properties;

	public Object[] getArray() {

		return array;
	}
	public void setArray(Object[] array) {

		this.array = array;
	}
	public List getList() {

		return list;
	}
	public void setList(List list) {

		this.list = list;
	}
	public Set getSet() {

		return set;
	}
	public void setSet(Set set) {

		this.set = set;
	}
	public Map getMap() {

		return map;
	}
	public void setMap(Map map) {

		this.map = map;
	}
	public Properties getProperties() {

		return properties;
	}
	public void setProperties(Properties properties) {

		this.properties = properties;
	}
	@Override
	public String toString() {

		return "MyCollection [properties=" + properties + "]";
	}

}
注解配置-将对象注册到容器
- 创建配置文件 applicationContext_annotation.xml
<beans xmlns="http://www.springframework.org/schema/beans"
	xmlns:xsi="http://www.w3.org/2001/XMLSchema-instance"
	xmlns:context="http://www.springframework.org/schema/context"
	xsi:schemaLocation="http://www.springframework.org/schema/beans http://www.springframework.org/schema/beans/spring-beans.xsd http://www.springframework.org/schema/context http://www.springframework.org/schema/context/spring-context-4.3.xsd http://www.springframework.org/schema/context http://www.springframework.org/schema/context/spring-context.xsd ">


	<context:component-scan base-package="com.chengyang.bean">context:component-scan>

	<bean name="cat" class="com.chengyang.bean.Pet">
		<property name="petType" value="橘猫">property>
		<property name="color" value="橘色">property>
	bean>

	<bean name="dog" class="com.chengyang.bean.Pet">
		<property name="petType" value="哈士奇">property>
		<property name="color" value="纯白">property>
	bean>

beans>
接下来就是在对象中使用注解配置
- 创建User类 User2.java
package com.chengyang.bean;
import javax.annotation.PostConstruct;
import javax.annotation.PreDestroy;
import javax.annotation.Resource;
import org.springframework.beans.factory.annotation.Autowired;
import org.springframework.beans.factory.annotation.Value;
import org.springframework.context.annotation.Scope;
import org.springframework.stereotype.Component;
//
- 上面介绍了反射注入和Set前注入
- @PostConstruct 注解init 方法
- @PreDestroy注解destroy 方法
- 当配置对象是引用类型的时候使用自动装配 @Resource(name=“dog”),这个dog 是在applicationContext_annotation.xml中配置好的
- @Scope(scopeName=“singleton”)设置为单例
- @Component(“user”)代替 “<” bean name=“user” class=“com.chengyang.bean.User” “>”
- 测试类
	@Test
	public void Test1() {

		ClassPathXmlApplicationContext ac=new ClassPathXmlApplicationContext("applicationContext_annotation.xml");
		User2 u2=(User2)ac.getBean("user");
		System.out.println(u2);
		ac.close();
	}
本博客为学习笔记,素材源自网络 SIKI学院
侵删


