在学习了flash中的事件机制后,我们就开始学习flex与Java中的3种通信方式。Flex与Java通信有3中方式:
●flex访问Java普通类使用RemoteObject方式,这也是用的最多的一种方式。
●flex访问Java服务器类(如servlet)用HttpService方式。
●Flex与WebService交互用WebService方式。
今天就先来学习flex访问普通Java类。在学习之前我们需要考虑这么一个问题:由于我们这3个例子都是以登陆为例子进行的,所以尽量让登陆界面分离出来可以重复使用,这用到Flex中的module。我们怎么将module中的数值传到父窗口去呢?我们又想到上节中学习的自定义事件。好了,既然想通了,就开始今天的学习。
将MyEclipse切换到MyEclipse视图,新建一个与flex交互的普通Java类,代码如下所示:
|
1
2
3
4
5
6
7
8
9
10
11
12
13
|
package
com.it161.test;
public
class
RemoteObjectDemo {
public
boolean
login(String username,String passworld ){
if
(username.equals(
"admin"
)&&passworld.equals(
"123"
)){
returntrue;
}
else
{
returnfalse;
}
}
}
|
在WebRoot/WEB-INF/flex目录下的remoting-config.xml文件中添加如下所示代码:
|
1
2
3
4
5
|
<
destination
id
=
"remoteObjectDemo"
>
<
           properties
           >
<
source
>com.yqsn.test.RemoteObjectDemo
|
将MyEclipse切换到Flash视图,首先自定义一个事件类LoginEvent.as,为以后传值服务,代码如下所示:
|
1
2
3
4
5
6
7
8
9
10
11
12
13
14
15
16
17
18
19
20
21
22
23
24
25
26
27
28
|
package
com.it161.ases
{
import
flash.events.Event;
public
class
LoginEvent
extends
Event
{
public
static
const
LOGIN_EVENT:
String
=
"LOGIN_EVENT"
;
private
var
_loginMess:
Object
;
public
function
LoginEvent(type:
String
,loginMess:
Object
=
null
, bubbles:
Boolean
=
false
,cancelable:
Boolean
=
false
)
{
this
._loginMess=loginMess;
super
(type, bubbles, cancelable);
}
public
functionget loginMess():
Object
{
return
_loginMess;
}
public
functionset loginMess(value:
Object
):
void
{
_loginMess = value;
}
}
}
|
在这个类中我们定义了一个事件类型LOGIN_EVENT,定义了一个Object类型的变量,用于存值。
接着新建一个登陆信息的VO类LoginMess.as,为以后存贮用户信息服务,代码如下所示:
|
1
2
3
4
5
6
7
8
9
10
11
12
13
14
15
16
17
18
19
20
21
22
23
24
25
26
27
28
29
30
31
32
33
34
35
36
|
package
com.it161.ases
{
publicclass LoginMess
{
private
var
_username:
String
;
private
var
_passworld:
String
;
publicfunction LoginMess()
{
}
publicfunctionget passworld():
String
{
return
_passworld;
}
publicfunctionset passworld(value:
String
):
void
{
_passworld = value;
}
publicfunctionget username():
String
{
return
_username;
}
publicfunctionset username(value:
String
):
void
{
_username = value;
}
}
}
|
新建一个登陆界面,新建一个MXMLModule文件LoginModule.mxml,代码如下所示:
|
1
2
3
4
5
6
7
8
9
10
11
12
13
14
15
16
17
18
19
20
21
22
23
24
25
26
27
28
29
30
31
32
33
34
35
36
37
38
39
40
41
42
43
44
45
46
47
48
49
50
51
52
53
54
55
56
57
58
59
60
61
62
63
64
|
<
s:Module
xmlns:fx
=
"http://ns.adobe.com/mxml/2009"
xmlns:s
=
"library://ns.adobe.com/flex/spark"
xmlns:mx
=
"library://ns.adobe.com/flex/mx"
width
=
"256"
height
=
"213"
>
<
           fx:Script
           >
import com.flex.ases.LoginEvent;
import mx.controls.Alert;
import mx.events.CloseEvent;
import mx.managers.PopUpManager;
protectedfunction login_clickHandler(event:MouseEvent):void
{
// TODOAuto-generated method stub
var loginMess:Object=new Object;
loginMess.username=userName.text;
loginMess.passworld=passworld.text;
if(userName.text=="" ||passworld.text==""){
Alert.show("用户名或密码不能为空!");
return;
}
this.dispatchEvent(newLoginEvent(LoginEvent.LOGIN_EVENT,loginMess));
userName.text="";
passworld.text="";
PopUpManager.removePopUp(this);
}
protectedfunction loginTitleWindow_closeHandler(event:CloseEvent):void
{
// TODO Auto-generatedmethod stub
userName.text="";
passworld.text="";
PopUpManager.removePopUp(this);
}
]]>
<
           fx:Declarations
           >
<
s:TitleWindow
x
=
"1"
y
=
"1"
width
=
"256"
height
=
"213"
title
=
"登陆"
id
=
"loginTitleWindow"
close
=
"loginTitleWindow_closeHandler(event)"
>
<
s:Form
width
=
"100%"
height
=
"183"
>
<
s:FormItem
left
=
"60"
height
=
"39"
width
=
"224"
label
=
"用户名"
required
=
"true"
>
<
s:TextInput
id
=
"userName"
/>
<
s:FormItem
required
=
"true"
width
=
"224"
label
=
"密码"
>
<
s:TextInput
id
=
"passworld"
displayAsPassword
=
"true"
/>
<
s:FormItem
width
=
"227"
>
<
s:Button
id
=
"login"
label
=
"登陆"
click
=
"login_clickHandler(event)"
/>
|
这个页面以后我们反复使用,这就是module文件的优点之一。在这个页面中我们不处理与Java交互的部分,因为既然是公共页面,我们应该将于Java交互的部分放在相应引用的文件中。
接着创建主页面RemoteObjectDemo.mxml,代码如下所示:
|
1
2
3
4
5
6
7
8
9
10
11
12
13
14
15
16
17
18
19
20
21
22
23
24
25
26
27
28
29
30
31
32
33
34
35
36
37
38
39
40
41
42
43
44
45
46
47
48
49
50
51
52
53
54
55
56
57
58
59
60
61
62
63
64
65
66
67
68
|
<
s:Application
xmlns:fx
=
"http://ns.adobe.com/mxml/2009"
xmlns:s
=
"library://ns.adobe.com/flex/spark"
xmlns:mx
=
"library://ns.adobe.com/flex/mx"
width
=
"100%"
height
=
"100%"
>
<
           fx:Script
           >
import com.flex.ases.LoginEvent;
import com.flex.ases.LoginMess;
import com.flex.component.LoginTitleWindow;
import com.flex.module.LoginModule;
import mx.collections.ArrayCollection;
import mx.controls.Alert;
import mx.managers.PopUpManager;
import mx.rpc.events.FaultEvent;
import mx.rpc.events.ResultEvent;
[Bindable]
privatevar loginMess:LoginMess=new LoginMess();
privatevar loginModule:LoginModule=new LoginModule();
protectedfunction login_clickHandler(event:MouseEvent):void
{
PopUpManager.addPopUp(loginModule,this,true);
PopUpManager.centerPopUp(loginModule);
loginModule.addEventListener(LoginEvent.LOGIN_EVENT,getLoginMess);
}
publicfunction getLoginMess(event:LoginEvent):void{
var username:String=event.loginMess['username'];
var passworld:String=event.loginMess['passworld'];
loginMess.username=username;
remoteObj.login(username,passworld);
}
protectedfunction remoteObj_resultHandler(event:ResultEvent):void
{
// TODOAuto-generated method stub
var str:Boolean=event.result as Boolean;
if(str){
Alert.show(loginMess.username+",欢迎您回来...","提示");
aaa.text=loginMess.username+",欢迎归来...";
bbb.text="";
login.label="";
}else{
Alert.show("登录失败,您输入的用户名或者密码不存在!","提示");
}
}
protectedfunction remoteObj_faultHandler(event:FaultEvent):void
{
// TODOAuto-generated method stub
Alert.show(event.fault.message,"出错了");
}
]]>
<
           fx:Declarations
           >
<
s:RemoteObject
id
=
"remoteObj"
destination
=
"remoteObjectDemo"
result
=
"remoteObj_resultHandler(event)"
fault
=
"remoteObj_faultHandler(event)"
/>
<
s:Label
x
=
"219"
y
=
"150"
width
=
"182"
height
=
"27"
fontSize
=
"18"
id
=
"aaa"
text
=
"您还没有登陆,现在就"
verticalAlign
=
"middle"
/>
<
mx:LinkButton
x
=
"409"
y
=
"150"
width
=
"57"
height
=
"27"
label
=
"登陆"
id
=
"login"
fontSize
=
"18"
click
=
"login_clickHandler(event)"
/>
<
s:Label
x
=
"478"
y
=
"150"
width
=
"37"
height
=
"27"
id
=
"bbb"
fontSize
=
"18"
text
=
"吧!"
verticalAlign
=
"middle"
/>
|
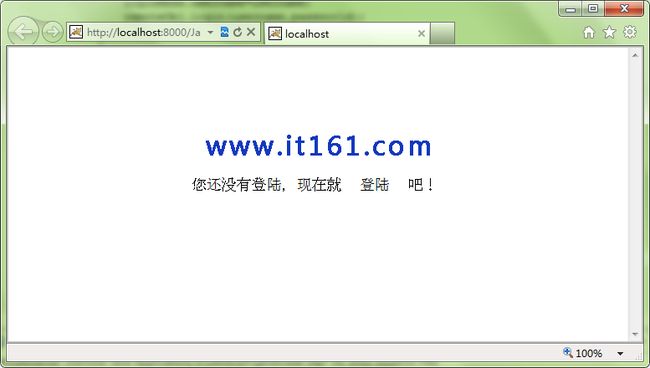
好了,页面与类算是处理完了,打开服务器并部署项目,运行felx页面RemoteObjectDemo.mxml,如下所示:
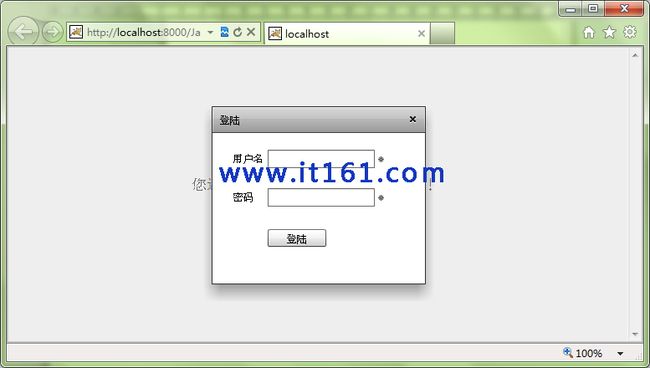
当我们点击“登陆”按钮后,弹出module页面,如下所示:
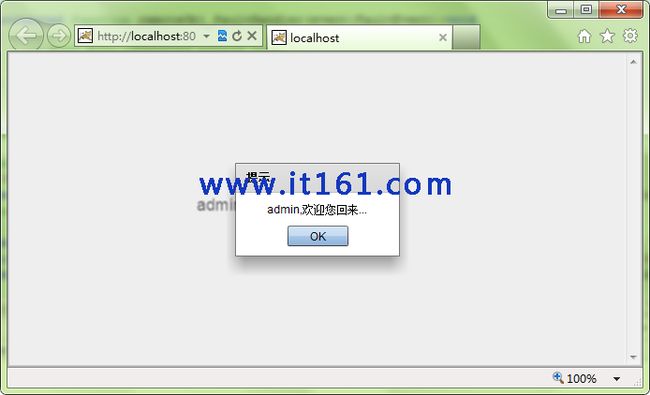
当我们输入的用户名和密码都正确时则提示你登陆正确:
输入错误则提示你输入不正确:
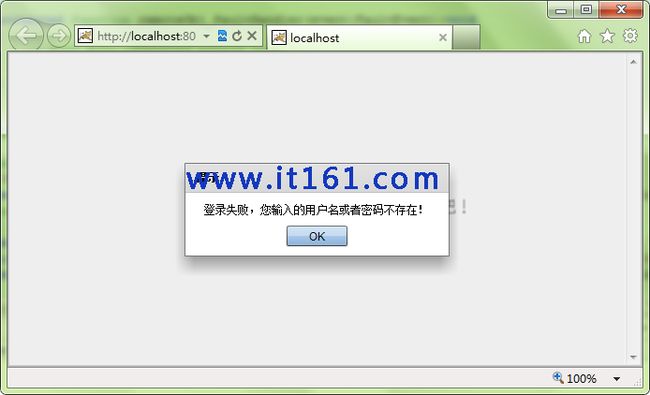
可以看出,我们输入的用户名与密码与Java中的login方法进行了交互。
好了,就学习这么多,下节将学习HttpService方式。
原创文章,转载请注明出处:http://www.it161.com/article/webDetail?articleid=140111224840
更多原创内容,请访问:http://www.it161.com/