基于 docker 搭建 elasticsearch:5.6.8 分布式集群环境
文章目录
- 1. 目录结构
- 2. 前置配置
- 3. 单机版 es 集群搭建
- 4. es 客户端工具安装
- 5. 通过 api 操作索引
- 5.1 创建索引
- 5.2 创建 index 对应的 mapping
- 5.3 查询索引信息
- 5.4 查看索引 mapping
- 5.5 修改索引配置
- 5.6 插入数据
- 5.7 批量导入数据
- 5.8 创建带 mapping 的索引
- 5.9 多索引批量导入
- 5.10 检索文档
- 5.11 删除文档
- 6 文档元数据
- 7. 索引创建原则
- 8. 对比关系型数据库
- 附录 - 中文分词器插件安装
- 附录 - 可视化 docker 管理工具安装
- 附录 - 参考网址
1. 目录结构
es
├── data1		# es1 数据文件挂载目录
├── data2		# es2 数据文件挂载目录
├── data3		# es3 数据文件挂载目录
├── es1.yml 	# es1 配置文件
├── es2.yml		# es2 配置文件
└── es3.yml		# es3 配置文件
强调: 如果 es 选的 6.x 版本的话,那么需将data1 data2 data3 开启777权限。 命令:sudo chmod 777 data*
2. 前置配置
# 1. 调高JVM线程数限制数量, 防止启动容器时,报出如下错误:
	#  bootstrap checks failed max virtual memory areas vm.max_map_count [65530] likely too low, increase to at least [262144]
# 方式1: 运行 ELK 镜像需要 vm.max_map_count 至少需要 262144 内存(永久性修改)
sudo vim /etc/sysctl.conf
	# 存在 vm.max_map_count 参数则修改,没有则新增
	vm.max_map_count = 262144

# 方式2: 临时改变某个指定参数的值
sysctl -w vm.max_map_count=262144

# 重新加载内核参数
sudo sysctl -p
3. 单机版 es 集群搭建
# 创建数据文件挂载目录
mkdir -p ./es/data1 ./es/data2 ./es/data3

# 创建 es 配置文件, 文件内容见下面 git 仓库
touch es1.yml  es2.yml  es3.yml

# 拉取 es 镜像
docker pull elasticsearch:5.6.8

# 启动 es 集群 节点1 实例
docker run -d -e ES_JAVA_OPTS="-Xms256m -Xmx256m" \
	-p 2181:2181 -p 7050:7050 \
	-v /data/es/es1.yml:/usr/share/elasticsearch/config/elasticsearch.yml \
	-v /data/es/data1:/usr/share/elasticsearch/data \
	--name es1 elasticsearch:5.6.8

# 启动 es 集群 节点2 实例
docker run -d -e ES_JAVA_OPTS="-Xms256m -Xmx256m" \
	-p 2888:2888 -p 7051:7051 \
	-v /data/es/es2.yml:/usr/share/elasticsearch/config/elasticsearch.yml \
	-v /data/es/data2:/usr/share/elasticsearch/data \
	--name es2 elasticsearch:5.6.8

# 启动 es 集群 节点3 实例
docker run -d -e ES_JAVA_OPTS="-Xms256m -Xmx256m" \
	-p 3888:3888 -p 7053:7053 \
	-v /data/es/es3.yml:/usr/share/elasticsearch/config/elasticsearch.yml \
	-v /data/es/data3:/usr/share/elasticsearch/data \
	--name es3 elasticsearch:5.6.8

# 查看节点状态, 以下三个地址均可
http://192.168.10.1:2181/_cat/nodes?pretty
http://192.168.10.1:2888/_cat/nodes?pretty
http://192.168.10.1:3888/_cat/nodes?pretty

# 查看集群健康, 以下三个地址均可
http://192.168.10.1:2181/_cluster/health
http://192.168.10.1:2181/_cluster/health
http://192.168.10.1:3888/_cluster/health

# 清理 es 集群容器实例
docker rm -f $(docker ps -a | grep "elasticsearch" | awk '{print $1}')
设置
-e ES_JAVA_OPTS="-Xms256m -Xmx256m"原因: /etc/elasticsearch/jvm.options 默认jvm最大最小内存是2G。 验证命令如下:
- docker exec -it es1 bash
- cat /etc/elasticsearch/jvm.options | egrep “Xms|Xmx”
es*.yml配置文件地址: https://github.com/AnswerAIL/aal-csdn-docs/tree/master/es
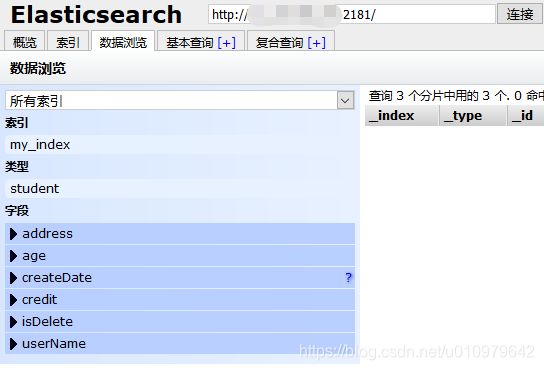
4. es 客户端工具安装
# 下载镜像
docker pull mobz/elasticsearch-head:5
# 启动实例
docker run -d -p 7058:9100 --name es-manager mobz/elasticsearch-head:5
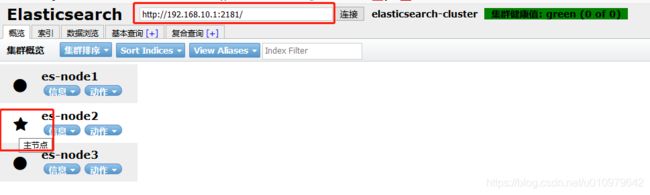
# 浏览器端访问
http://192.168.10.1:7058/
页面呈现效果
5. 通过 api 操作索引
5.1 创建索引
	# 执行以下指令, 创建 my_index  索引
	# number_of_shards: 设置索引分片个数
	# number_of_replicas: 设置索引副本个数
	# 格式: http://192.168.10.1:2181/{索引名称}
	curl -X PUT http://192.168.10.1:2181/my_index -d '
	 {
	   "settings": {
	     "number_of_shards": 3,
	     "number_of_replicas": 1
	   }
	 }'
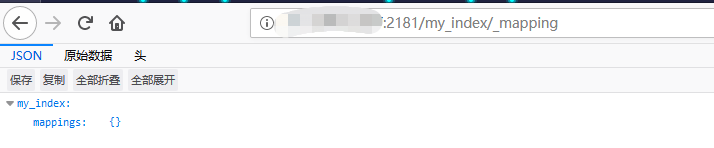
效果呈现

新建的索引 my_index 中 mapping 是一个空集
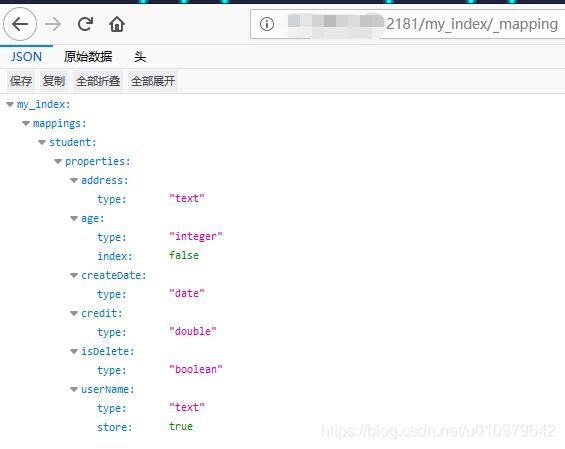
5.2 创建 index 对应的 mapping
# 格式: http://192.168.10.1:2181/{索引名称}/{类型}/_mapping
curl -X POST http://192.168.10.1:2181/my_index/student/_mapping -d '
{
	"student": {
		"properties": {
			"userName": {
				"type": "text",
				"store": "true"
			},
			"age": {
				"type": "integer",
				"index": "false"
			},
			"credit": {
				"type": "double"
			},
			"isDelete": {
				"type": "boolean"
			},
			"address": {
				"type": "text"
			},
			"createDate": {
				"type": "date"
			}
		}
	}
}'
此时查找索引 my_index 对应的mapping
5.3 查询索引信息
- 格式: http://192.168.10.1:2181/{索引名称}/_search_shards
- eg: http://192.168.10.1:2181/my_index/_search_shards
5.4 查看索引 mapping
- 格式: http://192.168.10.1:2181/{索引名称}/_mapping
- eg: http://192.168.10.1:2181/my_index/_mapping
5.5 修改索引配置
	# 格式: http://192.168.10.1:2181/{索引名称}/_settings
	curl -X PUT http://192.168.10.1:2181/my_index/_settings -d '
	 {
	   	"number_of_replicas": 2
	 }'
- number_of_shards: 索引分片个数, 默认为5.
在索引创建后不可修改- number_of_replicas: 索引副本个数, 默认为1.
该参数可随时修改
5.6 插入数据
	# 格式: http://192.168.10.1:2181/{索引名称}/{类型}, 此格式 _id 会自动生成
	# 格式: http://192.168.10.1:2181/{索引名称}/{类型}/{_id}
	curl -X POST http://192.168.10.1:2181/my_index/student -d '
	 {
	   "userName": "answer",
	   "age": 25,
	   "address": "pt",
	   "credit": 99.98,
	   "isDelete": false,
	   "createDate": "2019-05-12"
	 }'

5.7 批量导入数据
curl -X PUT “http://192.168.10.1:2181/_bulk” -H ‘Content-Type: application/json’ --data-binary @/data/es/data.json
data.json
{"index": {"_index":"my_index","_type":"student"}}
{"userName": "zhangsan", "age": 21, "address": "shenzhen", "credit": 90.1, "isDelete": false, "createDate": "2019-05-12"}
{"index": {"_index":"my_index","_type":"student"}}
{"userName": "lisi", "age": 12, "address": "beijing", "credit": 90.1, "isDelete": false, "createDate": "2019-05-12"}

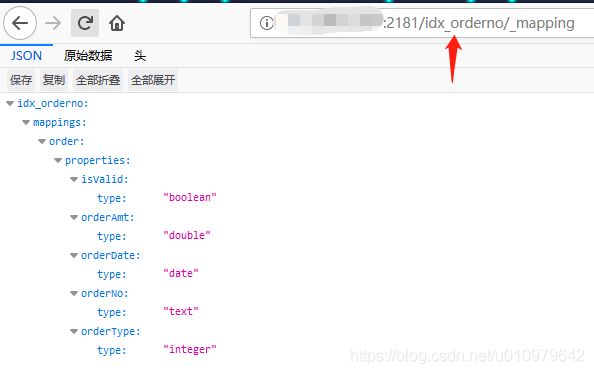
5.8 创建带 mapping 的索引
	# http://192.168.10.1:2181/{索引名称}
	curl -X PUT http://192.168.10.1:2181/idx_orderno -d '
	 {
	   "settings": {
	     "number_of_shards": 3,
	     "number_of_replicas": 1
	   },
	   "mappings": {
	     "order": {
	       "properties": {
	         "orderNo": {
	           "type": "text"
	         },
	         "orderType": {
	           "type": "integer"
	         },
	         "orderAmt": {
	           "type": "double"
	         },
	         "isValid": {
	           "type": "boolean"
	         },
	         "orderDate": {
	           "type": "date"
	         }
	       }
	     }
	   }
	 }'
5.9 多索引批量导入
修改 data.json 文件内容
{"index": {"_index": "my_index", "_type": "student"}}
{"userName": "paul", "age": 21, "address": "usa", "credit": 90.9, "isDelete": false, "createDate": "2019-05-12"}
{"index": {"_index": "my_index", "_type": "student"}}
{"userName": "james", "age": 32, "address": "usa", "credit": 92.1, "isDelete": false, "createDate": "2019-05-12"}

{"index": {"_index": "idx_orderno", "_type": "order"}}
{"orderNo": "20190512001", "orderType": 1, "orderAmt": 100.21, "isValid": true, "orderDate": "2019-05-12"}
{"index": {"_index": "idx_orderno", "_type": "order"}}
{"orderNo": "20190512002", "orderType": 2, "orderAmt": 890.15, "isValid": false, "orderDate": "2019-05-13"}
{"index": {"_index": "idx_orderno", "_type": "order"}}
{"orderNo": "20190512003", "orderType": 3, "orderAmt": 2890.98, "isValid": true, "orderDate": "2019-05-11"}
执行导入: curl -X PUT “http://192.168.10.1:2181/_bulk” -H ‘Content-Type: application/json’ --data-binary @/data/es/data.json
5.10 检索文档
- 格式: http://192.168.10.1:2181/{索引名称}/{类型}/{_id}/_source
- eg: http://192.168.10.1:2181/my_index/student/AWqq6Di5iA6UKPrDKXmT/_source

_source字段不会被美化,它的样子与我们输入的一致,现在只包含我们请求的字段,而且过滤了date字段
- 格式: http://192.168.10.1:2181/{索引名称}/{类型}/{_id}?pretty
- eg: http://192.168.10.1:2181/my_index/student/AWqq6Di5iA6UKPrDKXmT?pretty

pretty:在任意的查询字符串中增加pretty参数,类似于上面的例子。会让Elasticsearch美化输出(pretty-print)JSON响应以便更加容易阅读
5.11 删除文档
- 格式: curl -XDELETE http://192.168.10.1:2181/{索引名称}/{索引类型}/{_id}
- eg: curl -XDELETE http://192.168.10.1:2181/my_index/student/AWqq7x7YiA6UKPrDKXmV
6 文档元数据
| 属性 | 注释 | 说明 |
|---|---|---|
| _index | 索引 | 文档存储的地方 |
| _type | 类型 | 文档代表的对象的类 |
| _id | id仅仅是一个字符串,它与_index和_type组合时,就可以在es中唯一标识一个文档。 当创建一个文档,可以自定义_id,也可以让es帮你自动生成 |
文档的唯一标识 |
7. 索引创建原则
- 类似的数据放在一个索引,非类似的数据放不同索引
- 索引名称必须是小写的,不能用下划线开头,不能包含逗号
- index中包含了很多类似的document:类似是什么意思,其实指的就是说,这些document的fields很大一部分是相同的,你说你放了3个document,每个document的fields都完全不一样,这就不是类似了,就不太适合放到一个index里面去了
8. 对比关系型数据库
| es | 关系型数据库 |
|---|---|
| 索引(index) | 库(database) |
| 类型(type) | 表(table) |
| 文档(document) | 行(row) |
| 字段(field) | 列名(column) |
附录 - 中文分词器插件安装
	# 进入 es 集群的 es1 节点容器内部
	docker exec -it es1 bash

	cd /usr/share/elasticsearch

	# 执行安装命令, 请安装 ES 对应版本的分词器, https://github.com/medcl/elasticsearch-analysis-ik/releases
	./bin/elasticsearch-plugin install https://github.com/medcl/elasticsearch-analysis-ik/releases/download/v5.6.8/elasticsearch-analysis-ik-5.6.8.zip

	# 重启 es1 容器
	docker restart es1
ik 带有两个分词器:
ik_max_word:会将文本做最细粒度的拆分;尽可能多的拆分出词语ik_smart:会做最粗粒度的拆分;已被分出的词语将不会再次被其它词语占有
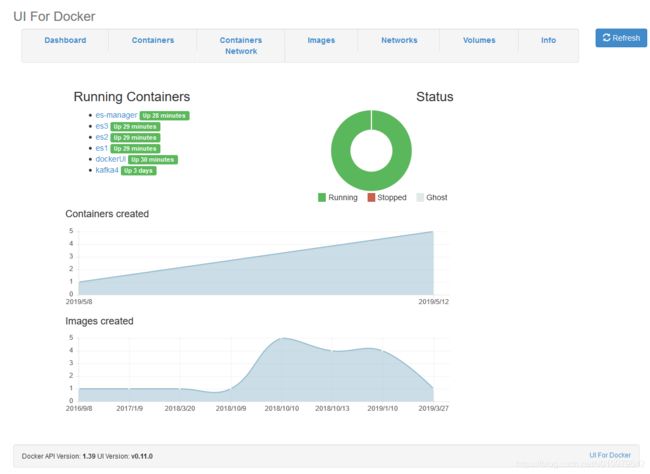
附录 - 可视化 docker 管理工具安装
# 下载 ui-for-docker 镜像
docker pull uifd/ui-for-docker

# 启动容器实例
docker run -d -p 7050:9000 --privileged -v /var/run/docker.sock:/var/run/docker.sock --name dockerUI uifd/ui-for-docker

# 浏览器端访问
http://192.168.10.1:7050/
页面呈现效果
附录 - 参考网址
- Elasticsearch Reference
- ES 配置文件参数说明
- 中文分词器 elasticsearch-analysis-ik git 地址
- ElasticSearch教程——汇总篇