java源码 - SpringMVC(1)之 初始组件
SpringMVC的本质是一个Servlet
建议看SpringMVC源码时,对Servlet和Tomcat要有一定的了解
看懂注释很重要
之前的一篇
文章目录
- 1. 环境搭建(maven)
-
- 1.1 导入pom
- 1.2 配置文件
- 2. SpringMVC的整体结构
-
- 2.1 HttpServletBean
- 2.2 FrameworkServlet
-
- initWebApplicationContext方法做了三件事
- 2.3. DispatcherServlet
1. 环境搭建(maven)
1.1 导入pom
      org.springframework
      spring-webmvc
      5.2.4.RELEASE
      compile
1.2 配置文件
配置一个Spring MVC只需要三步:
①在web.xml中配置Servlet;
②创建Spring MVC的xml配置文件;
③创建Controller和view。
过程如下,拷贝即可:
- web.xml
<web-app xmlns:xsi="http://www.w3.org/2001/XMLSchema-instance"
         xmlns="http://java.sun.com/xml/ns/javaee"
         xsi:schemaLocation="http://java.sun.com/xml/ns/javaee http://java.sun.com/xml/ns/javaee/web-app_2_5.xsd"
         id="WebApp_ID" version="2.5">


    <servlet>
        <servlet-name>dispatcherServletservlet-name>
        <servlet-class>org.springframework.web.servlet.DispatcherServletservlet-class>


        <init-param>
            <param-name>contextConfigLocationparam-name>
            <param-value>classpath:springmvc.xmlparam-value>
        init-param>

        <load-on-startup>1load-on-startup>
    servlet>


    <servlet-mapping>
        <servlet-name>dispatcherServletservlet-name>
        <url-pattern>/url-pattern>
    servlet-mapping>

web-app>
其次,还可再web.xml中配置Contextloaderlistener,其主要的功能:启动的Web容器的时候,就会默认执行它实现的方法。使用ServletContextListener接口,开发者可以在为客户端请求提供服务之前向ServletContext中添加任意的对象。这个对象启动的时候初始化,在整个运行期都可见。
- springmvc.xml
<beans xmlns="http://www.springframework.org/schema/beans"
       xmlns:xsi="http://www.w3.org/2001/XMLSchema-instance"
       xmlns:context="http://www.springframework.org/schema/context"
       xmlns:mvc="http://www.springframework.org/schema/mvc"
       xsi:schemaLocation="http://www.springframework.org/schema/beans http://www.springframework.org/schema/beans/spring-beans.xsd
        http://www.springframework.org/schema/context http://www.springframework.org/schema/context/spring-context-4.0.xsd
        http://www.springframework.org/schema/mvc http://www.springframework.org/schema/mvc/spring-mvc-4.0.xsd">


    <context:component-scan base-package="com.lyq.mvc">context:component-scan>


    <bean class="org.springframework.web.servlet.view.InternalResourceViewResolver">
        <property name="prefix" value="/WEB-INF/views/">property>
        <property name="suffix" value=".jsp">property>
    bean>


beans>
- controller和view
@Controller
public class HelloController {


    @RequestMapping("/hello")
    @ResponseBody
    public String hello() {

        return "hello";
    }

    @RequestMapping("/success")
    public String success() {

        return "success";
    }

}
success
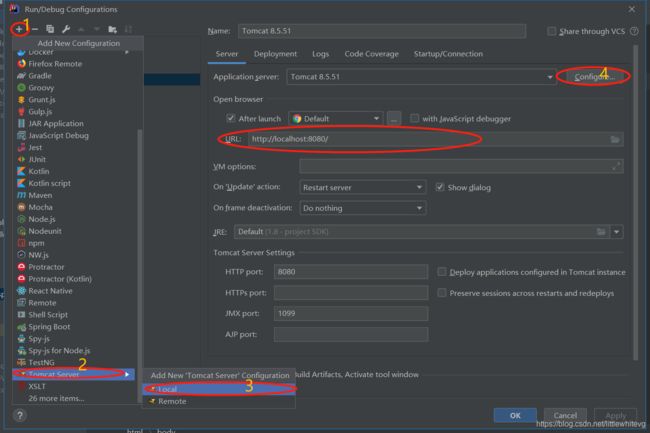
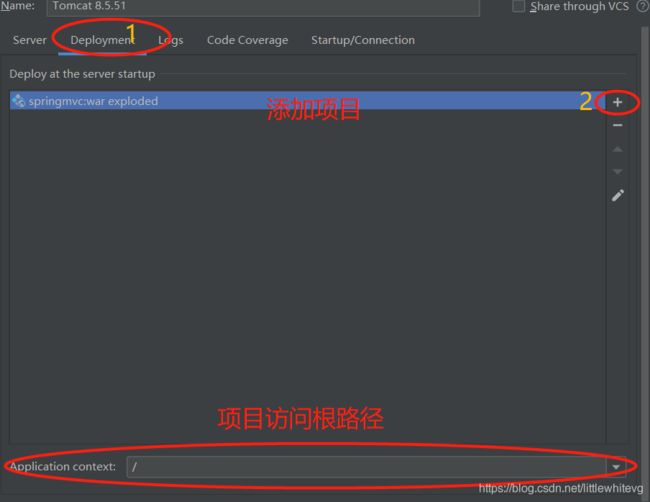
- idea配置tomcat


我修改了项目的默认index,index.jsp,目的是为了打开项目就能跳转;
Hello World!
chenggong
随后启动就搭建好了项目;
2. SpringMVC的整体结构
在IDEA下shift两下,输入SpringMVC的入口类:DispatcherServlet
Ctrl+Shift+Alt+U生成类图:

GenericServlet和HttpServlet在java中,属于java规范的接口,剩下的三个类HttpServletBean、FrameworkServlet和DispatcherServlet是SpringMVC中的。
2.1 HttpServletBean
![]()
EnvironmentCapable:表明SpringMVC框架可以提供环境,所谓环境大概是指一些配置文件,配置属性,系统变量,环境变量等;
Spring需要环境就调用这个接口的方法即可拿到环境;

EnvironmentAware:同ApplicationContextAware,需要spring的环境;
接下来做个小测试:我们需要的Environment到底是个什么东西?
HelloController 实现EnvironmentAware 接口;
@Controller
public class HelloController implements EnvironmentAware {


    private Environment environment = null;
    @RequestMapping("/getEnvironment")
    public String getEnvironment() {

        String[] activeProfiles = environment.getActiveProfiles();
        String[] profiles = environment.getDefaultProfiles();

        return profiles.toString()+activeProfiles.toString();
    }

    @Override
    public void setEnvironment(Environment environment) {

        this.environment = environment;
    }
}
从图中可以看到ServletConfigPropertySource的source的类型是StandardWrapperFacade,也就是Tomcat里定义的ServletConfig类型,所以ServletConfigPropertySource封装的就是ServletConfig。
在web.xml中定义的contextConfigLocation可以在config下的parameters里看到,这里还可以看到name以及parent等属性。
ServletContextPropertySource中保存的是ServletContext;

其他的,System…Property的读取的是本电脑的环境变量,JNDI没有用到所以没有;
如果有Tomcat与Servlet的源码阅读经验,我们可以知道:Servlet创建时可以直接调用无参数的init方法。
@Override
	public final void init() throws ServletException {


		// 从init参数设置bean属性。
		PropertyValues pvs = new ServletConfigPropertyValues(getServletConfig(), this.requiredProperties);
		if (!pvs.isEmpty()) {

			try {

				BeanWrapper bw = PropertyAccessorFactory.forBeanPropertyAccess(this);
				ResourceLoader resourceLoader = new ServletContextResourceLoader(getServletContext());
				bw.registerCustomEditor(Resource.class, new ResourceEditor(resourceLoader, getEnvironment()));
				initBeanWrapper(bw);
				bw.setPropertyValues(pvs, true);
			}
			catch (BeansException ex) {

				if (logger.isErrorEnabled()) {

					logger.error("Failed to set bean properties on servlet '" + getServletName() + "'", ex);
				}
				throw ex;
			}
		}

		//让子类做它们喜欢的任何初始化。即一个钩子函数
		initServletBean();
	}
可以看到,在HttpServletBean的init中,首先将Servlet中配置的参数使用BeanWrapper设置到DispatcherServle的相关属性,然后调用模板方法initServletBean,子类就通过这个方法初始化。
关于BeanWrapper的介绍
BeanWrapper是Spring提供的一个用来操作JavaBean属性的工具,使用它可以直接修改一个对象的属性,即一个封装了的java反射框架;
2.2 FrameworkServlet
用于Spring web框架的基本servlet。为集成提供了一个基于javabean的整体解决方案中的Spring应用程序上下文。
![]()
简而言之,我的这个框架需要使用Spring的环境,那么我就得实现ApplicationContextAware通过这个接口里的:
void setApplicationContext(ApplicationContext applicationContext) throws BeansException;
setApplicationContext获取到Spring的应用上下文;
而继承HttpServletBean,原因是:子类必须实现来处理请求。因为这个扩展
而不是直接HttpServlet, bean属性是自动映射到它。子类可以重写定义初始化。
从HttpServletBean中可知,FrameworkServlet的初始化入口方法应该是initServletBean,因为这是一个模板方法设计思想,父类留了一个钩子函数:
所以我们可以很轻易的就找到initServletBean():
/**
	*覆盖{@link HttpServletBean}的方法,在任何bean属性之后调用
	*创建这个servlet的WebApplicationContext。
	 */

核心代码:初始化WebApplicationContext,初始化FrameworkServlet,而且initFrameworkServlet方法是模板方法,子类可以覆盖然后在里面做一些初始化的工作,但子类并没有使用它。
接下来看initWebApplicationContext:
/**初始化并发布这个servlet的WebApplicationContext。
*
委托{@link #createWebApplicationContext}进行实际创建
*上下文。可以在子类中重写。
*/
	protected WebApplicationContext initWebApplicationContext() {

		WebApplicationContext rootContext =
				WebApplicationContextUtils.getWebApplicationContext(getServletContext());
		WebApplicationContext wac = null;

		if (this.webApplicationContext != null) {

			// 在构造时注入了一个上下文实例——>使用它
			wac = this.webApplicationContext;
			if (wac instanceof ConfigurableWebApplicationContext) {

				ConfigurableWebApplicationContext cwac = (ConfigurableWebApplicationContext) wac;
				if (!cwac.isActive()) {

					// 上下文还没有被刷新——>提供诸如此类的服务
					// 设置父上下文,设置应用程序上下文id,等等
					if (cwac.getParent() == null) {

						// 注入上下文实例时没有设置显式父对象>
						// 根应用程序上下文(如果有的话);可能是空)作为父
						cwac.setParent(rootContext);
					}
					configureAndRefreshWebApplicationContext(cwac);
				}
			}
		}
		if (wac == null) {

			// 在构造时没有注入上下文实例——看看是否有
			// 已在servlet上下文中注册。如果存在,它是假设的
			// 父上下文(如果有的话)已经设置,并且
			//用户已执行任何初始化,如设置上下文id
			wac = findWebApplicationContext();
		}
		if (wac == null) {

			// 没有为这个servlet定义上下文实例->创建一个本地实例
			wac = createWebApplicationContext(rootContext);
		}

		if (!this.refreshEventReceived) {

			// 上下文不是带有refresh的ConfigurableApplicationContext
			// 在构建时注入的支持或上下文已经被注入
			// 刷新->手动触发初始onRefresh。
			synchronized (this.onRefreshMonitor) {

				onRefresh(wac);
			}
		}

		if (this.publishContext) {

			//将上下文作为servlet上下文属性发布。
			String attrName = getServletContextAttributeName();
			getServletContext().setAttribute(attrName, wac);
		}

		return wac;
	}
initWebApplicationContext方法做了三件事
- 获取spring的根容器rootContext。
- 设置webApplicationContext并根据情况调用onRefresh方法。
- 将webApplicationContext设置到ServletContext中。
2.3. DispatcherServlet
onRefresh方法是DispatcherServlet的入口方法。
org.springframework.web.servlet.FrameworkServlet
/**
	*模板方法,可以重写该方法以添加特定于servlet的刷新工作。
	*在成功刷新上下文后调用。
	*
	该实现为空。
	* @param上下文当前WebApplicationContext
	* @see # refresh ()
	* /
	protected void onRefresh(ApplicationContext context) {
		// For subclasses: do nothing by default.
	}
org.springframework.web.servlet.DispatcherServlet
/**
	 * 这个实现调用{@link #initStrategies}。
	 */
	@Override
	protected void onRefresh(ApplicationContext context) {

		initStrategies(context);
	}
	/ * *
	初始化servlet使用的策略对象。
	为了进一步初始化策略对象,>可能会在子类中被重写。
* /
	protected void initStrategies(ApplicationContext context) {

		initMultipartResolver(context);
		initLocaleResolver(context);
		initThemeResolver(context);
		initHandlerMappings(context);
		initHandlerAdapters(context);
		initHandlerExceptionResolvers(context);
		initRequestToViewNameTranslator(context);
		initViewResolvers(context);
		initFlashMapManager(context);
	}
独立出initStrategies方法的原因:
其实这主要是分层的原因,onRefresh是用来刷新容器的,initStrategies用来初始化一些策略组件。如果把initStrategies里面的代码直接写到onRefresh里面,对于程序的运行也没有影响,不过这样一来,如果在onRefresh中想再添加别的功能,就会没有将其单独写一个方法出来逻辑清晰,不过这并不是最重要的,更重要的是,如果在别的地方也需要调用initStrategies方法(如需要修改一些策略后进行热部署),但initStrategies没独立出来,就只能调用onRefresh,那样在onRefresh增加了新功能的时候就麻烦了。另外单独将initStrategies写出来还可以被子类覆盖,使用新的模式进行初始化。
initStrategies的具体内容非常简单,就是初始化的9个组件。
初始化很简单:
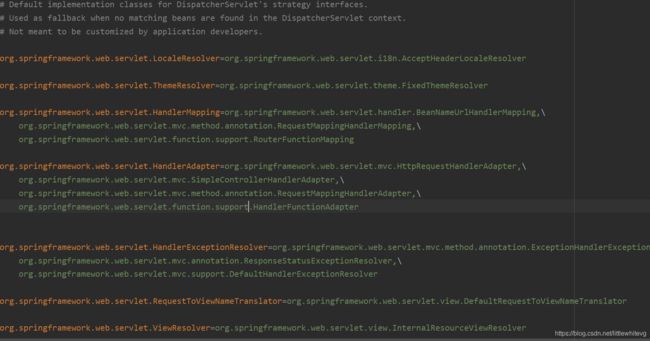
首先通过context.getBean在容器里面按注册时的名称或类型(这里指“localeResolver”名称或者LocaleResolver.class类型)进行查找,所以在Spring MVC的配置文件中只需要配置相应类型的组件,容器就可以自动找到。如果找不到就调用getDefaultStrategy按照类型获取默认的组件。
默认组件存在一个文件:


一共定义了8个组件,处理上传组件Multi-partResolver是没有默认配置的,这也很容易理解,并不是每个应用都需要上传功能,即使需要上传也不一定就要使用MultipartResolver,所以MultipartResolver不需要默认配置。另外HandlerMapping、HandlerAdapter和HandlerExceptionResolver都配置了多个,其实View-Resolver也可以有多个,只是默认的配置只有一个。


