darknet-yolov3训练自己的数据集,keras模型测试(超详细完整版)
一. darknet官网下载源码-----编译-----测试
1. 配置Darknet
下载darknet源码:git clone https://github.com/pjreddie/darknet
进入darknet目录: cd darknet
如果是cpu直接make,否则需要修改配置文件Makefile:
GPU=1         # 如果使用GPU设置为1,CPU设置为0
CUDNN=1       # 如果使用CUDNN设置为1,否则为0
OPENCV=0
OPENMP=0
DEBUG=0
2.开始编译
darknet目录下运行make
3.下载yolov3预训练模型
wget https://pjreddie.com/media/files/yolov3.weights
4.测试
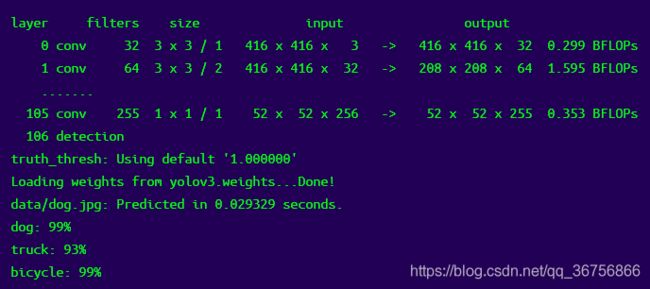
./darknet detect cfg/yolov3.cfg yolov3.weights data/dog.jpg
你会看到下面的输出:

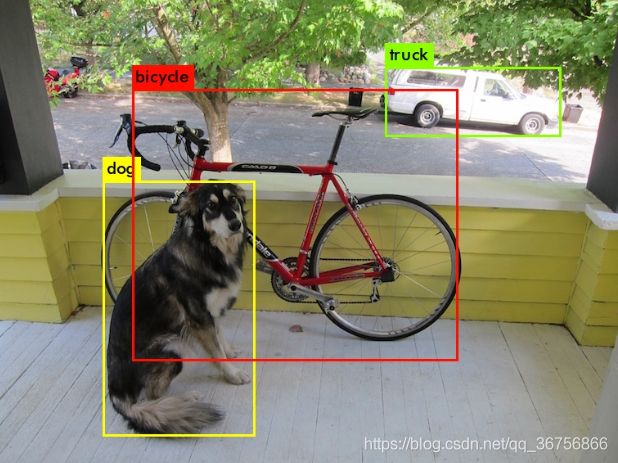
会在darknet目录下产生测试结果图片predictions.jpg,如下:

二. 准备自己的数据集-----训练
- 在darknet目录下创建myData文件夹,目录结构如下,将之前labelImg标注好的xml文件和图片放到对应目录下
myData
…JPEGImages # 存放图像
…Annotations # 存放图像对应的xml文件
…ImageSets/Main #之后会在Main文件夹内自动生成train.txt,val.txt,test.txt和trainval.txt四个文件,存放训练集、验证集、测试集图片的名字(无后缀.jpg)
将自己的数据集图片拷贝到JPEGImages目录下,将数据集label文件拷贝到Annotations目录下。在myData下创建test.py,将下面代码拷贝进去运行,将生成四个文件:train.txt,val.txt,test.txt和trainval.txt。
import os
import random

trainval_percent = 0.1
train_percent = 0.9
xmlfilepath = 'Annotations'
txtsavepath = 'ImageSets/Main'
total_xml = os.listdir(xmlfilepath)
num = len(total_xml)
list = range(num)
tv = int(num * trainval_percent)
tr = int(tv * train_percent)
trainval = random.sample(list, tv)
train = random.sample(trainval, tr)

ftrainval = open('ImageSets/Main/trainval.txt', 'w')
ftest = open('ImageSets/Main/test.txt', 'w')
ftrain = open('ImageSets/Main/train.txt', 'w')
fval = open('ImageSets/Main/val.txt', 'w')

for i in list:
    name = total_xml[i][:-4] + '\n'
    if i in trainval:
        ftrainval.write(name)
        if i in train:
            ftest.write(name)
        else:
            fval.write(name)
    else:
        ftrain.write(name)

ftrainval.close()
ftrain.close()
fval.close()
ftest.close()
运行test.py

2.将数据转换成darknet支持的格式
yolov3提供了将VOC数据集转为YOLO训练所需要的格式的代码,在scripts/voc_label.py文件中。我在这里提供一个修改版本,在darknet文件夹下新建一个my_lables.py文件,内容如下:
import xml.etree.ElementTree as ET
import pickle
import os
from os import listdir, getcwd
from os.path import join

#源代码sets=[('2012', 'train'), ('2012', 'val'), ('2007', 'train'), ('2007', 'val'), ('2007', 'test')]
sets=[('myData', 'train'), ('myData', 'test')]   # 改成自己建立的myData

# 改成自己的类别
classes = ["aeroplane", "bicycle", "bird", "boat", "bottle", "bus", "car", "cat", "chair", "cow", "diningtable",
           "dog", "horse", "motorbike", "person", "pottedplant", "sheep", "sofa", "train", "tvmonitor"]

def convert(size, box):
    dw = 1./(size[0])
    dh = 1./(size[1])
    x = (box[0] + box[1])/2.0 - 1
    y = (box[2] + box[3])/2.0 - 1
    w = box[1] - box[0]
    h = box[3] - box[2]
    x = x*dw
    w = w*dw
    y = y*dh
    h = h*dh
    return (x,y,w,h)

def convert_annotation(year, image_id):
    in_file = open('myData/Annotations/%s.xml'%(image_id))  # 源代码VOCdevkit/VOC%s/Annotations/%s.xml
    out_file = open('myData/labels/%s.txt'%(image_id), 'w')  # 源代码VOCdevkit/VOC%s/labels/%s.txt
    tree=ET.parse(in_file)
    root = tree.getroot()
    size = root.find('size')
    w = int(size.find('width').text)
    h = int(size.find('height').text)

    for obj in root.iter('object'):
        difficult = obj.find('difficult').text
        cls = obj.find('name').text
        if cls not in classes or int(difficult)==1:
            continue
        cls_id = classes.index(cls)
        xmlbox = obj.find('bndbox')
        b = (float(xmlbox.find('xmin').text), float(xmlbox.find('xmax').text), float(xmlbox.find('ymin').text), float(xmlbox.find('ymax').text))
        bb = convert((w,h), b)
        out_file.write(str(cls_id) + " " + " ".join([str(a) for a in bb]) + '\n')

wd = getcwd()

for year, image_set in sets:
    if not os.path.exists('myData/labels/'):  # 改成自己建立的myData
        os.makedirs('myData/labels/')
    image_ids = open('myData/ImageSets/Main/%s.txt'%(image_set)).read().strip().split()
    list_file = open('myData/%s_%s.txt'%(year, image_set), 'w')
    for image_id in image_ids:
        list_file.write('%s/myData/JPEGImages/%s.jpg\n'%(wd, image_id))
        convert_annotation(year, image_id)
    list_file.close()
3.运行代码python my_lables.py
会在myData目录下自动生成一个labels文件夹和两个txt文件(myData_train.txt和myData_test.txt) ,这两个txt文件会在训练模型时用到;lables文件中的每个txt文件内的内容含义为:

具体的每一个值的计算方式是这样的:假设一个标注的boundingbox的左下角和右上角坐标分别为(x1,y1)(x2,y2),图像的宽和高分别为w,h
归一化的中心点x坐标计算公式:((x2+x1) / 2.0)/ w
归一化的中心点y坐标计算公式:((y2+y1) / 2.0)/ h
归一化的目标框宽度的计算公式: (x2-x1) / w
归一化的目标框高度计算公式:((y2-y1)/ h
4.修改darknet/cfg下的voc.data和yolov3-voc.cfg文件
1)打开cfg/voc.data文件,进行如下修改:
classes= 20  # 自己数据集的类别数
train = /home/xxx/darknet/myData/myData_train.txt  # train文件的路径
valid = /home/xxx/darknet/myData/myData_test.txt   # test文件的路径
names = /home/xxx/darknet/myData/myData.names   # 用绝对路径(需要手动创建label name)
backup = backup  # 训练模型保存的文件夹
在myData文件夹下新建myData.names文件,将label name一行一个name写入,如下:
aeroplane
bicycle
......
tvmonitor
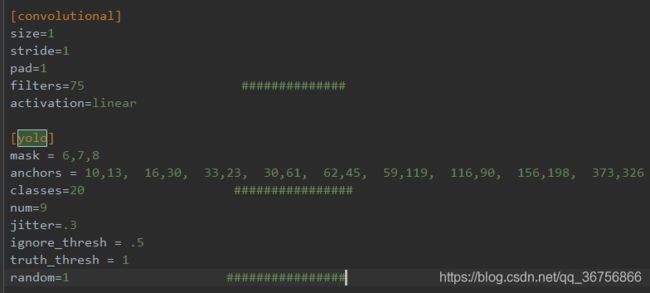
2)打开cfg/yolov3-voc.cfg文件,进行如下修改:
编辑器内按 Ctrl+F 搜索yolo, 总共会搜出3个含有yolo的地方。
每个地方都必须要改2处, filters:3*(5+len(classes));
其中:我展示的classes: len(classes) = 20,这里以我的工程为例
filters = 75 # 3*(5+20)
classes = 20
可修改:random = 1:原来是1,显存小改为0。(是否要多尺度输出。)
3个yolo显示的地方都要修改。

5.可以指定训练批次和训练轮数
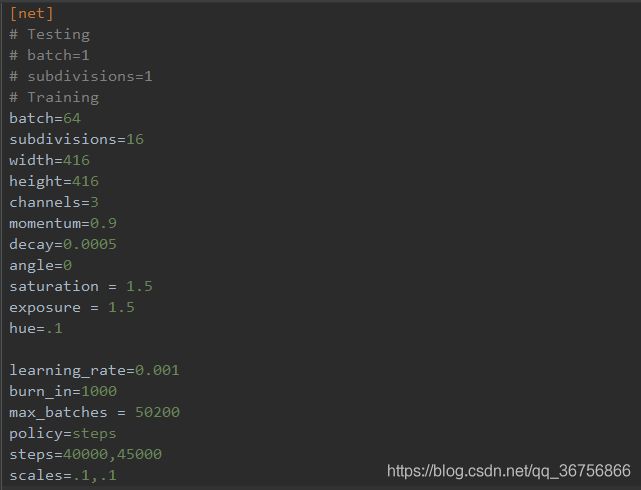
编辑器打开cfg/yolov3-voc.cfg文件,在最上面

解释一下:
[net]
# Testing            ### 测试模式
# batch=1
# subdivisions=1
# Training           ### 训练模式,每次前向的图片数目 = batch/subdivisions
batch=256
subdivisions=8
width=416            ### 网络的输入宽、高、通道数
height=416
channels=3
momentum=0.9         ### 动量
decay=0.0005         ### 权重衰减
angle=0
saturation = 1.5     ### 饱和度
exposure = 1.5       ### 曝光度
hue=.1               ### 色调
learning_rate=0.001  ### 学习率
burn_in=1000         ### 学习率控制的参数
max_batches = 50200  ### 迭代次数
policy=steps         ### 学习率策略
steps=40000,45000    ### 学习率变动步长
因为是训练,所以注释Testing,打开Training,其中
batch=256 每batch个样本更新一次参数。
subdivisions=8 如果内存不够大,将batch分割为subdivisions个子batch,每个子batch的大小为batch/subdivisions。
6.下载预训练权重
wget https://pjreddie.com/media/files/darknet53.conv.74
7.开始训练
如果你想使用gpu训练,运行如下命令:
./darknet detector train cfg/voc.data cfg/yolov3-voc.cfg darknet53.conv.74 -gpus 0,1,2,3
0 1 2 3…是GPU 的编号,根据自己的情况指定。
训练过程参数的意义
—Region xx: cfg文件中yolo-layer的索引;
—Avg IOU:当前迭代中,预测的box与标注的box的平均交并比,越大越好,期望数值为1;
—Class: 标注物体的分类准确率,越大越好,期望数值为1;
—obj: 越大越好,期望数值为1;
—No obj: 越小越好;
—.5R: 以IOU=0.5为阈值时候的recall; recall = 检出的正样本/实际的正样本
—0.75R: 以IOU=0.75为阈值时候的recall;
—count:正样本数目。
训练过程示例:
Loaded: 0.000034 seconds
Region 82 Avg IOU: -nan, Class: -nan, Obj: -nan, No Obj: 0.000009, .5R: -nan, .75R: -nan,  count: 0
Region 94 Avg IOU: 0.790078, Class: 0.996943, Obj: 0.777700, No Obj: 0.001513, .5R: 1.000000, .75R: 0.833333,  count: 6
Region 106 Avg IOU: 0.701132, Class: 0.998590, Obj: 0.710799, No Obj: 0.000800, .5R: 0.857143, .75R: 0.571429,  count: 14
Region 82 Avg IOU: -nan, Class: -nan, Obj: -nan, No Obj: 0.000007, .5R: -nan, .75R: -nan,  count: 0
Region 94 Avg IOU: 0.688576, Class: 0.998360, Obj: 0.855777, No Obj: 0.000512, .5R: 1.000000, .75R: 0.500000,  count: 2
Region 106 Avg IOU: 0.680646, Class: 0.998413, Obj: 0.675553, No Obj: 0.000405, .5R: 0.857143, .75R: 0.428571,  count: 7
Region 82 Avg IOU: 0.478347, Class: 0.999972, Obj: 0.999957, No Obj: 0.000578, .5R: 0.000000, .75R: 0.000000,  count: 1
Region 94 Avg IOU: 0.901106, Class: 0.999994, Obj: 0.999893, No Obj: 0.000308, .5R: 1.000000, .75R: 1.000000,  count: 1
Region 106 Avg IOU: -nan, Class: -nan, Obj: -nan, No Obj: 0.000025, .5R: -nan, .75R: -nan,  count: 0
Region 82 Avg IOU: 0.724108, Class: 0.988430, Obj: 0.765983, No Obj: 0.003308, .5R: 1.000000, .75R: 0.400000,  count: 5
Region 94 Avg IOU: 0.752382, Class: 0.996165, Obj: 0.848303, No Obj: 0.002020, .5R: 1.000000, .75R: 0.500000,  count: 8
Region 106 Avg IOU: 0.652267, Class: 0.998596, Obj: 0.646115, No Obj: 0.000728, .5R: 0.818182, .75R: 0.545455,  count: 11
Region 82 Avg IOU: 0.755896, Class: 0.999879, Obj: 0.999514, No Obj: 0.001232, .5R: 1.000000, .75R: 1.000000,  count: 1
Region 94 Avg IOU: 0.749224, Class: 0.999670, Obj: 0.988916, No Obj: 0.000441, .5R: 1.000000, .75R: 0.500000,  count: 2
Region 106 Avg IOU: 0.601608, Class: 0.999661, Obj: 0.714591, No Obj: 0.000147, .5R: 0.750000, .75R: 0.250000,  count: 4
Region 82 Avg IOU: -nan, Class: -nan, Obj: -nan, No Obj: 0.000011, .5R: -nan, .75R: -nan,  count: 0
Region 94 Avg IOU: 0.797704, Class: 0.997323, Obj: 0.910817, No Obj: 0.001006, .5R: 1.000000, .75R: 0.750000,  count: 4
Region 106 Avg IOU: 0.727626, Class: 0.998225, Obj: 0.798596, No Obj: 0.000121, .5R: 1.000000, .75R: 0.500000,  count: 2
Region 82 Avg IOU: 0.669070, Class: 0.998607, Obj: 0.958330, No Obj: 0.001297, .5R: 1.000000, .75R: 0.000000,  count: 2
Region 94 Avg IOU: 0.832890, Class: 0.999755, Obj: 0.965164, No Obj: 0.000829, .5R: 1.000000, .75R: 1.000000,  count: 1
Region 106 Avg IOU: 0.613751, Class: 0.999541, Obj: 0.791765, No Obj: 0.000554, .5R: 0.833333, .75R: 0.333333,  count: 12
Region 82 Avg IOU: -nan, Class: -nan, Obj: -nan, No Obj: 0.000007, .5R: -nan, .75R: -nan,  count: 0
Region 94 Avg IOU: 0.816189, Class: 0.999966, Obj: 0.999738, No Obj: 0.000673, .5R: 1.000000, .75R: 1.000000,  count: 2
Region 106 Avg IOU: 0.756419, Class: 0.999139, Obj: 0.891591, No Obj: 0.000712, .5R: 1.000000, .75R: 0.500000,  count: 12
12010: 0.454202, 0.404766 avg, 0.000100 rate, 2.424004 seconds, 768640 images
Loaded: 0.000034 seconds
这段代码展示了一个批次(batch),批次大小的划分根据yolov3-voc.cfg的subdivisions参数。在我使用的 .cfg 文件中 batch=256,subdivision = 8,所以在训练输出中,训练迭代包含了32组,每组又包含了8张图片,跟设定的batch和subdivision的值一致。
批输出针对上面的bacth的最后一行输出来说,12010代表当前训练的迭代次数,0.454202代表总体的loss,0.404766 avg代表平均损失,这个值越低越好,一般来说一旦这个数值低于0.060730 avg就可以终止训练了。0.0001代表当前的学习率,2.424004 seconds代表当前批次花费的总时间。768640代表3002*256代表当前训练的图片总数。
从停止处继续接着训练
当训练到一定程度需要测试效果时,可以终止一下训练(ctrl+c),此时在backup文件夹下有好多训练权重(.weight)文件。选用其中一个最好的权重(.weight)文件(一般是最后一个)进行测试,测试方法参见下文(三.测试)。待测试完毕后想接着继续训练模型时,则用如下代码:
./darknet detector train cfg/voc.data cfg/yolov3-voc.cfg backup/my_yolov3_30000.weights -gpus 0,1,2,3
三.测试
1.darknet模型转换为keras的h5模型
由于darknet是C++编译,修改代码每次需要重新编译,因此可以将darknet训练的模型my_yolov3_final.weights转换为可以用于keras的h5文件,然后写keras版python代码进行测试。
需要用到keras版yolo3文件夹下的文件,贴出本文主要参考的下载出处:
https://github.com/qqwweee/keras-yolo3,下载copy此处的yolo3文件夹和font字体文件夹和convert.py文件到darknet目录下,运行命令:
python convert.py cfg/yolov3-voc.cfg backup/my_yolov3_final.weights backup/yolo.h5 生成的h5被保存在训练模型保存的路径backup文件夹下。
2.从所有数据集中复制出测试图片数据集
在myData文件夹下创建TestImages文件夹,用来存放测试图片数据;创建TestResults文件夹,用来存放测试结果。创建select_testImg.py文件,用来从所有图片中copy出测试图片,代码内容如下:
# -*- coding:utf-8 -*-

import shutil

def objFileName():
    local_file_name_list = "ImageSets/Main/test.txt"
    obj_name_list = []
    for i in open(local_file_name_list, 'r'):
        i = i + '.jpg'
        obj_name_list.append(i.replace('\n', ''))
    return obj_name_list

def copy_img():
    local_img_name = 'JPEGImages'  # 指定要复制的图片路径
    path = 'TestImages'            # 指定要存放图片的路径
    for i in objFileName():
        new_obj_name = i
        shutil.copy(local_img_name + '/' + new_obj_name, path + '/' + new_obj_name)

if __name__ == '__main__':
    copy_img()
3.批量测试并保存测试结果
测试代码需要用到的几个文件:my_anchors.txt和my_classes.txt。
在myData文件夹下创建model_data文件夹,在model_data文件夹内创建my_anchors.txt文件,手动写入anchors,anchors来自cfg/yolov3-voc.cfg文件内,如下21,19, 13,41, 58,13, 26,33, 36,26, 19,79, 39,40, 85,20, 52,50
同时在model_data文件夹内创建my_classes.txt,手动写入label name,一行一个name。
在darknet目录下创建yolo_test.py测试代码文件,内容如下:
# -*- coding: utf-8 -*-
"""
功能:keras-yolov3 进行批量测试并保存结果
"""
import colorsys
import os
from timeit import default_timer as timer
import time
import tensorflow as tf

import numpy as np
from keras.models import load_model
from keras.layers import Input
from PIL import Image, ImageFont, ImageDraw

from yolo3.model import yolo_eval, yolo_body, tiny_yolo_body
from yolo3.utils import letterbox_image
from keras.utils import multi_gpu_model

os.environ["CUDA_VISIBLE_DEVICES"] = "0"
from keras import backend as K
config = tf.ConfigProto()
# config.gpu_options.allow_growth = True   # 当allow_growth设置为True时,分配器将不会指定所有的GPU内存,而是根据需求增长
config.gpu_options.per_process_gpu_memory_fraction = 0.50  # 占用50%显存
sess = tf.Session(config=config)
K.set_session(sess)

path = 'myData/TestImages/'  # 待检测图片的位置

# 创建创建一个存储检测结果的dir
result_path = 'myData/TestResults'
if not os.path.exists(result_path):
    os.makedirs(result_path)

# result如果之前存放的有文件,全部清除
for i in os.listdir(result_path):
    path_file = os.path.join(result_path, i)
    if os.path.isfile(path_file):
        os.remove(path_file)

# 创建一个记录检测结果的文件
txt_path = result_path + '/result.txt'
file = open(txt_path, 'w')


class YOLO(object):
    _defaults = {

        "model_path": 'backup/yolo.h5',
        "anchors_path": 'myData/model_data/my_anchors.txt',
        "classes_path": 'myData/model_data/my_classes.txt',
        "score": 0.3,
        "iou": 0.45,
        "model_image_size": (416, 416),
        "gpu_num": 1,
    }

    @classmethod
    def get_defaults(cls, n):
        if n in cls._defaults:
            return cls._defaults[n]
        else:
            return "Unrecognized attribute name '" + n + "'"

    def __init__(self, **kwargs):
        self.__dict__.update(self._defaults)  # set up default values
        self.__dict__.update(kwargs)  # and update with user overrides
        self.class_names = self._get_class()
        self.anchors = self._get_anchors()
        self.sess = K.get_session()
        self.boxes, self.scores, self.classes = self.generate()

    def _get_class(self):
        classes_path = os.path.expanduser(self.classes_path)
        with open(classes_path) as f:
            class_names = f.readlines()
        class_names = [c.strip() for c in class_names]
        return class_names

    def _get_anchors(self):
        anchors_path = os.path.expanduser(self.anchors_path)
        with open(anchors_path) as f:
            anchors = f.readline()
        anchors = [float(x) for x in anchors.split(',')]
        return np.array(anchors).reshape(-1, 2)

    def generate(self):
        model_path = os.path.expanduser(self.model_path)
        assert model_path.endswith('.h5'), 'Keras model or weights must be a .h5 file.'

        # Load model, or construct model and load weights.
        num_anchors = len(self.anchors)
        num_classes = len(self.class_names)
        is_tiny_version = num_anchors == 6  # default setting
        try:
            self.yolo_model = load_model(model_path, compile=False)
        except:
            self.yolo_model = tiny_yolo_body(Input(shape=(None, None, 3)), num_anchors // 2, num_classes) \
                if is_tiny_version else yolo_body(Input(shape=(None, None, 3)), num_anchors // 3, num_classes)
            self.yolo_model.load_weights(self.model_path)  # make sure model, anchors and classes match
        else:
            assert self.yolo_model.layers[-1].output_shape[-1] == \
                   num_anchors / len(self.yolo_model.output) * (num_classes + 5), \
                'Mismatch between model and given anchor and class sizes'

        print('{} model, anchors, and classes loaded.'.format(model_path))

        # Generate colors for drawing bounding boxes.
        hsv_tuples = [(x / len(self.class_names), 1., 1.)
                      for x in range(len(self.class_names))]
        self.colors = list(map(lambda x: colorsys.hsv_to_rgb(*x), hsv_tuples))
        self.colors = list(
            map(lambda x: (int(x[0] * 255), int(x[1] * 255), int(x[2] * 255)),
                self.colors))
        np.random.seed(10101)  # Fixed seed for consistent colors across runs.
        np.random.shuffle(self.colors)  # Shuffle colors to decorrelate adjacent classes.
        np.random.seed(None)  # Reset seed to default.

        # Generate output tensor targets for filtered bounding boxes.
        self.input_image_shape = K.placeholder(shape=(2,))
        if self.gpu_num >= 2:
            self.yolo_model = multi_gpu_model(self.yolo_model, gpus=self.gpu_num)
        boxes, scores, classes = yolo_eval(self.yolo_model.output, self.anchors,
                                           len(self.class_names), self.input_image_shape,
                                           score_threshold=self.score, iou_threshold=self.iou)
        return boxes, scores, classes

    def detect_image(self, image):
        start = timer()  # 开始计时

        if self.model_image_size != (None, None):
            assert self.model_image_size[0] % 32 == 0, 'Multiples of 32 required'
            assert self.model_image_size[1] % 32 == 0, 'Multiples of 32 required'
            boxed_image = letterbox_image(image, tuple(reversed(self.model_image_size)))
        else:
            new_image_size = (image.width - (image.width % 32),
                              image.height - (image.height % 32))
            boxed_image = letterbox_image(image, new_image_size)
        image_data = np.array(boxed_image, dtype='float32')

        print(image_data.shape)  # 打印图片的尺寸
        image_data /= 255.
        image_data = np.expand_dims(image_data, 0)  # Add batch dimension.

        out_boxes, out_scores, out_classes = self.sess.run(
            [self.boxes, self.scores, self.classes],
            feed_dict={

                self.yolo_model.input: image_data,
                self.input_image_shape: [image.size[1], image.size[0]],
                K.learning_phase(): 0
            })

        print('Found {} boxes for {}'.format(len(out_boxes), 'img'))  # 提示用于找到几个bbox

        font = ImageFont.truetype(font='font/FiraMono-Medium.otf',
                                  size=np.floor(2e-2 * image.size[1] + 0.2).astype('int32'))
        thickness = (image.size[0] + image.size[1]) // 500

        # 保存框检测出的框的个数
        file.write('find  ' + str(len(out_boxes)) + ' target(s) \n')

        for i, c in reversed(list(enumerate(out_classes))):
            predicted_class = self.class_names[c]
            box = out_boxes[i]
            score = out_scores[i]

            label = '{} {:.2f}'.format(predicted_class, score)
            draw = ImageDraw.Draw(image)
            label_size = draw.textsize(label, font)

            top, left, bottom, right = box
            top = max(0, np.floor(top + 0.5).astype('int32'))
            left = max(0, np.floor(left + 0.5).astype('int32'))
            bottom = min(image.size[1], np.floor(bottom + 0.5).astype('int32'))
            right = min(image.size[0], np.floor(right + 0.5).astype('int32'))

            # 写入检测位置
            file.write(
                predicted_class + '  score: ' + str(score) + ' \nlocation: top: ' + str(top) + '、 bottom: ' + str(
                    bottom) + '、 left: ' + str(left) + '、 right: ' + str(right) + '\n')

            print(label, (left, top), (right, bottom))

            if top - label_size[1] >= 0:
                text_origin = np.array([left, top - label_size[1]])
            else:
                text_origin = np.array([left, top + 1])

            # My kingdom for a good redistributable image drawing library.
            for i in range(thickness):
                draw.rectangle(
                    [left + i, top + i, right - i, bottom - i],
                    outline=self.colors[c])
            draw.rectangle(
                [tuple(text_origin), tuple(text_origin + label_size)],
                fill=self.colors[c])
            draw.text(text_origin, label, fill=(0, 0, 0), font=font)
            del draw

        end = timer()
        print('time consume:%.3f s ' % (end - start))
        return image

    def close_session(self):
        self.sess.close()


# 图片检测

if __name__ == '__main__':

    t1 = time.time()
    yolo = YOLO()
    for filename in os.listdir(path):
        image_path = path + '/' + filename
        portion = os.path.split(image_path)
        file.write(portion[1] + ' detect_result:\n')
        image = Image.open(image_path)
        r_image = yolo.detect_image(image)
        file.write('\n')
        # r_image.show() 显示检测结果
        image_save_path = 'myData/TestResults/result_' + portion[1]
        print('detect result save to....:' + image_save_path)
        r_image.save(image_save_path)

    time_sum = time.time() - t1
    file.write('time sum: ' + str(time_sum) + 's')
    print('time sum:', time_sum)
    file.close()
    yolo.close_session()
测试代码内部文件各个路径修改完毕后,运行python yolo_test.py就开始进行批量测试,测试速度根据每张图片中的目标物多少决定,总而言之还是挺快的。
至此,darknet-yolov3训练自己的数据集,包括数据集制作过程,和转换keras模型进行批量测试,整个过程已完毕。欢迎各位留言讨论和有误的地方给予批评指正。