spring-cloud-Hoxton.SR6 (springBoot2.2.x-2.3.x)学习篇(五)微服务调用篇(一) RestTemplate
前言…
微服务体系中,每个单独的小服务可能仅仅负责处理某一项业务逻辑。例如专门处理商品的微服务模块、库存的微服务模块、但是在处理商品的时候呢,可能需要依赖于某一服务或者多个服务,才能完成一次完整的请求。
例如:用户购买物品,首先要下一个支付订单、下单时,需要选择商品,商品选择完毕后呢,需要进行支付,支付前需要判断库存是否还存在物品,存在且支付成功后,库存减去对应数量、然后呢,将支付信息返给用
这其中呢,就会涉及到多个服务间的调用例如 用户服务、订单服务、商品服务、支付服务、库存服务、短信服务等等。传统的单体应用呢,这些操作都是在一个应用中完成,微服务下,由于模块更加简洁业务分明化,一个用户请求,或多或少会依赖一些其余服务模块,并且,为了服务健壮性,可能某些服务会做很多集群,那么就会产生一个服务多个ip端口的问题,那么这个时候,如何能够调用到服务呢?
本文呢,讲解的是 RestTemplate 方式进行微服务的调用!
一、什么是RestTemplate
传统情况下在java代码里访问restful服务,一般使用Apache的HttpClient。不过此种方法使用起来太过繁琐。spring提供了一种简单便捷的模板类来进行操作,这就是RestTemplate。
它简化了与http服务的通信方式,统一了RESTful的标准,封装了http链接, 我们只需要传入url及返回值类型即可。相较于之前常用的HttpClient,RestTemplate是一种更优雅的调用RESTful服务的方式。
所以哈,RestTemplate 并不是微服务访问的一种特有的解决措施,其只要是能执行Http 请求,都可以使用 RestTemplate进行服务间的访问请求
二、基于RestTemplate的服务间调用
(1)RestTemplate 初体验
-
创建一个springboot项目
-
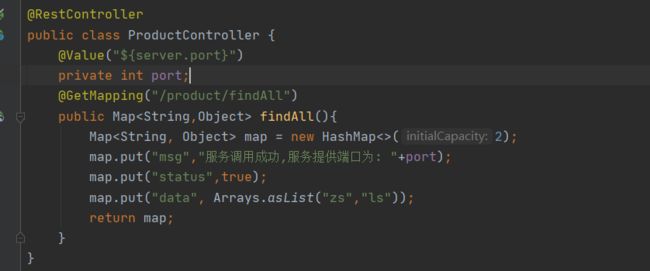
编写简单的请求接口
@RestController public class ProductController { @Value("${server.port}") private int port; @GetMapping("/product/findAll") public Map<String,Object> findAll(){ Map<String, Object> map = new HashMap<>(2); map.put("msg","服务调用成功,服务提供端口为: "+port); map.put("status",true); map.put("data", Arrays.asList("zs","ls")); return map; } } -
编写个微服务项目使用 RestTemplate 调用我们单个的Boot项目
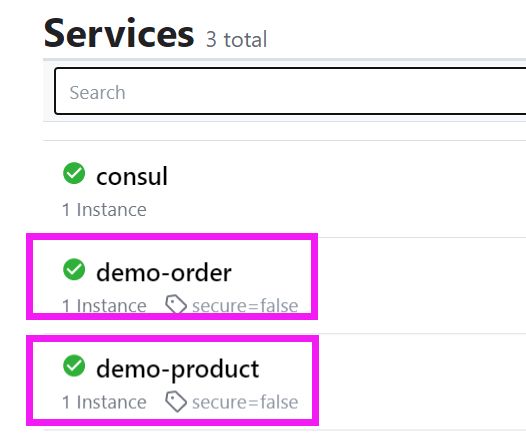
随意注册到我们的 consul 注册中心
RestTemplate调用编写
@RequestMapping("/dem") @RestController public class OutBoundController { @GetMapping("/find/all") public Map aa() { RestTemplate restTemplate = new RestTemplate(); Map body = restTemplate.getForObject("http://localhost:8081/product/findAll", Map.class); return body; } } -
由 微服务方发起调用
成功的拿到了返回值,这说明 两个项目间正确访问调用了 ,这里的目前的微服务呢,由于没做网关,以及其他配置,仅仅只是注册到了注册中心,实质就是一个 Boot 项目罢了!
注意的点:我restTemplate 是调用的 getForObject 方法,且单体项目的 /product/findAll 为get 请求url
-
测试由 boot 单体项目方调用微服务
boot 编写 restTemplate 调用请求,cloud提供对应接口
@GetMapping("/cloud/findAll") public Map<String, Object> findAllCloud() { RestTemplate restTemplate = new RestTemplate(); Map body = restTemplate.getForObject("http://localhost:9001/dem/cloud", Map.class); return body; }@GetMapping("/cloud") public Map<String, Object> findAllCloud() { Map<String, Object> map = new HashMap<>(2); map.put("msg", "服务调用成功,当前服务提供端口为: " + port); map.put("status", true); map.put("data", Arrays.asList("zs-cloud", "ls-cloud")); return map; }
看到这里,可能有人有一些疑问了!为什么要这么演示呢,一个不似微服务的微服务与boot单体应用之间使用 RestTemplate 进行调用,没有什么实际意义啊!
当然有意义!
发现没,我们restTemplate调用是这种形式:
当然! 单体与单体间调用或者 单体与微服务间使用 RestTemplate 调用只能如此!
restTemplate.getForObject("http://localhost:9001/dem/cloud", Map.class);那么我们的微服务间多个服务间调用呢?也需要这样么?
看出端倪了么,ip 端口是写死了的!
那么这个时候,服务的ip 或者端口变更了的话,我们就需要修改配置了。虽然可以在yml配置管理,但是,ip 或端口一改,项目中也得跟着修改! 这一点,在微服务群体中,操作更是不便,那么有没有解决办法呢?
当然也是有的
我们可以在 RestTemplate 中 使用服务名调用 ,但这一切是有前提的,调用方被调用方均要在同一个注册中心下(或注册中心集群下)
-
RestTemplate中使用服务名调用
-
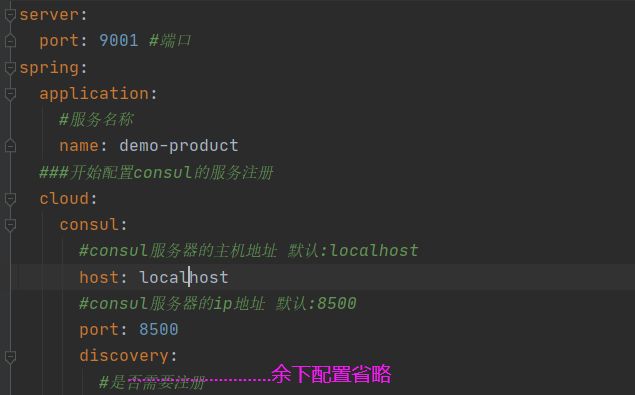
再构建一个springcloud 项目 与上方cloud 项目注册到一个注册中心
server:
  port: 9002 #端口
spring:
  application:
    #服务名称
    name: demo-order
  ###开始配置consul的服务注册
  cloud:
    consul:
      #consul服务器的主机地址 默认:localhost
      host: localhost
      #consul服务器的ip地址 默认:8500
      port: 8500
      #--------------------------------
      # 。。。。。。。。。。。。下边省略
-
restTemplate 设置
调用方restTemplate 需要由spring管理 且需要设置负载均衡 尤为重要
例如我们再 demo-product 中设置
-
注入设置的restTemplayte
-
发起调用
url 中取消原来编写的被调用方的端口与IP 直接 在 consul 控制台上 copy 服务名即可,后边跟url路径
@GetMapping("/order/find/all") public Map order() { Map body = restTemplate.getForObject("http://demo-order/order/all", Map.class); return body; } -
demo-order 接口如下
-
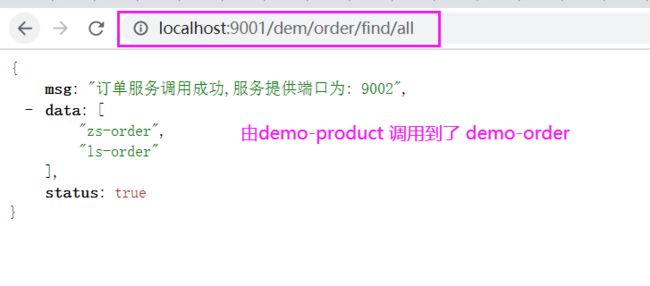
调用测试
使用服务名调用到了该服务!这呢,也是侧面证明了微服务注册中心的强大!
-
(2)RestTemplate 进阶
上边已经初步的使用了 restTemplate了,但是单单是使用了get 无参数查询方式,实际上呢,RestTemplate定义了36个与REST资源交互的方法,其中的大多数都对应于HTTP的方法。涉及到get 、post、put、delete 得请求类型,以及需要一些参数需要传递,所以,接下来呢,咱们开始restTemplate的进阶学习!
delete() 在特定的URL上对资源执行HTTP DELETE操作
exchange() 在URL上执行特定的HTTP方法,返回包含对象的ResponseEntity,这个对象是从响应体中映射得到的
execute() 在URL上执行特定的HTTP方法,返回一个从响应体映射得到的对象
getForEntity() 发送一个HTTP GET请求,返回的ResponseEntity包含了响应体所映射成的对象
getForObject() 发送一个HTTP GET请求,返回的请求体将映射为一个对象
postForEntity() POST 数据到一个URL,返回包含一个对象的ResponseEntity,这个对象是从响应体中映射得到的
postForObject() POST 数据到一个URL,返回根据响应体匹配形成的对象
headForHeaders() 发送HTTP HEAD请求,返回包含特定资源URL的HTTP头
optionsForAllow() 发送HTTP OPTIONS请求,返回对特定URL的Allow头信息
postForLocation() POST 数据到一个URL,返回新创建资源的URL
put() PUT 资源到特定的URL
…
(1)发送GET请求
可选择 getForEntity、getForObject 两者用法几乎相同,只是getForObject 返回值返回的是响应体,不需要我们再去 getBody()
getForObject
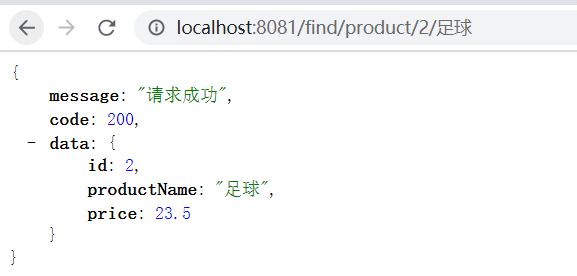
因为8081 服务所在返回值为map ,所以呢,我们在使用getForObject 时候,指定返回值类型即可直接拿到响应对象了
    @GetMapping("/find/all")
    public Map aa() {

        RestTemplate restTemplate = new RestTemplate();
        Map body = restTemplate.getForObject("http://localhost:8081/product/findAll", Map.class);
        return body;
    }
getForEntity
    @GetMapping("/find/GetForEntity")
    public Map learnGetForEntity() {

        RestTemplate restTemplate = new RestTemplate();
        ResponseEntity<Map> forEntity = restTemplate.getForEntity("http://localhost:8081/product/findAll", Map.class);
        return forEntity.getBody();
    }
无论使用哪一种方式均是可以拿到我们想要的请求结果的
为了统一,咱们定义一下公共的返回对象,下边演示则不使用Map了
但上方呢,都是无参的请求,接下来演示一下有参请求
有参的get 请求
    @GetMapping("/find/product/{id}")
    public Result getById(@PathVariable(name = "id") String id) {

        RestTemplate restTemplate = new RestTemplate();
        return restTemplate.getForObject("http://localhost:9001/dem/find/product/{id}", Result.class, id);
    }
多个参数,我们来看下 getForObject方法 参数, 原来是可变参数,那么我们的 PathVariable 可邦定多个请求参数了
get请求呢,其restTemplate 封装的方法已经是非常非常详细的了,注意事项呢,和正常get 请求一样,例如 安全问题,url 参数是否过大等…
(2)发送POST 请求
post 请求呢,也分为 postForEntity、postForObject 其二者区别呢,和get一致, forObject 可以直接拿到请求接口响应参数 不会拿到整个Respose 对象!
postForEntity
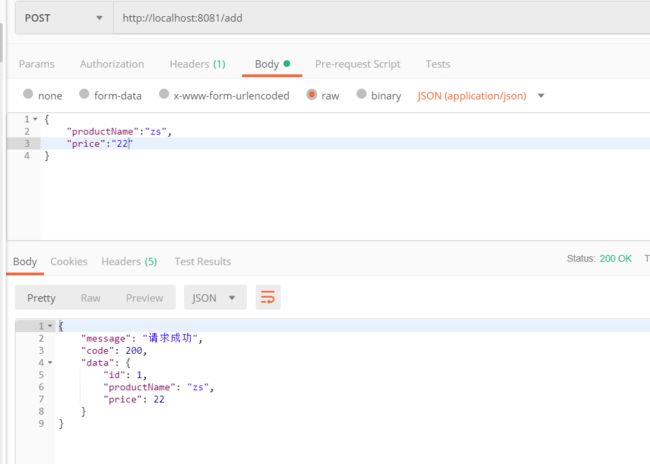
    @PostMapping("add")
    public Result addProduct(@RequestBody Product product) {

        ResponseEntity<Result> responseEntity = restTemplate.postForEntity("http://localhost:9001/dem/add", product, Result.class);
        return responseEntity.getBody();
    }
postForObejct
一样如此,多种参数供你选择,当然例如1 还可以post 时候绑定PathVariable
    @PostMapping("addObject")
    public Result addProductObject(@RequestBody Product product) {

        Result result = restTemplate.postForObject("http://localhost:9001/dem/add", product, Result.class);
        return result;
    }
    @PostMapping("addObject/{price}")
    public Result addProductPath(@RequestBody Product product, @PathVariable("price") BigDecimal price) {

        Result result = restTemplate.postForObject("http://localhost:9001/dem/add/{price}", product, Result.class,price);
        return result;
    }
(3)PUT请求
put 请求呢,在restful风格中呢,一般是针对于修改类型请求
    @PutMapping("put/product")
    public Result putProduct(@RequestBody Product product) {
        try {
            restTemplate.put("http://localhost:9001/dem/put", product);
            return Result.success("ok");
        } catch (Exception e) {
            e.printStackTrace();
            return Result.failure();
        }
    }
可能有小伙伴想要问我了,为什么你put 方法又要自己弄返回值呢?
那是因为呀! restTemplate 提供的 put 方法没有返回值啊!
三个方法,清一色的 void!
使用此方式呢,可能不能满足于我们的某些业务场景 例如:可能修改后需要拿到修改后的值作为参数传递或者条件等
**那么,有这样业务场景,项目又在使用restTemplate 远程调用服务,该怎么办呢? **
**这个时候呢,就轮到我们的 restTemplate 中 exchange 方法出场了!!,后边会讲到 **
(4)DELETE 请求
delete 请求,用作为删除数据请求
可以看到哈,我们的delete 请求呢,同样拿不到返回值的哈
    @DeleteMapping("product/{id}")
    public Result putProduct(@PathVariable("id") Integer id) {

        try {

            restTemplate.delete("http://localhost:9001/dem/product/{id}", id);
            return Result.success("ok");
        } catch (Exception e) {

            e.printStackTrace();
            return Result.failure();
        }
    }
这以上呢,便是咱们RestTemplate 提供的基础的 get、post、put、delete 方法。 其中呢,put 、delete 无法直接拿到远程请求接口的返回值,只能靠自己 try catch 判断是否有代码执行错误,无法真正判断是否操作成功(用户执行意志是否完成),这种情况肯定是不行的
(5)exchange 方法使用
上边也说了 普通的 put 、delete 无法获取到 请求接口返回值!这肯定有着极大的问题的!
所以呢, restTemplate 还有其他途径可以完成 put 、delete 请求类型 且能获取到接口返回值!
exchange 是一个类似于组合接口,其可以根据 请求对象构建请求类型 ,达到 get、post、put、delete 方法,且可以避免返回的结果是对象组合,使用xxxForObject类型转换问题
exchange的使用步骤
1.构建请求对象 ,其中包含(请求体、请求方式、url、请求头等)
2.使用ParameterizedTypeReference指定返回类型
3.restTemplate.exchange(“请求对象”,“返回类型”)
exchange get请求
核心点 ,在请求对象中指定请求类型为GET
    @GetMapping("/find/exchange/product/{id}/{name}")
    public Result exchangeGet(@PathVariable("id") Integer id, @PathVariable("name") String name) throws URISyntaxException {

        String url = "http://localhost:9001/dem/find/product/{id}/{name}";
        url = url.replace("{id}", id.toString());
        url = url.replace("{name}", name);
        //构造请求对象
        RequestEntity<Object> requestEntity = new RequestEntity<>(null, HttpMethod.GET, new URI(url));
        //构造 返回类型
        ParameterizedTypeReference<Result> typeReference = new ParameterizedTypeReference<Result>() {
     };
        //执行
        return restTemplate.exchange(requestEntity, typeReference).getBody();
    }
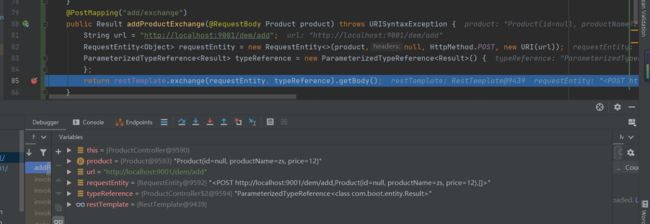
exchange post请求
    @PostMapping("add/exchange")
    public Result addProductExchange(@RequestBody Product product) throws URISyntaxException {

        String url = "http://localhost:9001/dem/add";
        RequestEntity<Object> requestEntity = new RequestEntity<>(product,null, HttpMethod.POST, new URI(url));
        ParameterizedTypeReference<Result> typeReference = new ParameterizedTypeReference<Result>() {

        };
        return restTemplate.exchange(requestEntity, typeReference).getBody();
    }
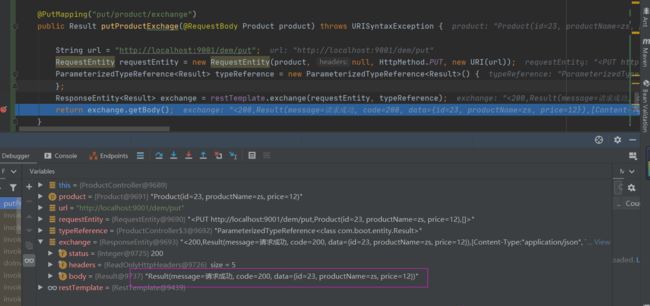
exchange put请求
 @PutMapping("put/product/exchange")
    public Result putProductExchage(@RequestBody Product product) throws URISyntaxException {


        String url = "http://localhost:9001/dem/put";
        RequestEntity requestEntity = new RequestEntity(product, null, HttpMethod.PUT, new URI(url));
        ParameterizedTypeReference<Result> typeReference = new ParameterizedTypeReference<Result>() {

        };
        ResponseEntity<Result> exchange = restTemplate.exchange(requestEntity, typeReference);
        return exchange.getBody();
    }
改造被请求服务器,查看是否是从接口服务器获取到的返回值
我们传个id 小于1的参数,发现确实拿到了请求服务器给我的接口响应!
exchange delete 请求
	    @DeleteMapping("product/exchange/{id}")
    public Result delProductExchange(@PathVariable("id") Integer id) throws URISyntaxException {

        String url = "http://localhost:9001/dem/product/{id}";
        url = url.replace("{id}", id.toString());
        RequestEntity requestEntity = new RequestEntity(null, null, HttpMethod.DELETE, new URI(url));
        ParameterizedTypeReference<Result> typeReference = new ParameterizedTypeReference<Result>() {

        };
        return restTemplate.exchange(requestEntity, typeReference).getBody();
    }
(6)添加请求头
通常情况下,我们是无法直接访问另一个服务器的接口的,因为服务器为了安全会设置一些token ,每个Http请求呢,必须携带token ,所以呢,我们这里也模拟一下restTemplate 添加 token 访问服务器
改造原有服务器(被请求服务器)
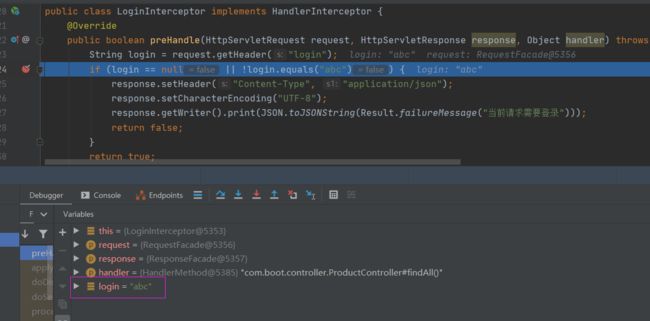
设置个拦截器,携带请求头信息xxx 则放行
@Component
public class LoginInterceptor implements HandlerInterceptor {

    @Override
    public boolean preHandle(HttpServletRequest request, HttpServletResponse response, Object handler) throws Exception {

        String login = request.getHeader("login");
        if (login == null || !login.equals("abc")) {

            response.setHeader("Content-Type", "application/json");
            response.setCharacterEncoding("UTF-8");
            response.getWriter().print(JSON.toJSONString(Result.failureMessage("当前请求需要登录")));
            return false;
        }
        return true;

    }

}
@Configuration
public class AuthConfiguration implements WebMvcConfigurer {


    @Override
    public void addInterceptors(InterceptorRegistry registry) {

        //将自定义的登录拦截器添加进去 必须是使用方法获取 否则LoginInterceptor中无法注入Bean
        registry.addInterceptor(getLoginInterceptor())
                //拦截所有
                .addPathPatterns("/**")
                //排除路径  排除中的路径 不需要进行拦截
                .excludePathPatterns("/login/**");
    }

    @Bean
    public LoginInterceptor getLoginInterceptor() {

        return new LoginInterceptor();
    }
}
这样,一个服务器简单鉴权就搭建好了
改造请求服务器
    @Bean
    public RestTemplate restTemplate(){

        // 设置restTemplate编码为utf-8
        List<ClientHttpRequestInterceptor> interceptors = new ArrayList<>();
        RestTemplate restTemplate = new RestTemplate();
        restTemplate.getMessageConverters().set(1,new StringHttpMessageConverter(StandardCharsets.UTF_8));
        RestTemplateInterceptor restTemplateInterceptor = new RestTemplateInterceptor();
        interceptors.add(restTemplateInterceptor);
        restTemplate.setInterceptors(interceptors);
        return restTemplate;
    }
我这里设置下统一的请求头到 restTemplate 中
@Slf4j
public class RestTemplateInterceptor implements ClientHttpRequestInterceptor {


    @Override
    public ClientHttpResponse intercept(HttpRequest request, byte[] body, ClientHttpRequestExecution execution) throws IOException {

        request.getHeaders().set("login", "abc");
        return execution.execute(request, body);
    }
}
请求接口
    @GetMapping("/find/GetForEntity")
    public Map learnGetForEntity() {

        ResponseEntity<Map> forEntity = restTemplate.getForEntity("http://localhost:8081/product/findAll", Map.class);
        return forEntity.getBody();
    }
被请求服务器打断点,页面访问!
(7)注意事项
注意事项!!!敲黑板了!!!
![]()
前边我们不是简单地使用了微服务访问微服务嘛!
回顾下操作步骤
- 定义restTemplate 打上bean 注解 且打上 @LoadBalanced 注解 达到负载的效果,这样微服务与微服务间就可以使用RestTemplate 进行调用了 (无虚输入调用者端口IP、输入服务名即可调用)
- 引发的问题 (重要的事说三边)
- 此打上 @LoadBalanced 注解的RestTemplate 无法再显示的输入 端口IP 访问另一个服务了!!
- 此打上 @LoadBalanced 注解的RestTemplate 无法再显示的输入 端口IP 访问另一个服务了!!
- 此打上 @LoadBalanced 注解的RestTemplate 无法再显示的输入 端口IP 访问另一个服务了!!
- 会抛出异常信息:No instances available for localhost
- 总结来讲!
- 打上 @LoadBalanced 注解的RestTemplate 必须调用被调用者间必须通过服务名访问(服务名访问的前提,则是服务在一个注册中心中)
- 未打@LoadBalanced 注解的RestTemplate 必须申明访问服务的端口IP
(8)Ribbon+RestTemplate 微服务间调用
前边所有的呢,仅仅是对restTemplate 的熟悉以及使用,现在咱们来系统梳理下,使用restTemplate 进行微服务间的调用!
首先,咱们需要先了解,什么是Ribbon! 了解Ribbon 前呢,也需要知道什么是负载均衡!
负载均衡
负载均衡,英文名称为Load Balance,其含义就是指将负载(工作任务)进行平衡、分摊到多个操作单元上进行运行,例如FTP服务器、Web服务器、企业核心应用服务器和其它主要任务服务器等,从而协同完成工作任务。
Ribbon
- https://github.com/Netflix/ribbon
- pring Cloud Ribbon是一个基于HTTP和TCP的客户端负载均衡工具,它基于Netflix Ribbon实现。通过Spring Cloud的封装,可以让我们轻松地将面向服务的REST模版请求自动转换成客户端负载均衡的服务调用
我们微服务下的服务器集群很简单 服务copy一份,改一改端口(ip) 注册到注册中心即可
我们在微服务架构中使用客户端负载均衡调用同样非常简单
服务提供者:说白了就是我们前边讲述的 被调用方
服务消费者:说白了就是 调用方
▪️服务提供者只需要启动多个服务实例并注册到一个注册中心或是多个相关联的服务注册中心。

▪️服务消费者直接通过调用被@LoadBalanced注解修饰过的RestTemplate来实现面向服务的接口调用。

这样,我们就可以将服务提供者的高可用以及服务消费者的负载均衡调用一起实现了
微服务间 一般服务都会做集群处理,我们这里,模拟订单服务
在原有微服务上copy 一个并启动
接下来,模拟 demo-product 作为服务消费者(调用方)调用 demo-order(服务提供者/被调用方)
Ribbon依赖
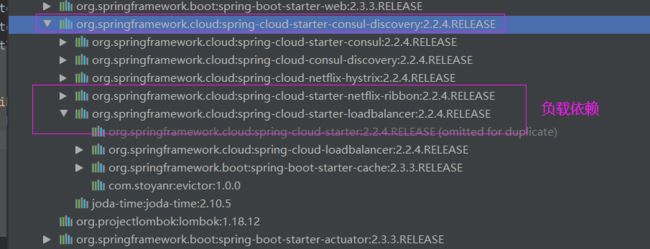
因为consul 客户端依赖中包含了 ribbon 所以呢,我这里不需要额外引入ribbon依赖
如果使用 eureka 作为注册中心,那么 eureka 客服端微服务则需要添加依赖
  <dependency>
            <groupId>org.springframework.cloud</groupId>
            <artifactId>spring-cloud-starter-ribbon</artifactId>
     </dependency>
我们的服务已经启了 9002、9003 为 order服务
RestTemplate 设置
    @Bean(name = "cloudRestTemplate")
	@LoadBalanced //负载均衡调用
    public RestTemplate cloudRestTemplate(){

        // 设置restTemplate编码为utf-8
        RestTemplate restTemplate = new RestTemplate();
        restTemplate.getMessageConverters().set(1,new StringHttpMessageConverter(StandardCharsets.UTF_8));
        return restTemplate;
    }
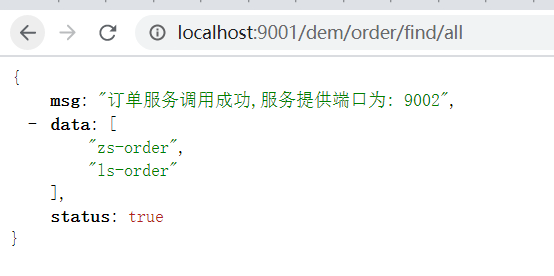
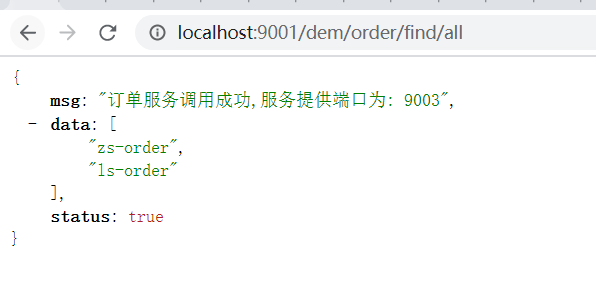
通过此接口 访问我们的 Order 服务!
不断访问此接口,我们发现9002 9003 都是一个被调用一次!
为什么呢?
因为@LoadBalanced注解就是开启客户端负载均衡,且默认轮询负载策略(轮询:轮流询问 一个一次公平公正)
如何设置其他负载策略?
随机负载
    @Bean
    public IRule ribbonRule() {

        return new RandomRule();
    }
此配置设置后则消费者会随机选择服务提供者进行访问,达到随机负载的效果
    # 负载均衡策略设置 (消费者方设置)
	@Bean
    public IRule ribbonRule() {

        return
        //随机负载策略
        new RandomRule();
        //轮询负载策略 默认
        // new RoundRobinRule();
        // 最低并发
		// new BestAvailableRule();
        //权重
		// new WeightedResponseTimeRule();
    }
以上,便是 RestTemplate 的简单使用了!
(9)问题思考
restTemplate 这种方式虽然可用,今天短篇学习下来,也发现了一些问题!
# 存在问题:
- 1.每次调用服务都需要写这些代码,存在大量的代码冗余
- 2.服务地址如果修改,维护成本增高
- 3.使用时不够灵活
如果在微服务与微服务间使用restTemplate ,我还要配置一些 restTemplate 规则 什么编码之类的…
那么能不能简化服务间调用呢?微服务间调用是否有更简化的别的方式呢?答案是肯定的!
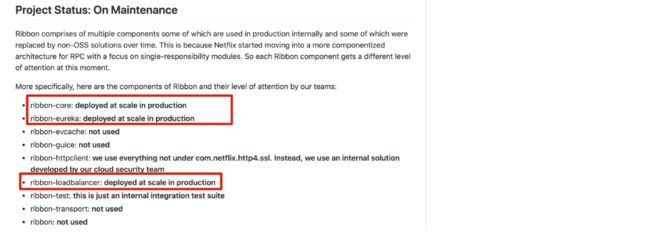
(10)Ribbon停止维护
# 1.官方停止维护说明
- https://github.com/Netflix/ribbon
下期见!微服务调用方式!Feign!
项目源码:restTemplate-learn

