tensorflow-cpu1.14.0/tensorflow-gpu1.13.1+CUDA10.0+cudnn7.4.2实现openpose人体姿态估计血泪史
tensorflow-gpu实现openpose人体姿态估计血泪史
从环境安装到代码运行
背景:我刚接触人体姿态估计方向,从装系统开始,漫漫环境路,何时到尽头!当当当~令人开心的是我已经上岸,这里以跑openpose为例说下tensorflow环境的安装,跟大家分享我的爬坑之旅,希望给刚开始这个领域的小伙伴一丢丢帮助,来次够!
目录
- 电脑环境
- tensorflow-cpu安装及简单测试
- tensorflow-gpu安装
- openpose对单人多人图片检测
- tensorflow-gpu安装
- tensorflow-cpu安装及简单测试
一、电脑配置
1.1、显卡 虽然处理不了视频,玩点游戏日常操作非常溜滴

1.2、 系统:Window10+ubuntu18.04双系统
装双系统费了好长时间,具体网上教程很多推荐一个我用的:
w10+ubuntu18.04安装
w10+ubuntu16.04安装
这里面一定要注意安全模式的设定 慢慢摸索吧~
1.3、版本!!!(重点) 我安装的是CUDA10.0+cudnn7.4.2+tensorflow1.13.1
安装依赖:
VS2015(之前没装的可以到后面跑代码的时候回报错,百度查错安装也行,我就是这样的)
Anoconda3 (这个必须安装 官网下载地址打上勾之后,一路next就可 以了 输入conda –V 查看版本)

opencv (安装过的跳过这步)
#以管理员身份运行cmd或PowerShell。依次输入以下命令:
pip install --upgrade setuptools
pip install numpy Matplotlib
pip install opencv-python
#如果比较下载速度比较慢,直接在后面加上清华源
pip install --upgrade setuptools   -i https://pypi.tuna.tsinghua.edu.cn/simple
完成后进入测试:进入ipython

成功!
再有其他依赖的都会在后面有提醒 百度安装就行~
二、tensorflow cpu安装
(如果CPU GPU都在外部环境安装 可能会报错,有博主说安装GPU之前要卸载CPU版本的,这里提出我的方法,就是添加conda虚拟环境,在每个环境下可以安装不同版本不会相互影响)
2.1 首先安装ipykernel:
conda install ipykernel
2.2 在cmd下执行命令行
#下面的tensorflow属于环境名  可以根据自己起,为了区分gpu 这里起名如下tensorflow-cpu
conda create -n tensorflow-cpu python=3.6 ipykernel
2.3 进入新建的tensorflow环境中
activate tensorflow
2.4 在cmd中使用pip安装输入以下指令:(速度慢可加 -i https://pypi.tuna.tsinghua.edu.cn/simple)
#这里==后面为tensoeflow版本  不加默认最新2.0版本
pip install tensorflow==1.14.0   -i https://pypi.tuna.tsinghua.edu.cn/simple
2.5 测试tensorflow是否安装成功:进入cmd
activate tensorflow
ipython
import tensorflow as tf
显示如下: 激活环境后路径前面多一个环境名~

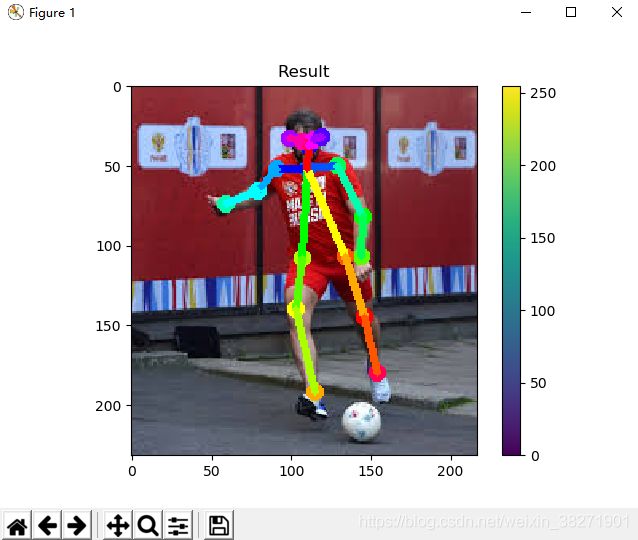
2.6 如上之后再这个环境下跑代码就可以 cpu速度慢(单人这个是0.3397s 多人为0.2294s)

python run.py --model=mobilenet_thin --resize=432x368 --image=./images/p1.jpg
![]()
![]()


三、tensorflow-GPU 安装 (多查资料,祝君顺利)
3.1 查看自己的版本 : 右键——NVIDIA控制面板——帮助——系统信息

我的电脑显示的是10.1的CUDA,然而我装了之后各种错误,不是说这个不行,可能目前来说不是很稳定。

3.2 CUDA10.0版本安装
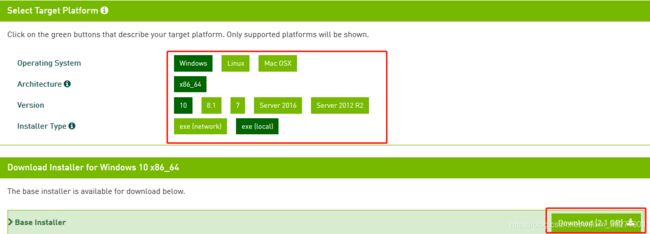
下载CUDA https://developer.nvidia.com/cuda-toolkit-archive 官网

安照红框走~ 如果是W10的就按照下面下载 最后点击download即可
 3.3 这里等待下载的时候可以去下载CUDNN(7.4.2forCUDA10.0)
需要注意的是,下载cuDNN需要在nvidia上注册账号,点击Join后,使用邮箱注册,完全免费的。不想用邮箱注册的可以直接点击Login,最下面用QQ或者微信登陆, 之后才可以继续下载。
下载cudnn https://developer.nvidia.com/rdp/cudnn-archive


用微信或者QQ登录吧快点这样~
登陆成功之后直接下载


3.4 下载完成后开始安装CUDA,直接下一步就行了,注意:安装完成后路径会自动变化所以这里路径选择默认就好

 完成后,C盘查看
 3.5 测试CUDA

如果这里报错,可能是上面环境变量没有添加
将bin路径(C:\Program Files\NVIDIA GPU Computing Toolkit\CUDA\v10.0\bin)添加在path中
3.6 安装cudnn7.4.2
3.6.1 在下载路径里解压,将解压的文件复制到cuda安装目录的对应文件中去

直接点开对应目录,将cudnn的文件复制到C盘v10.0下对应目录。
3.6.2 添加环境变量:C:\ProgramFiles\NVIDIA GPU ComputingToolkit\CUDA\v10.0\lib\x64

3.7 TensorFlow-gpu配置流程
3.7.1 打开cmd创建tf gpu虚拟环境 并激活
conda create -n tensorflow-gpu python=3.6 ipykernel
activate tensorflow-gpu
3.7.2 进入新建的tensorflow环境中
pip install tensorflow-gpu==1.13.1 -i https://pypi.tuna.tsinghua.edu.cn/simple
3.7.3 进入ipython测试TensorFlow
import tensorflow as tf
a = tf.constant(1.0)
b = tf.constant(2.0)
c = a + b
with tf.Session() as sess:
    print(sess.run(c))
四、openpose+tensorflow GPU
这里是作者的环境搭建视频,参考,英文的。。。
YouTube https://www.youtube.com/watch?v=nUjGLjOmF7o
如果上述环境都装好了,那么恭喜你,可以开始下面教程咯
4.1 进入虚拟环境
activate tensorflow-gpu
4.2 进入代码目录下
cd E:\tf-pose-estimation-master
显示如下:
4.3 安装依赖项 直接运行(速度慢可添加清华源)
pip install -r requirements.txt
requirements.txt文件内容如下:

运行这个txt需要安装git,(之前安装过的可以跳过这一节)
下载Git https://git-scm.com/downloads/
error1: ImportError: No module named '_pafprocess'
官方答案为:

没错,我们还要用swig编译一次 ok,先来下swig,同样之前下过的可以跳过这一节
我的swig版本是swigwin-3.0.6,下载地址是http://www.swig.org/download.html

下载解压:我的路径是 D:\app\swigwin-3.0.6
添加环境变量到path, 比如: D:\app\swigwin-3.0.6
在命令行执行: swig --help,不报错说明安装成功了。
然后在输入:
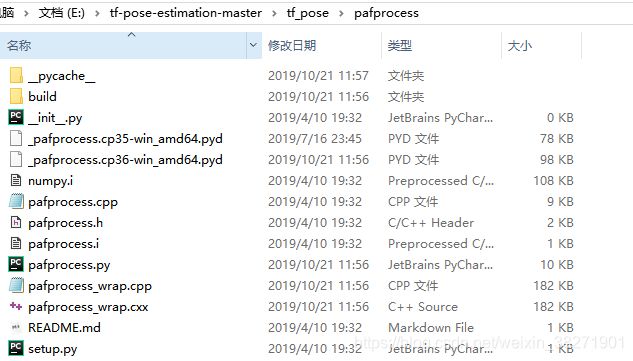
cd tf_pose\pafprocess
swig -python -c++ pafprocess.i && python setup.py build_ext --inplace
error2: Unable to find vcvarsall.bat
首先找到你的vcvarsall.bat所在路径。在你的 VS 安装路径下:C:\Program Files (x86)\Microsoft Visual Studio 14.0\VC

接着我们需要让python找到这个文件,这里只介绍我成功的方法,如果不行,百度百度百度
首先找到_msvccompiler.py文件,我的路径是D:\app\Anaconda\envs\tensorflow-gpu\Lib\distutils
用pycharm打开 Ctrl+G:def _find_vcvarsall(plat_spec): 找到这行代码:
将这个:
def _find_vcvarsall(plat_spec):
    try:
        key = winreg.OpenKeyEx(
            winreg.HKEY_LOCAL_MACHINE,
            r"Software\Microsoft\VisualStudio\SxS\VC7",
            access=winreg.KEY_READ | winreg.KEY_WOW64_32KEY
        )
    except OSError:
        log.debug("Visual C++ is not registered")
        return None, None

    with key:
        best_version = 0
        best_dir = None
        for i in count():
            try:
                v, vc_dir, vt = winreg.EnumValue(key, i)
            except OSError:
                break
            if v and vt == winreg.REG_SZ and os.path.isdir(vc_dir):
                try:
                    version = int(float(v))
                except (ValueError, TypeError):
                    continue
                if version >= 14 and version > best_version:
                    best_version, best_dir = version, vc_dir
        if not best_version:
            log.debug("No suitable Visual C++ version found")
            return None, None

        vcvarsall = os.path.join(best_dir, "vcvarsall.bat")
        if not os.path.isfile(vcvarsall):
            log.debug("%s cannot be found", vcvarsall)
            return None, None

        vcruntime = None
        vcruntime_spec = _VCVARS_PLAT_TO_VCRUNTIME_REDIST.get(plat_spec)
        if vcruntime_spec:
            vcruntime = os.path.join(best_dir,
                vcruntime_spec.format(best_version))
            if not os.path.isfile(vcruntime):
                log.debug("%s cannot be found", vcruntime)
                vcruntime = None

        return vcvarsall, vcruntime
修改为: 注意修改为自己的路径
def _find_vcvarsall(plat_spec):
        best_dir = r'C:\Program Files (x86)\Microsoft Visual Studio 14.0\VC'
        best_version = 17
        vcruntime = None
        vcruntime_spec = _VCVARS_PLAT_TO_VCRUNTIME_REDIST.get(plat_spec)
        if vcruntime_spec:
            vcruntime = os.path.join(best_dir,
                vcruntime_spec.format(best_version))
            if not os.path.isfile(vcruntime):
                log.debug("%s cannot be found", vcruntime)
                vcruntime = None
        print(vcruntime)
        return r'C:\Program Files (x86)\Microsoft Visual Studio 14.0\VC\vcvarsall.bat',vcruntime
然后在pafprocess文件夹运行:swig -python -c++ pafprocess.i && python setup.py build_ext --inplace
成功后:
cd  E:\tf-pose-estimation-master
python run.py --model=mobilenet_thin --resize=432x368 --image=./images/p1.jpg
到这块会保持很多错误,基本都是没有安装各种包 CV2、sliding window等等包按照提示pip install 即可
这里有个错误需要注意:ImportError: No module named 'pycocotools'
解决方法:
pycocotools安装需要Visual C++ Build Tools,可以在https://visualstudio.microsoft.com/visual-cpp-build-tools/ 下载,原错误信息给出的链接已经失效了 除此之外,还需要安装Cython,直接pip即可
 pip  intstall Cython
 pip install git+https://github.com/philferriere/cocoapi.git#egg=pycocotools^&subdirectory=PythonAPI

可以看出单人大概0.1534s 而多人的时间为0.0279s
**
视频处理
python run_video.py --model=mobilenet_thin --resolution=432x368 --video=bg.mp4
总结:
openpose可以同时对本地视频 和实时摄像机信息进行检测,实时姿态信息效果会更好,之后我将会基于openpose 的脚部信息来确定双脚间距及步长参数这个方向入手,继续死磕深度学习,有做步态分析或者相关方向感兴趣的可以跟我交流,一起up up up~
作者:小小的天


