slack 使用说明_使用现代Node.js工作流程构建Slack Bot
slack 使用说明
I recently started getting more requests from my workmates to refresh a “particular report” through one of the many custom reporting scripts we have. At first I didn’t mind, but eventually, I felt it would be better if people could get these reports themselves. There was no need to have this back and forth before getting a report, plus I’m certain I’m not the only developer who frowns upon the idea of being plugged out of my coding thoughts.
最近,我开始收到同事的更多要求,以通过我们拥有的许多自定义报告脚本之一来刷新“特定报告”。 起初我不介意,但最终,我觉得人们可以自己获得这些报告会更好。 在获得报告之前无需来回重复此操作,而且我敢肯定,我并不是唯一一个不赞成将编码思想排除在外的开发人员。
I decided to build a Slack app using Node.js that anyone at work could use to get reports on demand. This would save me from doing mundane reporting tasks and make for a better experience for everyone involved… a.k.a laziness for the win :p
我决定使用Node.js构建一个Slack应用程序,任何人都可以使用它来按需获取报告。 这将使我免于执行平凡的报告任务,并为每个参与其中的人提供了更好的体验……也为胜利而懒惰:p

In this tutorial, we’ll be building a Slack app called reporterbot that provides functionality to get reports on demand. Our app will need to allow a user to state what report they want, generate the actual report and finally send it back to the user. Aside from building the actual Slack app, this tutorial will also cover some modern practices when working on Node.js applications.
在本教程中,我们将构建一个名为Reporterbot的Slack应用程序,该应用程序提供按需获取报告的功能。 我们的应用程序将需要允许用户陈述他们想要的报告,生成实际报告,最后将其发送回用户。 除了构建实际的Slack应用程序之外,本教程还将介绍使用Node.js应用程序时的一些现代实践。
先决条件 ( Prerequisites )
Before getting started you will need to have node and npm installed on your machine. This is ridiculously easy when using a tool called nvm - node version manager. If you have node and npm installed but have never heard of nvm, please go check it out as it makes managing node installations quite simple.
在开始之前,您需要在计算机上安装node和npm。 使用名为nvm- node版本管理器的工具时,这非常容易。 如果您安装了节点和npm,但从未听说过nvm,请检查一下它,因为它使管理节点安装非常简单。
You’ll also need to have basic knowledge of using the Express web framework as well as ngrok or any other secure tunneling service to make your localhost publicly reachable.
您还需要具有使用Express Web框架以及ngrok或任何其他安全隧道服务的基本知识,以使您的本地主机可公开访问。
创建松弛应用 ( Create Slack App )
Our bot will be packaged as a Slack app. Slack apps allow you to add more functionality into your Slack workspace. In our case, we’ll be adding our custom reporting functionality.
我们的机器人将打包为Slack应用 。 Slack应用程序允许您向Slack工作区添加更多功能。 就我们而言,我们将添加自定义报告功能。
To create your new Slack app, go to this page and set your app name as well as the workspace you’ll be developing your app in. If you don’t have a workspace, you can create one here.
要创建新的Slack应用, 请转到此页面并设置应用名称以及将在其中开发应用的工作空间。如果没有工作空间,则可以在此处创建一个工作空间。

Once you finish this step, you’ll have a new Slack app to manage.
完成此步骤后,将有一个新的Slack应用程序要管理。
启用Slack应用功能 ( Enable Slack App Features )
Next we’ll need to configure our new slack app with the features we’ll be using to achieve our needed functionality. For our reporterbot to work, we’ll need to enable the following features:
接下来,我们需要使用将用于实现所需功能的功能配置新的Slack应用程序。 为了使Reporterbot正常工作,我们需要启用以下功能:
- Bot Users - This will enable our app to interact with users in a more conversational manner Bot用户-这将使我们的应用能够以更多的对话方式与用户互动
- Slash Commands - This will allow users to invoke app methods that we expose. We’ll use this to allow the user to initiate the get report flow (on demand) 斜杠命令-这将允许用户调用我们公开的应用程序方法。 我们将使用它来允许用户启动获取报告流程(按需)
- Interactive Components - This will help us make the experience more interactive using components like drop down menus to help the user select a report instead of having them type it in 互动组件-这将帮助我们使用诸如下拉菜单之类的组件来帮助用户提高体验的交互性,以帮助用户选择报告,而无需让他们在其中键入

To enable bot users, click on the “Bots” feature button as shown in the image above. Set your bots Display Name and Default Username to reporterbot or whatever name you find fitting.
要启用机器人用户,请单击“机器人”功能按钮,如上图所示。 将您的机器人的显示名称和默认用户名设置为reporterbot或您认为合适的任何名称。
For slash commands and interactive components to work, our app we’ll need to provide webhooks that slack can post to. These features involve actions that are initiated by the user inside Slack. Every time an action happens through a slash command or interactive component, Slack will make a POST request to our registered webhook and our application will need to respond accordingly.
为了使斜杠命令和交互式组件正常工作,我们需要提供我们的应用程序,这些程序可以将松弛释放到其中。 这些功能涉及用户在Slack内部发起的操作。 每次通过斜杠命令或交互式组件执行操作时,Slack都会向我们注册的Webhook发出POST请求,并且我们的应用程序需要相应地做出响应。
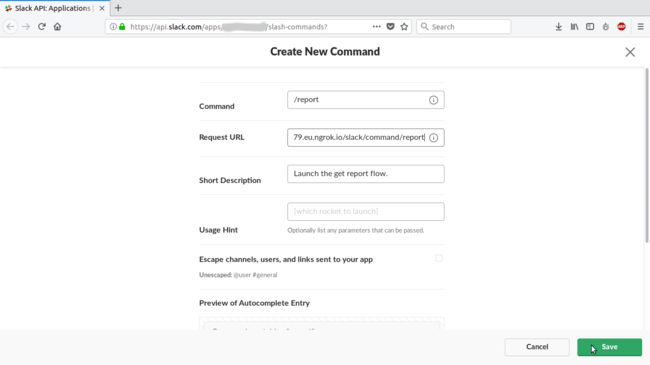
To enable slash commands, click on the “Slash Commands” feature button as shown in the image above. We’ll create a new slash command called /report and set the webhook to our server side endpoint that will handle this action:
要启用斜线命令,请单击“斜线命令”功能按钮,如上图所示。 我们将创建一个名为/report的新斜杠命令,并将webhook设置为将处理此操作的服务器端端点:
https://**your-ngrok-domain-here**/slack/command/report
https://**your-ngrok-domain-here**/slack/command/report
Whenever a user sends a message beginning with /report, slack will make a POST request to the configured webhook and our app will initiate the get report flow.
每当用户发送以/report开头的消息时,slack都会向配置的webhook发出POST请求,我们的应用将启动get报告流程。
Once the get report flow is initiated, we’ll make use of “Interactive Components” to allow the user to select the report they want.
启动获取报告流程后,我们将使用“交互式组件”来允许用户选择他们想要的报告。
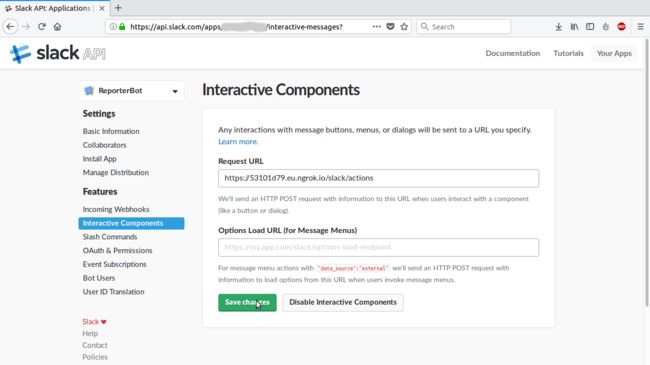
To enable interactive components, click on the “Interactive Components” feature button as shown in the image above and set the webhook to our server side endpoint that will handle this action:
要启用交互式组件,请单击上图所示的“交互式组件”功能按钮,并将webhook设置为将处理此操作的服务器端端点:
https://**your-ngrok-domain-here**/slack/actions
https://**your-ngrok-domain-here**/slack/actions

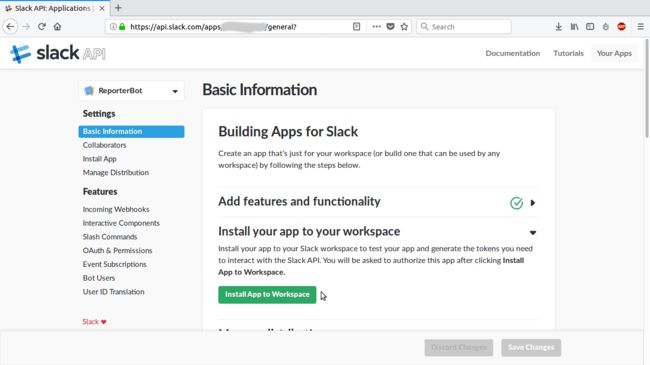
将Slack App安装到工作区 ( Install Slack App to workspace )
With our features configured, we’ll now need to install the app into our Slack workspace. This will make the app available to the users in the workspace plus generate all the necessary tokens our application will need to make authenticated requests to Slacks API.
配置好功能后,我们现在需要将应用程序安装到Slack工作区中。 这将使该应用程序可用于工作空间中的用户,并生成我们的应用程序向Slacks API进行身份验证的请求所需的所有必要令牌。
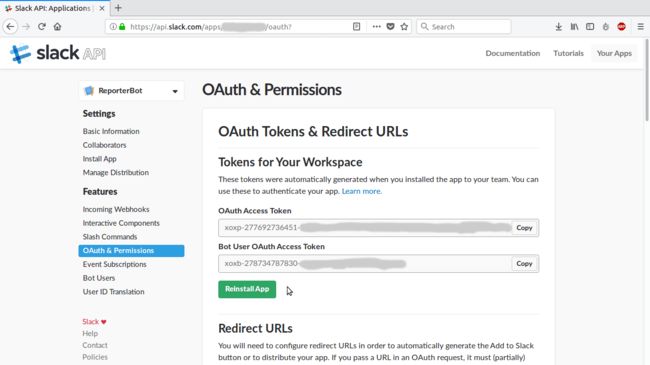
After installing the app to your workspace, click the “OAuth & Permissions” menu item available to the right of the screen to get the authentication tokens we’ll be using. Our application will only be making use of the “Bot User OAuth Access Token”, copy it and save it privately.
将应用程序安装到工作区后,单击屏幕右侧的“ OAuth&Permissions”菜单项以获取我们将使用的身份验证令牌。 我们的应用程序将仅使用“ Bot用户OAuth访问令牌”,将其复制并私下保存。
设置Node.js应用程序 ( Set Up Node.js Application )
Great! Now that our Slack app is successfully configured and installed, we can begin working on the Node.js application. Let’s begin by recapping what the scope of our Node.js application will be. It will need to:
大! 现在我们的Slack应用已成功配置和安装,我们可以开始使用Node.js应用了。 让我们首先回顾一下Node.js应用程序的范围。 它将需要:
- Process POST requests from Slack as a result of our users sending the
/reportslash command or selecting a report through an interactive component 由于我们的用户发送/reportslash命令或通过交互式组件选择报告,因此处理了来自Slack的POST请求 - Generate the selected report 生成所选报告
- Send the report back to the user 将报告发送回用户
Enough mambo jambo! Let’s look at some code :D
足够的曼波舞! 让我们看一些代码:D
Open your terminal and create a new folder called reporterbot or whatever name you find fitting. Navigate into the folder and initialize the project by running npm init. This will give you a few prompts, no need to answer all of them, just keep pressing enter to use the default values.
打开终端,并创建一个名为reporterbot的新文件夹或您认为合适的任何名称。 导航到该文件夹并通过运行npm init初始化项目。 这将为您提供一些提示,无需全部回答,只需按住enter键即可使用默认值。
mkdir reporterbot
cd reporterbot
npm init
Babel&ESlint安装和配置 ( Babel & ESlint Installation and Configuration )
We’ll be building our Node.js application using some sweet ES6 features. If you’re anything like I used to be, you’re probably cringing at the idea of using ES6, please don’t. ES6 has been out for quite some time and learning the new syntax and features will make you a more productive Node.js developer.
我们将使用一些出色的ES6功能来构建Node.js应用程序。 如果您像我以前一样,可能会对使用ES6的想法有所畏惧,请不要。 ES6已经问世了很长时间,学习新的语法和功能将使您成为更有效率的Node.js开发人员。
Some of the ES6 features we’ll be using are not supported in older Node.js environments. To solve this, we’ll use Babel - a JavaScript transpiler - to convert our ES6 code into plain old ES5 which is more widely supported. Install Babel by running:
我们将要使用的某些ES6功能在较旧的Node.js环境中不受支持。 为了解决这个问题,我们将使用Babel(JavaScript编译器)将我们的ES6代码转换为更广泛支持的普通旧ES5。 通过运行以下命令安装Babel:
npm i babel-cli babel-preset-env babel-polyfillWe need all the above dependencies to work with Babel. babel-preset-env is a handy tool that makes configuring Babel a breeze. babel-polyfill as the name suggests, provides polyfills for features that are not supported in older environments.
我们需要以上所有依赖关系才能与Babel一起工作。 babel-preset-env是一个方便的工具,使配置Babel变得轻而易举。 顾名思义, babel-polyfill为较旧环境中不支持的功能提供了polyfill。
Create a new file, .babelrc in the project root folder and copy the following into it:
在项目根文件夹中创建一个新文件.babelrc并将以下内容复制到其中:
{

  "presets": [
    ["env", {

      "targets": {

        "node": "current"
      }
    }]
  ]
}
The Babel configuration file is quite straight forward thanks to babel-preset-env. We’re instructing Babel to convert only what’s necessary for the current Node.js version installed in our machines. Check out their docs for more information.
由于babel-preset-env ,Babel配置文件非常简单。 我们指示Babel仅转换安装在我们机器中的当前Node.js版本所需的内容。 查看他们的文档以获取更多信息。
Up next, we’re going to set up ESlint. From their documentation site:
接下来,我们将设置ESlint。 从他们的文档站点:
“JavaScript code is typically executed in order to find syntax or other errors. Linting tools like ESLint allow developers to discover problems with their JavaScript code without executing it.”
“通常执行JavaScript代码以查找语法或其他错误。 像ESLint这样的Linting工具使开发人员无需执行JavaScript代码就能发现问题。”
ESlint improves your development experience by helping you catch bugs early. ESlint also helps with enforcing a style guide. What is a style guide?… I’m glad you asked :D
ESlint通过帮助您及早发现错误来改善您的开发经验。 ESlint还有助于实施样式指南。 什么是样式指南?…很高兴你问:D
A style guide is a set of rules on how to write code for a particular project. Style guides are important to make sure you’re writing code that is visually consistent and readable. This makes it easier for other developers to understand your code. IMHO, writing clean, easy to read code makes you that much more of a professional and more importantly, it makes you a better human being. Install ESlint by running:
样式指南是关于如何为特定项目编写代码的一组规则。 样式指南对于确保您编写的视觉上一致且可读的代码很重要。 这使其他开发人员更容易理解您的代码。 恕我直言,编写简洁,易于阅读的代码可以使您变得更加专业,更重要的是,它可以使您成为更好的人。 通过运行以下命令安装ESlint:
npm i eslint eslint-config-airbnb-base eslint-plugin-importThere’s a number of JavaScript style guides we can use. These style guides are mostly made by teams that have massive JavaScript code bases… Airbnb, jQuery, Google e.t.c
我们可以使用许多JavaScript样式指南 。 这些样式指南主要是由拥有大量JavaScript代码库的团队制作的……Airbnb,jQuery,Google等
eslint-config-airbnb-base will configure ESlint to run with the style guide provided by Airbnb; I find their style guide effective for my work flow but you’re free to use whatever style guide you want. eslint-plugin-import will set rules on how to use the new ES6 module import syntax.
eslint-config-airbnb-base将配置ESlint以使用Airbnb提供的样式指南运行; 我发现他们的样式指南对我的工作流程很有效,但是您可以随意使用任何所需的样式指南。 eslint-plugin-import将设置有关如何使用新的ES6模块import语法的规则。
Create a new file, .eslintrc in the project root folder and copy the following into it:
在项目根文件夹中创建一个新文件.eslintrc并将以下内容复制到其中:
{

  "extends": "airbnb-base",
  "plugins": [
    "import"
  ],
  "env": {

    "browser":false,
    "node": true
  },
  "rules": {

    "indent": [2, 2],
    "import/no-extraneous-dependencies": [2, {

      "devDependencies": true
    }]
  }
}
The ESlint configuration file is also quite straight forward. We’re instructing ESlint to use the Airbnb style guide, to use the import plugin, setting the environment our project will be running in and setting a few other rules. Check out their docs for more information.
ESlint配置文件也非常简单。 我们指示ESlint使用Airbnb样式指南,使用导入插件,设置项目将在其中运行的环境并设置其他一些规则。 查看他们的文档以获取更多信息。
We’ve set up a pretty good base to build our application logic, before we jump into more code, our project file structure should look like this:
我们已经建立了一个很好的基础来构建应用程序逻辑,然后再跳入更多代码,我们的项目文件结构应如下所示:
.
|-- node_modules
|-- .babelrc
|-- .eslintrc
|-- package-lock.json
|-- package.json
Node.js应用程序逻辑 ( Node.js Application Logic )
Let’s jump into our application logic. Create two folders config and src in the project root folder. config will have our configuration files and src will have our application logic. Inside config we’ll add a default.json file and a development.json file. Inside src we’ll add an index.js file.
让我们跳入我们的应用程序逻辑。 在项目根文件夹中创建两个文件夹config和src 。 config将具有我们的配置文件, src将具有我们的应用程序逻辑。 在config内部,我们将添加一个default.json文件和一个development.json文件。 在src内部,我们将添加一个index.js文件。
mkdir config src
touch config/default.json config/development.json src/index.js
Our project file structure should now look like this:
现在,我们的项目文件结构应如下所示:
.
|-- config
    |-- default.json
    |-- development.json
|-- node_modules
|-- src
    |-- index.js
|-- .babelrc
|-- .eslintrc
|-- package-lock.json
|-- package.json
Open config/default.json and copy the following into it:
打开config/default.json并将以下内容复制到其中:
{

  "baseUrl": "http://127.0.0.1:8000",
  "host": "127.0.0.1",
  "port": 8000,
  "reportFilesDir": "reportFiles"
}
Open conig/development.json and copy the following into it:
打开conig/development.json并将以下内容复制到其中:
{

  "slack": {

    "fileUploadUrl": "https://slack.com/api/files.upload",
    "reporterBot": {

        "fileUploadChannel": "#reporterbot_files",
        "botToken": "YOUR-BOT-TOKEN-HERE"
    }
  }
}
Make sure to add the development.json file to your .gitgnore as your Slack tokens should be private. The file upload channel as you might have guessed is where we’ll eventually upload the report to. We’ll come back to this later.
确保将development.json文件添加到您的.gitgnore因为Slack令牌应该是私有的。 您可能已经猜到文件上传通道是我们最终将报告上传到的渠道。 我们待会儿会再谈这个。
We need to install a couple of modules:
我们需要安装几个模块:
npm i express config morgan tracer csv-write-stream mkdirpexpress as mentioned earlier is the web framework we’ll be using. The config module will help us manage our environment variables by reading the files in the config folder. morgan and tracer will provide us with logging functionality. csv-write-stream will help us write data into csv files and mkdirp will help us create folders dynamically.
如前所述, express是我们将要使用的Web框架。 config模块将通过读取config文件夹中的文件来帮助我们管理环境变量。 morgan和tracer将为我们提供日志记录功能。 csv-write-stream将帮助我们将数据写入csv文件,而mkdirp将帮助我们动态创建文件夹。
Open src/index.js and copy the following into it:
打开src/index.js并将以下内容复制到其中:
import 'babel-polyfill';

import config from 'config';
import express from 'express';
import http from 'http';

import bootstrap from './bootstrap';
import {
        log, normalizePort } from './utils';

const app = express();
app.start = async () => {

  log.info('Starting Server...');
  const port = normalizePort(config.get('port'));
  app.set('port', port);
  bootstrap(app);
  const server = http.createServer(app);

  server.on('error', (error) => {

    if (error.syscall !== 'listen') throw error;
    log.error(`Failed to start server: ${
         error}`);
    process.exit(1);
  });

  server.on('listening', () => {

    const address = server.address();
    log.info(`Server listening ${
         address.address}:${
         address.port}`);
  });

  server.listen(port);
};

app.start().catch((err) => {

  log.error(err);
});

export default app;
We’ve created our express server but it won’t run yet as there are some missing files. There’s a bootsrap.js and utils.js file that we’re importing objects from but haven’t created yet. Let’s create those inside the src folder:
我们已经创建了Express服务器,但是由于缺少某些文件,因此它无法运行。 有一个bootsrap.js和utils.js文件,我们从中导入对象,但尚未创建对象。 让我们在src文件夹中创建它们:
touch src/utils.js src/bootstrap.jsutils.js as the name suggests has utility methods like logging that we’ll be using across the project. bootsrap.js is where we’ll set up our application routes.
utils.js具有实用程序方法,例如日志记录,我们将在整个项目中使用它。 bootsrap.js是我们设置应用程序路由的地方。
Open src/utils.js and copy the following into it:
打开src/utils.js并将以下内容复制到其中:
import fs from 'fs';
import path from 'path';
import config from 'config';
import csvWriter from 'csv-write-stream';
import morgan from 'morgan';
import mkdirp from 'mkdirp';
import tracer from 'tracer';

export const log = (() => {

  const logger = tracer.colorConsole();
  logger.requestLogger = morgan('dev');
  return logger;
})();

export const normalizePort = (val) => {

  const port = parseInt(val, 10);
  if (Number.isNaN(port)) return val;
  if (port >= 0) return port;
  return false;
};

export const delay = time => new Promise((resolve) => {

  setTimeout(() => {
        resolve(); }, time);
});

export const fileExists = async (filePath) => {

  let exists = true;
  try {

    fs.accessSync(filePath);
  } catch (err) {

    if (err.code === 'ENOENT') {

      exists = false;
    } else {

      throw err;
    }
  }
  return exists;
};

export const writeToCsv = ({
        headers, records, filePath }) => {

  const writer = csvWriter({
        headers });
  writer.pipe(fs.createWriteStream(filePath));
  records.forEach(r => writer.write(r));
  writer.end();
};

export const getReportFilesDir = () => {

  let reportFilesDir;
  try {

    reportFilesDir = path.join(__dirname, `../${
         config.get('reportFilesDir')}`);
    mkdirp.sync(reportFilesDir);
    return reportFilesDir;
  } catch (err) {

    throw err;
  }
};
log and normalizePort are the two objects we imported from the index.js file earlier. We’ll use delay, fileExists, writeToCsv and getReportFilesDir later but from their names you can guess what they’ll be used for.
log和normalizePort是我们之前从index.js文件导入的两个对象。 稍后,我们将使用delay , fileExists , writeToCsv和getReportFilesDir但是从它们的名称中,您可以猜测它们的用途。
Next we need to configure our routes in the bootstrap.js file. Before doing this we’ll have to install a module called body-parser to help parse incoming request bodies.
接下来,我们需要在bootstrap.js文件中配置路由。 在执行此操作之前,我们必须安装一个名为body-parser的模块以帮助解析传入的请求正文。
npm i body-parserNow open src/bootstrap.js and copy the following into it:
现在打开src/bootstrap.js并将以下内容复制到其中:
import bodyParser from 'body-parser';

import {
        log } from './utils';
import routes from './routes';

export default function (app) {

  app.use(bodyParser.json());
  app.use(bodyParser.urlencoded({
        extended: true }));

  // Routes
  app.use(routes);

  // 404
  app.use((req, res) => {

    res.status(404).send({

      status: 404,
      message: 'The requested resource was not found',
    });
  });

  // 5xx
  app.use((err, req, res) => {

    log.error(err.stack);
    const message = process.env.NODE_ENV === 'production'
      ? 'Something went wrong, we\'re looking into it...'
      : err.stack;
    res.status(500).send({

      status: 500,
      message,
    });
  });
}
There’s a routes.js file we’re importing the actual routes from but haven’t created yet. Let’s create it inside the src folder:
有一个routes.js文件,我们正在routes.js导入实际路由,但尚未创建。 让我们在src文件夹中创建它:
touch src/routes.jsOpen src/routes.js and copy the following into it:
打开src/routes.js并将以下内容复制到其中:
import express from 'express';

import {
        log } from './utils';
import {
        reportsList } from './modules/reports';

const router = new express.Router();

router.post('/slack/command/report', async (req, res) => {

  try {

    const slackReqObj = req.body;
    const response = {

      response_type: 'in_channel',
      channel: slackReqObj.channel_id,
      text: 'Hello :slightly_smiling_face:',
      attachments: [{

        text: 'What report would you like to get?',
        fallback: 'What report would you like to get?',
        color: '#2c963f',
        attachment_type: 'default',
        callback_id: 'report_selection',
        actions: [{

          name: 'reports_select_menu',
          text: 'Choose a report...',
          type: 'select',
          options: reportsList,
        }],
      }],
    };
    return res.json(response);
  } catch (err) {

    log.error(err);
    return res.status(500).send('Something blew up. We\'re looking into it.');
  }
});

export default router;
Ok that’s quite a bit of code, let’s break it down. Close to the top of the file we have this line:
好的,这是很多代码,让我们分解一下。 在文件顶部附近,我们有以下行:
import {
        reportsList } from './modules/reports';
We’re importing a reportsList that we’ll be using shortly. Notice we’re importing it from a reports module we haven’t created yet. We’ll do this soon.
我们正在导入不久将要使用的reportsList 。 注意,我们正在从尚未创建的报告模块中导入它。 我们将尽快进行。
The first route we create is /slack/command/report. This is the webhook that will handle the /report slash command; we configured this earlier in our Slack app. When a user sends a message beginning with /report, Slack will make a POST request to this route.
我们创建的第一条路线是/slack/command/report 。 这是将处理/report slash命令的webhook。 我们之前在Slack应用中对此进行了配置。 当用户发送以/report开头的消息时,Slack将对此路由发出POST请求。
The first thing we do is capture what Slack has posted to our application in the slackReqObj. This object has a lot of data but all we need for now is the channel_id. This channel_id represents the channel the user on Slack sent the /report command on. This could be a public channel, private channel or a direct message. Our app doesn’t really care at this point, all we need is the channel_id so that we can return the response to the sender.
我们要做的第一件事是在slackReqObj捕获Slack发布到应用程序的slackReqObj 。 这个对象有很多数据,但是我们现在只需要channel_id 。 该channel_id代表Slack上的用户向其发送/report命令的通道。 这可以是公共频道,私人频道或直接消息。 目前我们的应用程序并不在乎,我们只需要channel_id以便我们可以将响应返回给发送者。
Next we construct our response object to send back to Slack. I’d like to highlight four keys within this object:
接下来,我们构造响应对象以发送回Slack。 我想突出显示此对象中的四个键:
response.channel- This is where we set the channel we want to send our response to.response.channel这是我们设置要将响应发送到的通道的位置。response.attachments- This is where we’ll add our interactive component to allow the user to select a report.response.attachments这是我们将添加交互式组件以允许用户选择报告的地方。response.attachments[0].callback_id- We’ll use this later after the user selects a report from the interactive component.response.attachments[0].callback_id我们将在用户从交互式组件中选择报告之后使用。response.attachments[0].actions- This is where we create our interactive component. It’s a select menu and it’s options are in the reportsList object that we’ll create shortly.response.attachments[0].actions这是我们创建交互式组件的地方。 这是一个选择菜单,它的选项在我们即将创建的reportsList对象中。
Let’s create that reportsList object. Inside the src folder, we’ll create a folder called modules and inside modules we’ll add another folder called reports with an index.js file.
让我们创建一个reportsList对象。 在src文件夹内,我们将创建一个名为modules的文件夹,在modules我们将添加一个名为reports带有index.js文件的文件夹。
mkdir src/modules src/modules/reports
touch src/modules/reports/index.js
Open src/reports/index.js and copy the following into it:
打开src/reports/index.js并将以下内容复制到其中:
import path from 'path';
import config from 'config';

import {
        log, delay, fileExists, getReportFilesDir } from '../../utils';

// Reports
import getUserActivity from './getUserActivity';

const slackConfig = config.get('slack');

const REPORTS_CONFIG = {

  userActivity: {

    name: 'User Activity',
    namePrefix: 'userActivity',
    type: 'csv',
    func: getUserActivity,
  },
};

export const reportsList = Object.entries(REPORTS_CONFIG)
  .map(([key, value]) => {

    const report = {

      text: value.name,
      value: key,
    };
    return report;
  });
Let’s break down the index.js file we just created. Think of this file as a control center for all the reports we could potentially have. Close to the top of the file we import a function called getUserActivity which as you might have guessed is a function that will generate a user activity report. We haven’t made this function yet but we’ll do so shortly.
让我们分解一下我们刚刚创建的index.js文件。 将此文件视为我们可能拥有的所有报告的控制中心。 在文件顶部附近,我们导入了一个名为getUserActivity的函数,您可能已经猜到它是一个将生成用户活动报告的函数。 我们尚未实现此功能,但是我们很快就会实现。
The REPORTS_CONFIG variable is an object that has data on all the available reports. Every key within this object maps to a particular report; In this case userActivity. The name, namePrefix and type keys are going to come in handy when we’re uploading the report to Slack. In the func key, we store the function needed to generate the actual report. We’ll call this function later after the user selects a report.
REPORTS_CONFIG变量是一个对象,其中包含所有可用报告的数据。 该对象内的每个键都映射到特定的报告。 在这种情况下, userActivity 。 当我们将报告上传到Slack时, name , namePrefix和type键namePrefix上用场。 在func键中,我们存储了生成实际报告所需的功能。 用户选择报告后,我们将在稍后调用此函数。
To create the reportsList variable we use a handy little feature called Object.entries to loop through the REPORTS_CONFIG variable and get all available reports. Eventually reportsList will be an array that looks like this:
为了创建reportsList变量,我们使用了一个方便的小功能,称为Object.entries,以遍历REPORTS_CONFIG变量并获取所有可用的报告。 最终, reportsList将是一个如下所示的数组:
const reportsList = [{

  text: 'User Activity',
  value: 'userActivity'
}];
This is the reportsList object we used to configure our interactive component earlier. Every object in the reportsList corresponds to a select option the user will be presented with.
这是我们先前用来配置交互式组件的reportsList对象。 reportsList中的每个对象reportsList对应一个将向用户显示的选择选项。
When we send this response back to Slack, our user should see a message that looks like this:
当我们将此响应发送回Slack时,我们的用户应该看到一条如下所示的消息:
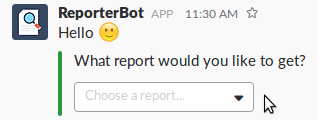

We’re halfway done, all we need to do is add the logic for what happens after a user selects a particular report. Before we move on, let’s create that getUserActivity function. This function will generate a simple csv report with some random user activity data. Inside the reports folder create a getUserActivity.js file:
我们已经完成了一半,我们所要做的就是添加用户选择特定报告后发生的逻辑。 在继续之前,让我们创建该getUserActivity函数。 此功能将生成一个简单的csv报告,其中包含一些随机的用户活动数据。 在reports文件夹中,创建一个getUserActivity.js文件:
touch src/modules/reports/getUserActivity.jsOpen getUserActivity.js and copy the following into it:
打开getUserActivity.js并将以下内容复制到其中:
import {
        log, writeToCsv } from '../../utils';

const generateData = async ({
        startDate, endDate, totalRecords }) => {

  try {

    const userActivity = [];
    for (let index = 0; index < totalRecords; index += 1) {

      userActivity.push({

        username: `user_${
         index + 1}`,
        startDate,
        endDate,
        loginCount: Math.floor(Math.random() * 20),
        itemsPurchased: Math.floor(Math.random() * 15),
        itemsReturned: Math.floor(Math.random() * 5),
      });
    }

    return userActivity;
  } catch (err) {

    throw err;
  }
};

export default async (options) => {

  try {

    const {

      startDate = '2017-11-25',
      endDate = '2017-11-28',
      totalRecords = 20,
      reportFilePath,
    } = options;

    const userActivity = await generateData({

      startDate,
      endDate,
      totalRecords,
    });

    if (userActivity.length > 0) {

      const headers = [
        'Username',
        'Start Date',
        'End Date',
        'Login Count',
        'Items Purchased',
        'Items Returned',
      ];

      const records = userActivity.map(record => [
        record.username,
        record.startDate,
        record.endDate,
        record.loginCount,
        record.itemsPurchased,
        record.itemsReturned,
      ]);

      const filePath = reportFilePath;
      writeToCsv({
        headers, records, filePath });
      log.info(`${
         records.length} records compiled into ${
         filePath}`);
    }
  } catch (err) {

    throw err;
  }
};
All we’re doing here is generating some random data and organizing it in a format that the csv-write-stream module we installed earlier can consume. Notice we’re making use of the writeToCsv function we created earlier in the utils.js file. One more thing to point out at the top of the default function is the use of Object destructuring. This allows us to do all sorts of cool tricks like setting default values for our parameters.
我们在这里所做的只是生成一些随机数据,并以我们之前安装的csv-write-stream模块可以使用的格式来组织它们。 注意,我们正在使用之前在utils.js文件中创建的writeToCsv函数。 需要指出的是,默认功能顶部是使用Object destructuring 。 这使我们可以做各种很酷的技巧,例如为参数设置默认值。
OK, let’s keep moving. First, make sure your project file structure looks like this:
好吧,让我们继续前进。 首先,确保您的项目文件结构如下所示:
.
|-- config
    |-- default.json
    |-- development.json
|-- node_modules
|-- src
    |-- modules
        |-- reports
            |-- getUserActivity.js
            |-- index.js
    |-- bootstrap.js
    |-- index.js
    |-- routes.js
    |-- utils.js
|-- .babelrc
|-- .eslintrc
|-- package-lock.json
|-- package.json
The second route we’ll create is /slack/actions. This is the webhook that will handle actions on interactive components; we configured this earlier in our Slack app. When a user selects a report, Slack will make a POST request to this route. Copy the following into the routes.js file under the /slack/command/report route we just created:
我们将创建的第二条路线是/slack/actions 。 这是用于处理交互式组件上的操作的Webhook。 我们之前在Slack应用中对此进行了配置。 当用户选择报告时,Slack将对此路由发出POST请求。 将以下内容复制到我们刚刚创建的/slack/command/report路由下的routes.js文件中:
router.post('/slack/actions', async (req, res) => {

  try {

    const slackReqObj = JSON.parse(req.body.payload);
    let response;
    if (slackReqObj.callback_id === 'report_selection') {

      response = await generateReport({
        slackReqObj });
    }
    return res.json(response);
  } catch (err) {

    log.error(err);
    return res.status(500).send('Something blew up. We\'re looking into it.');
  }
});
Once again, we capture what Slack has posted to our app in the slackReqObj. Notice that this time round we derive the slackReqObj by parsing the payload key in the request body. Now we need to compose a response based on what action this request represents.
再次,我们在slackReqObj捕获Slack发布到应用程序的slackReqObj 。 注意,这一次我们通过解析请求主体中的有效负载密钥来导出slackReqObj 。 现在,我们需要根据此请求代表的操作来组成响应。
Remember the response.attachments[0].callback_id key I highlighted earlier, that’s what we use to figure out what action we’re responding to. The interactive components webhook can be used for more than one action, using this callback_id let’s us know what action we’re handling.
记住我之前强调的response.attachments[0].callback_id键,这就是我们用来确定我们正在响应的操作的键。 交互式组件webhook可以用于多个动作,使用此callback_id我们可以知道要处理的动作。
If the callback_id === "``report_selection``", we know that this is an action from the select report interactive component we had sent out earlier; this means our user has selected a report. We need to give the user feedback that we have received their request and begin generating the report they selected.
如果callback_id === "``report_selection``" ,我们知道这是我们之前发送的选择报告交互组件的操作; 这表示我们的用户已选择一个报告。 我们需要给用户反馈我们已经收到他们的请求,并开始生成他们选择的报告。
To do this we’ll use a generateReport function. Calling this function will return a confirmation message that we send back to the user as well as invoke the report func we saved earlier in the REPORTS_CONFIG to begin generating the selected report.
为此,我们将使用generateReport函数。 调用此函数会返回一个确认信息,我们发回给用户,以及调用报告func我们前面所保存的REPORTS_CONFIG开始产生选定的报告。
Open src/reports/index.js and copy the following under the reportsList object:
打开src/reports/index.js并将以下内容复制到reportsList对象下:
export const generateReport = async (options) => {

  try {

    const {
        slackReqObj } = options;
    const reportKey = slackReqObj.actions[0].selected_options[0].value;
    const report = REPORTS_CONFIG[reportKey];

    if (report === undefined) {

      const slackReqObjString = JSON.stringify(slackReqObj);
      log.error(new Error(`reportKey: ${
         reportKey} did not match any reports. slackReqObj: ${
         slackReqObjString}`));
      const response = {

        response_type: 'in_channel',
        text: 'Hmmm :thinking_face: Seems like that report is not available. Please try again later as I look into what went wrong.',
      };
      return response;
    }

    const reportTmpName = `${
         report.namePrefix}_${
         Date.now()}.${
         report.type}`;
    const reportFilesDir = getReportFilesDir();
    const reportFilePath = path.join(reportFilesDir, reportTmpName);

    const reportParams = {

      reportName: report.name,
      reportTmpName,
      reportType: report.type,
      reportFilePath,
      reportFunc() {

        return report.func({
        reportFilePath });
      },
    };

    // Begin async report generation
    generateReportImplAsync(reportParams, {
        slackReqObj });

    const response = {

      response_type: 'in_channel',
      text: `Got it :thumbsup: Generating requested report *${
         report.name}*\nPlease carry on, I'll notify you when I'm done.`,
      mrkdwn: true,
      mrkdwn_in: ['text'],
    };
    return response;
  } catch (err) {

    throw err;
  }
};
Now open the src/routes.js file and add the generateReport function in the same import statement as the reportsList
现在打开src/routes.js文件,并将generateReport函数添加到与reportsList相同的导入语句中
import {
        reportsList, generateReport } from './modules/reports';
The first thing we do in the generateReport function is figure out what report the user selected. The object Slack posts to the interactive component webhook has the selected value and we get it here slackReqObj.actions[0].selected_options[0].value;. We extract this value into a reportKey variable as it corresponds to the key that’s in our REPORTS_CONFIG. In our case this will be userActivity. We use this key to get the report object from the REPORTS_CONFIG.
我们在generateReport函数中要做的第一件事是弄清楚用户选择了什么报告。 Slack发布到交互式组件webhook的对象具有选定的值,我们在这里获得slackReqObj.actions[0].selected_options[0].value; 。 我们提取该值成reportKey变量,因为它对应于在我们的关键REPORTS_CONFIG 。 在我们的例子中,这将是userActivity 。 我们使用此键从REPORTS_CONFIG获取report对象。
If the reportKey doesn’t match a particular report, we log an error and send the user a failure message. If it matches a report, we proceed to generate it.
如果reportKey与特定报告不匹配,我们将记录错误并向用户发送失败消息。 如果它与报告匹配,我们将继续生成它。
First we create a temporary name for the report in the reportTmpName variable using the current timestamp; the temporary name will look like this userActivity_1511870113670.csv. Next we get the directory where we’ll be saving the report. We created a utility function earlier called getReportFilesDir for this. Finally we compose the full reportFilePath by joining the reportFilesDir path and the reportTmpName
首先,我们使用当前时间戳在reportTmpName变量中为报告创建一个临时名称; 临时名称将类似于此userActivity_1511870113670.csv 。 接下来,我们将获得用于保存报告的目录。 为此,我们创建了一个名为getReportFilesDir的实用程序函数。 最后,我们组成了完整的reportFilePath通过加入reportFilesDir路径和reportTmpName
Next we create a reportParams object with some metadata and the report function to call. We pass this object to a generateReportImplAsync function that we’ll create shortly. The generateReportImplAsync function will execute the function to generate the report asynchronously. It’s important we do it asynchronously as we don’t know how long the report generation will take. As the report is being generated we send the user a confirmation message.
接下来,我们创建一个带有一些元数据和要调用的报告功能的reportParams对象。 我们将此对象传递给我们将很快创建的generateReportImplAsync函数。 generateReportImplAsync函数将执行该函数以异步生成报告。 重要的是我们异步进行操作,因为我们不知道报告生成将花费多长时间。 在生成报告时,我们向用户发送确认消息。
Let’s create the generateReportImplAsync function. Copy the following above the generateReport function:
让我们创建generateReportImplAsync函数。 将以下内容复制到generateReport函数上方:
const generateReportImplAsync = async (options, {
        slackReqObj }) => {

  const {

    reportName,
    reportTmpName,
    reportType,
    reportFilePath,
    reportFunc,
  } = options;

  try {

    // Initiate report function
    await reportFunc();

    /*
      FIX ME::
      Delay hack to ensure previous fs call is done processing file
    */
    await delay(250);
    const reportExists = await fileExists(reportFilePath);

    if (reportExists === false) {

      const message = {

        responseUrl: slackReqObj.response_url,
        replaceOriginal: false,
        text: `There's currently no data for report *${
         reportName}*`,
        mrkdwn: true,
        mrkdwn_in: ['text'],
      };
      return postChatMessage(message)
        .catch((ex) => {

          log.error(ex);
        });
    }

    /*
      FIX ME::
      Delay hack to ensure previous fs call is done processing file
    */
    await delay(250);
    const uploadedReport = await uploadFile({

      filePath: reportFilePath,
      fileTmpName: reportTmpName,
      fileName: reportName,
      fileType: reportType,
      channels: slackConfig.reporterBot.fileUploadChannel,
    });
    const message = {

      responseUrl: slackReqObj.response_url,
      replaceOriginal: false,
      text: 'Your report is ready!',
      attachments: [{

        text: `<${
         uploadedReport.file.url_private}|${
         reportName}>`,
        color: '#2c963f',
        footer: 'Click report link to open menu with download option',
      }],
    };
    return postChatMessage(message)
      .catch((err) => {

        log.error(err);
      });
  } catch (err) {

    log.error(err);
    const message = {

      responseUrl: slackReqObj.response_url,
      replaceOriginal: false,
      text: `Well this is embarrassing :sweat: I couldn't successfully get the report *${
         reportName}*. Please try again later as I look into what went wrong.`,
      mrkdwn: true,
      mrkdwn_in: ['text'],
    };
    return postChatMessage(message)
      .catch((ex) => {

        log.error(ex);
      });
  }
};
Let’s break down whats going on here. First we initiate the actual report function with await reportFunc(); this corresponds to the getUserActivity function we made earlier. This will generate the report and save it in the reportFilePath we created in the generateReportFunction.
让我们分解一下这里发生的事情。 首先,我们使用await reportFunc()启动实际的报告功能; 这对应于我们之前所做的getUserActivity函数。 这将生成报告并将其保存在我们在generateReportFunction创建的reportFilePath中。
Next we make use of a delay hack; this is the delay utility function we created earlier. We need this hack as the file system module behaves inconsistently. The report file would get created but on the next call where we check if the file exists, it would resolve to false. Adding a slight delay between file system calls will create a buffer to guarantee that the file system is indeed done processing the file. I’m sure there’s something I’m missing here so if anyone knows anything, please comment or better yet create a PR :)
接下来,我们利用延迟破解; 这是我们之前创建的delay实用程序函数。 我们需要此技巧,因为文件系统模块的行为不一致。 该报告文件将被创建,但是在下一个我们检查该文件是否存在的调用中,它将解析为false。 在文件系统调用之间添加一点延迟会创建一个缓冲区,以确保文件系统确实完成了文件处理。 我敢肯定,这里缺少我想要的东西,所以如果有人知道什么,请发表评论或更好地创建PR :)
After the report function is done, we check to make sure the report actually exists and if it doesn’t we assume there’s no data for the report and respond to the user. To send this response we use a postChatMessage function that we haven’t created yet. We’ll do this shortly.
报告功能完成后,我们检查以确保报告确实存在,如果不存在,则我们假设该报告没有数据并响应用户。 要发送此响应,我们使用尚未创建的postChatMessage函数。 我们将尽快执行此操作。
If the report exists we upload it to Slack using an uploadFile function that we’ll create soon. One interesting thing to note here is that we upload the file to the fileUploadChannel in our Slack config. This has to do with how Slack handles file permissions. By uploading a file to a public channel, the file automatically becomes public within the workspace and can be shared to anyone within the same workspace. You’ll need to create a channel on your Slack workspace to handle file uploads if you are looking to share the uploads with more than one user.
如果报告存在,我们将使用即将创建的uploadFile函数将其上传到Slack。 这里要注意的一件事是我们将文件上传到Slack配置中的fileUploadChannel 。 这与Slack处理文件权限的方式有关。 通过将文件上传到公共频道,该文件将自动在工作空间内公开,并且可以共享给同一工作空间内的任何人。 如果您希望与多个用户共享上载,则需要在Slack工作区上创建一个通道来处理文件上载。
After the file gets uploaded, we need to send the user a notification that their report is ready and a link to the actual file. The response object from the upload function contains a file url that we can use to reference the file we just uploaded. We compose the message to send back to the user using some Slack message formatting features and finally use the postChatMessage function to send the message.
文件上传后,我们需要向用户发送通知,告知他们报告已准备就绪,并提供了指向实际文件的链接。 上传函数的响应对象包含一个文件url,我们可以使用它来引用我们刚刚上传的文件。 我们使用一些Slack消息格式化功能 postChatMessage了发送回用户的消息 ,最后使用postChatMessage函数发送了消息。
We are almost at the finish line guys! Let’s create the postChatMessage and uploadFile functions. Inside the src/modules folder, we’ll create a folder called slack with an index.js file:
我们几乎快到终点线了! 让我们创建postChatMessage和uploadFile函数。 在src/modules文件夹中,我们将使用index.js文件创建一个名为slack的文件夹:
mkdir src/modules/slack
touch src/modules/slack/index.js
We’ll also be using the request module to make HTTP calls. Install it by running:
我们还将使用request模块进行HTTP调用。 通过运行以下命令进行安装:
npm i requestNow open src/modules/slack/index.js and copy the following into it:
现在打开src/modules/slack/index.js并将以下内容复制到其中:
import fs from 'fs';
import config from 'config';
import request from 'request';

const slackConfig = config.get('slack');

export const postChatMessage = message => new Promise((resolve, reject) => {

  const {

    responseUrl,
    channel = null,
    text = null,
    attachments = null,
    replaceOriginal = null,
  } = message;

  const payload = {

    response_type: 'in_channel',
  };

  if (channel !== null) payload.channel = channel;
  if (text !== null) payload.text = text;
  if (attachments !== null) payload.attachments = attachments;
  if (replaceOriginal !== null) payload.replace_original = replaceOriginal;

  request.post({

    url: responseUrl,
    body: payload,
    json: true,
  }, (err, response, body) => {

    if (err) {

      reject(err);
    } else if (response.statusCode !== 200) {

      reject(body);
    } else if (body.ok !== true) {

      const bodyString = JSON.stringify(body);
      reject(new Error(`Got non ok response while posting chat message. Body -> ${
         bodyString}`));
    } else {

      resolve(body);
    }
  });
});

export const uploadFile = options => new Promise((resolve, reject) => {

  const {

    filePath,
    fileTmpName,
    fileName,
    fileType,
    channels,
  } = options;

  const payload = {

    token: slackConfig.reporterBot.botToken,
    file: fs.createReadStream(filePath),
    channels,
    filetype: fileType,
    filename: fileTmpName,
    title: fileName,
  };

  request.post({

    url: slackConfig.fileUploadUrl,
    formData: payload,
    json: true,
  }, (err, response, body) => {

    if (err) {

      reject(err);
    } else if (response.statusCode !== 200) {

      reject(body);
    } else if (body.ok !== true) {

      const bodyString = JSON.stringify(body);
      reject(new Error(`Got non ok response while uploading file ${
         fileTmpName} Body -> ${
         bodyString}`));
    } else {

      resolve(body);
    }
  });
});
Let’s break down the postChatMessage function. We begin by initializing some optional parameters to null. There’s an interesting responseUrl we are using. We get this responseUrl from the object Slack posts to our webhook. Every message has a corresponding responseUrl that you can use to reply to it later. This works for us as we told the user we were generating the report and would notify them when we are done. We then construct the payload to send to Slack and finally fire off the request.
让我们分解一下postChatMessage函数。 我们首先将一些可选参数初始化为null 。 我们正在使用一个有趣的responseUrl 。 我们从对象Slack发布到我们的webhook获得此responseUrl 。 每条消息都有一个对应的responseUrl ,以后您可以用来回复它。 当我们告诉用户我们正在生成报告时,这将对我们有用,并在完成后通知他们。 然后,我们构造有效负载以发送给Slack,最后触发请求。
Next we have the uploadFile function. Here we simply stream the file to Slack on the file upload url that’s set in the slack config and use our botToken to authorize the request.
接下来,我们有uploadFile函数。 在这里,我们只需在slack配置中设置的文件上传网址上将文件流式传输到Slack,然后使用我们的botToken授权请求。
Now open src/modules/reports/index.js and add both the postChatMessage and uploadFile functions under the utils.js import:
现在打开src/modules/reports/index.js并在utils.js导入下添加postChatMessage和uploadFile函数:
import {
        postChatMessage, uploadFile } from '../slack';
运行! ( Run it! )
Time to run our bot. Open your package.json file and add these scripts:
是时候运行我们的机器人了。 打开您的package.json文件并添加以下脚本:
{

  "name": "reporterbot",
  "version": "1.0.0",
  "main": "./dist/index.js",

  // add the scripts key to your package.json

  "scripts": {

    "dev": "NODE_ENV=development babel-node src/index.js",
    "build": "rm -rf ./dist/ && babel src --out-dir dist/ --copy-files",
    "prod": "NODE_ENV=production node dist/index.js",
    "lint": "eslint src"
  },
  "dependencies": {

    ...
  }
}
Let’s break down these scripts.
让我们分解这些脚本。
The dev script runs our process using babel-node. This is a handy tool to use while in development that will run our src files through babel as well as run the node process in one go. You should not use this while in a production environment as it is considerably slower.
dev脚本使用babel-node运行我们的过程。 这是在开发中使用的便捷工具,它将通过babel运行我们的src文件以及一次性运行节点进程。 在生产环境中,请勿使用此功能,因为它的速度相当慢。
The build script uses babel to convert everything in the src folder into a dist folder. Make sure to add this dist folder to your .gitgnore as it doesn’t make sense to push it up to git.
build脚本使用babel将src文件夹中的所有内容转换为dist文件夹。 确保将此dist文件夹添加到您的.gitgnore因为将其推至git并没有意义。
The prod script runs our process using the normal node binary. This however relies on the already built files. Notice that the node call points to the index.js file in the dist folder.
prod脚本使用普通节点二进制文件运行我们的过程。 但是,这依赖于已经生成的文件。 注意,节点调用指向dist文件夹中的index.js文件。
Finally the lint script uses ESlint to check our src files for any linting errors. A better workflow would be integrating ESlint directly into your editor for faster feedback instead of having to manually run this command. Check out the ESlint integration docs for more info.
最后, lint脚本使用ESlint来检查我们的src文件中是否存在任何掉毛错误。 更好的工作流程是将ESlint直接集成到编辑器中以获得更快的反馈,而不必手动运行此命令。 查看ESlint集成文档以获取更多信息。
You can now run the dev command together with your ngrok secure tunnel and head on over to your Slack workspace to test things out. If everything checks out your reporterbot should be ready for use and is waiting to greet you with a warm smile! :D
现在,您可以将dev命令与ngrok安全隧道一起运行,并转到Slack工作区进行测试。 如果一切都已完成,您的Reporterbot应该准备就绪,可以等待着温暖的微笑向您打招呼! :D
结论 ( Conclusion )
Slack can be used for all types of interesting things, reporting is one of the more common use cases. Slack has great documentation so make sure to dig through them to see all the interesting features available to you. Hopefully this tutorial has taught you a thing or two about building Slack applications and Node.js development in general. If you have any improvements / thoughts please drop me a comment.
Slack可以用于所有类型的有趣事物,报告是较常见的用例之一。 Slack拥有丰富的文档,因此请务必仔细阅读它们,以查看所有可用的有趣功能。 希望本教程能教您一两个关于构建Slack应用程序和Node.js开发的知识。 如果您有任何改进/想法,请给我评论。
Cheers!
干杯!
翻译自: https://scotch.io/tutorials/building-a-slack-bot-with-modern-nodejs-workflows
slack 使用说明