学习回顾_Java高级
- Spring
-
- 1.Spring Inversion Of Control
- 2.Spring创建对象的三种方式
- 3.Spring Dependency Injection
- 4.Spring整合Mybatis
-
- 1.原始版
- 2.优化版一-降低service中spirng容器对象冗余
- 3.优化版二-降低servlet中spring容器对象的冗余
- 4.优化版三-解耦spring的配置文件
- 5.优化版四-解耦数据库配置信息
- 5.Spring Aspect Oriented Programming
-
- 1.实现方式
-
- 1.Schema-Based方式
- 2.AspectJ方式
- 3.注解方式
- 2.AOP底层的代理模式
- 6.Spring Transaction Management
- 7.常用注解
- 8.整合Junit
- Spring MVC
-
- 1.简单使用流程
- 2.配置优化
- 3.运行流程
- 4.静态资源放行
- 5.获取请求数据
-
- 1.紧耦方式
- 2.解耦方式
- 6.响应方式
-
- 1.紧耦方式
- 2.解耦方式
- 7.Model作用域
- 8.上传下载的实现
- 9.自定义视图解析器
- 10.拦截器
- 11.运行原理
- 12.编码过滤器配置
- RoleBasedAccessControl
- Linux
-
- 1.CentOS.6.5常用命令
- 2.使用Xshell连接CentOS
- 3.安装JDK
- 4.Tomcat安装
- 5.MySQL安装
- 6.上传SSM项目并访问
- 7.虚拟机克隆之后的网卡信息修改
- Maven
-
- 1.安装
- 2.项目类型
- 3.项目关系
- 4.项目继承关系的管理
- 5.远程部署
-
- 1.使用Apache Tomcat Maven Plugin
- 2.使用IDEA自带的Tools窗口下的Deployment工具
- Spring Boot
-
- 1.整合Servlet
- 2.整合Filter
- 3.整合Listener
- 4.整合静态资源
- 5.整合文件上传
- 6.整合jsp
- 7.整合thymeleaf
-
- 1.Thymeleaf常用API
- 8.整合jdbc
- 9.整合mybatis
- 10.数据校验
- 11.热部署
-
- 1.SpringLoader
- 2.DevTools
- 12.注解解释
-
- 1.@SpringBootApplication
- 2.@ServletComponentScan
- 3.@WebServlet
- 4.@WebFilter
- 5.@WebListener
- Spring Security
-
- 1.简单实现
- 2.自定义登录认证逻辑
-
- 3.自定义认证页
- 4.自定义认证成功处理器
- 5.自定义认证失败处理器
- 6.自定义403处理逻辑
- 7.自定义访问控制
- 8.基于注解的访问控制
-
- 1.开启注解
- 2.@Secured
- 3.@PreAuthorize/@PostAuthorize
- 9.Remember Me实现
- 10.整合Thymeleaf
- CSRF
Spring
Spring是一个轻量级控制反转(IOC)和面向切面(AOP)的容器框架
1.Spring Inversion Of Control
Spring IOC将对象的管理权力由程序员反转给了Spring容器,程序员只需通过配置对象信息,之后对象的创建、销毁等完全由Spring容器处理,实现了对象之间的解耦
//导入jar
//commons-logging-1.1.3.jar
//spring-beans-4.1.6.RELEASE.jar
//spring-context-4.1.6.RELEASE.jar
//spring-core-4.1.6.RELEASE.jar
//spring-expression-4.1.6.RELEASE.jar

class Test{

	public static void main(String[] args){

		//非Spring获取对象
		User user01 = new User();
		//Spring获取对象
		ApplicationContext ac = new ClassPathXmlApplicationContext("application-context.xml");
		User user02 = (User)ac.getBean("user");
	}
}

class User{

	public void test(){
     }
}
<beans xmlns="http://www.springframework.org/schema/beans"
        xmlns:xsi="http://www.w3.org/2001/XMLSchema-instance"
        xsi:schemaLocation="http://www.springframework.org/schema/beans
            http://www.springframework.org/schema/beans/spring-beans.xsd">

        <bean id="user" class="cn.khue.test.User"/>

beans>
2.Spring创建对象的三种方式
- 构造器方式(必须存在对应的构造器)
<beans xmlns="http://www.springframework.org/schema/beans" xmlns:xsi="http://www.w3.org/2001/XMLSchema-instance" xsi:schemaLocation="http://www.springframework.org/schema/beans http://www.springframework.org/schema/beans/spring-beans.xsd"> <bean id="user01" class="cn.khue.test.User"/> <bean id="user02" class="cn.khue.test.User"> <constructor-arg index="0" type="java.lang.String" name="name" value="Khue" /> <constructor-arg index="1" type="java.lang.Integer" name="age" value="25" /> bean> beans> - 属性注入方式(必须存在属性的get/set方法)
<beans xmlns="http://www.springframework.org/schema/beans" xmlns:xsi="http://www.w3.org/2001/XMLSchema-instance" xsi:schemaLocation="http://www.springframework.org/schema/beans http://www.springframework.org/schema/beans/spring-beans.xsd"> <bean id="user03" class="cn.khue.test.User"> <property name="name" value="Khue" /> <property name="age" value="25"/> bean> beans> - 工厂方式
<beans xmlns="http://www.springframework.org/schema/beans"
        xmlns:xsi="http://www.w3.org/2001/XMLSchema-instance"
        xsi:schemaLocation="http://www.springframework.org/schema/beans
            http://www.springframework.org/schema/beans/spring-beans.xsd">


        <bean id="factory" class="cn.khue.test.UserFactory" />
        <bean id="user04" factory-bean="factory" factory-method="newInstance01" />

        <bean id="user05" class="cn.khue.test.StudentFactory" factory-method="newInstance02" />
beans>
class UserFactory{ public User newInstance01(){ return new User(); } public static User newInstance02(){ return new User(); } }
3.Spring Dependency Injection
使用Spring DI可以解决Spring在创建对象时,完成其引用类型属性的赋值
<beans xmlns="http://www.springframework.org/schema/beans"
		xmlns:xsi="http://www.w3.org/2001/XMLSchema-instance"
		xsi:schemaLocation="http://www.springframework.org/schema/beans
		http://www.springframework.org/schema/beans/spring-beans.xsd">


		<bean id="test01" class="cn.khue.test.Test01">
			<property name="test02" ref="test02" />
		bean>
		<bean id="test02" class="cn.khue.test.Test01">
			<property name="test03" ref="test03" />
		bean>
		<bean id="test03" class="cn.khue.test.Test03" />


		<bean id="test01" class="cn.khue.test.Test01">
			<constructor-arg index="0" type="cn.khue.test.Test02" name="test02" ref="test02" />
		bean>
		<bean id="test02" class="cn.khue.test.Test01">
			<constructor-arg index="0" type="cn.khue.test.Test03" name="test03" ref="test03" />
		bean>
		<bean id="test03" class="cn.khue.test.Test03" />
beans>
class Test01{

	private Test02 test02;
	public Test02(Test02 test02){

		this.test02=test02;
	}
	public void setTest02(Test02 test02){

		this.test02=test02;
	}
}
class Test02{

	private Test03 test03;
	public Test02(Test03 test03){

		this.test03=test03;
	}
	public void setTest02(Test03 test03){

		this.test03=test03;
	}
}
class Test03{
     }
当bean的id与属性名称一致时,可以使用自动注入
<beans xmlns="http://www.springframework.org/schema/beans"
		xmlns:xsi="http://www.w3.org/2001/XMLSchema-instance"
		xsi:schemaLocation="http://www.springframework.org/schema/beans
		http://www.springframework.org/schema/beans/spring-beans.xsd">


	    default-autowire="byName"


		<bean id="test01" class="cn.khue.test.Test01">

		bean>
		<bean id="test02" class="cn.khue.test.Test01">

		bean>
		<bean id="test03" class="cn.khue.test.Test03" />
beans>
4.Spring整合Mybatis
导包:
spring:spring-core.jar spring-bean.jar spring-context.jar spring-expression.jar commons-logging.jar
spring整合mybatis:spring-jdbc.jar spring-tx.jar spring-aop.jar mybatis-spring.jar
Mybatis:mybatis.jar
MySQL:mysql-connector-java.jar
日志文件:log4j.jar
1.原始版
<beans xmlns="http://www.springframework.org/schema/beans"
        xmlns:xsi="http://www.w3.org/2001/XMLSchema-instance"
        xsi:schemaLocation="http://www.springframework.org/schema/beans
            http://www.springframework.org/schema/beans/spring-beans.xsd">


        <bean id="driver" class="org.springfarmework.jdbc.datasource.DriverManagerDataSource">
        	<property name="driverClassName" value="com.mysql.jdbc.Driver" />
        	<property name="url" value="jdbc:mysql://localhost:3306/test" />
        	<property name="username" value="root" />
        	<property name="password" value="root" />
        bean>


        <bean id="factory" class="org.mybatis.spring.SqlSessionFactoryBean">
        	<property name="dataSource" ref="driver"/>
        bean>


		<bean id="mapper" class="org.mybatis.spring.mapper.MapperScannerConfigurer">
			<property name="basePackage" value="cn.khue.mapper" />
			<property name="sqlSessionFactory" ref="factory" />
		bean>


		<bean id="userServiceImpl" class="cn.khue.test.service.impl.UserServiceImpl" />
beans>
class UserServiceImpl implements UserService{

	@Override
	public User login(String username, String password){

		//获取Spring容器对象
		ApplicationContext ac = new ClassPathXmlApplicationContext("application-context.xml");
		//获取mapper(默认生成的为接口名称的小驼峰命名)
		UserMapper mapper = (UserMapper)ac.getBean("userMapper");
		return mapper.login(user);
	}
}

@WebServlet("/login")
class UserServlet extends HttpServlet{

	@Override
	protected void service(HttpServletRequest req, HttpServletResponse res){

		String username=req.getParameter("username");
		String password=req.getParameter("password");
		//获取Spring容器对象
		ApplicationContext ac = new ClassPathXmlApplicationContext("application-context.xml");
		//获取UserServiceImpl对象
		UserServiceImpl usi=(UserServiceImpl)ac.getBean("userServiceImpl");
		User user=usi.login(username,password);
		...
	}
}
这里存在一个问题,那就是获取了两次Spring容器对象,也就是说,Spring管理的对象也会被创建两次,造成冗余,可以将UserMapper作为UserServiceImpl的属性,通过属性注入(需要提供get/set方法)或构造器注入(需要提供对应构造器)的方式在初始化时就赋值了
2.优化版一-降低service中spirng容器对象冗余
<beans xmlns="http://www.springframework.org/schema/beans"
        xmlns:xsi="http://www.w3.org/2001/XMLSchema-instance"
        xsi:schemaLocation="http://www.springframework.org/schema/beans
            http://www.springframework.org/schema/beans/spring-beans.xsd">


        <bean id="driver" class="org.springfarmework.jdbc.datasource.DriverManagerDataSource">
        	<property name="driverClassName" value="com.mysql.jdbc.Driver" />
        	<property name="url" value="jdbc:mysql://localhost:3306/test" />
        	<property name="username" value="root" />
        	<property name="password" value="root" />
        bean>


        <bean id="factory" class="org.mybatis.spring.SqlSessionFactoryBean">
        	<property name="dataSourec" ref="driver"/>
        bean>


		<bean id="mapper" class="org.mybatis.spring.mapper.MapperScannerConfigurer">
			<property name="basePackage" value="cn.khue.mapper" />
			<property name="sqlSessionFactory" ref="factory" />
		bean>


		<bean id="userServiceImpl" class="cn.khue.test.service.impl.UserServiceImpl">
			<property name="userMapper" ref="userMapper" />
		bean>
beans>
class UserServiceImpl implements UserService{

	private UserMapper userMapper;

	public void setUserMapper(UserMapper userMapper){

		this.userMapper=userMapper;
	}
	public UserMapper getUserMapper(){

		return this.userMapper
	}

	@Override
	public User login(String username, String password){

		return userMapper.login(user);
	}
}

@WebServlet("/login")
class UserServlet extends HttpServlet{

	@Override
	protected void service(HttpServletRequest req, HttpServletResponse res){

		String username=req.getParameter("username");
		String password=req.getParameter("password");
		//获取Spring容器对象
		ApplicationContext ac = new ClassPathXmlApplicationContext("application-context.xml");
		//获取UserServiceImpl对象
		UserServiceImpl usi=(UserServiceImpl)ac.getBean("userServiceImpl");
		User user=usi.login(username,password);
		...
	}
}
这里实现了service层的解耦,但将Spring容器初始化放在servlet中的service方法中非常不妥,因为请求一次,service就会执行一次,那个也会造成Spring容器对象的重复创建,造成冗余,解决思路是在请求来临之前就已经初始化好了Spring容器,也就是说,只需要Spring容器对象在服务器启动的时候初始化一次就好
3.优化版二-降低servlet中spring容器对象的冗余
<beans xmlns="http://www.springframework.org/schema/beans"
        xmlns:xsi="http://www.w3.org/2001/XMLSchema-instance"
        xsi:schemaLocation="http://www.springframework.org/schema/beans
            http://www.springframework.org/schema/beans/spring-beans.xsd">


        <bean id="driver" class="org.springfarmework.jdbc.datasource.DriverManagerDataSource">
        	<property name="driverClassName" value="com.mysql.jdbc.Driver" />
        	<property name="url" value="jdbc:mysql://localhost:3306/test" />
        	<property name="username" value="root" />
        	<property name="password" value="root" />
        bean>


        <bean id="factory" class="org.mybatis.spring.SqlSessionFactoryBean">
        	<property name="dataSourec" ref="driver"/>
        bean>


		<bean id="mapper" class="org.mybatis.spring.mapper.MapperScannerConfigurer">
			<property name="basePackage" value="cn.khue.mapper" />
			<property name="sqlSessionFactory" ref="factory" />
		bean>


		<bean id="userServiceImpl" class="cn.khue.test.service.impl.UserServiceImpl">
			<property name="userMapper" ref="userMapper" />
		bean>
beans>
class UserServiceImpl implements UserService{

	private UserMapper userMapper;

	public void setUserMapper(UserMapper userMapper){

		this.userMapper=userMapper;
	}
	public UserMapper getUserMapper(){

		return this.userMapper
	}

	@Override
	public User login(String username, String password){

		return userMapper.login(user);
	}
}

@WebServlet("/login")
class UserServlet extends HttpServlet{

	private UserServiceImpl userServiceImpl;

	@Override
	public void init(ServletConfig config) throws ServletException{

		//获取Spring容器对象
		ApplicationContext ac = new ClassPathXmlApplicationContext("application-context.xml");
		//获取UserServiceImpl对象
		UserServiceImpl usi=(UserServiceImpl)ac.getBean("userServiceImpl");
	}

	@Override
	protected void service(HttpServletRequest req, HttpServletResponse res){

		String username=req.getParameter("username");
		String password=req.getParameter("password");

		User user=userServiceImple.login(username,password);
		...
	}
}
这里还存在一个问题,那就是Spring配置文件名称已经写死,后期更改比较麻烦,可以在web.xml中配置Spring配置文件
4.优化版三-解耦spring的配置文件
导入spring-web.jar
<web-app xmlns="http://xmlns.jcp.org/xml/ns/javaee"
         xmlns:xsi="http://www.w3.org/2001/XMLSchema-instance"
         xsi:schemaLocation="http://xmlns.jcp.org/xml/ns/javaee http://xmlns.jcp.org/xml/ns/javaee/web-app_4_0.xsd"
         version="4.0">

    <context-param>
    	<param-name>contextConfigLocationparam-name>
    	<param-value>classpath:application-context.xmlparam-value>
    context-param>


    <listener>
		<listener-class>org.springframework.web.context.ContextLoaderListenerlistener-class>
	listener>
web-app>
@WebServlet("/login")
class UserServlet extends HttpServlet{

	private UserServiceImpl userServiceImpl;

	@Override
	public void init(){

		//获取Spring容器对象
		ApplicationContext ac = WebApplicationContextUtils.getWebApplicationContext(this.getServletContext());
		//获取UserServiceImpl对象
		UserServiceImpl usi=(UserServiceImpl)ac.getBean("userServiceImpl");
	}

	@Override
	protected void service(HttpServletRequest req, HttpServletResponse res){

		String username=req.getParameter("username");
		String password=req.getParameter("password");

		User user=userServiceImple.login(username,password);
		...
	}
}
5.优化版四-解耦数据库配置信息
mysql.driver=com.mysql.jdbc.Driver
mysql.url=jdbc:mysql://localhost:3306/test
mysql.username=root
mysql.password=root
<beans xmlns="http://www.springframework.org/schema/beans"
        xmlns:xsi="http://www.w3.org/2001/XMLSchema-instance"
        xmlns:context="http://www.springframework.org/schema/context"
        xsi:schemaLocation="http://www.springframework.org/schema/beans
            http://www.springframework.org/schema/beans/spring-beans.xsd
            http://www.springframework.org/schema/context
            http://www.springframework.org/schema/context/spring-context.xsd">


       	<context:property-placeholder location="classpath:mysql-config.properties" />


        <bean id="driver" class="org.springfarmework.jdbc.datasource.DriverManagerDataSource">
        	<property name="driverClassName" value="${mysql.driver}" />
        	<property name="url" value="${mysql.url}" />
        	<property name="username" value="${mysql.username}" />
        	<property name="password" value="${mysql.password}" />
        bean>


        <bean id="factory" class="org.mybatis.spring.SqlSessionFactoryBean">
        	<property name="dataSourec" ref="driver"/>
        bean>


		<bean id="mapper" class="org.mybatis.spring.mapper.MapperScannerConfigurer">
			<property name="basePackage" value="cn.khue.mapper" />
			<property name="sqlSessionFactoryBeanName" value="factory" />
		bean>


		<bean id="userServiceImpl" class="cn.khue.test.service.impl.UserServiceImpl">
			<property name="userMapper" ref="userMapper" />
		bean>
beans>
注意:如果使用properties文件,那么SqlSessionFactoryBean的sqlSessionFactory属性必须使用value注入,不能使用自动注入和ref注入,因为context:property-placeholder标签的优先级要低于bean标签中property子标签的ref属性
5.Spring Aspect Oriented Programming
Spring AOP可以实现在不修改原有功能代码的基础上进行功能扩展
相关概念:
- 切点:要进行功能扩展的功能方法
- 切面:前置+切点+后置组成的横向执行面
- 织入:形成切面的过程
- 前置通知:在切点之前的扩展方法
- 后置通知:在切点之后的扩展方法
- 环绕通知:在切点之前和之后的扩展方法
- 异常通知:切面异常的扩展方法
需要导入jar:
spring的jar:spring-beans.jar spring-core.jar spring-context.jar spring-expression.jar commons-logging.jar
spring aop的jar:spring-aop.jar spring-aspects.jar aopalliance.jar aspectjweaver.jar
1.实现方式
1.Schema-Based方式
<beans xmlns="http://www.springframework.org/schema/beans"
        xmlns:xsi="http://www.w3.org/2001/XMLSchema-instance"
        xmlns:aop="http://www.springframework.org/schema/aop"
        xsi:schemaLocation="http://www.springframework.org/schema/beans
            http://www.springframework.org/schema/beans/spring-beans.xsd
            http://www.springframework.org/schema/aop
            http://www.springframework.org/schema/aop/spring-aop.xsd">


        <bean id="test" class="cn.khut.test.Test" />


		<bean id="myBeforeAdvice" class="cn.khue.advice.MyBeforeAdvice" />


		<bean id="myAfterAdvice" class="cn.khue.advice.MyAfterAdvice" />


		<bean id="myAroundAdvice" class="cn.khue.advice.MyAroundAdvice" />


		<bean id="myExceptionAdvice" class="cn.khue.advice.MyExceptionAdvice" />


		<aop:config>

			<aop:pointcut id="myPointcut" expression="execution(* cn.khut.test.Test.test())" />
			<aop:advisor advice-ref="myBeforeAdvice" pointcut-ref="myPointcut" />
			<aop:advisor advice-ref="myAfterAdvice" pointcut-ref="myPointcut" />
			<aop:advisor advice-ref="myAroundAdvice" pointcut-ref="myPointcut" />
			<aop:advisor advice-ref="myExceptionAdvice" pointcut-ref="myPointcut" />
		aop:config>
beans>
//自定义前置通知
class MyBeforeAdvice implements MethodBeforeAdivce{

	@Override
	public void before(Method method, Object[] objects, Object object) throws Throwable{

		//method为切点
		//objects为切点形参
		//object为当前bean对象
		System.out.println("前置通知");
	}
}

//自定义后置通知
class MyAfterAdvice implements AfterReturningAdvice{

	@Override
	public void afterReturning(Object o, Method method, Object[] objects, object 01) throws Throwable{

		//method为切点
		//objects为切点形参
		//object为切点返回值
		//object01为当前bean对象
		System.out.println("后置通知");
	}
}

//自定义环绕通知
class MyAroundAdvice implements MethodInterceptor{

	@Override
	public Object invoke(MethodInvocation methodInvocation) throws Throwable{

		//methodInvocation可以获取参数、放行切点等
		System.out.println("环绕前通知");

		//执行切点
		Object obj=methodInvocation.proceed();

		System.out.println("环绕后通知");

		return obj;
	}
}

//自定义异常通知类
class MyExceptionAdvice implements ThrowsAdvice{

	public void afterThrowing(Exception e) throws Throwable{

		System.out.println("异常通知");
	}
}
2.AspectJ方式
避免了Schema-Based方式中每个通知都要单独声明配置,将通知方法全部声明在一个类中
<beans xmlns="http://www.springframework.org/schema/beans"
        xmlns:xsi="http://www.w3.org/2001/XMLSchema-instance"
        xmlns:aop="http://www.springframework.org/schema/aop"
        xsi:schemaLocation="http://www.springframework.org/schema/beans
            http://www.springframework.org/schema/beans/spring-beans.xsd
            http://www.springframework.org/schema/aop
            http://www.springframework.org/schema/aop/spring-aop.xsd">


        <bean id="test" class="cn.khut.test.Test" />


		<bean id="myAdvice" class="cn.khue.advice.MyAdvice" />


		<aop:config>
			<aop:aspect ref="myAdvice">
				<aop:pointcut id="myPointcut" expression="excution(* cn.khut.test.Test.test())" />


				<aop:before method="before" pointcut-ref="myPointcut" />
				<aop:after method="after" pointcut-ref="myPointcut" />
				<aop:around method="around" pointcut-ref="myPointcut" />
				<aop:after-throwing method="exceptions" pointcut-ref="myPointcut" throwing="e" />
			aop:aspect>
		aop:config>
beans>
//自定义通知
class MyAdvice{


	public void before(){

		System.out.println("前置通知");
	}

	public void after(){

		System.out.println("后置通知");
	}

	public Object around(ProceedingJoinPoint pjp){

		System.out.println("环绕前通知");
		pjp.proceed();
		System.out.println("环绕后通知");
	}

	public void exceptions(Exception e){

		System.out.println("异常通知");
		e.printStackTrace();
	}
}
3.注解方式
注解方式是基于AspectJ方式实现的,使用时必须在配置文件中声明注解扫描路径、开启AspectJ自动代理
@Component:相当于bean标签,默认生成小驼峰命名的ID
@Aspect:扩展类
@Pointcut:切点
@Before:前置通知
@After:后置通知
@Around:环绕通知
@AfterThrowing:异常通知
<beans xmlns="http://www.springframework.org/schema/beans"
        xmlns:xsi="http://www.w3.org/2001/XMLSchema-instance"
        xmlns:aop="http://www.springframework.org/schema/aop"
        xmlns:context="http://www.springframework.org/schema/context"
        xsi:schemaLocation="http://www.springframework.org/schema/beans
            http://www.springframework.org/schema/beans/spring-beans.xsd
            http://www.springframework.org/schema/aop
            http://www.springframework.org/schema/aop/spring-aop.xsd
            http://www.springframework.org/schema/context
            http://www.springframework.org/schema/context/spring-context.xsd">


        <context:component-scan base-package="cn.khut.test" />


        <aop:aspectj-autoproxy expose-proxy="true" />
beans>
@Component
class Test{

	@Pointcut("excution(* cn.khut.test.Test.test())")
	public void test(){

		System.out.println("切点");
	}
}

@Component
@Aspect
class MyAdvice{

	@Before("cn.khut.test.Test.test()")
	public void before(){

		System.out.println("前置通知");
	}

	@After("cn.khut.test.Test.test()")
	public void after(){

		System.out.println("后置通知");
	}

	@Around("cn.khut.test.Test.test()")
	public Object around(ProceedingJoinPoint pjp){

		System.out.println("环绕前通知");
		pjp.proceed();
		System.out.println("环绕后通知");
	}

	@AfterThrowing(value="cn.khut.test.Test.test()", throwing="e")
	public void exceptions(Exception e){

		System.out.println("异常通知");
		e.printStackTrace();
	}
}
2.AOP底层的代理模式
Spring AOP默认使用JDK动态代理,Cglib需要手动配置
<beans xmlns="http://www.springframework.org/schema/beans"
        xmlns:xsi="http://www.w3.org/2001/XMLSchema-instance"
        xmlns:aop="http://www.springframework.org/schema/aop"
        xsi:schemaLocation="http://www.springframework.org/schema/beans
            http://www.springframework.org/schema/beans/spring-beans.xsd
            http://www.springframework.org/schema/aop
            http://www.springframework.org/schema/aop/spring-aop.xsd">


       <aop:aspectj-autoproxy proxy-target-class="true"/>
beans>
6.Spring Transaction Management
在Spring中手动为每个业务方法添加事务管理代码,但非常麻烦且可能冗余,而Spring TX以AOP的方式将事务注入到业务代码中,程序员只需编写事务管理通知类即可实现事务管理
事务类型:
1.编程式事务:事务管理代码手动编写
2.声明式事务:事务管理代码由第三方直接提供,只需声明哪些位置需要使用
<beans xmlns="http://www.springframework.org/schema/beans"
        xmlns:xsi="http://www.w3.org/2001/XMLSchema-instance"
        xmlns:aop="http://www.springframework.org/schema/aop"
        xmlns:tx="http://www.springframework.org/schema/tx"
        xsi:schemaLocation="http://www.springframework.org/schema/beans
            http://www.springframework.org/schema/beans/spring-beans.xsd
            http://www.springframework.org/schema/aop
            http://www.springframework.org/schema/aop/spring-aop.xsd
            http://www.springframework.org/schema/tx
            http://www.springframework.org/schema/tx/spring-tx.xsd">


		<bean id="dataSource" class="org.springframework.jdbc.datasource.DriverManagerDataSource">
			<property name="driverClassName" value="com.mysql.jdbc.Driver" />
			<property name="url" value="jdbc:mysql://localhost:3306/test" />
			<property name="username" value="root" />
			<property name="password" value="root" />
		bean>


       	<bean id="transactionManager" class="org.springframework.jdbc.datasource.DateSourceTransactionManager">
       		<property name="dataSource" ref="dataSource" />
       	bean>


		<tx:advice id="advice" transaction-manager="transactionManager">
			<tx:attributes>

				<tx:method name="insert*" />
				<tx:method name="delete*" />
				<tx:method name="update*" />
			tx:attributes>
		tx:advice>


		<aop:config>
			<aop:pointcut id="myTransactionManager" expression="execution(* cn.khue.service.impl.*.*(..))" />
			<aop:advisor advice-ref="advice" pointcut-ref="myTransactionManager" />
		aop:config>
beans>
7.常用注解
要使用注解,必须在配置文件中配置注解扫描路径
<beans xmlns="http://www.springframework.org/schema/beans"
        xmlns:xsi="http://www.w3.org/2001/XMLSchema-instance"
        xmlns:context="http://www.springframework.org/schema/context"
        xsi:schemaLocation="http://www.springframework.org/schema/beans
            http://www.springframework.org/schema/beans/spring-beans.xsd
            http://www.springframework.org/schema/context
            http://www.springframework.org/schema/context/spring-context.xsd">


        <context:component-scan base-package="cn.khut.test" />
beans>
@Component:相当于配置了bean标签
@Component
class User{

	...
}
@Service:相当于配置了bean标签(在service层使用)
@Service
class UserService{

	...
}
@Controller:相当于配置了bean标签(在controller层使用)
@Controller
class UserController{


}
@Resource:相当于bean标签的property子标签依赖注入标签(无需提供get/set方法)【JDK自带】
@Service
class UserServiceImpl implements UserService{

	@Resource
	private UserMapper userMapper;
	...
}
@Autowire:相当于bean标签的property子标签依赖注入标签-【Spring提供】
@Service
class UserServiceImpl implements UserService{

	@Autowire
	private UserMapper userMapper;
	...
}
8.整合Junit
Junit为我们省去了main方法编写,但如果使用spring测试代码时,还是需要手动加载spring容器,这不免有些麻烦
不整合
<dependencies>
        <dependency>
            <groupId>junitgroupId>
            <artifactId>junitartifactId>
            <version>4.12version>
            <scope>testscope>
        dependency>
        <dependency>
            <groupId>org.springframeworkgroupId>
            <artifactId>spring-contextartifactId>
            <version>5.2.1.RELEASEversion>
        dependency>
    dependencies>
<beans xmlns="http://www.springframework.org/schema/beans"
       xmlns:xsi="http://www.w3.org/2001/XMLSchema-instance"
       xmlns:context="http://www.springframework.org/schema/context"
       xsi:schemaLocation="http://www.springframework.org/schema/beans
        http://www.springframework.org/schema/beans/spring-beans.xsd http://www.springframework.org/schema/context https://www.springframework.org/schema/context/spring-context.xsd">

    <context:component-scan base-package="cn.khue"/>
beans>
import org.springframework.stereotype.Component;

@Component
public class MyTest {

    public void test(){

        System.out.println("test");
    }
}
import org.junit.Test;
import cn.khue.test.MyTest;

public class AppTest {

    @Test
    public void test() {

       	ApplicationContext ac=new ClassPathXmlApplicationContext("spring-config.xml");
        MyTest myTest = ac.getBean("myTest", MyTest.class);
        myTest.test();
    }
}
整合
<dependencies>
        <dependency>
            <groupId>junitgroupId>
            <artifactId>junitartifactId>
            <version>4.12version>
            <scope>testscope>
        dependency>
        <dependency>
            <groupId>org.springframeworkgroupId>
            <artifactId>spring-testartifactId>
            <version>5.2.1.RELEASEversion>
        dependency>
        <dependency>
            <groupId>org.springframeworkgroupId>
            <artifactId>spring-contextartifactId>
            <version>5.2.1.RELEASEversion>
        dependency>
    dependencies>
<beans xmlns="http://www.springframework.org/schema/beans"
       xmlns:xsi="http://www.w3.org/2001/XMLSchema-instance"
       xmlns:context="http://www.springframework.org/schema/context"
       xsi:schemaLocation="http://www.springframework.org/schema/beans
        http://www.springframework.org/schema/beans/spring-beans.xsd http://www.springframework.org/schema/context https://www.springframework.org/schema/context/spring-context.xsd">

    <context:component-scan base-package="cn.khue"/>
beans>
import org.springframework.stereotype.Component;

@Component
public class MyTest {

    public void test(){

        System.out.println("test");
    }
}
import org.junit.Test;
import cn.khue.test.MyTest;
import org.junit.runner.RunWith;
import org.springframework.beans.factory.annotation.Autowired;
import org.springframework.test.context.ContextConfiguration;
import org.springframework.test.context.junit4.SpringJUnit4ClassRunner;

@RunWith(SpringJUnit4ClassRunner.class)
@ContextConfiguration(locations = "classpath:spring-config.xml")
public class AppTest {

    @Autowired
    private MyTest myTest;

    @Test
    public void test() {

        myTest.test();
    }
}
Spring MVC
在Spring+Mybatis开发web项目时,需要手动声明编码格式、获取获取数据,请求数据处理、响应结果等,有时候还需要强制转换类型、封装对象等,且一个功能一个servlet,导致servlet难以管理,开发效率较低
1.简单使用流程
Spring的jar:spring-core.jar spring-beans.jar spring-expression.jar spring-context.jar commons-logging.jar
Spring MVC的jar:spring-webmvc.jar spring-web.jar spring-aop.jar
- 配置web.xml
<web-app xmlns="http://xmlns.jcp.org/xml/ns/javaee" xmlns:xsi="http://www.w3.org/2001/XMLSchema-instance" xsi:schemaLocation="http://xmlns.jcp.org/xml/ns/javaee http://xmlns.jcp.org/xml/ns/javaee/web-app_4_0.xsd" version="4.0"> <servlet> <servlet-name>springMVCservlet-name> <servlet-class>org.springframework.web.servlet.DispatcherServletservlet-class> <load-on-startup>1load-on-startup> servlet> <servlet-mapping> <servlet-name>springMVCservlet-name> <url-pattern>/url-pattern> servlet-mapping> web-app> - 配置springMVC-servlet.xml (xx-servlet.xml中xx看DispatcherServlet配置的servlet-name)
<beans xmlns="http://www.springframework.org/schema/beans" xmlns:xsi="http://www.w3.org/2001/XMLSchema-instance" xmlns:context="http://www.springframework.org/schema/context" xmlns:mvc="http://www.springframework.org/schema/mvc" xsi:schemaLocation="http://www.springframework.org/schema/beans http://www.springframework.org/schema/beans/spring-beans.xsd http://www.springframework.org/schema/context http://www.springframework.org/schema/context/spring-context.xsd http://www.springframework.org/schema/mvc http://www.springframework.org/schema/mvc/spring-mvc.xsd"> <context:component-scan base-package="cn.khut.test" /> <mvc:annotation-driven /> beans> - 编写测试类
@Controller
class Test{

	@RequestMapping("/test")
	public String test(){

		System.out.println("测试");
		return "test.jsp";
	}
}
2.配置优化
SpringMVC默认配置文件存在WEB-INF下,而一般配置文件存在于src目录下
- 配置web.xml
<web-app xmlns="http://xmlns.jcp.org/xml/ns/javaee" xmlns:xsi="http://www.w3.org/2001/XMLSchema-instance" xsi:schemaLocation="http://xmlns.jcp.org/xml/ns/javaee http://xmlns.jcp.org/xml/ns/javaee/web-app_4_0.xsd" version="4.0"> <servlet> <servlet-name>springMVCservlet-name> <servlet-class>org.springframework.web.servlet.DispatcherServletservlet-class> <init-param> <param-name>contextConfigLocationparam-name> <param-value>classpath:spring-mvc-config.xmlparam-value> init-param> <load-on-startup>1load-on-startup> servlet> <servlet-mapping> <servlet-name>springMVCservlet-name> <url-pattern>/url-pattern> servlet-mapping> web-app> - 配置spring-mvc-config.xml
<beans xmlns="http://www.springframework.org/schema/beans"
        xmlns:xsi="http://www.w3.org/2001/XMLSchema-instance"
        xmlns:context="http://www.springframework.org/schema/context"
        xmlns:mvc="http://www.springframework.org/schema/mvc"
        xsi:schemaLocation="http://www.springframework.org/schema/beans
            http://www.springframework.org/schema/beans/spring-beans.xsd
            http://www.springframework.org/schema/context
            http://www.springframework.org/schema/context/spring-context.xsd
            http://www.springframework.org/schema/mvc
            http://www.springframework.org/schema/mvc/spring-mvc.xsd">


	<context:component-scan base-package="cn.khut.test" />


	<mvc:annotation-driven />
beans>
3.运行流程
服务器启动 - DispatcherServlet初始化 - 执行init方法 - 初始化SpringMVC容器对象 - 加载WEB-INF下的xx-servlet.xml - 初始化控制器
浏览器访问 - DsipatcherServlet拦截 - 执行service方法 - 执行单元方法
4.静态资源放行
在配置DispatcherServlet时,拦截路径为/,表示会拦截除jsp之外的所有请求,其中就包括了对js、css、img等静态资源的拦截
<beans xmlns="http://www.springframework.org/schema/beans"
		xmlns:xsi="http://www.w3.org/2001/XMLSchema-instance"
	    xmlns:context="http://www.springframework.org/schema/context"
	    xmlns:mvc="http://www.springframework.org/schema/mvc"
	    xsi:schemaLocation="http://www.springframework.org/schema/beans
	    http://www.springframework.org/schema/beans/spring-beans.xsd
	    http://www.springframework.org/schema/context
	    http://www.springframework.org/schema/context/spring-context.xsd
	    http://www.springframework.org/schema/mvc
	  	http://www.springframework.org/schema/mvc/spring-mvc.xsd">


	<context:component-scan base-package="cn.khut.test" />


	<mvc:annotation-driven />


	<mvc:resources mapping="/js/**" location="/js/" />
	<mvc:resources mapping="/css/**" location="/css/" />
	<mvc:resources mapping="/img/**" location="/img/" />

	<mvc:resources mapping="/js/**" location="/WEB-INF/js/" />
beans>
注意:单元方法的RequestMapping()的value值不能和某个静态资源的访问路径相同,不然会导致该静态资源无法被放行(因为DispatcherSerrvlet会先执行单元方法,而不再会放行静态资源)
5.获取请求数据
1.紧耦方式
@Controller
class Test{

	@RequestMapping("/test01")
	public void test(HttpServeltRequest req){

		//获取请求数据
		String name=req.getParameter("name");
		int age=Integer.parseInt(req.getParameter("age"));
		...
	}
}
2.解耦方式
@Controller
class Test{

	//形参名必须与请求参数键名保持一致
	//如果不存在,会将null值传递给单元方法,如果涉及类型转换则会抛出转换异常
	@RequestMaping("/test02")
	public void test(String name, int age){

		...
	}

	//使用别名 - 要求@RequestParam的value值必须与请求参数键名保持一致
	/*@RequestParam(
		value="",			//请求参数的键名
		defaultValue="",	//请求参数默认值(请求参数为null时会传递默认值给后端)
		required="true"		//是否必须获取到请求参数(请求参数为null会报400异常,不能与defaultValue联用)
		)
	*/
	@RequestMaping("/test03")
	public void test(@RequestParam("name")String username, int age){

		...
	}

	//获取同键不同值的请求数据
	@RequestMaping("/test04")
	public void test(String[] hobby){

		...
	}

	//使用对象获取请求数据
	//对象的属性名称必须与请求参数的键名保持一致
	@RequestMaping("/test05")
	public void test(User user){

		...
	}

	//获取restful请求数据
	//传统请求:http://localhost:8080/test/test06?name=khue&age=25
	//restful请求:http://localhost:8080/test/test06/khue/25
	@RequestMaping("/test06/{name}/{age}")
	public void test(@PathVariable("name")String name, @PathVariable("age")int age){

		...
	}
}
6.响应方式
1.紧耦方式
@Controller
class Test{

	@RequestMapping("/test01")
	public void test(){
     String name, HttpServletRequest req, HttpServletResponse res}{

		//直接响应
		res.getWriter().write("test");
		//请求转发
		req.getRequestDispatcher("/test02.jsp").forward(req,res);
		//重定向
		res.sendRedirect(req.getContextPath()+"/test02.jsp");
	}
}
2.解耦方式
@Controller
class Test{

	@RequestMapping("/test02")
	public String test(String name){

		//请求转发
		return "forward:/test02.jsp";
		//转发到项目内单元方法
		return "forward:/test03";
		//重定向到项目内jsp
		return "redirect:/test02.jsp";
		//重定向到百度
		return "redirect:https://www.baidu.com";
	}

	@RequestMapping("/test03")
	public void test(String name){

		...
	}

	//ajax直接响应字符串
	@RequestMapping("/test04")
	@ResponseBody
	public String test(String name){

		return name;
	}

	//ajax直接响应对象
	//需要导入jackson的jar(jackson-annotations.jar jackson-core.jar jackson-databind.jar)
	//前端不再需要使用eval函数将响应的对象转换成js对象
	@RequestMapping("/test04")
	@ResponseBody
	public User test(User user){
     }{

		return user;
	}
}
7.Model作用域
在请求转发中Model对象可用于数据流转的载体(类似于HttpServletRequest域)
在重定向中,第一次请求时存储到Model中的数据附带到第二次请求的请求参数(只能是基础类型数据)
@Controller
class Test{

	@RequestMapping("/test")
	public String test(Model model){

		model.addAttribute("test","this is test");
		return "forward:/test.jsp";
	}
}
8.上传下载的实现
1.导入jar
2.配置web.xml
<web-app xmlns="http://xmlns.jcp.org/xml/ns/javaee"
         xmlns:xsi="http://www.w3.org/2001/XMLSchema-instance"
         xsi:schemaLocation="http://xmlns.jcp.org/xml/ns/javaee http://xmlns.jcp.org/xml/ns/javaee/web-app_4_0.xsd"
         version="4.0">


    <welcome-file-list>
        <welcome-file>/html/login.htmlwelcome-file>
    welcome-file-list>


    <context-param>
        <param-name>contextConfigLocationparam-name>
        <param-value>classpath:spring-config.xmlparam-value>
    context-param>
    <listener>
        <listener-class>org.springframework.web.context.ContextLoaderListenerlistener-class>
    listener>


    <servlet>
        <servlet-name>spring-mvcservlet-name>
        <servlet-class>org.springframework.web.servlet.DispatcherServletservlet-class>
        <init-param>
            <param-name>contextConfigLocationparam-name>
            <param-value>classpath:spring-mvc-config.xmlparam-value>
        init-param>
        <load-on-startup>1load-on-startup>
    servlet>
    <servlet-mapping>
        <servlet-name>spring-mvcservlet-name>
        <url-pattern>/url-pattern>
    servlet-mapping>
web-app>
3.配置Spring配置文件
<beans xmlns="http://www.springframework.org/schema/beans"
       xmlns:xsi="http://www.w3.org/2001/XMLSchema-instance"
       xmlns:context="http://www.springframework.org/schema/context"
       xmlns:aop="http://www.springframework.org/schema/aop"
       xmlns:tx="http://www.springframework.org/schema/tx"
       xsi:schemaLocation="http://www.springframework.org/schema/beans
            http://www.springframework.org/schema/beans/spring-beans.xsd
             http://www.springframework.org/schema/context
            http://www.springframework.org/schema/context/spring-context.xsd
            http://www.springframework.org/schema/aop
            http://www.springframework.org/schema/aop/spring-aop.xsd
            http://www.springframework.org/schema/tx
            http://www.springframework.org/schema/tx/spring-tx.xsd">

    <context:component-scan base-package="cn.khue.service.impl"/>


    <context:property-placeholder location="classpath:mysql-config.properties"/>


    <bean id="dataSource" class="org.springframework.jdbc.datasource.DriverManagerDataSource">
        <property name="driverClassName" value="${mysql.driver}"/>
        <property name="url" value="${mysql.url}"/>
        <property name="username" value="${mysql.username}"/>
        <property name="password" value="${mysql.password}"/>
    bean>


    <bean id="factory" class="org.mybatis.spring.SqlSessionFactoryBean">
        <property name="dataSource" ref="dataSource"/>
    bean>


    <bean id="mapper" class="org.mybatis.spring.mapper.MapperScannerConfigurer">
        <property name="basePackage" value="cn.khue.mapper"/>
        <property name="sqlSessionFactoryBeanName" value="factory"/>
    bean>


    <bean id="dataSourceTransactionManager" class="org.springframework.jdbc.datasource.DataSourceTransactionManager">
        <property name="dataSource" ref="dataSource"/>
    bean>


    <tx:advice id="myAdvice" transaction-manager="dataSourceTransactionManager">
        <tx:attributes>
            <tx:method name="sel*" read-only="true"/>
            <tx:method name="del*" />
            <tx:method name="up*" />
            <tx:method name="ins*" />
        tx:attributes>
    tx:advice>


    <aop:config>
        <aop:pointcut id="myPointcut" expression="execution(* cn.khue.service.impl.*.*(..))"/>
        <aop:advisor advice-ref="myAdvice" pointcut-ref="myPointcut"/>
    aop:config>
beans>
4.配置SpringMVC的配置文件
<beans xmlns="http://www.springframework.org/schema/beans"
       xmlns:xsi="http://www.w3.org/2001/XMLSchema-instance"
       xmlns:context="http://www.springframework.org/schema/context"
       xmlns:mvc="http://www.springframework.org/schema/mvc"
       xsi:schemaLocation="http://www.springframework.org/schema/beans
            http://www.springframework.org/schema/beans/spring-beans.xsd
            http://www.springframework.org/schema/context
            http://www.springframework.org/schema/context/spring-context.xsd
            http://www.springframework.org/schema/mvc
            http://www.springframework.org/schema/mvc/spring-mvc.xsd">


    <context:component-scan base-package="cn.khue.controller" />


    <mvc:annotation-driven />


    <mvc:resources mapping="/js/**" location="/js/"/>


	<bean id="commonsMultipartResolver" class="org.springframework.web.multipart.commons.CommonsMultipartResolver">

		<property name="defaultEncoding" value="utf-8" />

		<property name="maxInMemorySize" value="1024000" />

		<property name="maxUploadSize" value="102400" />
	bean>


	<bean id="exceptionResolver" class="org.springframework.web.servlet.handler.SimpleMappingExceptionResolver">
		<property name="exceptionMappings">
			<props>

				<prop key="org.springframework.web.multipart.MaxUploadSizeExceededException">maxLimitError.jspprop>
			props>
		property>
	bean>
beans>
5.配置log4j的配置文件
log4j.rootCategory=info,CONSOLE
#指定某位置的日志级别
log4j.logger.cn.khue.mapper=debug
#控制台打印
log4j.appender.CONSOLE=org.apache.log4j.ConsoleAppender
log4j.appender.CONSOLE.target=System.err
log4j.appender.CONSOLE.layout=org.apache.log4j.PatternLayout
log4j.appender.CONSOLE.layout.ConversionPattern=[%d] %p %c %m%n
#文件打印
log4j.appender.FILE=org.apache.log4j.FileAppender
log4j.appender.FILE.File=d:/log.log
log4j.appender.FILE.layout=org.apache.log4j.PatternLayout
log4j.appender.FILE.layout.ConversionPattern=[%d] %p %c %m%n
6.配置MySQL的配置文件
mysql.driver=com.mysql.jdbc.Driver
mysql.url=jdbc:mysql://127.0.0.1:3306/test?useSSL=false
mysql.username=root
mysql.password=root
7.创建文件上传页
<%@ page contentType="text/html;charset=utf-8" language="java"%>
<%
	String path=request.getContextPath();
	String basePath=request.getScheme()+"://"+request.getServerName()+":"+request.getServerPort()+path+"/";
%>
<html>
<head>
	<base href="<%=basePath%>">
	<titile>Testtitle>
head>
<body>
	<form action="upload" method="post" enctype="multipart/form-data">
		<input type="file" name="file">
		<input type="submit" value="点击上传">
	form>
body>
html>
8.创建文件上传控制器
@Controller
class FileUploadController{


	@RequestMapping("/upload")
	public String upload(HttpServletRequest req, MultipartFile file){

		//获取文件名称
		String fileOldName=file.getOriginalFilename();
		//获取文件后缀名
		String suffix=fileOldName.substring(fileOldName.lastIndexOf("."));
		//校验文件类型
		if(suffix.qeuals(".jpg") || suffix.equals(".png")){

			//创建文件存储名
			String fileNewName=UUID.randomUUID()+suffix;
			//获取文件存储路径
			String filePath=req.getServletContext().getRealPath("/img/");
			//存储文件
			file.transferTo(new File(filePath,fileNewName));
			//返回结果
			return "forward:/jsp/success.jsp";
		}else{

			return "forward:/jsp/fial.jsp";
		}
	}
}
9.创建文件下载控制器
@Controller
class FileDownloadController{

	@RequestMapping("/download")
	public void download(HttpServletRequest req, HttpServeltResponse res, File file){

		//设置响应格式
		res.setContentType(file.getType());
		res.setHeader("Content-Dispositon","attachment;filename="+file.getOldName());
		//获取文件的存储路径
		String filePath=req.getServletContext().getRealPath("/img/"+file.getNewName());
		//获取文件输入流
		InputStream is=new FileInputStream(new File(filePath));
		//获取文件输出流
		ServletOutputStream sos=res.getOutputStream();
		//响应到浏览器
		IOUtils.copy(is,sos);
		//关闭流资源
		sos.close();
		is.close();
	}
}
9.自定义视图解析器
针对于WEB-INF下的资源,必须通过请求转发才可以访问,那么在Handler中返回必须按如下规范书写
@Controller
class TestController{

	@RequestMapping("/test")
	public String test(){

		return "forward:/WEB-INF/test.jsp";
		//也可以省略forward
		return "/WEB-INF/test.jsp";
	}
}
那么如果存在多个需要访问的资源,那么能够省略部分字符串的书写呢(使用自定义视图解析器)
<beans xmlns="http://www.springframework.org/schema/beans"
       xmlns:xsi="http://www.w3.org/2001/XMLSchema-instance"
       xmlns:context="http://www.springframework.org/schema/context"
       xmlns:mvc="http://www.springframework.org/schema/mvc"
       xsi:schemaLocation="http://www.springframework.org/schema/beans
            http://www.springframework.org/schema/beans/spring-beans.xsd
            http://www.springframework.org/schema/context
            http://www.springframework.org/schema/context/spring-context.xsd
            http://www.springframework.org/schema/mvc
            http://www.springframework.org/schema/mvc/spring-mvc.xsd">


    <context:component-scan base-package="cn.khue.controller" />


    <mvc:annotation-driven />


    <mvc:resources mapping="/js/**" location="/js/"/>


	<bean id="viewResolver" class="org.springframework.web.servlet.view.InternalResourceViewResolver">
		<property name="prefix" value="/WBE-INF/" />
		<property name="suffix" vavlue=".jsp" />
	bean>
beans>
@Controller
class TestController{

	@RequestMapping("/test")
	public String test(){

		return "test";
	}
}
注意:如果存在单元方法与资源名称一致,必须使用forward前缀(使用forward前缀,便不会执行自定义视图解析器了)
如果每个jsp资源都声明一个单元方法进行转发,过于麻烦,可以声明一个单元方法(使用restful),根据请求,转发到对应的jsp
@Controller
class TestController{

	//声明公共单元方法,用于实现jsp资源的转发
	@RequestMapping("{uri}")
	public String getJSP(@PathVirable("uri")String uri){

		return uri;
	}
}
10.拦截器
因为SpringMVC的入口servlet只有一个,如果再使用过滤器对请求进行拦截的话,拦截的范围配置就过于广泛了(拦截了所有请求),无法根据需求拦截指定的请求(拦截行为应该发生再DispatcherServlet之后,单元方法之前)
<beans xmlns="http://www.springframework.org/schema/beans"
       xmlns:xsi="http://www.w3.org/2001/XMLSchema-instance"
       xmlns:context="http://www.springframework.org/schema/context"
       xmlns:mvc="http://www.springframework.org/schema/mvc"
       xsi:schemaLocation="http://www.springframework.org/schema/beans
            http://www.springframework.org/schema/beans/spring-beans.xsd
            http://www.springframework.org/schema/context
            http://www.springframework.org/schema/context/spring-context.xsd
            http://www.springframework.org/schema/mvc
            http://www.springframework.org/schema/mvc/spring-mvc.xsd">


    <context:component-scan base-package="cn.khue.controller" />


    <mvc:annotation-driven />


    <mvc:resources mapping="/js/**" location="/js/"/>


	<mvc:interceptors>

		<bean id="" class="" />

		<mvc:interceptor>

			<mvc:mapping path="/test01" />
			<mvc:mapping path="/test02" />

			<bean id="" class="cn.khue.test.interceptor.MyInterceptor" />
		mvc:interceptor>
	mvc:interceptors>
beans>
class MyInterceptor implements HandlerInterceptor{

	@Autowired
	private TestController testController;

	//拦截单元方法的请求
	//DispatcherServlet之后,单元方法之前执行
	//true表示放行(后继续执行单元方法),false表示拦截(后不再继续执行单元方法、postHander及afterCompletion,直接返回DispatcherServlet)
	//形参Object o的实参为HandlerMehotd,存储当前访问的单元方法的方法对象
	@Override
	public boolean preHandler(HttpServletRequest httpServletRequest, HttpServletResponse httpServletResponse, Object o) throws Exception {

		//获取单元方法的HandlerMethod对象
		HandlerMethod method=(HandlerMethod)o;
		//执行单元方法(这里调用的是testController类中的无参单元方法;如果有参数的话,则需要从req中获取,然后传递即可)
		String result=(String)method.invoke(testController,null);
		//请求转发
		httpServletRequest.getRequestDispatcher(result).forward(httpServletRequest,httpServletResponse);
		return false;
	}

	//单元方法之后,资源跳转之前
	//对单元方法中的资源进行拦截处理(如跳转到其他指定页、model中关键字替换等)
	//形参Object o的实参为HandlerMethod,存储当前访问的单元方法的方法对象
	//形参ModelAndView用来存储单元方法的返回值,同时存储要流转的数据
	@Override
	public void postHandler(HtttpServletRequest httpServletRequest, HttpServletResponse httpServletResponse, Object o, ModelAndView modelAndView) throws Excetpion{

		//获取单元方法返回值
		String viewName=modelAndView.getViewName();
		//获取Model对象中流转的数据
		Map<String,Obejct> model=modelAndView.getModel();
	}

	//在资源跳转之后执行
	//用于捕捉本次请求的异常信息
	@Override
	public void afterCompletion(HttpServletRequest httpServletRequest, HttpServletResponse httpServletResponse, Object o, Exception e) throws Excetpion{

		if(null != e){

			httpServeltResponse.getWriter().write("服务器繁忙");
		}
	}
}
使用过滤器:请求 -> 过滤器 -> Servlet
使用拦截器:请求 -> DispatcherServelt -> 拦截器 -> 单元方法
11.运行原理
浏览器请求 - DispatcherServlet判断URL合法性 - 遍历HandlerMappings - 遍历
12.编码过滤器配置
<web-app xmlns="http://xmlns.jcp.org/xml/ns/javaee"
         xmlns:xsi="http://www.w3.org/2001/XMLSchema-instance"
         xsi:schemaLocation="http://xmlns.jcp.org/xml/ns/javaee http://xmlns.jcp.org/xml/ns/javaee/web-app_4_0.xsd"
         version="4.0">


    <welcome-file-list>
        <welcome-file>/html/login.htmlwelcome-file>
    welcome-file-list>


    <context-param>
        <param-name>contextConfigLocationparam-name>
        <param-value>classpath:spring-config.xmlparam-value>
    context-param>
    <listener>
        <listener-class>org.springframework.web.context.ContextLoaderListenerlistener-class>
    listener>


    <servlet>
        <servlet-name>spring-mvcservlet-name>
        <servlet-class>org.springframework.web.servlet.DispatcherServletservlet-class>
        <init-param>
            <param-name>contextConfigLocationparam-name>
            <param-value>classpath:spring-mvc-config.xmlparam-value>
        init-param>
        <load-on-startup>1load-on-startup>
    servlet>
    <servlet-mapping>
        <servlet-name>spring-mvcservlet-name>
        <url-pattern>/url-pattern>
    servlet-mapping>


    <filter>
    	<filter-name>my-encodingfilter-name>
    	<filter-class>org.springframework.web.filter.CharacterEncodingFilterfilter-class>
    	<init-param>
    		<param-name>encodingparam-name>
    		<param-value>utf-8param-value>
    	init-param>
    	<init-param>
    		<param-name>forceEncodingparam-name>
    		<param-value>trueparam-value>
    	init-param>
    filter>
    <filter-mapping>
    	<filter-name>my-encodingtfilter-name>
    	<url-pattern>/*url-pattern>
    filter-mapping>
web-app>
RoleBasedAccessControl
RBAC是一种基于角色实现全线控制的数据库涉及思想
如:实现不同用户登录后看到的菜单不同的数据库设计
1.传统设计
#用户表
create table user(
	id int(10) not null auto_increment,
	username varchar(20) not null,
	password varchar(20) not null,
	primary key(id)
)

#菜单表
create table menu(
	id int(10) not null auto_increment,
	name varchar(20) not null,
	url varchar(255) not null,
	parentId int(10) not null,
	primary key(id)
)

#用户菜单关联表
create table user_menu(
	id int(10) not null auto_increment,
	userId int(10) not null,
	menuId int(10) not null,
	primary key(id)
)
2.RBAC设计
#用户表
create table user(
	id int(10) not null auto_increment,
	username varchar(20) not null,
	password varchar(20) not null,
	primary key(id)
)
#菜单表
create table menu(
	id int(10) not null auto_increment,
	name varchar(20) not null,
	url varchar(255) not null,
	parentId int(10),
	primary key(id)
)
#角色表
create table role(
	id int(10) not null auto_increment,
	name varchar(10) not null,
	description text,
	primary key(id)
)
#用户角色关联表
create table user_role(
	id int(10) not null auto_increment,
	userId int(10) not null,
	roleId int(10) not null,
	primary key(id)
)
#菜单角色关联表
create table user_role(
	id int(10) not null auto_increment,
	menuId int(10) not null,
	roleId int(10) not null,
	primary key(id)
)
Linux
1.CentOS.6.5常用命令
# 查看ip
ifconfig

#查看当前所在目录的绝对路径
pwd

#进入上级目录
cd ..
#进入根目录
cd /
# ~表示root目录

#清屏
clear

#查看当前目录下的所有文件
#平铺
ls
#详细列表
ll
#查看指定目录下所有文件
ls /usr/

#创建目录
mkdir myDir

#创建或编辑文件(文件已存在就是编辑,不存在就是创建)
#按insert或i进入编辑状态,按esc退出编辑状态
#shit+:后,输入q是退出不保存,输入!q是强制退出不保存,输入wq是保存并退出
vi test.txt
vim test.txt

#创建空文件
touch test.txt

#文件追加内容(新增一行)
echo "good test" >> test.txt
#或
echo good test >> test.txt

#查看文件内容
#输出文件所有内容
cat test.txt
#查看文件第一行内容
head -1 test.txt
#查看文件前十行内容
head test.txt
#查看文件最后两行内容
tail -2 test.txt
#查看文件最后十行内容
tail test.txt
#动态查看文件最后十行内容(ctrl+c中断)
tailf test.txt
#分页查看(space下一页,b上一页,enter下一行)
more test.txt

#复制文件
#到指定目录(重命名)
cp -rf test.txt /usr/test02.txt
#到指定目录(原名)
cp test.txt /usr/
#到本目录
cp test.txt test03.txt

#剪切文件(重命名)
mv test.txt /usr/test02.txt
#剪切文件(原名)
mv test.txt /usr/

#删除文件(需要确认)
rm test.txt
#强制删除(不需要确认)
rm -f test.txt
#删除目录(需要确认)
rm -r tests
#强制删除(不需要确认)
rm -rf tests


#解压与压缩
#-z使用Gzip
#-j使用bzip2
#-c创建压缩文件
#-x解压
#-v显示过程
#-f目标文件名
#-t查看压缩包内文件
#-----------------
#压缩test.txt test02.txt
tar -zcvf test.tar.gz test.txt test02.txt
#查看压缩文件
tar -tf test.tar.gz
#解压tar.gz文件(本目录)
tar -zxvf test.tar.gz
#解压tar.gz文件(指定目录)
tar -zxvf test.tar.gz /usr/
#-----------------
#解压tar.bz2文件
tar -jxvf test.tar.bz2
#-----------------
#解压zip
yum install -y unzip zip
unzip test.zip
#压缩zip
zip test

#重启
reboot
#或(root用户)
shutdown -r now
#十分钟后重启
shutdown -r 10
#21:00重启
shutdown -r 21:00
#取消
shutdown -c

#关机
halt
#或
poweroff
#或(root用户)
shutdown -h now
#十分钟后关机
shutdown -h 10
#21:00关机
shutdown -h 21:00
#取消
shutdown -c

#root登录后修改密码
passwd

#root登录后修改主机名
vi /etc/sysconfig/network
#将HOSTNAME属性修改,后保存重启生效

#查找(user路径下查找名字是test的文件或目录)
find /user/ -name test
find / -name "test"
# 模糊全局查询
find / -name "*test*"

#杀死进程(进程号pid=345223)
kill 354223
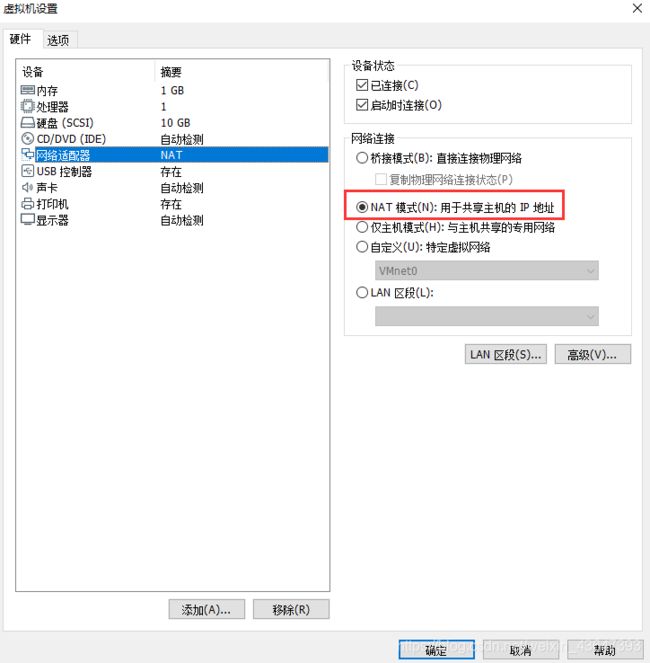
2.使用Xshell连接CentOS
测试虚拟机使用的网络连接模式
1.使用ping检查CentOS能否连接网络(ctrl+c终止ping)
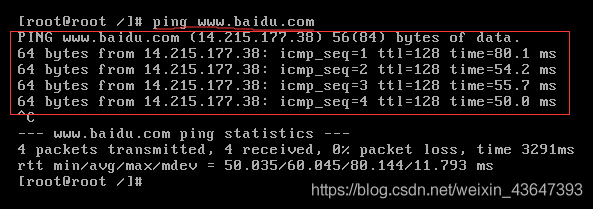
2.正常ping后查看本机ip

3.使用Xshell远程连接
3.安装JDK
1.查看本机是否安装了jdk
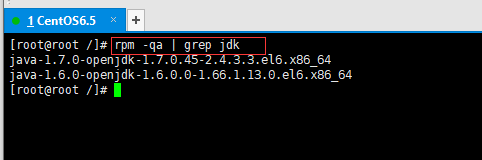
2.查看当前jdk版本

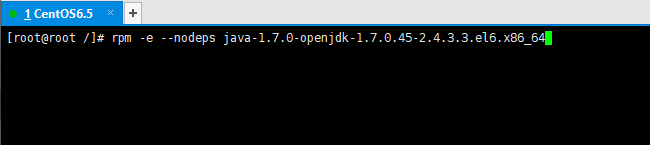
3.卸载jdk(可以使用rpm -e --nodeps或yum remove语法)
4.上传jdk1.8
5.解压jdk到指定目录

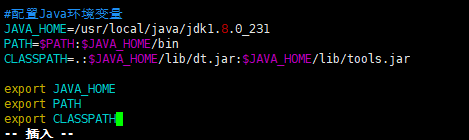
6.配置环境变量
7.重新载入配置文件
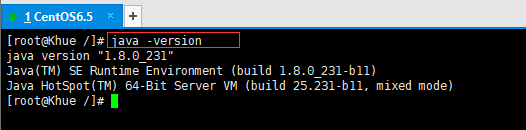
8.检查是否安装成功
4.Tomcat安装
1.上传apache-tomcat-8.5.47.tar.gz(同jdk一样)
2.解压tomcat至指定目录

3.配置放行端口

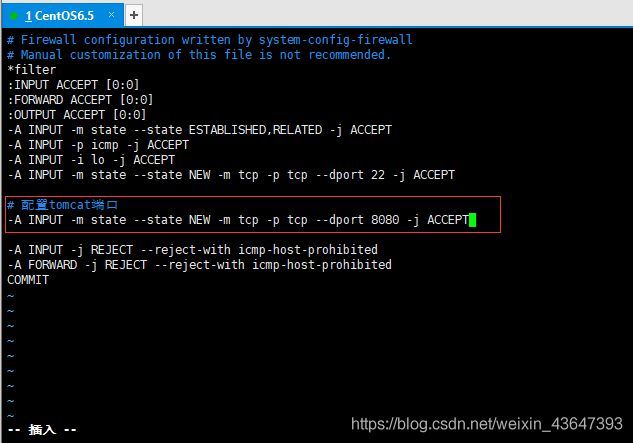
4.重启防火墙

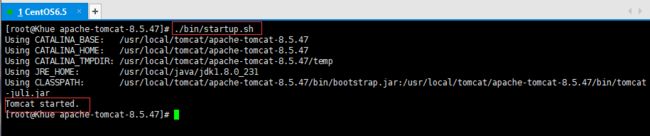
5.在tomcat根目录中启动tomcat(也可以进入tomcat的bin目录下启动)
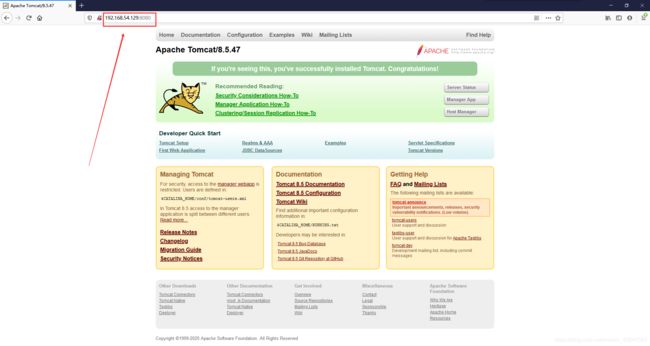
6.访问测试
5.MySQL安装
1.上传mysql-5.6.3.1-linux-glibc.2.5-x86_64.tar.gz
2.解压至指定目录

3.mysql根目录下创建myql用户组和mysql用户组下的mysql用户(root为最高权限用户,对于MySQL的使用一般都专门创建一个用户组和用户)


4.mysql根目录下用户组和用户赋权
允许mysql用户组操作当前目录

允许mysql用户操作当前目录(当前目录为/usr/local/mysql)

上面两句可合并为一句

5.初始化mysql
先检查/etc/my.cnf是否存在,存在就先删除

然后初始化

然后将重新生成的my.cnf复制到/etc/下

6.复制启动文件

7.启动mysql

启动报错

原因在于我的mysql在/usr/local/mysql-5.6.31/,而启动文件是在/usr/local/mysql/下找
解决办法:修改mysql-5.6.31为mysql


#关闭mysql
service mysql stop
#重启mysql
service mysql restart
8.添加软连接

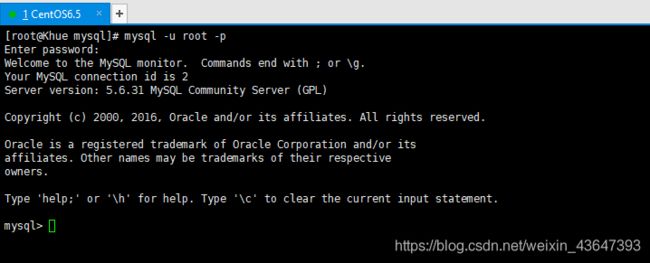
9.进入mysql
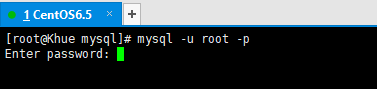
第一次登录因为没有设置密码,所以直接回车即可登录
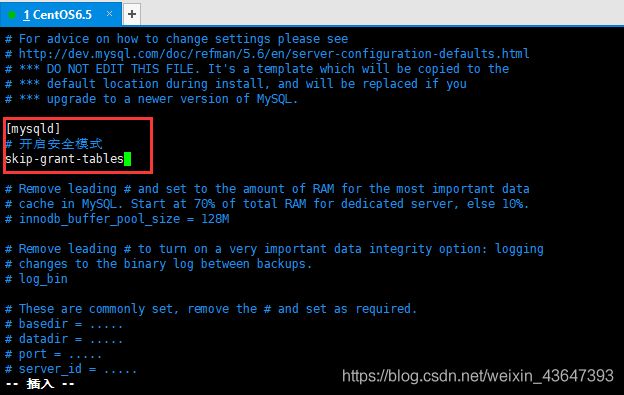
10.创建密码
使用mysql的安全模式

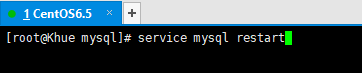
重启mysql
直接回车
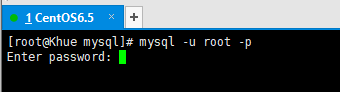
修改密码之后刷新权限再重启

11.授权远程访问
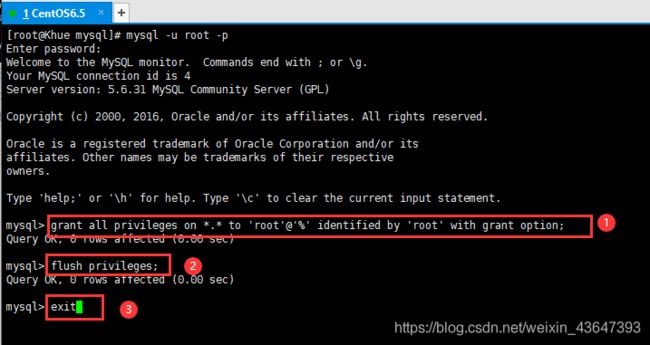
开放访问端口

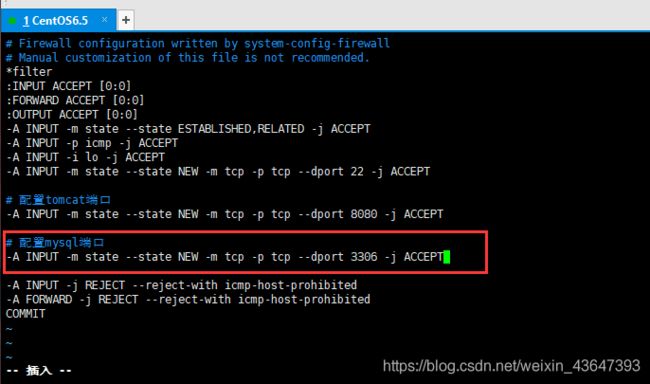
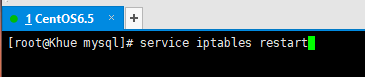
重启防火墙
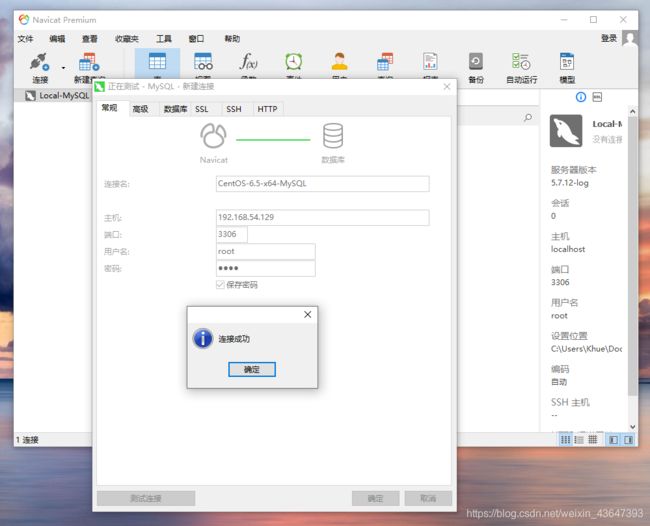
远程测试
6.上传SSM项目并访问
1.使用IntelliJ IDEA将项目打成war包
2.将war包上传到tomcat的webapps目录下
注意:
1.上传war包之后,tomcat会自动解压(无需重启)
2.如果tomcat没有关闭,删除war包,那么项目也会被删除
也可以访问tomcat首页,通过Manager App进行上传
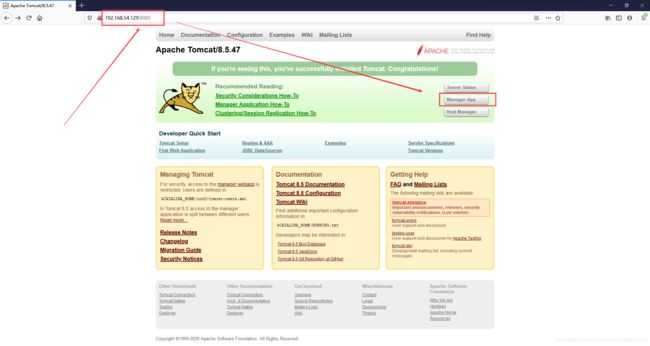
但第一使用需要配置tomcat-user.xml
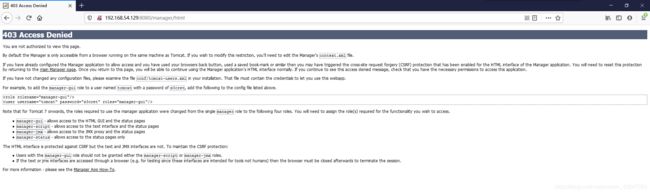
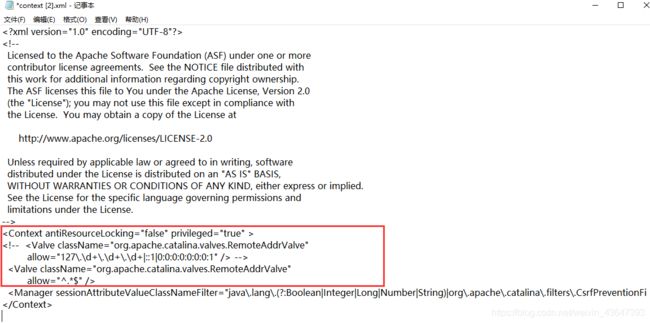
修改webapps/manager/META-INF/context.xml
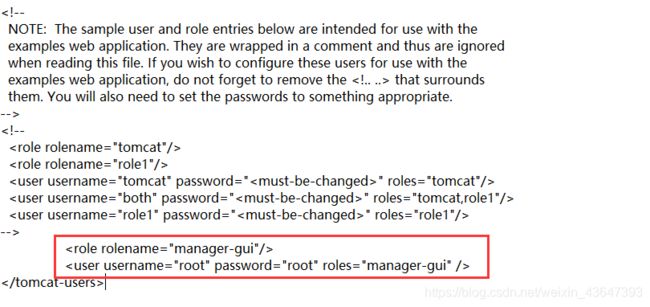
修改conf/tomcat-users.xml
访问并部署项目
7.虚拟机克隆之后的网卡信息修改
克隆虚拟机之后,会自动新增一个网卡信息,为了能保证虚拟机联网,需要对其修改
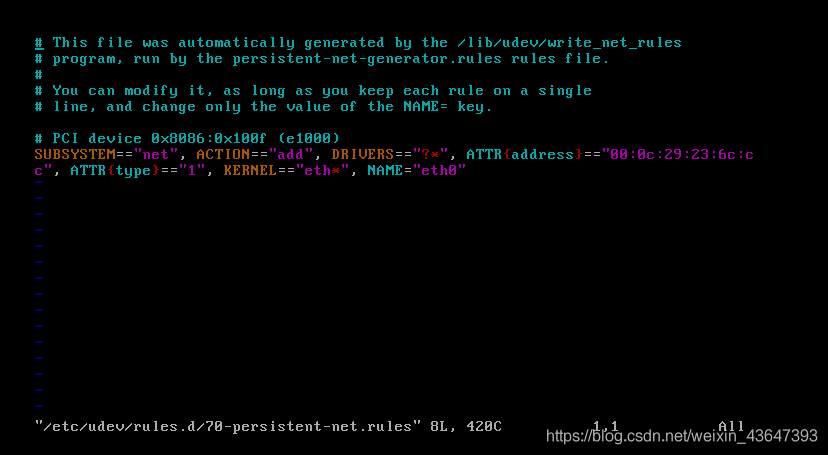
# 查看网卡信息
cat /etc/udev/rules.d/70-persistent-net.rules
下图为原始的网卡信息
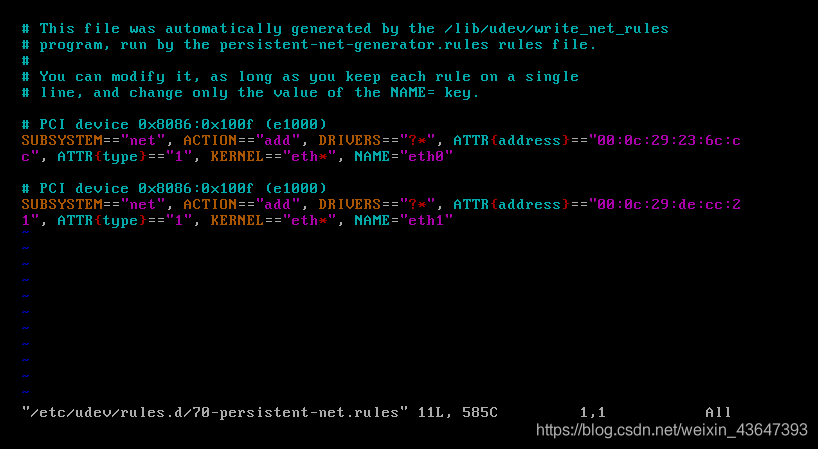
下图为克隆之后的网卡信息
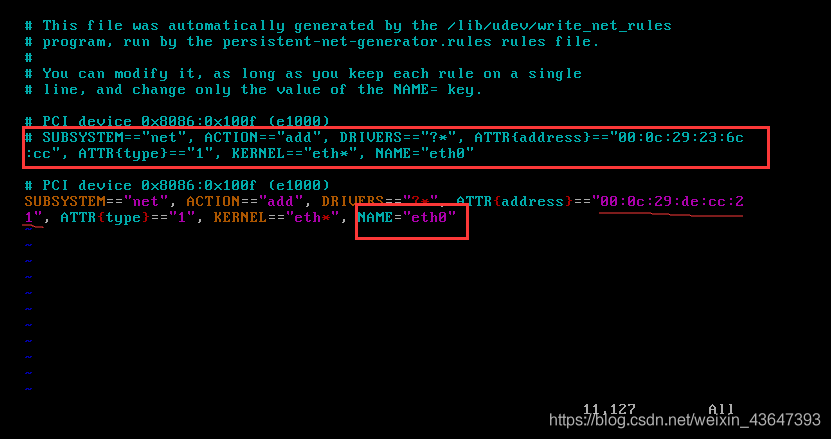
1.删除或注释eth0的网卡信息,将eth1改名为eth0,并记下其ATTR值
vim /etc/udev/rules.d/70-persistent-net.rules
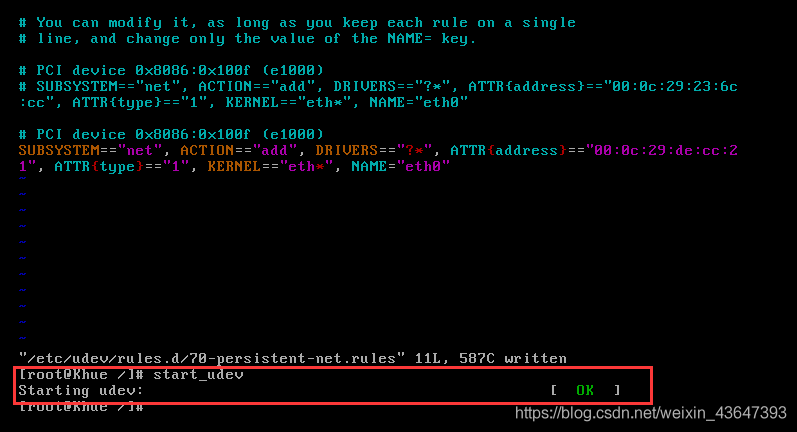
2.wq保存退出后,刷新网卡信息
start_udev
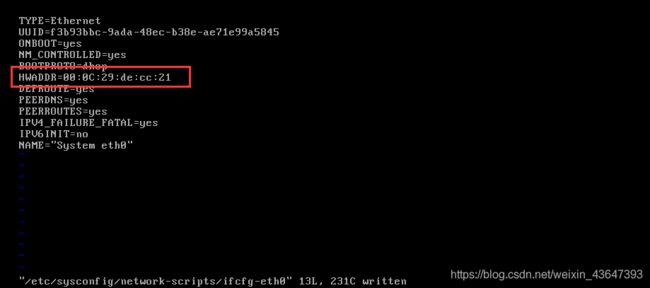
3.修改网络配置文件(将HWADDR的值修改为刚才记下的ATTR值)
vim /etc/sysconfig/network-scripts/ifcfg-eth0
下图为原始数据
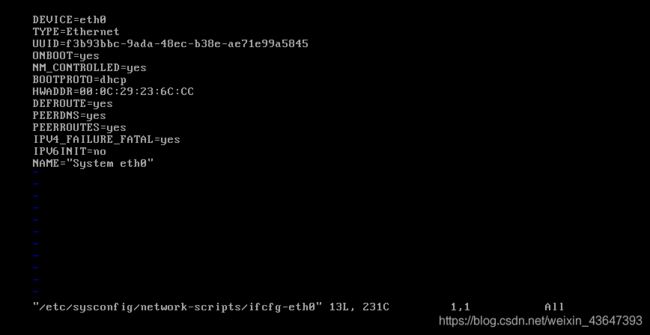
下图为修改后的数据
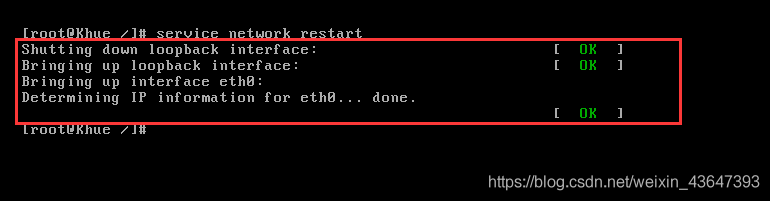
4.重启网络
server network restart
Maven
1.安装
下载解压Maven之后,配置好IntelliJ IDEA,还需要配置Maven根目录下conf目录下的settings.xml
<localRepository>d:/software/maven/resplocalRepository>


<mirrors>
	<mirror>
		<id>alimavenid>
		<name>aliyun mavenname>
		<url>http://maven.aliyun.com/nexus/content/groups/publicurl>
		<mirrirOf>centralmirrorOf>
	<mirror>
<mirrors>


<profile>
	<id>jdk-1.8id>
	<activation>
		<activeByDefault>trueactiveByDefault>
		<jdk>1.8jdk>
	activation>
	<properties>
		<maven.compiler.source>1.8maven.compiler.source>
		<maven.compiler.targer>1.8maven.compiler.targer>
		<maven.compiler,compilerVersion>1.8maven.compiler.compilerVersion>
	properties>
profile>
2.项目类型
1.jar类型:Java项目(不使用archetype创建)
<groupId>cn.khue.testgroupId>
<artifactId>01-jarartifactId>
<version>1.0-SNAPSHOTversion>
2.war类型:JavaEE项目(使用org.apache.maven.archetype:maven-archetype-webapp模板创建)
<groupId>cn.khue.testgroupId>
<artifactId>01-warartifactId>
<version>1.0-SNAPSHOTversion>
<packaging>warpackaging>
3.pom类型:逻辑项目,用于不同项目的资源整合管理(不声明代码,不使用archetype创建,删除src目录)
<groupId>cn.khue.testgroupId>
<artifactId>01-pomartifactId>
<version>1.0-SNAPSHOTversion>
<packaging>pompackaging>
3.项目关系
1.依赖关系:项目A需要项目B的功能
<groupId>cn.khue.testgroupId>
<artifactId>01-warartifactId>
<version>1.0-SNAPSHOTversion>
<packaging>warpackaging>

<dependencies>
	<dependency>
		<groupId>cn.khue.testgroupId>
		<artifactId>01-jararticfactId>
		<version>1.0-SNAPSHOTversion>
	dependency>
dependencies>
2.继承关系:从项目A、B、C抽取的相同功能的项目D(父项目D一般为pom项目)
<groupId>cn.khue.testgroupId>
<artifactId>01-pomartifactId>
<version>1.0-SNAPSHOTversion>
<packaging>pompackaging>

<dependencies>
	<dependency>
		<groupId>cn.khue.testgroupId>
		<artifactId>01-jararticfactId>
		<version>1.0-SNAPSHOTversion>
	dependency>
dependencies>
<parent>
	<groupId>cn.khue.testgroupId>
	<artifactId>01-pomartifactId>
	<version>1.0-SNAPSHOTversion>
<parent>

<groupId>cn.khue.testgroupId>
<artifactId>01-warartifactId>
<version>1.0-SNAPSHOTversion>
<packaging>warpackaging>
3.聚合关系:项目A、B、C组合成项目D(父项目D一般为pom类型)
<modelVersion>4.0.0modelVersion>

<groupId>cn.khue.testgroupId>
<artifactId>01-pomartifactId>
<version>1.0-SNAPSHOTversion>
<modules>
	<module>01-warmodule>
modules>
<packaging>pompackaging>

<dependencies>
	<dependency>
		<groupId>cn.khue.testgroupId>
		<artifactId>01-jararticfactId>
		<version>1.0-SNAPSHOTversion>
	dependency>
dependencies>
<parent>
	<groupId>cn.khue.testgroupId>
	<artifactId>01-pomartifactId>
	<version>1.0-SNAPSHOTversion>
<parent>
<modelVersion>4.0.0modelVersion>

<groupId>cn.khue.testgroupId>
<artifactId>01-warartifactId>
<version>1.0-SNAPSHOTversion>
<packaging>warpackaging>
4.项目继承关系的管理
1.资源管理
一般来说子项目会继承父项目的所有资源,但有时候期望有的子项目不完全继承父项目的资源
<groupId>cn.khue.testgroupId>
<artifactId>01-pomartifactId>
<version>1.0-SNAPSHOTversion>
<packaging>pompackaging>


<dependencyManagement>
	<dependencies>
		<dependency>
			<groupId>cn.khue.testgroupId>
			<artifactId>01-jararticfactId>
			<version>1.0-SNAPSHOTversion>
		dependency>
	dependencies>
dependencyManagement>
<parent>
	<groupId>cn.khue.testgroupId>
	<artifactId>01-pomartifactId>
	<version>1.0-SNAPSHOTversion>
<parent>

<groupId>cn.khue.testgroupId>
<artifactId>01-warartifactId>
<version>1.0-SNAPSHOTversion>
<packaging>warpackaging>

<dependencies>
	<dependency>
		<groupId>cn.khue.testgroupId>
		<artifactId>01-jararticfactId>
	dependency>
dependencies>
2.版本管理
当项目存在多个资源时,父项目中散乱的版本号不方便管理,可以提取进行统一管理
<groupId>cn.khue.testgroupId>
<artifactId>01-pomartifactId>
<version>1.0-SNAPSHOTversion>
<packaging>pompackaging>


<properties>
	<jar01>1.0-SNAPSHOTjar01>
properties>


<dependencyManagement>
	<dependencies>
		<dependency>
			<groupId>cn.khue.testgroupId>
			<artifactId>01-jararticfactId>
			<version>${jar01}version>
		dependency>
	dependencies>
dependencyManagement>
3.插件管理
有的资源可以做为插件独立运行
<groupId>cn.khue.testgroupId>
<artifactId>01-pomartifactId>
<version>1.0-SNAPSHOTversion>
<packaging>pompackaging>


<properties>
	<jar01>1.0-SNAPSHOTjar01>
properties>


<dependencyManagement>
	<dependencies>
		<dependency>
			<groupId>cn.khue.testgroupId>
			<artifactId>01-jararticfactId>
			<version>${jar01}version>
		dependency>
	dependencies>
dependencyManagement>


<build>
	<pluginManagement>
		<plugins>
			<plugin>
			plugin>
		plugins>
	pluginManagement>
build>
5.远程部署
1.使用Apache Tomcat Maven Plugin
本方法仅限远程服务器为tomcat7
1.配置manager页面的访问用户【tomcat/conf/tomcat-users.xml】
<tomcat-users>
	...
	<role rolename="manager-gui"/>
	<role rolename="manager-script"/>
	<user username="root" password="123" roles="manager-gui, manager-script" />
tomcat-users>
2.配置manager页面的跨域访问权限【tomcat/webapps/manager/MENT-INF/context.xml】
<Context>
	...


	<Valve className="org.apache.catalina.valves.RemoteAddrValve"
         allow="^.*$" />
  <Manager sessionAttributeValueClassNameFilter="java\.lang\.(?:Boolean|Integer|Long|Number|String)|org\.apache\.catalina\.filters\.CsrfPreventionFilter\$LruCache(?:\$1)?|java\.util\.(?:Linked)?HashMap"/>
Context>
3.在需要部署的项目的pom.xml中添加插件
<build>
	<plugins>
		<plugin>
			<groupId>org.apache.tomcat.mavengroupId>
			<artifactId>tomcat8-maven-pluginartifactId>
			<version>2.2version>
			<configuration>

				<url>http://192.168.54.129:8080/manager/texturl>

				<username>rootusername>

				<password>rootpassword>

				<path>/test<path>
			configuration>
		plugin>
	plugins>
build>
4.使用Maven打包后,使用deploy即可部署

2.使用IDEA自带的Tools窗口下的Deployment工具
参考使用IntelliJ IDEA进行远程项目部署(Tools下的Deployment工具)
Spring Boot
Spring Boot可以实现配置轻量化,提供一系列的集成环境,简化spring应用的初始搭建及开发过程
1.整合Servlet
1.引入依赖
    <parent>
        <groupId>org.springframework.bootgroupId>
        <artifactId>spring-boot-starter-parentartifactId>
        <version>2.1.10.RELEASEversion>
    parent>

    <groupId>cn.khuegroupId>
    <artifactId>testartifactId>
    <version>1.0-SNAPSHOTversion>


    <dependencies>

        <dependency>
            <groupId>org.springframework.bootgroupId>
            <artifactId>spring-boot-starter-webartifactId>
        dependency>
    dependencies>
2.编写servlet
import javax.servlet.ServletException;
import javax.servlet.annotation.WebServlet;
import javax.servlet.http.HttpServlet;
import javax.servlet.http.HttpServletRequest;
import javax.servlet.http.HttpServletResponse;
import java.io.IOException;

@WebServlet("/test")
public class TestServlet extends HttpServlet {


    @Override
    protected void service(HttpServletRequest req, HttpServletResponse resp) throws ServletException, IOException {

        //设置响应格式及编码字符集
        resp.setContentType("text/html;charset=utf-8");
        //响应内容
        resp.getWriter().write("来呀");
    }
}
3.编写启动类
import org.springframework.boot.SpringApplication;
import org.springframework.boot.autoconfigure.SpringBootApplication;
import org.springframework.boot.web.servlet.ServletComponentScan;

@SpringBootApplication
@ServletComponentScan
public class App {

    public static void main(String[] args) {

        SpringApplication.run(App.class,args);
    }
}
4.配置tomcat端口
src/main/resources/static/application.properties
#配置tomcat端口(默认8080)
server.port=80
2.整合Filter
1.引入依赖
    <parent>
        <groupId>org.springframework.bootgroupId>
        <artifactId>spring-boot-starter-parentartifactId>
        <version>2.1.10.RELEASEversion>
    parent>

    <groupId>cn.khuegroupId>
    <artifactId>testartifactId>
    <version>1.0-SNAPSHOTversion>


    <dependencies>

        <dependency>
            <groupId>org.springframework.bootgroupId>
            <artifactId>spring-boot-starter-webartifactId>
        dependency>
    dependencies>
2.编写servlet
import javax.servlet.ServletException;
import javax.servlet.annotation.WebServlet;
import javax.servlet.http.HttpServlet;
import javax.servlet.http.HttpServletRequest;
import javax.servlet.http.HttpServletResponse;
import java.io.IOException;

@WebServlet("/test")
public class TestServlet extends HttpServlet {


    @Override
    protected void service(HttpServletRequest req, HttpServletResponse resp) throws ServletException, IOException {

        //设置响应格式及编码字符集
        resp.setContentType("text/html;charset=utf-8");
        //响应内容
        resp.getWriter().write("来呀");
    }
}
3.编写启动类
import org.springframework.boot.SpringApplication;
import org.springframework.boot.autoconfigure.SpringBootApplication;
import org.springframework.boot.web.servlet.ServletComponentScan;

@SpringBootApplication
@ServletComponentScan
public class App {

    public static void main(String[] args) {

        SpringApplication.run(App.class,args);
    }
}
3.整合Listener
1.引入依赖
    <parent>
        <groupId>org.springframework.bootgroupId>
        <artifactId>spring-boot-starter-parentartifactId>
        <version>2.1.10.RELEASEversion>
    parent>

    <groupId>cn.khuegroupId>
    <artifactId>testartifactId>
    <version>1.0-SNAPSHOTversion>


    <dependencies>

        <dependency>
            <groupId>org.springframework.bootgroupId>
            <artifactId>spring-boot-starter-webartifactId>
        dependency>
    dependencies>
2.编写filter
import javax.servlet.ServletContextEvent;
import javax.servlet.ServletContextListener;
import javax.servlet.annotation.WebListener;

@WebListener
public class TestListener implements ServletContextListener {

    @Override
    public void contextInitialized(ServletContextEvent sce) {

        System.out.println("初始化上下文");
    }

    @Override
    public void contextDestroyed(ServletContextEvent sce) {

        System.out.println("销毁上下文");
    }
}
3.编写启动类
import org.springframework.boot.SpringApplication;
import org.springframework.boot.autoconfigure.SpringBootApplication;
import org.springframework.boot.web.servlet.ServletComponentScan;

@SpringBootApplication
@ServletComponentScan
public class App {

    public static void main(String[] args) {

        SpringApplication.run(App.class,args);
    }
}
4.整合静态资源
springboot中定义静态资源的目录是src/main/resources/static或src/main/webapp
5.整合文件上传
spring-boot-starter-web中包含了sparingmvc,可以通过springmvc实现文件上传
注意:springmvc中默认上传的文件容量为10M,可通过src/main/resources/static/application.properties修改
#上传资源总大小限制
spring.http.multipart.maxFileSize=100M

#上传资源单个文件最大限制
spring.http.multipart.maxRequestSize=90M
6.整合jsp
1.引入依赖
	<dependencies>

        <dependency>
            <groupId>org.springframework.bootgroupId>
            <artifactId>spring-boot-starter-webartifactId>
        dependency>


        <dependency>
            <groupId>org.apache.tomcat.embedgroupId>
            <artifactId>tomcat-embed-jasperartifactId>
            <scope>providedscope>
        dependency>
        <dependency>
            <groupId>javax.servletgroupId>
            <artifactId>jstlartifactId>
        dependency>
    dependencies>
2.编写jsp页面
<%@ page contentType="text/html;charset=UTF-8" language="java" %>
<%
    String path = request.getContextPath();
    String basePath = request.getScheme() + "://" + request.getServerName() + ":" + request.getServerPort() + path + "/";
%>
<html>
<head>
    <base href="<%=basePath%>">
    <title>Titletitle>
head>
<body>
    测试jsp
body>
html>
3.编写控制器
import org.springframework.stereotype.Controller;
import org.springframework.web.bind.annotation.RequestMapping;

@Controller
public class TestController {

    @RequestMapping("/testjsp")
    public String test(){

        return "forward:/WEB-INF/test.jsp";
    }
}
4.配置自定义视图解析器
新建配置文件src/main/resources/static/application.properties
#InternalResourceViewResolver前缀
spring.mvc.view.prefix=/WEB-INF/

#InternalResourceViewResolver后缀
spring.mvc.view.suffix=.jsp
5.修改控制器
import org.springframework.stereotype.Controller;
import org.springframework.web.bind.annotation.RequestMapping;

@Controller
public class TestController {

    @RequestMapping("/testjsp")
    public String test(){

        return "test";
    }
}
7.整合thymeleaf
thymeleaf是springboot推荐使用的视图层技术,用于web和独立环境的现代服务器端Java模板引擎(能够处理六种模板:标记模板模式【htm(包括html5、html4和xhtml)l、xml】、文本模板模式【text、javascript、css】、无操作模板模式【raw】),其试图逻辑存储再classpath/templates下,通常定义在src/main/resources/templates下,该路径下不能通过http协议直接访问,必须经过控制器做转发才能访问(转发的路径无需完整路径,只需相对于src/main/resources/template下的相对路径,且.xx可以省略)
1.引入依赖
<dependencies>

        <dependency>
            <groupId>org.springframework.bootgroupId>
            <artifactId>spring-boot-starter-webartifactId>
        dependency>


        <dependency>
            <groupId>org.springframework.bootgroupId>
            <artifactId>spring-boot-starter-thymeleafartifactId>
        dependency>
    dependencies>
2.编写页面
<html lang="en">
<head>
    <meta charset="UTF-8">
    <title>Titletitle>
head>
<body>
    测试thymeleaf
body>
html>
3.编写控制器
import org.springframework.stereotype.Controller;
import org.springframework.web.bind.annotation.RequestMapping;

@Controller
public class ThymeleafController {

    @RequestMapping("/test.thymeleaf")
    public String test(){

        return "test";
    }
}
1.Thymeleaf常用API
<html lang="en">
<head>
    <meta charset="UTF-8">
    <title>Titletitle>
head>
<body>

	<h1 th:text="ok">string填充h1>
    <h1 th:text="${username}">request域填充h1>
    <h1 th:text="${#httpServletRequest.getAttribute('username')}">request域填充h1>
    <h1 th:text="${session.userCount+'个在线用户'}">session域+string填充h1>
    <h1 th:text="${application.number}">context域填充h1>


	<input type="text" name="username" th:value="${username}">


	<h1 th:text="${#strings.isEmpty(username)}">非空判断h1>
	<h1 th:text="${#strings.contains(username,'khue')}">是否包含子串h1>
	<h1 th:text="${#strings.startsWith(username,'khue')}">是否以子串开始h1>
	<h1 th:text="${#strings.endsWith(username,'khue')}">是否以子串结束h1>
	<h1 th:text="${#strings.lenght(username)}">字符串长度h1>
	<h1 th:text="${#strings.indexOf(username,'khue')}">查找子串索引,不存在返回-1h1>
	<h1 th:text="${#strings.substring(username,1,3)}">截取字串h1>
	<h1 th:text="${#strings.toUpperCase(username)}">转大写h1>
	<h1 th:text="${#strings.toLowerCase(username)}">转小写h1>


	<h1 th:text="${#dates.format(loginDate,'yyyy-MM-dd hh:mm:ss')}">格式化h1>
	<h1 th:text="${#dates.year(loginDate)}">获取年h1>
	<h1 th:text="${#dates.month(loginDate)}">获取月h1>
	<h1 th:text="${#dates.day(loginDate)}">获取日h1>


	<span th:if="${user:userRole == '1'}">if判断span>
	<div th:swith="${userType}">
		<span th:case="0">分支一span>
		<span th:case="1">分支二span>
		<span th:case="2">分之三span>
	div>
	<tr th:each="${userList}">
		<td th:text="${user.id}">td>
		<td th:text="${user.name}">td>
		<td th:text="${user.age}">td>
	tr>
	<tr th:each="user,status:${userList}">
		<td th:text="${user.id}">td>
		<td th:text="${user.name}">td>
		<td th:text="${user.age}">td>
		<td th:text="${status.index}">索引-从0开始td>
		<td th:text="${status.count}">计数-从1开始td>
		<td th:text="${status.size}">集合容量td>
		<td th:text="${status.even}">是否为偶数td>
		<td th:text="${status.odd}">是否为奇数td>
		<td th:text="${status.first}">是否为第一个元素td>
		<td th:text="${status.last}">是否为最后一个元素td>
	tr>
	<tr th:each="${maps:userMap}">
		<td th:each="entry:${userMap}" th:text="${entry.key}">td>
		<td th:each="entry:${userMap}" th:text="${entry.value}">td>
	tr>


	<form th:action="@{/login}">表单提交路径form>
	<a th:href="@{https://www.baidu.com}">绝对路径a>
	<a th:href="@{/test}">相对项目根路径a>
	<a th:href="@{~/test}">相对服务器根路径a>
	<a th:href="@{test}">相对当前路径a>
	<a th:href="@{/test(username=admin,password=123)">/test?username=admin&password=123a>
	<a th:href="@{/test/{username}(username=admin)}">/login/admina>restful仅能传一个参数
	<img th:src="@{/test.png}"/>

body>
html>
8.整合jdbc
1.引入依赖
<dependency>
	<groupId>org.springframework.bootgroupId>
	artifactId>spring-boot-starter-jdbcartifactId>
dependency>
2.配置数据库环境
#driver
spring.datasource.driver-class-name=com.mysql.jdbc.Driver
#url
spring.datasource.url=jdbc:mysql://localhost:3306/test?useUnicode=true&characterEncoding=utf-8
#username
spring.datasource.username=root
#password
spring.datasource.password=root
9.整合mybatis
1.引入依赖
	<dependencies>

        <dependency>
            <groupId>org.springframework.bootgroupId>
            <artifactId>spring-boot-starter-webartifactId>
        dependency>


        <dependency>
            <groupId>org.mybatis.spring.bootgroupId>
            <artifactId>mybatis-spring-boot-starterartifactId>
            <version>2.1.1version>
        dependency>


        <dependency>
            <groupId>mysqlgroupId>
            <artifactId>mysql-connector-javaartifactId>
        dependency>


        <dependency>
            <groupId>org.projectlombokgroupId>
            <artifactId>lombokartifactId>
        dependency>


        <dependency>
            <groupId>org.springframework.bootgroupId>
            <artifactId>spring-boot-starter-thymeleafartifactId>
        dependency>
    dependencies>
2.配置数据库环境
#driver
spring.datasource.driver-class-name=com.mysql.cj.jdbc.Driver
#url
spring.datasource.url=jdbc:mysql://localhost:3306/test?serverTimezone=UTC&Timezone=Asia/Shanghai&characterEncoding=UTF-8
#username
spring.datasource.username=root
#password
spring.datasource.password=root
#别名扫描路径
mybatis.type-aliases-package=cn.khue.pojo
#mapper文件路径
mybatis.mapper-locations=classpath:cn.khue.mapper/*.xml
3.编写页面
webapp/login.html或resources/static/login.html
<html lang="en">
<head>
    <meta charset="UTF-8">
    <title>登录页title>
head>
<body>
    <form action="login" method="post">
        <label>
            <input type="text" name="username" placeholder="username"/>
        label>
        <label>
            <input type="password" name="password" placeholder="password"/>
        label>
        <input type="submit" value="login" />
    form>
body>
html>
resources/templates/html/success.html
<html lang="en" xmlns:th="http://www.w3.org/1999/xhtml">
<head>
    <meta charset="UTF-8">
    <title>Titletitle>
head>
<body>
    <h1 th:text="${
      '欢迎回来,'+session.user.username}">h1>
body>
html>
resources/templates/html/fail.html
<html lang="en">
<head>
    <meta charset="UTF-8">
    <title>Titletitle>
head>
<body>
    <h1>登录失败h1>
body>
html>
cn/khue/pojo
import lombok.*;

@Data
@NoArgsConstructor
@AllArgsConstructor
@RequiredArgsConstructor
public class User {

    private int id;
    @NonNull
    private String username;
    @NonNull
    private String password;
}
cn/khue/controller
import cn.khue.pojo.User;
import cn.khue.service.TestService;
import javax.servlet.http.HttpSession;
import org.springframework.stereotype.Controller;
import org.springframework.beans.factory.annotation.Autowired;
import org.springframework.web.bind.annotation.RequestMapping;

@Controller
public class TestController {

    @Autowired
    private TestService testService;

    @RequestMapping("/login")
    public String test(User user, HttpSession session){

        User result = testService.login(user);
        if(null != result){

            session.setAttribute("user",result);
            return "html/success";
        }else{

            return "html/fail";
        }
    }
}
cn/khue/service
import cn.khue.pojo.User;

public interface TestService {

    User login(User user);
}
cn/khue/service/impl
import cn.khue.pojo.User;
import cn.khue.mapper.TestMapper;
import cn.khue.service.TestService;
import org.springframework.stereotype.Service;
import org.springframework.beans.factory.annotation.Autowired;

@Service
public class TestServiceImpl implements TestService {

    @Autowired
    private TestMapper testMapper;

    @Override
    public User login(User user) {

        return testMapper.selectByUser(user);
    }
}
cn/khue/mapper
import cn.khue.pojo.User;
import org.springframework.stereotype.Repository;

@Repository
public interface TestMapper {

    User selectByUser(User user);
}
resources/cn/khue/mapper
<mapper namespace="cn.khue.mapper.TestMapper">

    <select id="selectByUser" resultType="user">
        select * from user where username=#{username} and password=#{password}
    select>
mapper>
4.编写启动类
import org.mybatis.spring.annotation.MapperScan;
import org.springframework.boot.SpringApplication;
import org.springframework.boot.autoconfigure.SpringBootApplication;
import org.springframework.boot.web.servlet.ServletComponentScan;

@SpringBootApplication
@ServletComponentScan
@MapperScan("cn.khue.mapper")
public class App {

    public static void main(String[] args) {

        SpringApplication.run(App.class,args);
    }
}
注意
1.如果在mapper的接口上使用的@Mapper而非@Repository,那么启动了可省略@MapperScan
2.如果mapper的xml文件中resultType使用的全限定名,则application.properties中可省略mybatis.type-aliases-package
10.数据校验
一般数据校验放在前端更加高效,但springboot提供了后端数据校验,底层使用hibernate-validator实现
1.实体类
import lombok.*;
import javax.validation.constraints.*;
import org.hibernate.validator.constraints.Length;

@Data
@NoArgsConstructor
@AllArgsConstructor
public class User {

    private int id;

    @NotBlank(message = "不能为空")
    @Length(min = 4,max = 6,message = "长度在4-6个字符")
    private String username;

    @NotBlank(message = "不能为空")
    @Length(min = 6,max = 20,message = "长度在6-20个字符")
    private String password;

    @NotNull(message = "不能为空")
    @Min(value = 18,message = "最小年龄18")
    private Integer age;

    @NotEmpty(message = "不能为空")
    @Email(message = "格式不正确")
    private String email;
}
2.控制类
import cn.khue.pojo.User;
import javax.validation.Valid;
import org.springframework.ui.Model;
import org.springframework.stereotype.Controller;
import org.springframework.validation.BindingResult;
import org.springframework.web.bind.annotation.RequestMapping;

@Controller
public class TestController {


    @RequestMapping("/login")
    public String test(@Valid User user, BindingResult bindingResult, Model model){


        model.addAttribute("user",user);

        if(bindingResult.hasErrors()){

            return "/html/login";
        }
        return "/html/fail";
    }
}
3.页面
<html lang="en" xmlns:th="http://www.w3.org/1999/xhtml">
<head>
    <meta charset="UTF-8">
    <title>登录页title>
head>
<body>
    <form action="login" method="post" th:object="${user}">
        <label>
            <input type="text" name="username" placeholder="username" th:value="*{username}"/>
            <span th:if="${#fields.hasErrors('username')}" th:errors="*{username}" th:style="'color:red'">span>
        label>
        <br>
        <label>
            <input type="password" name="password" placeholder="password" th:value="*{password}"/>
            <span th:if="${#fields.hasErrors('password')}" th:errors="*{password}" th:style="'color:red'">span>
        label>
        <br>
        <label>
            <input type="text" name="age" placeholder="18" th:value="*{age}"/>
            <span th:if="${#fields.hasErrors('age')}" th:errors="*{age}" th:style="'color:red'">span>
        label>
        <br>
        <label>
            <input type="email" name="email" th:value="*{email}" />
            <span th:if="${#fields.hasErrors('email')}" th:errors="*{email}" th:style="'color:red'">span>
        label>
        <br>
        <input type="submit" value="login" />
    form>
body>
html>

11.热部署
热部署是指在应用不停止的情况下,实现应用的部署和服务的重新加载。spring boot底层通过classloader重新加载代码内容实现热部署,在不使用热部署时,spring boot只启动了一个classloader,加载一次代码后,形成的spring容器就是当前应用的上下文;如果使用热部署,springboot会启动两个classloader,启动后一个classloader进行代码加载,形成spring容器作为应用上下文,然后会启动一个线程,做class文件扫描,如果class文件发生了变化,则只用另一个classloader加载修改后的calss文件,重新初始化spring容器并与前一个classloader初始化的spring容器做merge合并
1.SpringLoader
springloader只可以实现代码的热部署,不能实现静态资源的热部署,可通过插件或提供jvm启动参数来实现
插件:
1.添加插件
	<build>
		<plugins>
			<plugin>
				<groupId>org.springframework.bootgroupId>
				<artifactId>spring-boot-maven-pluginartifactId>
				<dependencies>
					<dependency>
						<groupId>org.springframeworkgroupId>
						<artifactId>springloadedartifactId>
						<version>1.2.8.RELEASEversion>
					dependency>
				dependencies>
			plugin>
		plugins>
	build>
2.通过maven - run as - maven build…面板的goals中输入spring-boot:run启动
提供jvm启动参数:
1.引入springloaded-1.2.8.RELEASE.jar资源
2.添加VM arguments:-javaagent:\lib\springloaded-1.2.8.RELEASE.jar -noverify
2.DevTools
DevTools并不是严格意义上的热部署,而是使用重新部署的方式实现应用环境再次加载,底层依然是通过SpringLoader来实现
1.引入依赖
<dependency>
	<groupId>org.springframework.bootgroupId>
	<artifactId>spring-boot-devtoolsartifactId>

	<optional>trueoptional>
dependency>
2.配置运行时更新策略
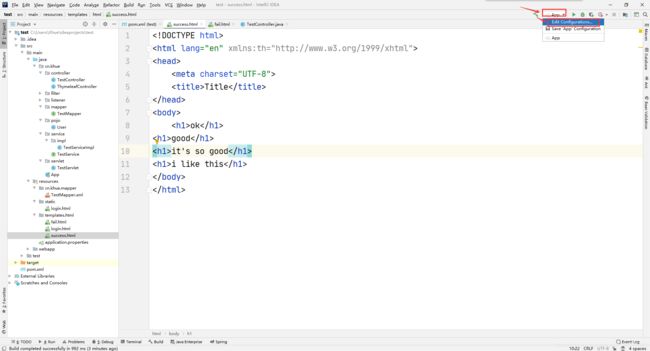
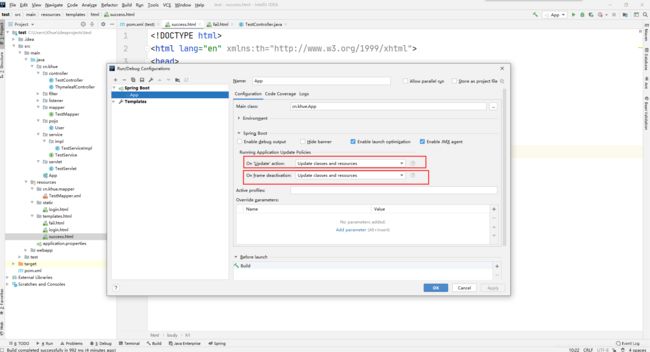
3.启动应用,修改代码后,会自动重新部署(自动重启)

12.注解解释
1.@SpringBootApplication
@SpringBootApplication是spring boot的核心注解,使用该注解即开启了自动配置,同时它也是一个组合注解,其中包括了@ComponentScan(自动扫描并加载组件到IOC容器,其basePackages属性指定扫描范围,默认扫描其包及子包)、@SpringBootConfiguration(类似于@Configuration标注当前类为配置类+@Bean将@Bean标注的方法返回值纳入spring容器)、@EnableAutoConfiguration(收集和注册特点场景相关的bean)等
2.@ServletComponentScan
使用@ServletComponentScan注解后,通过@WebServlet、@WebFilter、@WebListener配置的类会自动注册到spring容器
3.@WebServlet
@WebServlet是Servlet3.0以后提供的注解配置,用来替换web.xml中servlet标签的相关配置
<servlet>
	<servlet-name>dispatcherServletservlet-name>
	<servlet-class>org.springframework.web.servlet.DispatcherServletservlet-class>
	<load-on-startup>1load-on-startup>
	<init-param>
		<param-name>contextConfigLocationparam-name>
		<param-value>classpath:spring-mvc-config.xmlparam-value>
	init-param>
servlet>
<servlet-mapping>
	<servlet-name>dispatcherServletservlet-name>
	<url-pattern>/pattern>
servlet-mapping>
@WebServlet(
	name="dispatcherServlet",
	urlPatterns={
     "/"},	//多个url-pattern用逗号隔开urlPattern("/test01","/test02");也可使用value属性
	loadOnStartup=1,
	initeParams={

		@WebInitParam(name="contextConfigLocation",value="classpath:spring-mvc-config.xml")
		//可多个@WebInitParam(...)
	}
)
public class DispathcherServlet implements HttpServlet{

	...
}
4.@WebFilter
@WebServlet是Servlet3.0以后提供的注解配置,用来替换web.xml中filter标签的相关配置
	 <filter>
    	<filter-name>my-encodingfilter-name>
    	<filter-class>org.springframework.web.filter.CharacterEncodingFilterfilter-class>
    	<init-param>
    		<param-name>encodingparam-name>
    		<param-value>utf-8param-value>
    	init-param>
    	<init-param>
    		<param-name>forceEncodingparam-name>
    		<param-value>trueparam-value>
    	init-param>
    filter>
    <filter-mapping>
    	<filter-name>my-encodingtfilter-name>
    	<url-pattern>/*url-pattern>
    filter-mapping>
@WebFilter(
	name="my-encoding",
	urlPatterns={
     "/*"},	//多个url-pattern用逗号隔开urlPattern("/test01","/test02");也可使用value属性
	initeParams={

		@WebInitParam(name="encoding",value="utf-8"),
		@WebInitParam(name="forceEncoding",value="true")
	}
)
public class CharacterEncoding implements Filter{

	...
}
5.@WebListener
@WebServlet是Servlet3.0以后提供的注解配置,用来替换web.xml中listener标签的相关配置
<listener>
	<listener-class>cn.khue.listener.TestListenerlistener-class>
listener>
@WebListener
public class TestListener implements ServletContextListener{

	...
}
Spring Security
spring security是一个基于spring为企业应用系统提供声明式的安全访问控制解决方案的安全框架,主要包括用户认证和用户授权
用户认证(Authentication):指验证某个用户是否为系统中的合法主体,一般要求用户提供用户名和密码
用户授权(Authorization):指验证某个用户是否有权限执行某个操作
实现原理:Filter和Interceptor
核心组件:
Authentication - 认证主体
UserDetails - 构建Authentication对象的必须信息
SecurityContext - 安全上下文,持有Authentication对象及其他可能需要的信息
SecurityContextHolder - 提供对SecurityContext的访问
AuthenticationProvider - 进行认证操作,调用authenticate()进行认证
AuthenticationManager - 管理AuthenticationProvider
ProviderManager - AuthenticationManager实现类
…
1.简单实现
1.依赖
<artifactId>spring-boot-starter-securityartifactId>
2.启动类
3.访问
spring security默认拦截全部请求,如果用户没有登录,会跳转到内置登录页面,默认username为user,password会打印在控制台
2.自定义登录认证逻辑
1.依赖
<artifactId>spring-boot-starter-securityartifactId>
2.配置密码编码器
@Configuration
public class MySecurityConfig{

	@Bean
	public PasswordEncoder getPasswordEncoder(){

		return new BCryPasswordEncoder();
	}
}
3.自定义认证逻辑
public MyTestClass implements UserDetailsService{

	//注入认证密码编码器
	@Autowired
	prviate PasswordEncoder passwordEncoder;

	//自定义认证逻辑
	@Override
	public UserDetails loadUserByUsername(String username) throws UsernameNotFoundException{

		//admin为认证名
		if(!"admin".equalsIgnoreCase(username)){

			throw new  UsernameNotFoundException("用户名不正确,请核对!");
		}

		//123为认证密码
		String password = passwordEncoder.encode("123");

		return new User(username,passwordEncode,AuthorityUtils.commaSeparatedStringToAuthorityList("admin,ROLE_admin"));
	}
}
3.自定义认证页
@Configuration
public class MyLoginPage extends WebSecurityConfigurerAdapter{

	@Override
	protected void configure(HttpSecurity httpSecurity) throws Exception{


		httpSecurity.formLogin()
			.loginProcessingUrl("/login")				//需要执行自定义登录逻辑的的访问路径
			.loginPage("/login.html")					//认证页
			//.successForwardUrl("/main")				//认证成功后处理 - 自带请求转发(post方式)
			.successHandler(new MySuccessHandler())		//认证成功后处理 - 自定义
			.failForwardUrl("/fail")					//认证失败后处理 - 自带请求转发
			.failureHandler(new MyFailureHandler())		//认证失败后处理 - 自定义
			.usernameParameter("username")				//修改认证名的属性名称
			.passwordParameter("password");				//修改认证密码的属性名称

		/*自定义认证:
		匹配规则:
			anyRequest() - 匹配所有请求
			antMatchers(String ...) - 匹配url(参数为ant表达式)
			regexMatchers(String ...) - 匹配url(参数为正则表达式)
			mvcMatchers(String ...).serveltPath("xx") - 匹配servletPath下的url
			antMatchers和regexMatchers都具有两个参数的方法,还有一个参数是HtppMethod,可实现匹配指定请求方式的url

		权限控制:
			permitAll() - 所匹配的url无需认证
			authenticated() - 所匹配的url需要认证
			anonymous() - 所匹配的url可匿名访问
			denyAll() - 所匹配的url不允许被访问
			rememberMe() - 所匹配的url只有标识了remember me的用户可访问
			fullyAuthenticated() - 所匹配的url只有通过正常认证而非remember me 的才可访问

		角色判断:
			hasAuthority(String) - 用户具备权限String才可访问
			hasAnyAuthority(String ...) - 用户具备某个权限就可访问
			权限配置在UserDetailsService类的loadUserByUsername方法中AuthorityUtils.commaSeparatedStringToAuthorityList(String)

			hasRole(String) - 用户具备给定角色才可访问,否则403
			hasAnyRole(String ...)
			角色配置在UserDetailsService类的loadUserByUsername方法中AuthorityUtils.commaSeparatedStringToAuthorityList(String),要求以ROLE_角色名

			hasIpAddress(String) - 请求是指定IP才可访问
		*/
		httpSecurity.authorizeRequests()
			.antMatchers("/login.html")						//login.html无需认证
			.antMatchers("/fail.html")						//fial.html无需认证
			.mvcMatchers("/a","/b").servletPath("/test")	///test下的/a和/b放行
			.antMatchers("/**/*.js")						//js文件放行
			.antMatchers("/**/*.css").permitAll()			//css文件放行
			.anyRequest().authenticated();					//其他请求需要认证

		//关闭csrf防护
		httpSecurity.csrf().disable();
	}
}
4.自定义认证成功处理器
public class MySuccessHandler implements AuthenticationSuccessHandler{

	@Override
	public void onAuthenticationSuccess(HttpServletRequest req, HttpServletResponse res, Authentication authentication) throws IOException, ServletException{

		//获取认证用户的信息
		User user = (User)authentication.getPrincipal();
		user.getUsername();
		user.getPassword();
		//重定向
		res.sendRedirect("/main");
	}
}
5.自定义认证失败处理器
public class MyFailureHander implements AuthenticationFailureHandler{

	@Override
	public void onAuthenticationFailure(HttpServletRequest req, HttpServletResponse res, AuthenticationException e) throws IOException, ServletException{

		res.sendRedirect("/fail");
	}
}
6.自定义403处理逻辑
@Configuration
public class MyLoginPage extends WebSecurityConfigurerAdapter{

	@Bean
	private AccessDeniedHandler getAccessDeniedHandler(){

		reutrn new My403Handler();
	}

	@Override
	protected void configure(HttpSecurity httpSecurity) throws Exception{

		httpSecurity.exceptionHandling().accessDeniedHandler(my403Handler);
	}
}
public class My403Handler implements AccessDeniedHandler{

	@Override
	public void handler(HttpServletRequest res, HttpServletResponse res, AccessDniedException e) throws IOException, ServletException{

		res.setStatus(HttpServletResponse.SC_FORBIDDEN);
		res.setHeader("Content-Type","aplication/json;charset=utf-8");
		PrintWriter printWriter = res.getWriter();
		printWriter.write("{'status':'error','msg':'权限不足,请联系管理员!'}");
		printWriter.flush();
		printWriter.close();
	}
}
7.自定义访问控制
spring security自定的访问控制底层都是调用的access(),如:
	antMatchers("/login.html");
	//等价于
	antMatchers("/login.html").access("permitAll")

	antMatchers("/main.html").hasRole("admin");
	//等价于
	antMatchers("/main.html").access("hasRole('admin')")
@Component
public class MyAccess{

	public boolean hasPermission(HttpServletRequest req,Authentication authentication){

		Object obj = authentication.getPrincipal();
		if(obj instanceof UserDetails){

			UserDetails userDetails = (UserDetails)obj;
			Collection<? extends GrantedAuthority> authorities = userDetails.getAuthorities();
			return authorities.contains(new SimpleGrantedAuthority(req.getRequestURI()));
		}
		return false;
	}
}
@Configuration
public class MyLoginPage extends WebSecurityConfigurerAdapter{

	@Override
	protected void configure(HttpSecurity httpSecurity) throws Exception{

		httpSecurity.authorizeRequests()
			.anyRequest().access("@myAccess.hasPermission(req,authentication)");
	}
}
8.基于注解的访问控制
1.开启注解
@SpringBootApplication
@EnableGlobalMethodSecurity
public class App{

	public static void main(Stirng[] args){

		SpringApplication.run(App.class,args);
	}
}
2.@Secured
@Secured用来判断是否具有角色,用于方法或类上,参数要以ROLE_开头
@SpringBootApplication
@EnableGlobalMethodSecurity(securedEnabled=true)
public class App{

	public static void main(Stirng[] args){

		SpringApplication.run(App.class,args);
	}
}
@Controller
public class TestController{

	@RequestMapping("/main")
	@Secured("ROLE_admin")
	public String test(){

		return "/test"
	}
}
@Configuration
public class MyLoginPage extends WebSecurityConfigurerAdapter{

	@Override
	protected void configure(HttpSecurity httpSecurity) throws Exception{

		httpSecurity.formLogin()
			.loginPage("/login.html")
			.loginProcessingUrl("/login")
			.successForwardUrl("/main")
			.failForwardUrl("/fail");

		httpSecurity.authorizeReqeust()
			.anMatchers("/login.html","/fail.html").permitAll()
			.anyRequest().authenticated();

		httpSecurity.csrf().disable();
	}
}
3.@PreAuthorize/@PostAuthorize
@PreAuthorize用来在访问方法或类之前先判断权限
@PostAuthorize用来在访问方法或类之后判断权限
@PreAuthorize/@PostAuthorize用于方法或类上
@SpringBootApplication
@EnableGlobalMethodSecurity(prePostEnabled=true)
public class App{

	public static void main(Stirng[] args){

		SpringApplication.run(App.class,args);
	}
}
@Controller
public class TestController{

	@RequestMapping("/main")
	@PreAuthorize("hasRole('admin')")
	public String test(){

		return "/test"
	}
}
@Configuration
public class MyLoginPage extends WebSecurityConfigurerAdapter{

	@Override
	protected void configure(HttpSecurity httpSecurity) throws Exception{

		httpSecurity.formLogin()
			.loginPage("/login.html")
			.loginProcessingUrl("/login")
			.successForwardUrl("/main")
			.failForwardUrl("/fail");

		httpSecurity.authorizeReqeust()
			.anMatchers("/login.html","/fail.html").permitAll()
			.anyRequest().authenticated();

		httpSecurity.csrf().disable();
	}
}
9.Remember Me实现
@Configuration
public class MySecurityConfig{

	@Autowired
	private DataSource dataSource;

	@Bean
	public PersisitentTokenRepository getPersistentTokenRepository(){

		JdbcTokenRepositoryImpl jdbcTokenRepositoryImpl = new JdbcTokenRepositoryImpl();
		jdbcTokenRepositoryImpl.setCreateTableOnStartup(true);
		return jdbcTokenRepositoryImpl;
	}
}
@Configuration
public class MyLoginPage extends WebSecurityConfigurerAdapter{

	@Override
	protected void configure(HttpSecurity httpSecurity) throws Exception{

		httpSecurity.formLogin()
			.loginPage("/login.html")
			.loginProcessingUrl("/login")
			.successForwardUrl("/main")
			.failForwardUrl("/fail");

		httpSecurity.authorizeReqeust()
			.anMatchers("/login.html","/fail.html").permitAll()
			.anyRequest().authenticated();

		httpSecurity.csrf().disable();

		httpSecurity.rememberMe()
			.userDetailService(userDetailsService)	//登录逻辑
			.tokenRepository(repository)			//持久层对象
			.tokenValiditySeconds(60);				//有效时间(默认两周,单位s)
	}
}
<form action="/login" method="post">
	用户名<input type="text" name="username" />
	密码<input type="password" name="password" />
	记住密码<input type="checkbox" name="remember-me" value="true" />
	<input type="submit" value="登录" />
form>
10.整合Thymeleaf
依赖
<artifactId>thymeleaf-extras-springsecurity5artifactId>
获取登录账号名称<span sec:authentication="name">

获取登录主体(UserDetails)<span sec:authentication="principal">

获取凭证<span sec:authentication="credentials">

获取权限和角色<span sec:authentication="authorities">

获取WebAuthenticationDetails<span sec:authentication="details">

通过权限判断显示<button sec:authorize="hasAuthority('/delete')">删除button>

通过角色判断显示<button sec:authorize="hasRole('admin')">删除button>

退出登录<a href="/logout">注销a>
退出登录默认的url为"/logout",可自定
@Configuration
public class MyLoginPage extends WebSecurityConfigurerAdapter{

	@Override
	protected void configure(HttpSecurity httpSecurity) throws Exception{

		httpSecurity.logout()
			.logoutUrl("/logout")
			.logoutSuccessUrl("/logout.html");
	}
}
CSRF
csrf(Cross-Site Request Forgery)是指跨站请求伪造,也被称为One Click Attack或Session Riding,攻击者通过伪造用户请求访问受信任站点的非法请求访问
csrf攻击能够成功是因为攻击者可以伪造用户的请求,请求中所有的用户验证信息都存在cookie中,所以攻击者可以在不知道这些验证信息的情况下直接利用用户的cookie来通过安全验证
抵御csrf攻击的关键在于在请求中放入攻击者不能伪造的信息,开发者可以在http请求中以参数的形式加入一个随机产生的token,然后再服务器端建立一个拦截器来验证token