cobar
Cobar是基于MySQL的分布式数据库服务中间件,它可以让传统的数据库得到良好的线性扩展,并看上去还是一个数据库,对应用保持透明。
- 产品在阿里巴巴稳定运行3年以上。
- 接管了3000+个MySQL数据库的schema。
- 集群日处理在线SQL请求50亿次以上。
- 集群日处理在线数据流量TB级别以上。
官方Github地址:https://github.com/alibaba/cobar
Cobar下载地址:https://github.com/alibaba/cobar/releases
使用手册
【来自官方DOC: Cobar-Alibaba Open Sesame.pdf】
目录结构
- 基本目录
下载最新Cobar压缩包,解压后,进入cobar-server-1.2.7目录,可以看到Cobar的主要目录如下:
bin     #包含Cobar的启动、重启、停止等脚本文件
conf    #包含Cobar所有配置文件
lib     #包含Cobar及其依赖的jar文件
logs    #包含Cobar所有日志文件(该目录需手动添加)
- 启动脚本
Cobar的所有启动和停止脚本全部放在bin目录中,进入bin目录,可以看到:
startup.sh    #Linux环境启动脚本
startup.bat   #Windows环境启动脚本
restart.sh    #Linux环境重启脚本
shutdown.sh   #Linux环境停止脚本
- 配置文件
Cobar的所有配置文件全部放在conf目录中,进入conf目录,可以看到:
server.xml    #Cobar系统、用户、集群等相关配置
schema.xml    #schema, dataNode, dataSource相关配置
rule.xml      #分布式规则定义
log4j.xml     #日志相关配置
Demo
在本机上进行测试,故MySQL服务器IP为127.0.0.1:3306,用户名和密码都为root。
Step1:数据准备,数据库创建脚本
需要创建schema:dbtest1、dbtest2、dbtest3,table:tb1、tb2,脚本如下:
#创建dbtest1
drop database if exists dbtest1;
create database dbtest1;
use dbtest1;
#在dbtest1上创建tb1
create table tb1(
id int not null,
gmt datetime);
#创建dbtest2
drop database if exists dbtest2;
create database dbtest2;
use dbtest2;
#在dbtest2上创建tb2
create table tb2(
id int not null,
val varchar(256));
#创建dbtest3
drop database if exists dbtest3;
create database dbtest3;
use dbtest3;
#在dbtest3上创建tb2
create table tb2(
id  int not null,
val varchar(256));
Step2:下载软件并解压
wget -c "https://github.com/alibaba/cobar/releases/download/v1.2.7/cobar-server-1.2.7.tar.gz" -O cobar-server-1.2.7.tar.gz
tar zxf cobar-server-1.2.7.tar.gz
Step3:配置
- schema.xml
      dsTest[0]


      dsTest[1]


      dsTest[2]


      127.0.0.1:3306/dbtest1
      127.0.0.1:3306/dbtest2
      127.0.0.1:3306/dbtest3

    root
    root
    STRICT_TRANS_TABLES
在schema.xml里主要配置了数据源以及数据节点,对于schema的配置里可以为table指定路由规则,至于路由规则的来源下面会有说明。如果所有数据源的用户名与密码相同可以配置在同一datasource节点下。系统会将其组装为一个数组,当为数据节点指定数据源时只需用数组下标以及数据源名称表示即可例如dsTest[1]。同时可以为数据节点指定心跳检测运行情况,当主数据源出现异常的时候便可切换到备数据源,遗憾的是当主数据源恢复正常的时候不能自动切换会主数据源,除非备数据源也发生异常。
- rule.xml
本文仅以数字类型的id字段作为拆分字段,将数据拆分到两个库中。
源码里只提供了根据long型数据分区,根据String类型数据分区,根据FileMap分区。
      id


    2
    512
- server.xml
    test
    dbtest
Step4:启动
运行bin目录下的startup.sh脚本,启动成功后,可打印查看logs目录下的日志文件:
日志文件(stdout.log)
Step5:连接数据库
并可通过mysql命令登录Cobar,指定主机为安装Cobar的Server,username和password则是Cobar server.xml里设置的用户名和密码
mysql -h127.0.0.1 -utest -ptest -P8066 -Ddbtest
insert into tb1 (id, gmt) values (1, now());                   #向表tb1插入一条数据
insert into tb2 (id, val) values (1, "part1");                 #向表tb2插入一条数据
insert into tb2 (id, val) values (2, "part1"), (513, "part2"); #向表tb2同时插入多条数据
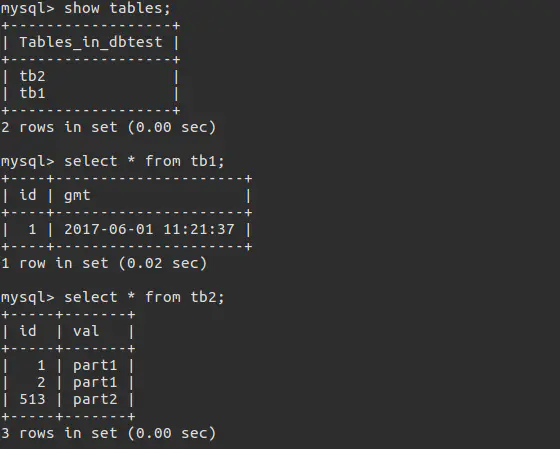
数据插入后在Cobar中的查询结果如下图所示:
数据插入结果
-
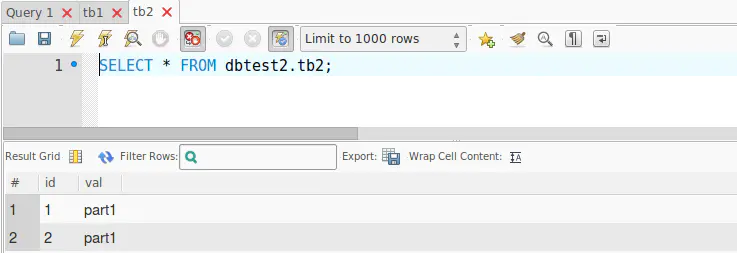
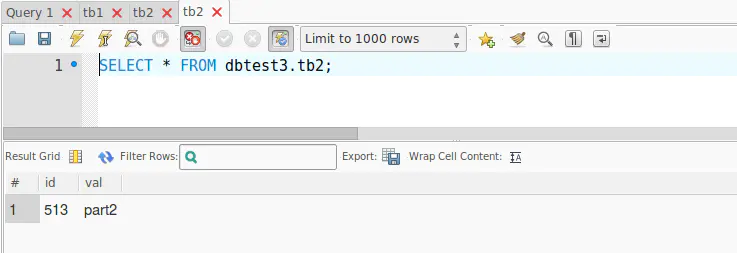
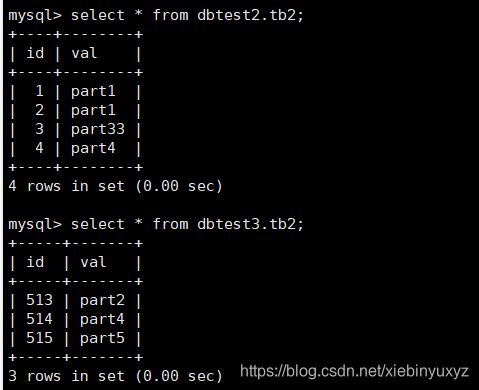
查看后端MySQL数据库dbtest1,dbtest2和dbtest3,验证数据分布在不同的库中
dbtest1.tb1
dbtest2.tb2
dbtest3.tb2
- 使用排序以及聚合函数等,结果是独立的数据库表的集合,无法正确使用,需要业务再进行处理
JDBC方式访问
支持用户使用JDBC连接池
jdbc:mysql://127.0.0.1:8066/testdb?user=test&password=test
也可以如下:
Class.forName("com.mysql.jdbc.Driver");
Connection conn =
DriverManager.getConnection("jdbc:mysql://127.0.0.1:8066/dbtest",
"test", "test")
小礼物走一走,
作者:aZeShine
链接:https://www.jianshu.com/p/88e255702b31
来源:简书
简书著作权归作者所有,任何形式的转载都请联系作者获得授权并注明出处。


